ECU HONDA RIDGELINE 2017 2.G Quick Guide
[x] Cancel search | Manufacturer: HONDA, Model Year: 2017, Model line: RIDGELINE, Model: HONDA RIDGELINE 2017 2.GPages: 85, PDF Size: 8.35 MB
Page 70 of 85

HANDLING THE UNEXPECTED
132 || 133
H
ANDLING THE UNEXPECTED
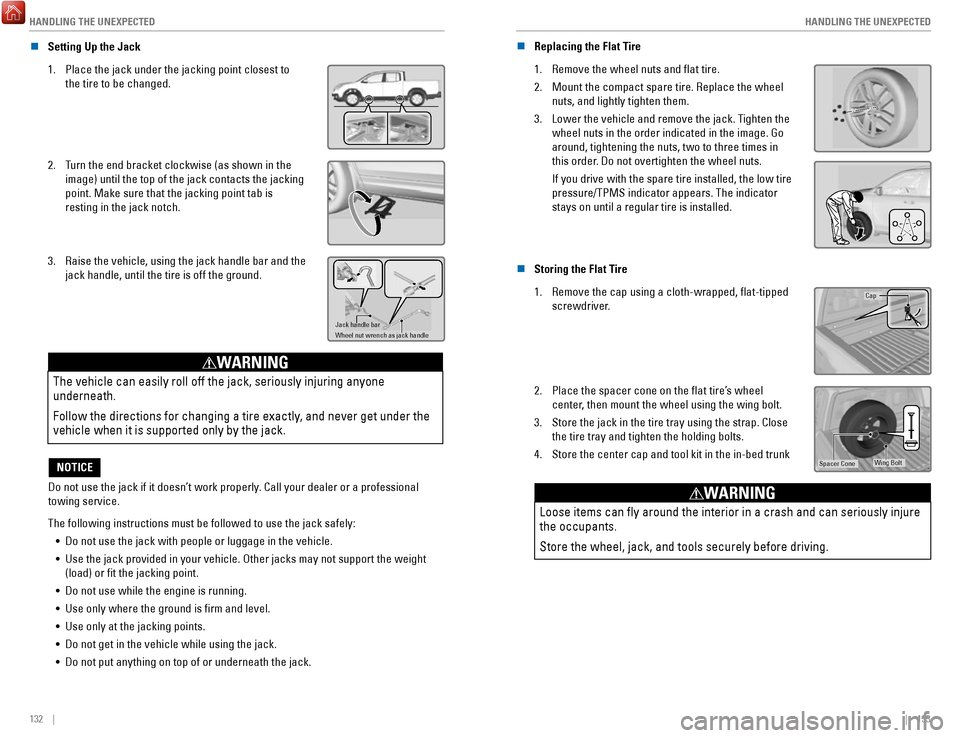
n Setting Up the Jack
1.
Place the jack under the jacking point closest to
the tire to be changed.
2. Turn the end bracket clockwise (as shown in the
image) until the top of the jack contacts the jacking
point. Make sure that the jacking point tab is
resting in the jack notch.
3. Raise the vehicle, using the jack handle bar and the
jack handle, until the tire is off the ground.
Jack handle bar
Wheel nut wrench as jack handle
The vehicle can easily roll off the jack, seriously injuring anyone
underneath.
Follow the directions for changing a tire exactly, and never get under the
vehicle when it is supported only by the jack.
WARNING
Do not use the jack if it doesn’t work properly. Call your dealer or a professional
towing service.
NOTICE
The following instructions must be followed to use the jack safely: •
Do not use the jack with people or luggage in the vehicle.
•
Use the jack provided in your vehicle. Other jacks may not support the w\
eight (load) or fit the jacking point.
•
Do not use while the engine is running.
•
Use only where the ground is firm and level.
•
Use only at the jacking points.
•
Do not get in the vehicle while using the jack.
•
Do not put anything on top of or underneath the jack. n
Replacing the Flat Tire
1.
Remove the wheel nuts and flat tire.
2.
Mount the compact spare tire. Replace the wheel
nuts, and lightly tighten them.
3.
Lower the vehicle and remove the jack. Tighten the
wheel nuts in the order indicated in the image. Go
around, tightening the nuts, two to three times in
this order. Do not overtighten the wheel nuts.
If you drive with the spare tire installed, the low tire
pressure/TPMS indicator appears. The indicator
stays on until a regular tire is installed.
n Storing the Flat Tire
1.
Remove the cap using a cloth-wrapped, flat-tipped
screwdriver.Cap
2. Place the spacer cone on the flat tire’s wheel
center, then mount the wheel using the wing bolt.
3.
Store the jack in the tire tray using the strap. Close
the tire tray and tighten the holding bolts.
4.
Store the center cap and tool kit in the in-bed trunkWing BoltSpacer Cone
Loose items can fly around the interior in a crash and can seriously i\
njure
the occupants.
Store the wheel, jack, and tools securely before driving.
WARNING
Page 75 of 85

MAINTENANCE
142 || 143
M
AINTENANCE
Engine Oil
Park the vehicle on level ground, and wait approximately three minutes after turning the
engine off before you check the oil.
n
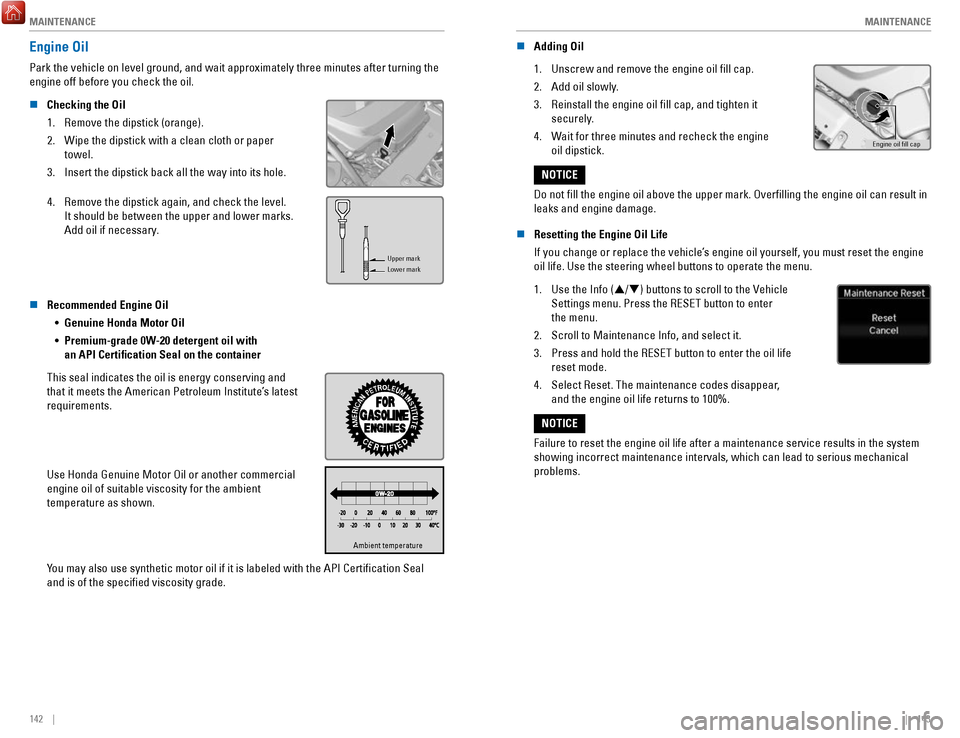
Checking the Oil
1.
Remove the dipstick (orange).
2.
Wipe the dipstick with a clean cloth or paper
towel.
3.
Insert the dipstick back all the way into its hole.
4.
Remove the dipstick again, and check the level.
It should be between the upper and lower marks.
Add oil if necessary.
Upper mark
Lower mark
n Recommended Engine Oil •
Genuine Honda Motor Oil
•
Premium-grade 0W-20 detergent oil with
an API Certification Seal on the container
This seal indicates the oil is energy conserving and
that it meets the American Petroleum Institute’s latest
requirements.
Use Honda Genuine Motor Oil or another commercial
engine oil of suitable viscosity for the ambient
temperature as shown.
Ambient temperatureAmbient temperature
You may also use synthetic motor oil if it is labeled with the API Certifi\
cation Seal
and is of the specified viscosity grade. n
Adding Oil
1.
Unscrew and remove the engine oil fill cap.
2.
Add oil slowly.
3.
Reinstall the engine oil fill cap, and tighten it
securely.
4.
Wait for three minutes and recheck the engine
oil dipstick.Engine oil �ll cap
Do not fill the engine oil above the upper mark. Overfilling the eng\
ine oil can result in
leaks and engine damage.
NOTICE
n
Resetting the Engine Oil Life
If you change or replace the vehicle’s engine oil yourself, you must reset the engine
oil life. Use the steering wheel buttons to operate the menu.
1.
Use the Info (/) buttons to scroll to the Vehicle
Settings menu. Press the RESET button to enter
the menu.
2.
Scroll to Maintenance Info, and select it.
3.
Press and hold the RESET button to enter the oil life
reset mode.
4.
Select Reset. The maintenance codes disappear,
and the engine oil life returns to 100%.
Failure to reset the engine oil life after a maintenance service results\
in the system
showing incorrect maintenance intervals, which can lead to serious mecha\
nical
problems.
NOTICE