cooling HONDA RIDGELINE 2017 2.G Quick Guide
[x] Cancel search | Manufacturer: HONDA, Model Year: 2017, Model line: RIDGELINE, Model: HONDA RIDGELINE 2017 2.GPages: 85, PDF Size: 8.35 MB
Page 29 of 85

VEHICLE CONTROLS
50 || 51
V
EHICLE CONTROLS
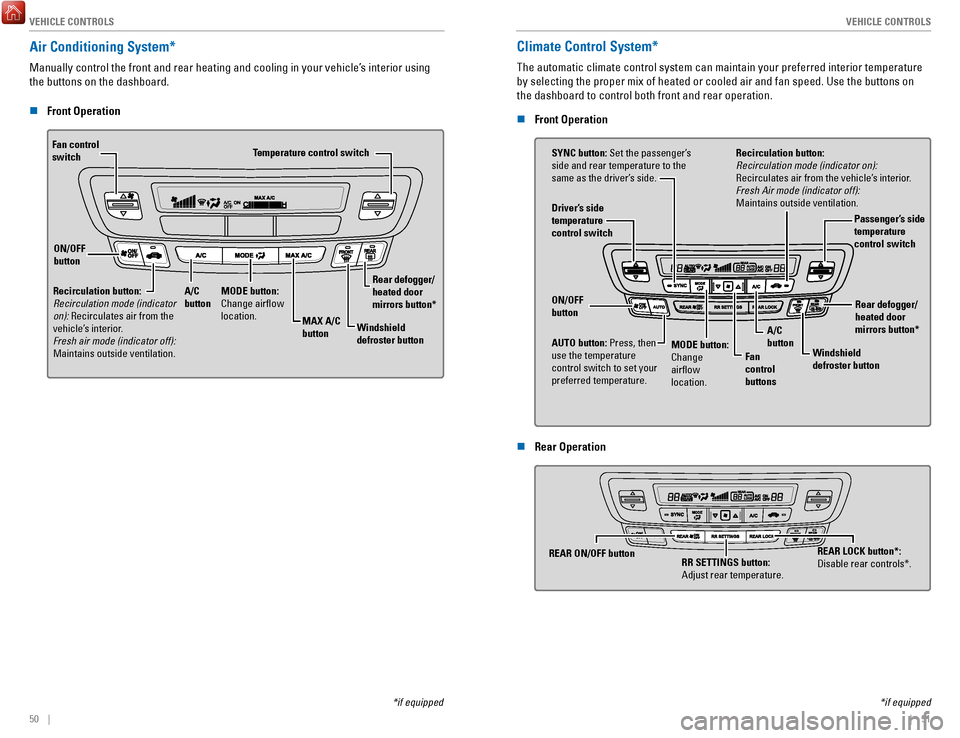
Air Conditioning System*
Manually control the front and rear heating and cooling in your vehicle’\
s interior using
the buttons on the dashboard.
n
Front Operation
Fan control
switch
A/C
buttonMAX A/C
button Windshield
defroster button
Temperature control switch
Recirculation button:
Recirculation mode (indicator
on): Recirculates air from the
vehicle’s interior.
Fresh air mode (indicator off):
Maintains outside ventilation. Rear defogger/
heated door
mirrors button*
ON/OFF
button
MODE button:
Change airflow
location.
Climate Control System*
The automatic climate control system can maintain your preferred interio\
r temperature
by selecting the proper mix of heated or cooled air and fan speed. Use t\
he buttons on
the dashboard to control both front and rear operation.
n
Front Operation
AUTO button: Press, then
use the temperature
control switch to set your
preferred temperature. SYNC button: Set the passenger’s
side and rear temperature to the
same as the driver’s side.
Driver’s side
temperature
control switch
A/C
buttonPassenger’s side
temperature
control switch
Recirculation button:
Recirculation mode (indicator on):
Recirculates air from the vehicle’s interior.
Fresh Air mode (indicator off):
Maintains outside ventilation.
Rear defogger/
heated door
mirrors button*
Windshield
defroster button
Fan
control
buttons
ON/OFF
button
MODE button:
Change
airflow
location.
n Rear Operation
RR SETTINGS button:
Adjust rear temperature.
REAR ON/OFF button
*if equipped
*if equipped
REAR LOCK button*:
Disable rear controls*.
Page 67 of 85

HANDLING THE UNEXPECTED
126 || 127
H
ANDLING THE UNEXPECTED
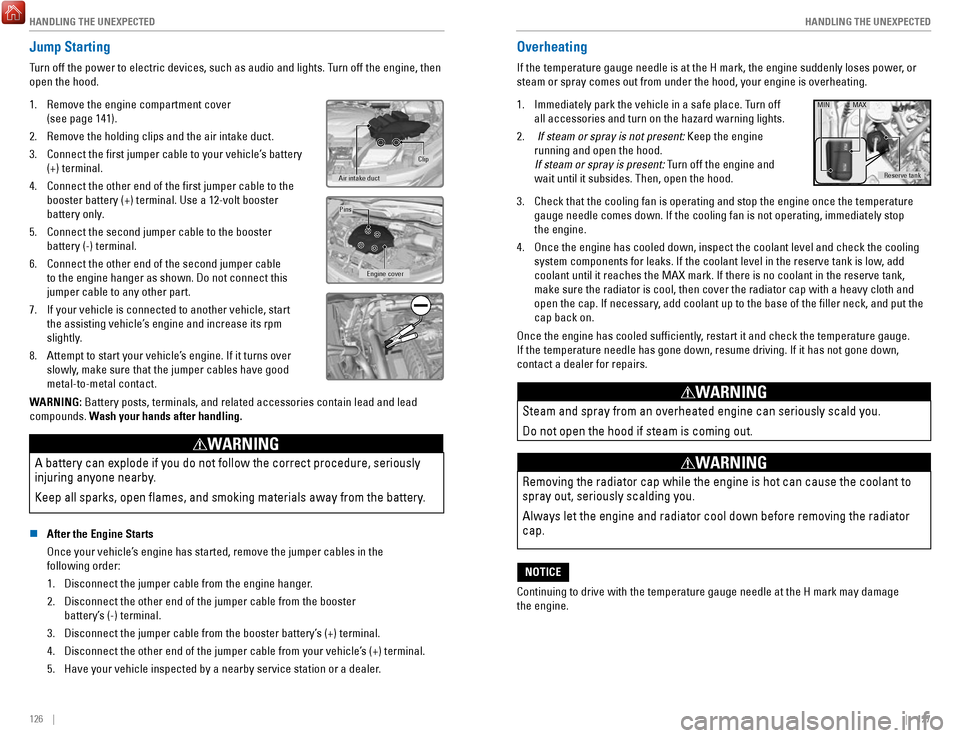
Jump Starting
Turn off the power to electric devices, such as audio and lights. Turn off the engine, then
open the hood.
1.
Remove the engine compartment cover
(see page 141).
2.
Remove the holding clips and the air intake duct.
3.
Connect the first jumper cable to your vehicle’s battery
(+) terminal.
4.
Connect the other end of the first jumper cable to the
booster battery (+) terminal. Use a 12-volt booster
battery only.
5.
Connect the second jumper cable to the booster
battery (-) terminal.
6.
Connect the other end of the second jumper cable
to the engine hanger as shown. Do not connect this
jumper cable to any other part.
7.
If your vehicle is connected to another vehicle, start
the assisting vehicle’s engine and increase its rpm
slightly.
8.
Attempt to start your vehicle’s engine. If it turns over
slowly, make sure that the jumper cables have good
metal-to-metal contact.
Clip
Air intake duct
Engine cover
Pins
WARNING: Battery posts, terminals, and related accessories contain lead and lead\
compounds. Wash your hands after handling.
A battery can explode if you do not follow the correct procedure, seriou\
sly
injuring anyone nearby.
Keep all sparks, open flames, and smoking materials away from the batt\
ery.
WARNING
n After the Engine Starts
Once your vehicle’s engine has started, remove the jumper cables in the
following order:
1.
Disconnect the jumper cable from the engine hanger.
2.
Disconnect the other end of the jumper cable from the booster
battery’s (-) terminal.
3.
Disconnect the jumper cable from the booster battery’s (+) terminal.
4.
Disconnect the other end of the jumper cable from your vehicle’s (+) terminal.
5.
Have your vehicle inspected by a nearby service station or a dealer.
Overheating
If the temperature gauge needle is at the H mark, the engine suddenly lo\
ses power, or
steam or spray comes out from under the hood, your engine is overheating\
.
1.
Immediately park the vehicle in a safe place. Turn off
all accessories and turn on the hazard warning lights.
2.
If steam or spray is not present: Keep the engine
running and open the hood.
If steam or spray is present: Turn off the engine and
wait until it subsides. Then, open the hood.
Reserve tank
MIN MAX
3. Check that the cooling fan is operating and stop the engine once the tem\
perature
gauge needle comes down. If the cooling fan is not operating, immediatel\
y stop
the engine.
4.
Once the engine has cooled down, inspect the coolant level and check the\
cooling
system components for leaks. If the coolant level in the reserve tank is\
low, add
coolant until it reaches the MAX mark. If there is no coolant in the res\
erve tank,
make sure the radiator is cool, then cover the radiator cap with a heavy\
cloth and
open the cap. If necessary
, add coolant up to the base of the filler neck, and put the
cap back on.
Once the engine has cooled sufficiently, restart it and check the temperature gauge.
If the temperature needle has gone down, resume driving. If it has not g\
one down,
contact a dealer for repairs.
Steam and spray from an overheated engine can seriously scald you.
Do not open the hood if steam is coming out.
WARNING
Removing the radiator cap while the engine is hot can cause the coolant \
to
spray out, seriously scalding you.
Always let the engine and radiator cool down before removing the radiato\
r
cap.
WARNING
Continuing to drive with the temperature gauge needle at the H mark may \
damage
the engine.
NOTICE
Page 76 of 85

MAINTENANCE
144 || 145
M
AINTENANCE
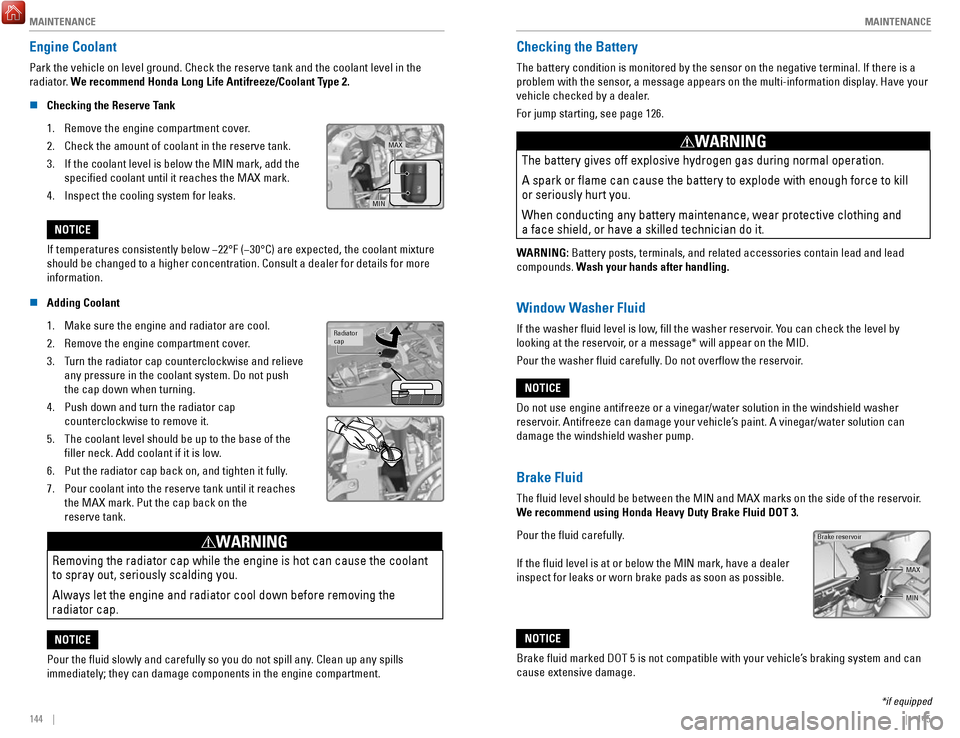
Engine Coolant
Park the vehicle on level ground. Check the reserve tank and the coolant\
level in the
radiator. We recommend Honda Long Life Antifreeze/Coolant Type 2.
n
Checking the Reserve Tank
1.
Remove the engine compartment cover.
2.
Check the amount of coolant in the reserve tank.
3.
If the coolant level is below the MIN mark, add the
specified coolant until it reaches the MAX mark.
4.
Inspect the cooling system for leaks.
MAX
MIN
If temperatures consistently below −22°F (−30°C) are expec\
ted, the coolant mixture
should be changed to a higher concentration. Consult a dealer for detail\
s for more
information.
NOTICE
n
Adding Coolant
1.
Make sure the engine and radiator are cool.
2.
Remove the engine compartment cover.
3.
Turn the radiator cap counterclockwise and relieve
any pressure in the coolant system. Do not push
the cap down when turning.
4.
Push down and turn the radiator cap
counterclockwise to remove it.
5.
The coolant level should be up to the base of the
filler neck. Add coolant if it is low.
6.
Put the radiator cap back on, and tighten it fully.
7.
Pour coolant into the reserve tank until it reaches
the MAX mark. Put the cap back on the
reserve tank.
Radiator
cap
Removing the radiator cap while the engine is hot can cause the coolant \
to spray out, seriously scalding you.
Always let the engine and radiator cool down before removing the
radiator cap.
WARNING
Pour the fluid slowly and carefully so you do not spill any. Clean up any spills
immediately; they can damage components in the engine compartment.
NOTICE
Checking the Battery
The battery condition is monitored by the sensor on the negative termina\
l. If there is a
problem with the sensor, a message appears on the multi-information display. Have your
vehicle checked by a dealer.
For jump starting, see page 126.
The battery gives off explosive hydrogen gas during normal operation.
A spark or flame can cause the battery to explode with enough force to\
kill
or seriously hurt you.
When conducting any battery maintenance, wear protective clothing and
a face shield, or have a skilled technician do it.
WARNING
WARNING: Battery posts, terminals, and related accessories contain lead and lead\
compounds. Wash your hands after handling.
Window Washer Fluid
If the washer fluid level is low, fill the washer reservoir. You can check the level by
looking at the reservoir, or a message* will appear on the MID.
Pour the washer fluid carefully. Do not overflow the reservoir.
Do not use engine antifreeze or a vinegar/water solution in the windshie\
ld washer
reservoir. Antifreeze can damage your vehicle’s paint. A vinegar/water solution can
damage the windshield washer pump.
NOTICE
Brake Fluid
The fluid level should be between the MIN and MAX marks on the side of\
the reservoir.
We recommend using Honda Heavy Duty Brake Fluid DOT 3.
Pour the fluid carefully.
If the fluid level is at or below the MIN mark, have a dealer
inspect for leaks or worn brake pads as soon as possible.
Brake reservoir
MAX
MIN
Brake fluid marked DOT 5 is not compatible with your vehicle’s braking system and can
cause extensive damage.
NOTICE
*if equipped