hood open HONDA RIDGELINE 2017 2.G Quick Guide
[x] Cancel search | Manufacturer: HONDA, Model Year: 2017, Model line: RIDGELINE, Model: HONDA RIDGELINE 2017 2.GPages: 85, PDF Size: 8.35 MB
Page 17 of 85
INSTRUMENT PANEL
26 || 27
I
NSTRUMENT PANEL
INSTRUMENT PANEL
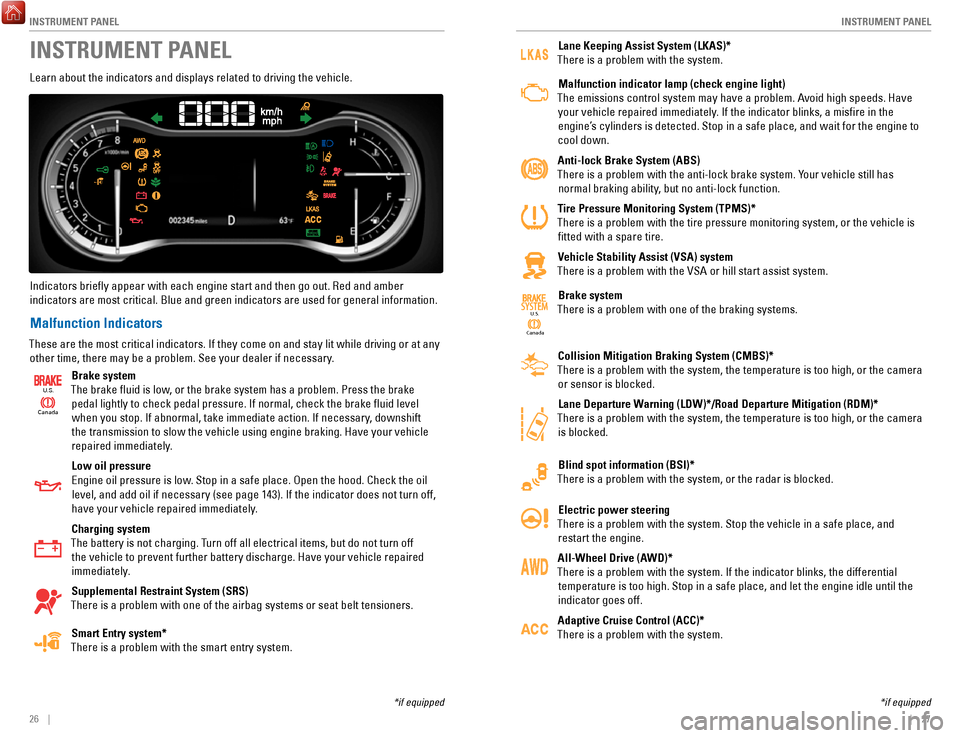
Learn about the indicators and displays related to driving the vehicle.
Indicators briefly appear with each engine start and then go out. Red \
and amber indicators are most critical. Blue and green indicators are used for gen\
eral information.
Malfunction Indicators
These are the most critical indicators. If they come on and stay lit whi\
le driving or at any other time, there may be a problem. See your dealer if necessary.
Ca nada
U.S.
Brake system
The brake fluid is low, or the brake system has a problem. Press the brake pedal lightly to check pedal pressure. If normal, check the brake flui\
d level when you stop. If abnormal, take immediate action. If necessary, downshift
the transmission to slow the vehicle using engine braking. Have your vehicle
repaired immediately.
Low oil pressure
Engine oil pressure is low. Stop in a safe place. Open the hood. Check the oil level, and add oil if necessary (see page 143). If the indicator does not turn off,
have your vehicle repaired immediately.
Charging system
The battery is not charging. Turn off all electrical items, but do not turn off the vehicle to prevent further battery discharge. Have your vehicle repa\
ired
immediately.
Supplemental Restraint System (SRS)
There is a problem with one of the airbag systems or seat belt tensioner\
s.
Smart Entry system*
There is a problem with the smart entry system.
*if equipped
Lane Keeping Assist System (LKAS)*
There is a problem with the system.
Malfunction indicator lamp (check engine light)
The emissions control system may have a problem. Avoid high speeds. Have your vehicle repaired immediately. If the indicator blinks, a misfire in the
engine’s cylinders is detected. Stop in a safe place, and wait for the engine to
cool down.
Anti-lock Brake System (ABS)
There is a problem with the anti-lock brake system. Your vehicle still has normal braking ability, but no anti-lock function.
Tire Pressure Monitoring System (TPMS)*
There is a problem with the tire pressure monitoring system, or the vehi\
cle is fitted with a spare tire.
Vehicle Stability Assist (VSA) system
There is a problem with the VSA or hill start assist system.
Canada U.S.
SYSTEMBrake system
There is a problem with one of the braking systems.
Collision Mitigation Braking System (CMBS)*
There is a problem with the system, the temperature is too high, or the \
camera or sensor is blocked.
Lane Departure Warning (LDW)*/Road Departure Mitigation (RDM)*
There is a problem with the system, the temperature is too high, or the \
camera is blocked.
Blind spot information (BSI)*
There is a problem with the system, or the radar is blocked.
Electric power steering
There is a problem with the system. Stop the vehicle in a safe place, an\
d restart the engine.
All-Wheel Drive (AWD)*
There is a problem with the system. If the indicator blinks, the differe\
ntial temperature is too high. Stop in a safe place, and let the engine idle u\
ntil the
indicator goes off.
Adaptive Cruise Control (ACC)*
There is a problem with the system.
*if equipped
Page 52 of 85
NAVIGATION
96 || 97
D
RIVING
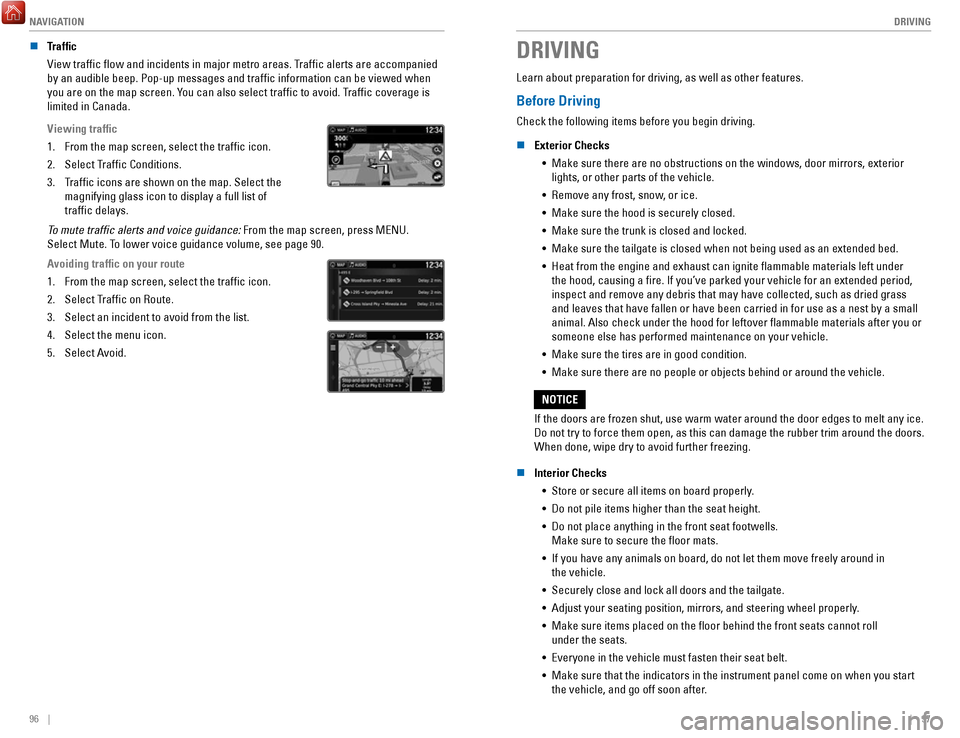
n Traffic
View traffic flow and incidents in major metro areas. Traffic alerts are accompanied
by an audible beep. Pop-up messages and traffic information can be vie\
wed when
you are on the map screen. You can also select traffic to avoid. Traffic coverage is
limited in Canada.
Viewing traffic
1.
From the map screen, select the traffic icon.
2.
Select Traffic Conditions.
3.
Traffic icons are shown on the map. Select the
magnifying glass icon to display a full list of
traffic delays.
To mute traffic alerts and voice guidance: From the map screen, press MENU.
Select Mute. To lower voice guidance volume, see page 90.
Avoiding traffic on your route
1.
From the map screen, select the traffic icon.
2.
Select Traffic on Route.
3.
Select an incident to avoid from the list.
4.
Select the menu icon.
5.
Select Avoid.
DRIVING
Learn about preparation for driving, as well as other features.
Before Driving
Check the following items before you begin driving.
n
Exterior Checks •
Make sure there are no obstructions on the windows, door mirrors, exteri\
or lights, or other parts of the vehicle.
•
Remove any frost, snow, or ice.
•
Make sure the hood is securely closed.
•
Make sure the trunk is closed and locked.
•
Make sure the tailgate is closed when not being used as an extended bed.\
•
Heat from the engine and exhaust can ignite flammable materials left u\
nder
the hood, causing a fire. If you’ve parked your vehicle for an exte\
nded period,
inspect and remove any debris that may have collected, such as dried gra\
ss
and leaves that have fallen or have been carried in for use as a nest by\
a small
animal. Also check under the hood for leftover flammable materials aft\
er you or
someone else has performed maintenance on your vehicle.
•
Make sure the tires are in good condition.
•
Make sure there are no people or objects behind or around the vehicle.
If the doors are frozen shut, use warm water around the door edges to me\
lt any ice.
Do not try to force them open, as this can damage the rubber trim around\
the doors.
When done, wipe dry to avoid further freezing.
NOTICE
n
Interior Checks •
Store or secure all items on board properly.
•
Do not pile items higher than the seat height.
•
Do not place anything in the front seat footwells.
Make sure to secure the floor mats.
•
If you have any animals on board, do not let them move freely around in \
the vehicle.
•
Securely close and lock all doors and the tailgate.
•
Adjust your seating position, mirrors, and steering wheel properly.
•
Make sure items placed on the floor behind the front seats cannot roll\
under the seats.
•
Everyone in the vehicle must fasten their seat belt.
•
Make sure that the indicators in the instrument panel come on when you s\
tart
the vehicle, and go off soon after.
Page 67 of 85
HANDLING THE UNEXPECTED
126 || 127
H
ANDLING THE UNEXPECTED
Jump Starting
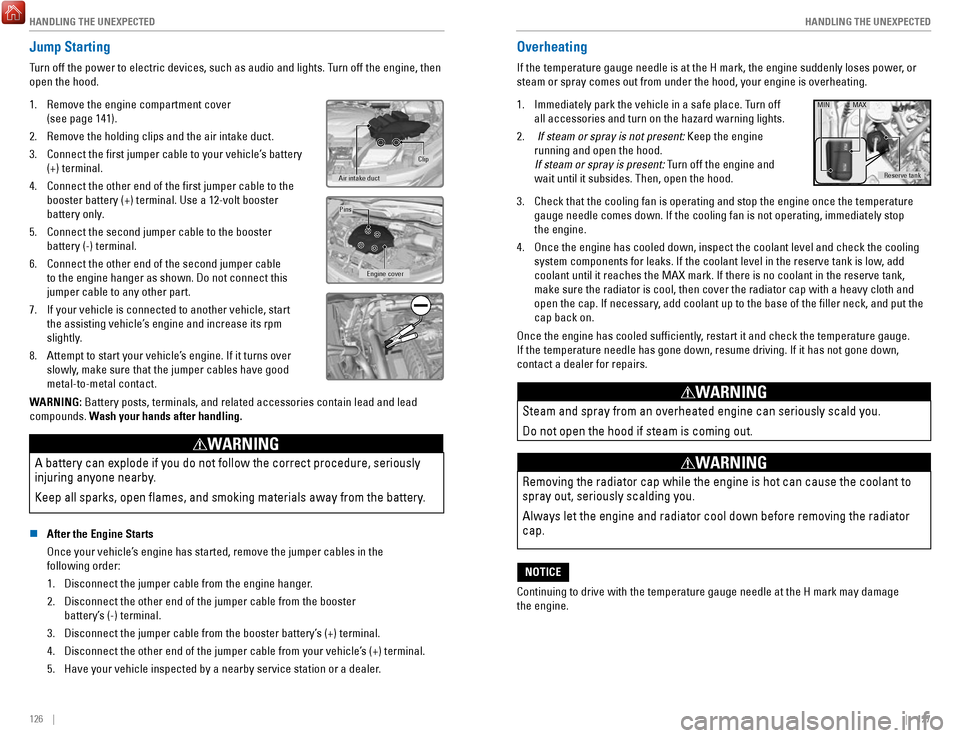
Turn off the power to electric devices, such as audio and lights. Turn off the engine, then
open the hood.
1.
Remove the engine compartment cover
(see page 141).
2.
Remove the holding clips and the air intake duct.
3.
Connect the first jumper cable to your vehicle’s battery
(+) terminal.
4.
Connect the other end of the first jumper cable to the
booster battery (+) terminal. Use a 12-volt booster
battery only.
5.
Connect the second jumper cable to the booster
battery (-) terminal.
6.
Connect the other end of the second jumper cable
to the engine hanger as shown. Do not connect this
jumper cable to any other part.
7.
If your vehicle is connected to another vehicle, start
the assisting vehicle’s engine and increase its rpm
slightly.
8.
Attempt to start your vehicle’s engine. If it turns over
slowly, make sure that the jumper cables have good
metal-to-metal contact.
Clip
Air intake duct
Engine cover
Pins
WARNING: Battery posts, terminals, and related accessories contain lead and lead\
compounds. Wash your hands after handling.
A battery can explode if you do not follow the correct procedure, seriou\
sly
injuring anyone nearby.
Keep all sparks, open flames, and smoking materials away from the batt\
ery.
WARNING
n After the Engine Starts
Once your vehicle’s engine has started, remove the jumper cables in the
following order:
1.
Disconnect the jumper cable from the engine hanger.
2.
Disconnect the other end of the jumper cable from the booster
battery’s (-) terminal.
3.
Disconnect the jumper cable from the booster battery’s (+) terminal.
4.
Disconnect the other end of the jumper cable from your vehicle’s (+) terminal.
5.
Have your vehicle inspected by a nearby service station or a dealer.
Overheating
If the temperature gauge needle is at the H mark, the engine suddenly lo\
ses power, or
steam or spray comes out from under the hood, your engine is overheating\
.
1.
Immediately park the vehicle in a safe place. Turn off
all accessories and turn on the hazard warning lights.
2.
If steam or spray is not present: Keep the engine
running and open the hood.
If steam or spray is present: Turn off the engine and
wait until it subsides. Then, open the hood.
Reserve tank
MIN MAX
3. Check that the cooling fan is operating and stop the engine once the tem\
perature
gauge needle comes down. If the cooling fan is not operating, immediatel\
y stop
the engine.
4.
Once the engine has cooled down, inspect the coolant level and check the\
cooling
system components for leaks. If the coolant level in the reserve tank is\
low, add
coolant until it reaches the MAX mark. If there is no coolant in the res\
erve tank,
make sure the radiator is cool, then cover the radiator cap with a heavy\
cloth and
open the cap. If necessary
, add coolant up to the base of the filler neck, and put the
cap back on.
Once the engine has cooled sufficiently, restart it and check the temperature gauge.
If the temperature needle has gone down, resume driving. If it has not g\
one down,
contact a dealer for repairs.
Steam and spray from an overheated engine can seriously scald you.
Do not open the hood if steam is coming out.
WARNING
Removing the radiator cap while the engine is hot can cause the coolant \
to
spray out, seriously scalding you.
Always let the engine and radiator cool down before removing the radiato\
r
cap.
WARNING
Continuing to drive with the temperature gauge needle at the H mark may \
damage
the engine.
NOTICE
Page 71 of 85
HANDLING THE UNEXPECTED
134 || 135
H
ANDLING THE UNEXPECTED
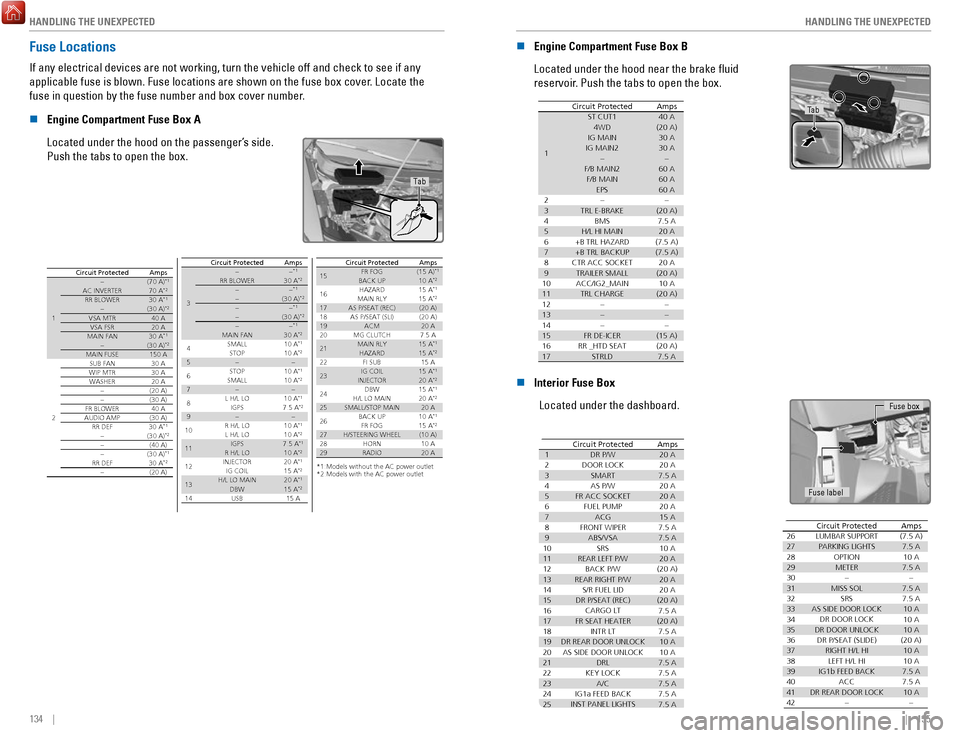
Fuse Locations
If any electrical devices are not working, turn the vehicle off and chec\
k to see if any
applicable fuse is blown. Fuse locations are shown on the fuse box cover\
. Locate the
fuse in question by the fuse number and box cover number.
n
Engine Compartment Fuse Box A
Located under the hood on the passenger’s side.
Push the tabs to open the box.
Tab
Circuit ProtectedAmps
1
�(70 A)*1AC INVERTER70
A*2RR BLOWER30 A*1�(30 A)*2VSA MTR40 A
VSA FSR20 AMAIN FAN30 A*1�(30 A)*2MAIN FUSE 150 A
2
SUB FAN30 A
WIP MTR30 AWASHER20 A
�(20 A)�(30 A)FR BLOWER 40 AAUDIO AMP(30 A)
RR DEF30 A*1�(30 A)*2�(40 A)
�(30 A)*1RR DEF30 A*2�(20 A)
3
��*1RR BLOWER30 A*2��*1�(30 A)*2��*1�(30 A)*2��*1MAIN FAN
4 SMALL 30
A
*2
STOP 10
A*110 A*25��
6 STOP
SMALL 10
A*110 A*27��
8 L H/L LO
10 A*1IGPS9 7.5
A*2��
10 R H/L LO
10 A*1L H/L LO
11 10
A
*2IGPS7.5 A*1R H/L LO
12 10
A
*2INJECTO R2 0 A*1IG COIL15 A*2
13H/L LO MAIN20 A*1DBW14 15
A*2USB15 A
AmpsCircuit Protecte d
15
*1:Models without the AC power outlet
*2:Models with the AC power outle t
(15 A)*1
16 10
A
*215 A*115 A*217(20 A)
18(20 A)
1920 A
20 7.5 A
2115 A*1
22 15
A*215 A
2315 A*120 A*2
24 15
A*120 A*22520 A
26 10
A*115 A*22728 (10 A)10
A
2920 A
Circuit Protecte dAmpsFR FOG
BACK UP HAZARD
MAIN RL Y
AS P/SEAT (REC) AS P/SEAT (SLI) ACM
MG CLUTCH MAIN RL Y
HAZARD FI SUB
IG COIL
INJECTOR DBW
H/L LO MAIN
SMALL/STOP MAIN BACK UPFR FOG
H/STEERING WHEEL HORN
RADIO
n Engine Compartment Fuse Box B
Located under the hood near the brake fluid
reservoir. Push the tabs to open the box.
Circuit Protected Amps
1
ST CUT140 A4WD (20 A)IG MAIN30 AIG MAIN230 A
��F/B MAIN 260 AF/B MAIN60 A
EPS60 A
2��3TRL E-BRAKE(20 A)
4 7.5 A
BM S
5H/L HI MAIN6 20
A(7.5 A)
7
8 (7.5 A)
20 A9(20 A)
10 10 A
11TRL CHARGE
+B TRL HAZARD
+B TRL BACKUP
CTR ACC SOCKE T
TRAILER SMAL L
ACC/IG2_MAIN (20 A)
12��13��14��15FR DE-ICER(15 A)16RR _HTD SEAT(20 A)17STRLD7.5 A
Tab
n Interior Fuse Box
Located under the dashboard.
AmpsCircuit Protected
120 A
220 A
37.5 A
420 A
520 A620 A715 A
87.5 A
97.5 A
1010 A
1120 A
12(20 A)
1320 A
1420 A
15(20 A)
167.5 A
17(20 A)
187.5 A
19DR REAR DOOR UNLOCK10 A
2010 A
21
DR P/W
DOOR LOCK SMAR T
AS P/W
FR ACC SOCKET FUEL PUMP ACG
FRONT WIPER ABS/VSA SRS
REAR LEFT P/W BACK P/W
REAR RIGHT P/ W
S/R FUEL LID
DR P/SEAT (REC) CARGO LT
FR SEAT HEATER INTR LT
7.5 A
227.5 A
237.5 A
247.5 A
257.5 A
AS SIDE DOOR UNLOCK
DRL
KEY LOCK A/C
IG1a FEED BACK
INST PANEL LIGHTS
26(7.5 A)277.5 A2810 A297.5 A30�317.5 A327.5 A3310 A3410 A3510 A36(20 A)3710 A3810 A397.5 A407.5 A4110 A42�
Circuit ProtectedAmpsLUMBAR SUPPORT
PARKING LIGHTS OPTIONMETER �
MISS SOL SRS
AS SIDE DOOR LOCK DR DOOR LOCK
DR DOOR UNLOCK DR P/SEAT (SLIDE) RIGHT H/L HILEFT H/L HI
IG1b FEED BACK ACC
DR REAR DOOR LOCK �
Fuse label Fuse box
Page 74 of 85
MAINTENANCE
140 || 141
M
AINTENANCE
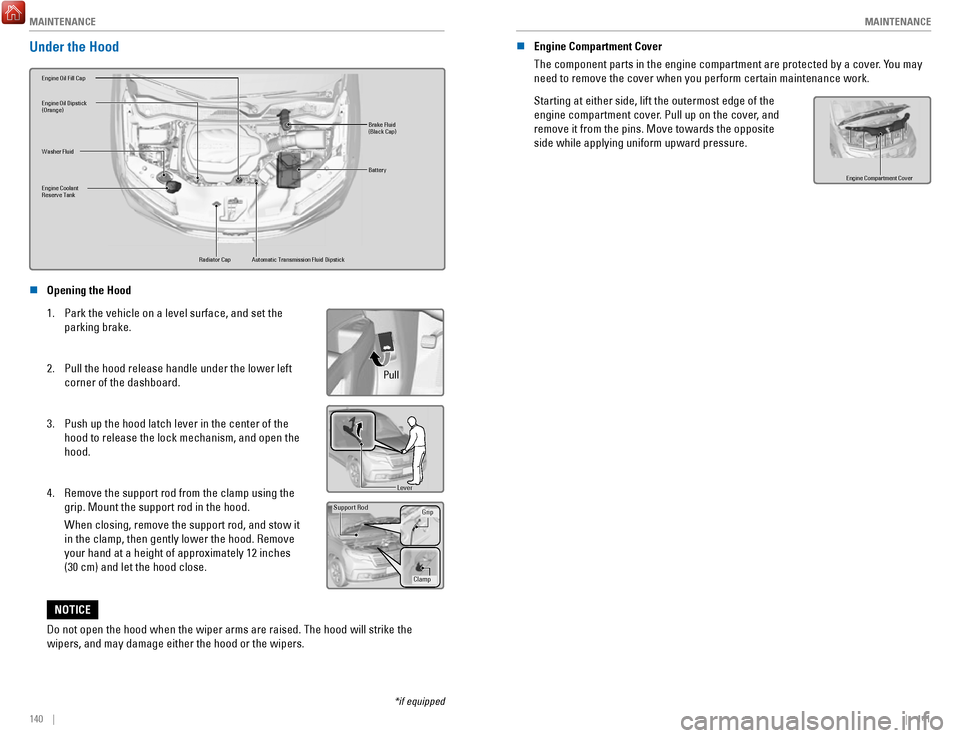
Under the Hood
Brake Fluid
(Black Cap)
Washer Fluid
Radiator Cap
Engine Coolant
Reserve Tan
k
Engine Oil Dipstick
(Orange)
Battery
Engine Oil Fill Ca p
Automatic Transmission Fluid Dipstick
n Opening the Hood
1.
Park the vehicle on a level surface, and set the
parking brake.
2.
Pull the hood release handle under the lower left
corner of the dashboard.
3.
Push up the hood latch lever in the center of the
hood to release the lock mechanism, and open the
hood.
4.
Remove the support rod from the clamp using the
grip. Mount the support rod in the hood.
When closing, remove the support rod, and stow it
in the clamp, then gently lower the hood. Remove
your hand at a height of approximately 12 inches
(30 cm) and let the hood close.
Pull
Lever
Support Ro d
Grip
Clamp
Do not open the hood when the wiper arms are raised. The hood will strik\
e the
wipers, and may damage either the hood or the wipers.
NOTICE
*if equipped
n Engine Compartment Cover
The component parts in the engine compartment are protected by a cover. You may
need to remove the cover when you perform certain maintenance work.
Starting at either side, lift the outermost edge of the
engine compartment cover. Pull up on the cover, and
remove it from the pins. Move towards the opposite
side while applying uniform upward pressure.
Engine Compartment Cove r
Page 85 of 85
INDEX
162 |
Opening the hood ............................................... 140
Service codes ..................................................... 139
Transmission fluid .............................................. 140
Under the hood ................................................... 140
Window washer fluid ......................................... 145
Wiper blades ....................................................... 146
Mirrors Door mirrors
.......................................................... 48
Rearview mirror .................................................... 48
Reverse tilt-down mirrors ................................... 48
Moonroof .................................................................. 37
Multi-Information Display (MID)........................... 30
Multi-View Rear Camera
..................................... 121
Navigation .......................................................... 90–96
Address .................................................................. 92
Destination ............................................................ 92
Home address ....................................................... 92
Legend .................................................................... 95
Place Category ..................................................... 93
Recent places ....................................................... 93
Routing ................................................................... 95
Saved places ......................................................... 94
Steering-wheel controls ..................................... 90
Traffic ..................................................................... 96
Turn-by-turn directions ....................................... 95
Overheating............................................................ 127 Parking sensor.......................................................
118
Power Mode
.......................................................... 106
Power outlets 12-volt
..................................................................... 57
Readiness codes ................................................... 153
Remote engine start ....................................... 31, 105
Road Departure Mitigation (RDM) ..................... 116
Safety Reporting safety defects
..................................... 25
Safety information .................................................. 7
Safety label locations .......................................... 25
Seat belts.............................................................. 9–11 Fastening
............................................................... 11
Lap/Shoulder belts ................................................. 9
Proper use ............................................................... 9
Seat belt inspection ............................................. 10
Shoulder anchor ................................................... 11
Seating ................................................................ 43–47Driver seat
.............................................................
43
Driving Position Memory System ...................... 47
Head restraints ..................................................... 45
Rear seats .............................................................. 46
Specifications ........................................................ 154
Steering wheel Adjusting
................................................................ 47
Tailgate ............................................................... 31, 33
Tires ................................................. 129–133, 147–152
Flat tire ......................................................... 131–133
Low tire pressure ............................................... 147
Tire and loading information label ................... 148
Tire and wheel replacement ............................. 148
Tire chains ........................................................... 149
Tire identification number ................................. 150
Tire information ................................................... 147
Tire labeling ......................................................... 150
Tire Pressure Monitor System (TPMS) ........... 129
Tire quality grading ............................................ 151
Tire service life ................................................... 149
Tire terminology .................................................. 150
Wear indicators .................................................. 147
Winter tires .......................................................... 149
Towing ............................................................. 101–104
Emergency towing ....................................... C6, 128
Load limits ............................................................ 101
Tongue load ......................................................... 102
Trailer weight ...................................................... 101
Truck Bed Audio ...................................................... 79
Turn signals .............................................................. 39
Vehicle Stability Assist (VSA) ............................. 110
Voice command index .......................................... 159
Warranty ................................................................. 158
Window Power windows
.................................................... 36
Wipers................................................................. 41–42 Intermittent wipers
............................................... 41
Rain-sensing wipers ............................................ 42