change time HONDA RIDGELINE 2018 (in English) Owner's Guide
[x] Cancel search | Manufacturer: HONDA, Model Year: 2018, Model line: RIDGELINE, Model: HONDA RIDGELINE 2018Pages: 623, PDF Size: 25.85 MB
Page 342 of 623
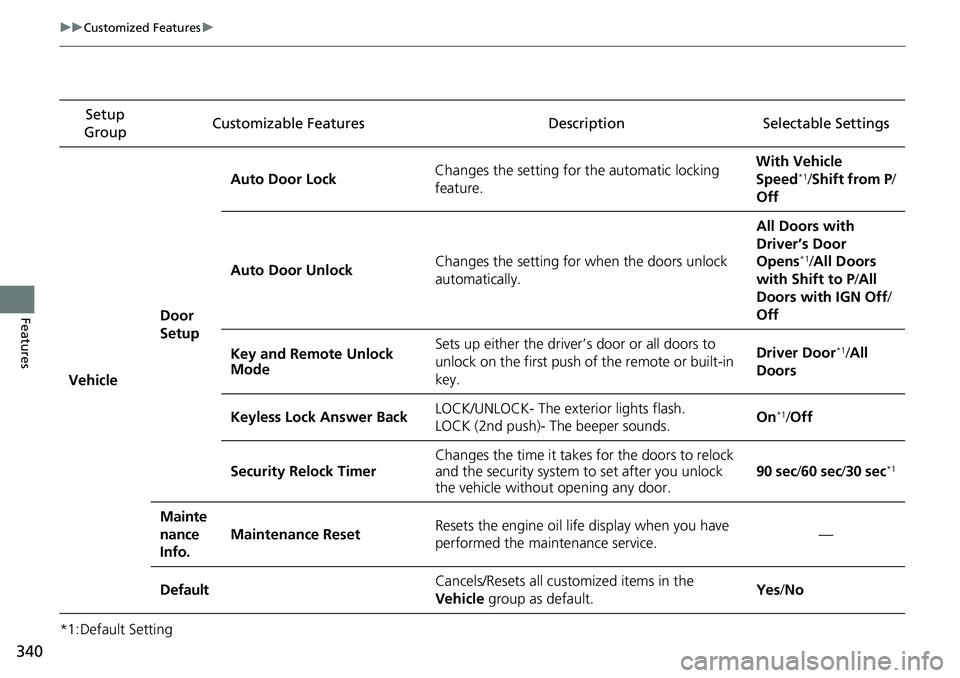
340
uuCustomized Features u
Features
*1:Default SettingSetup
Group Customizable Features Descri
ption Selectable Settings
Vehicle Door
SetupAuto Door Lock
Changes the setting for the automatic locking
feature. With Vehicle
Speed
*1/
Shift from P/
Off
Auto Door Unlock Changes the setting for when the doors unlock
automatically. All Doors with
Driver’s Door
Opens
*1/
All Doors
with Shift to P /All
Doors with IGN Off /
Off
Key and Remote Unlock
Mode Sets up either the driver
’s door or all doors to
unlock on the first push of the remote or built-in
key. Driver Door
*1/
All
Doors
Keyless Lock Answer Back LOCK/UNLOCK- The exterior lights flash.
LOCK (2nd push)- The beeper sounds. On
*1/
Off
Security Relock Timer Changes the time it takes for the doors to relock
and the security system to set after you unlock
the vehicle without opening any door.
90 sec
/60 sec /30 sec
*1
Mainte
nance
Info.
Maintenance ResetResets the engine oil life display when you have
performed the maintenance service.—
DefaultCancels/Resets all cust omized items in the
Vehicle group as default.Yes/No
Page 344 of 623
342
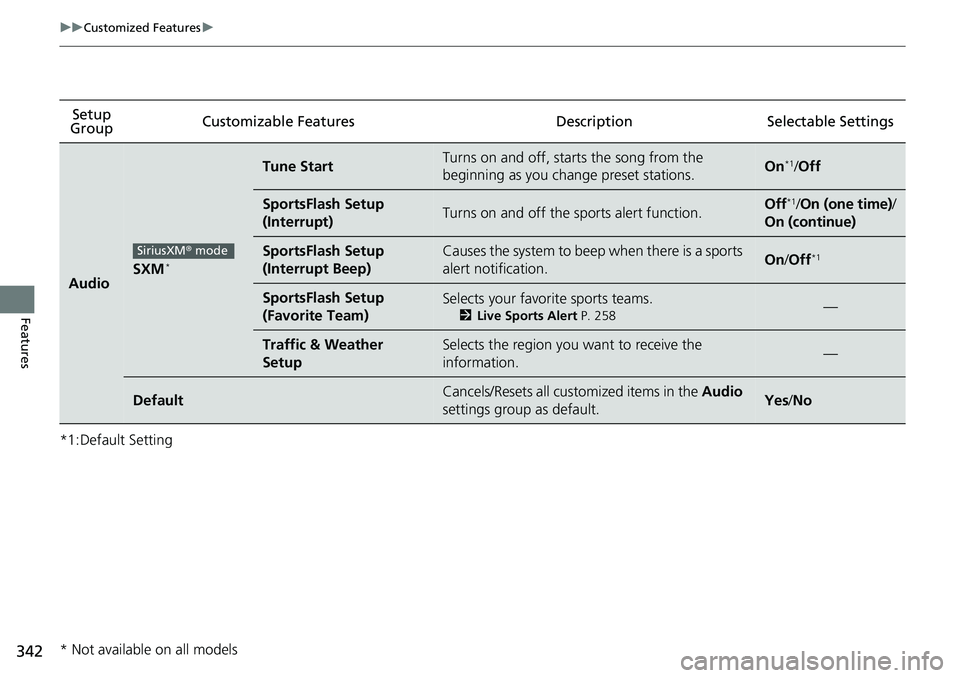
uuCustomized Features u
Features
*1:Default SettingSetup
Group Customizable Features Descri
ption Selectable Settings
AudioSXM*
Tune StartTurns on and off, starts the song from the
beginning as you change preset stations.On*1/Off
SportsFlash Setup
(Interrupt)Turns on and off the sports alert function.Off*1/On (one time) /
On (continue)
SportsFlash Setup
(Interrupt Beep)Causes the system to beep when there is a sports
alert notification.On /Off*1
SportsFlash Setup
(Favorite Team)Selects your favorite sports teams.
2 Live Sports Alert P. 258—
Traffic & Weather
SetupSelects the region you want to receive the
information.—
DefaultCancels/Resets all customized items in the Audio
settings group as default.Yes /No
SiriusXM ® mode
* Not available on all models
Page 345 of 623
343
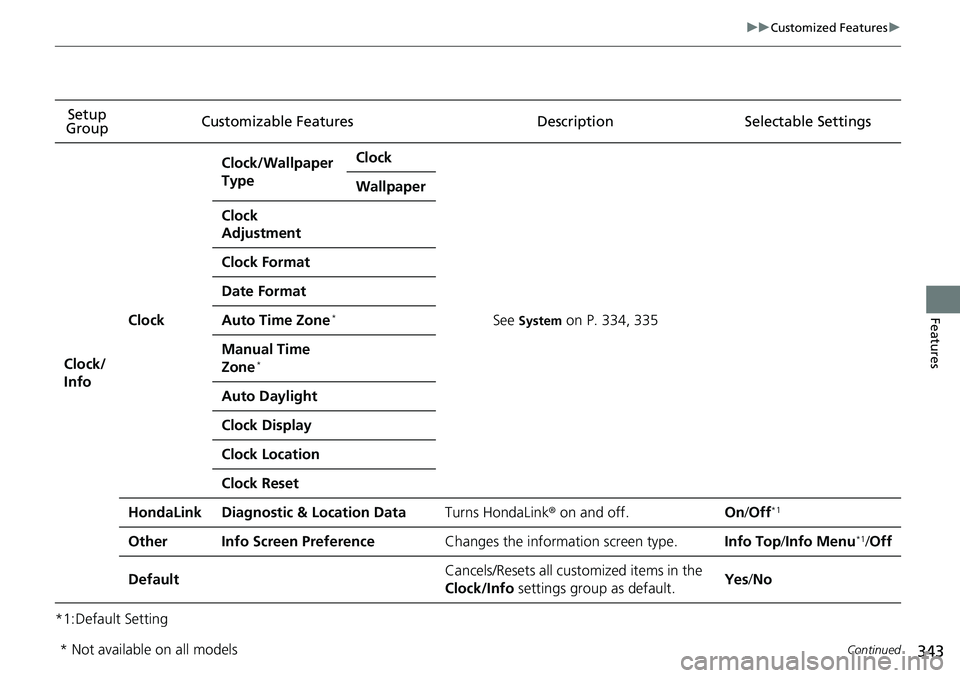
uuCustomized Features u
Continued
Features
*1:Default SettingSetup
Group Customizable Features Description Selectable Settings
Clock/
Info
Clock
Clock/Wallpaper
TypeClock
See System on P. 334, 335
Wallpaper
Clock
Adjustment
Clock Format
Date Format
Auto Time Zone*
Manual Time
Zone*
Auto Daylight
Clock Display
Clock Location
Clock Reset
HondaLinkDiagnostic & Location DataTurns HondaLink
® on and off.On/Off*1
OtherInfo Screen PreferenceChanges the information screen type.Info Top /Info Menu*1/Off
DefaultCancels/Resets all customized items in the
Clock/Info settings group as default.Yes/No
* Not available on all models
Page 347 of 623
345
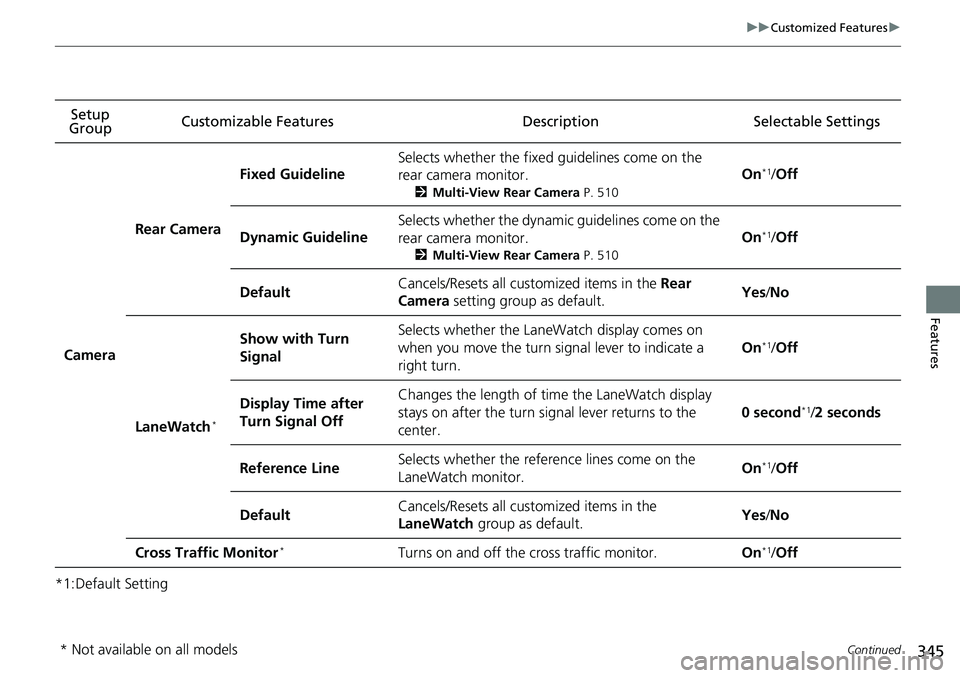
uuCustomized Features u
Continued
Features
*1:Default SettingSetup
Group Customizable Featur
es Description Selectable Settings
Camera
Rear Camera
Fixed Guideline
Selects whether the fixed guidelines come on the
rear camera monitor.
2Multi-View Rear Camera P. 510
On*1/Off
Dynamic Guideline
Selects whether the dynamic guidelines come on the
rear camera monitor.
2 Multi-View Rear Camera P. 510
On*1/Off
DefaultCancels/Resets all customized items in the Rear
Camera setting group as default.Yes /No
LaneWatch*
Show with Turn
SignalSelects whether the LaneWatch display comes on
when you move the turn signal lever to indicate a
right turn.
On*1/ Off
Display Time after
Turn Signal OffChanges the length of time the LaneWatch display
stays on after the turn signal lever returns to the
center.
0 second*1/2 seconds
Reference LineSelects whether the reference lines come on the
LaneWatch monitor.On*1/ Off
DefaultCancels/Resets all customized items in the
LaneWatch group as default.Yes/No
Cross Traffic Monitor*Turns on and off the cross traffic monitor.On*1/ Off
* Not available on all models
Page 387 of 623
Continued385
uuBluetooth ® HandsFreeLink ®u HFL Menus
Features
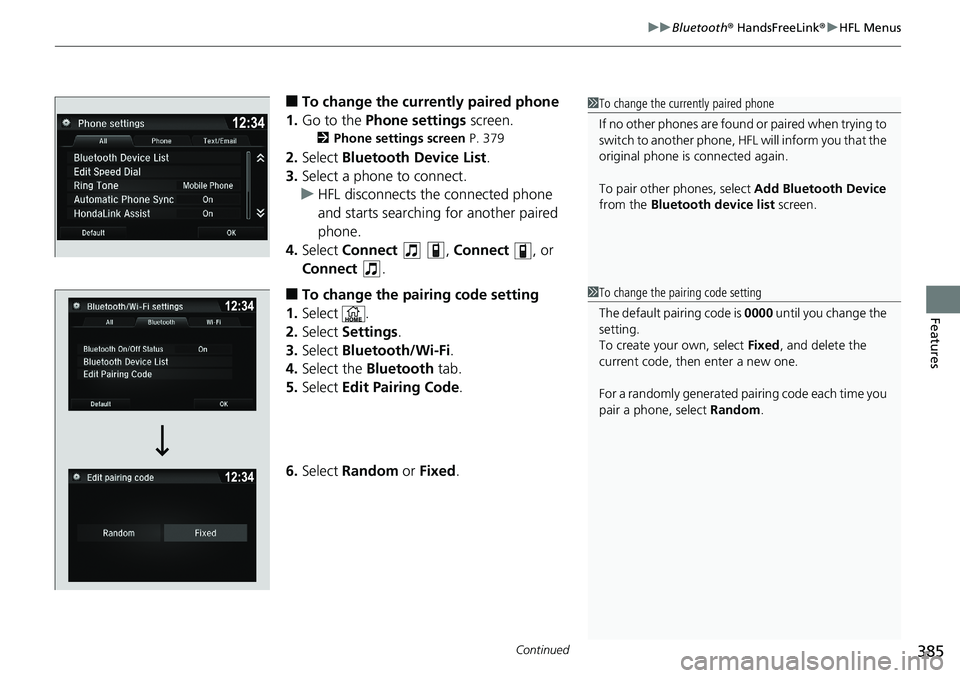
■To change the currently paired phone
1. Go to the Phone settings screen.
2Phone settings screen P. 379
2.Select Bluetooth Device List .
3. Select a phone to connect.
u HFL disconnects the connected phone
and starts searching for another paired
phone.
4. Select Connect , Connect , or
Connect .
■To change the pairing code setting
1. Select .
2. Select Settings .
3. Select Bluetooth/Wi-Fi .
4. Select the Bluetooth tab.
5. Select Edit Pairing Code .
6. Select Random or Fixed .
1To change the currently paired phone
If no other phones are found or paired when trying to
switch to another phone, HFL will inform you that the
original phone is connected again.
To pair other phones, select Add Bluetooth Device
from the Bluetooth device list screen.
1To change the pairing code setting
The default pair ing code is 0000 until you change the
setting.
To create your own, select Fixed, and delete the
current code, then enter a new one.
For a randomly generated pa iring code each time you
pair a phone, select Random.
Page 409 of 623
Continued407
uuBluetooth ® HandsFreeLink ®u HFL Menus
Features
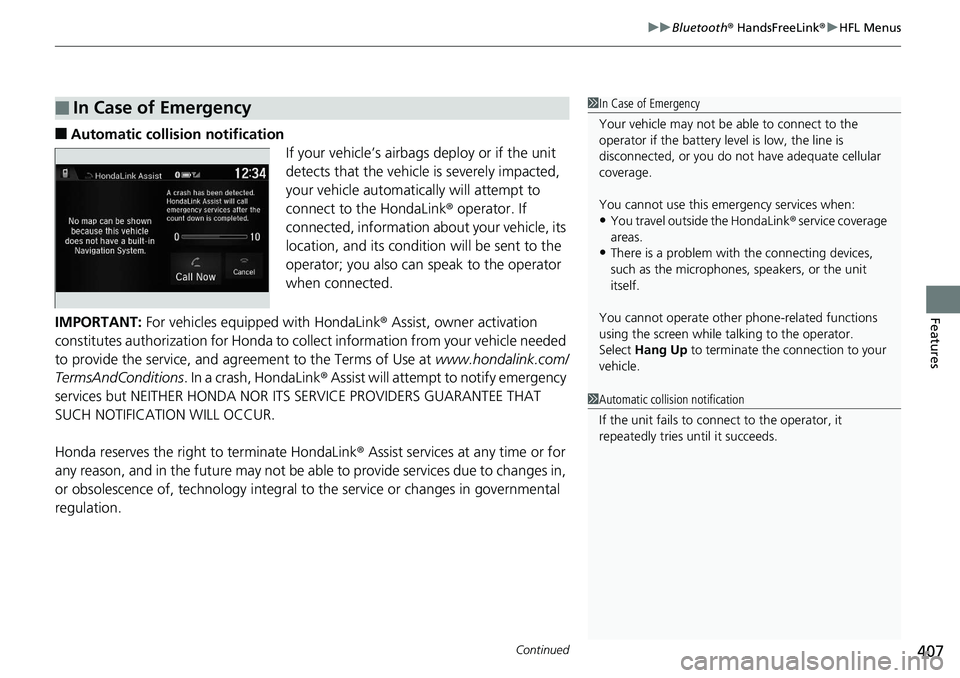
■Automatic collis ion notification
If your vehicle’s airbags deploy or if the unit
detects that the vehicle is severely impacted,
your vehicle automatically will attempt to
connect to the HondaLink ® operator. If
connected, information about your vehicle, its
location, and its condition will be sent to the
operator; you also can speak to the operator
when connected.
IMPORTANT: For vehicles equipped with HondaLink ® Assist, owner activation
constitutes authorization for Honda to collect information from your vehicle needed
to provide the service, and agreement to the Terms of Use at www.hondalink.com/
TermsAndConditions . In a crash, HondaLink ® Assist will attempt to notify emergency
services but NEITHER HONDA NOR I TS SERVICE PROVIDERS GUARANTEE THAT
SUCH NOTIFICATION WILL OCCUR.
Honda reserves the right to terminate HondaLink® Assist services at any time or for
any reason, and in the future may not be ab le to provide services due to changes in,
or obsolescence of, technology integral to the service or changes in governmental
regulation.
■In Case of Emergency1 In Case of Emergency
Your vehicle may not be able to connect to the
operator if the battery level is low, the line is
disconnected, or you do not have adequate cellular
coverage.
You cannot use this emergency services when:
•You travel outside the HondaLink ® service coverage
areas.
•There is a problem with the connecting devices,
such as the microphones, speakers, or the unit
itself.
You cannot operate othe r phone-related functions
using the screen while talking to the operator.
Select Hang Up to terminate the connection to your
vehicle.
1 Automatic collision notification
If the unit fails to connect to the operator, it
repeatedly tries until it succeeds.
Page 465 of 623
463
uuWhen Driving uAdaptive Cruise Control (ACC)*
Continued
Driving
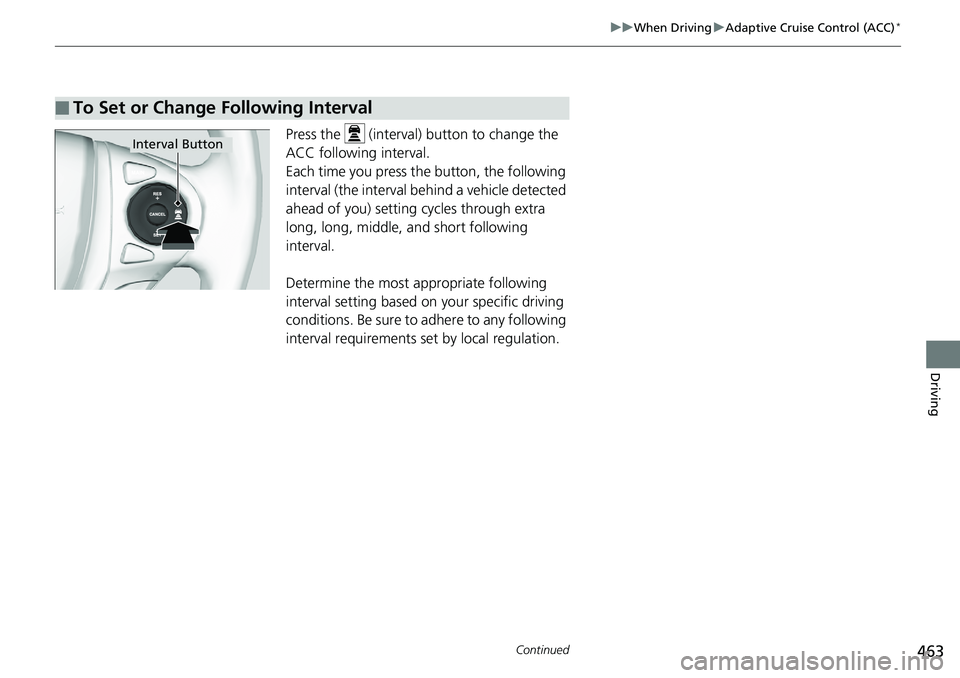
Press the (interval) button to change the
ACC following interval.
Each time you press th e button, the following
interval (the interval behind a vehicle detected
ahead of you) setting cycles through extra
long, long, middle, and short following
interval.
Determine the most appropriate following
interval setting based on your specific driving
conditions. Be sure to adhere to any following
interval requirements set by local regulation.
■To Set or Change Following Interval
Interval Button
Page 473 of 623
Continued471
uuWhen Driving uLane Keeping Assist System (LKAS)*
Driving
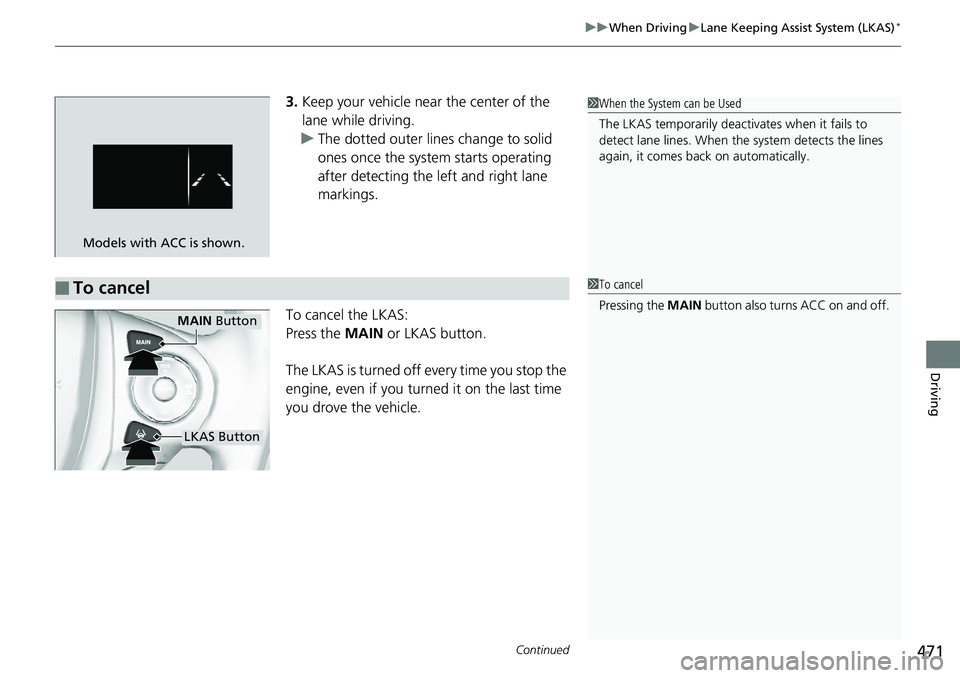
3. Keep your vehicle near the center of the
lane while driving.
u The dotted outer lines change to solid
ones once the system starts operating
after detecting the left and right lane
markings.
To cancel the LKAS:
Press the MAIN or LKAS button.
The LKAS is turned off every time you stop the
engine, even if you turned it on the last time
you drove the vehicle.
Models with ACC is shown.
■To cancel
1 When the System can be Used
The LKAS temporarily deactivates when it fails to
detect lane lines. When the system detects the lines
again, it comes back on automatically.
1To cancel
Pressing the MAIN button also turns ACC on and off.
MAIN Button
LKAS Button
Page 479 of 623
477
uuWhen Driving uVehicle Stability Assist (VSA ®), aka Electronic Stability Control (ESC), System
Driving
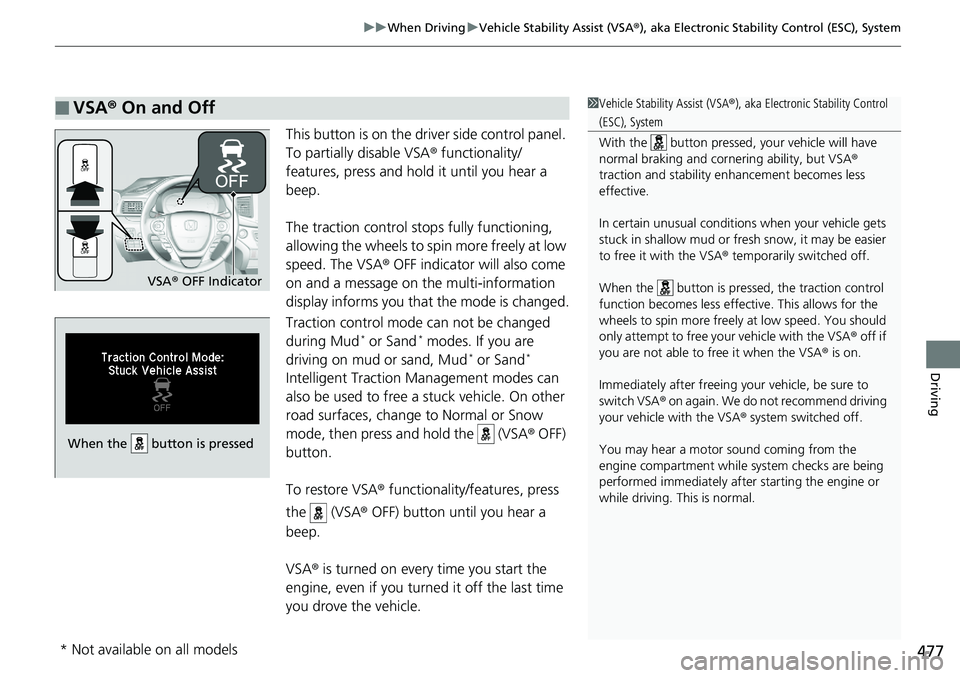
This button is on the driver side control panel.
To partially disable VSA ® functionality/
features, press and hold it until you hear a
beep.
The traction control stop s fully functioning,
allowing the wheels to spin more freely at low
speed. The VSA ® OFF indicator will also come
on and a message on the multi-information
display informs you that the mode is changed.
Traction control mode can not be changed
during Mud
* or Sand* modes. If you are
driving on mud or sand, Mud* or Sand*
Intelligent Traction Management modes can
also be used to free a stuck vehicle. On other
road surfaces, change to Normal or Snow
mode, then press and hold the (VSA ® OFF)
button.
To restore VSA ® functionality/features, press
the (VSA ® OFF) button until you hear a
beep.
VSA ® is turned on every time you start the
engine, even if you turned it off the last time
you drove the vehicle.
■VSA ® On and Off1 Vehicle Stability Assist (VSA ®), aka Electronic Stability Control
(ESC), System
With the button pressed, your vehicle will have
normal braking and corn ering ability, but VSA®
traction and stability enhancement becomes less
effective.
In certain unusual conditions when your vehicle gets
stuck in shallow mud or fr esh snow, it may be easier
to free it with the VSA ® temporarily switched off.
When the button is pressed, the traction control
function becomes less effective. This allows for the
wheels to spin more freely at low speed. You should
only attempt to free your vehicle with the VSA ® off if
you are not able to free it when the VSA ® is on.
Immediately after freeing your vehicle, be sure to
switch VSA ® on again. We do not recommend driving
your vehicle with the VSA ® system switched off.
You may hear a motor sound coming from the
engine compartment while system checks are being
performed immediately after starting the engine or
while driving. This is normal.
VSA ® OFF Indicator
When the button is pressed
* Not available on all models
Page 487 of 623
485
uuWhen Driving uBlind spot information (BSI) System*
Driving
■When the system detects a vehicle1Blind spot inform ation (BSI) System*
You can change the setting for BSI.
2 Customized Features P. 317
Turn the system off when towing a trailer.
The system may not work properly for the following
reasons:
•The added mass tilts the vehicle and changes the
radar coverage.
•The trailer itself can be detected by the radar
sensors, causing the BSI al ert indicators to come on.
BSI may be adversel y affected when:
•Objects (guard rails, poles, trees, etc,.) are
detected.
•An object that does not re flect radio waves well,
such as a motorcycle, is in the alert zone.
•Driving on a curved road.
•A vehicle is moving from a far lane to the adjacent
lane.
•The system picks up external electrical interference.•The rear bumper or the sens ors have been improperly
repaired or the rear bu mper has been deformed.
•The orientation of the sensors has been changed.•In bad weather (Heavy rain, snow, and fog).
For proper BSI use:
•Always keep the rear bumper corner area clean.
•Do not cover the rear bumper corner area with
labels or sticke rs of any kind.
•Take your vehicle to a dealer if you need the rear
bumper corner area or the radar sensors to be repaired,
or the rear bumper corner area is strongly impacted.
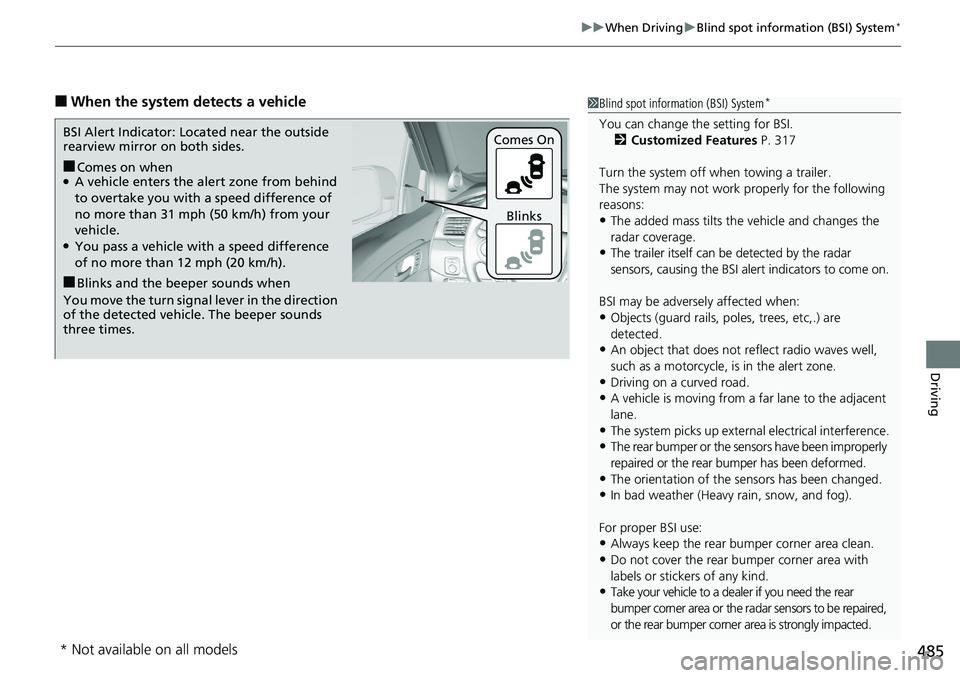
■Comes on when●A vehicle enters the ale rt zone from behind
to overtake you with a speed difference of
no more than 31 mph (50 km/h) from your
vehicle.
●You pass a vehicle with a speed difference
of no more than 12 mph (20 km/h).
BSI Alert Indicator: Located near the outside
rearview mirror on both sides.
■Blinks and the beeper sounds when
You move the turn signal lever in the direction
of the detected vehicle. The beeper sounds
three times. Comes On
Blinks
* Not available on all models