battery HONDA RIDGELINE 2018 Owner's Manual (in English)
[x] Cancel search | Manufacturer: HONDA, Model Year: 2018, Model line: RIDGELINE, Model: HONDA RIDGELINE 2018Pages: 623, PDF Size: 25.85 MB
Page 5 of 623
Contents
Child Safety P. 55Exhaust Gas Hazard P. 70Safety Labels P. 71
Opening and Closing the Tailgate P. 128 Opening and Closing the Trunk P. 130
Opening and Closing the Moonroof* P. 140 Operating the Switches Around the Steering Wheel P. 142
Interior Lights/Convenience It ems P. 171Climate Control System* P. 188
Audio System Basic Operation P. 206, 224 Audio Error Messages P. 294
Customized Features P. 317
Off-Highway Driving Guidelines P. 430 When Driving P. 432 Braking P. 488
Refueling P. 512 Fuel Economy and CO
2 Emissions P. 515
Maintenance Under the Hood P. 525 Replacing Light Bulbs P. 537
Checking and Maintaining Tires P. 545 Battery P. 554 Remote Transmitter Care P. 555
Cleaning P. 557 Accessories and Modifications P. 563
Engine Does Not Start P. 576Jump Starting P. 579 Shift Lever Does Not Move P. 582
Fuses P. 589 Emergency Towing P. 594
Refueling P. 596
Devices that Emit Radio Waves P. 603 Reporting Safety Defects P. 604
Authorized Manuals P. 609 Customer Service Information P. 610
Quick Reference GuideP. 4
Safe DrivingP. 29
Instrument PanelP. 73
ControlsP. 109
FeaturesP. 199
DrivingP. 409
MaintenanceP. 517
Handling the UnexpectedP. 565
InformationP. 599
IndexP. 611
Page 25 of 623
23
Quick Reference Guide
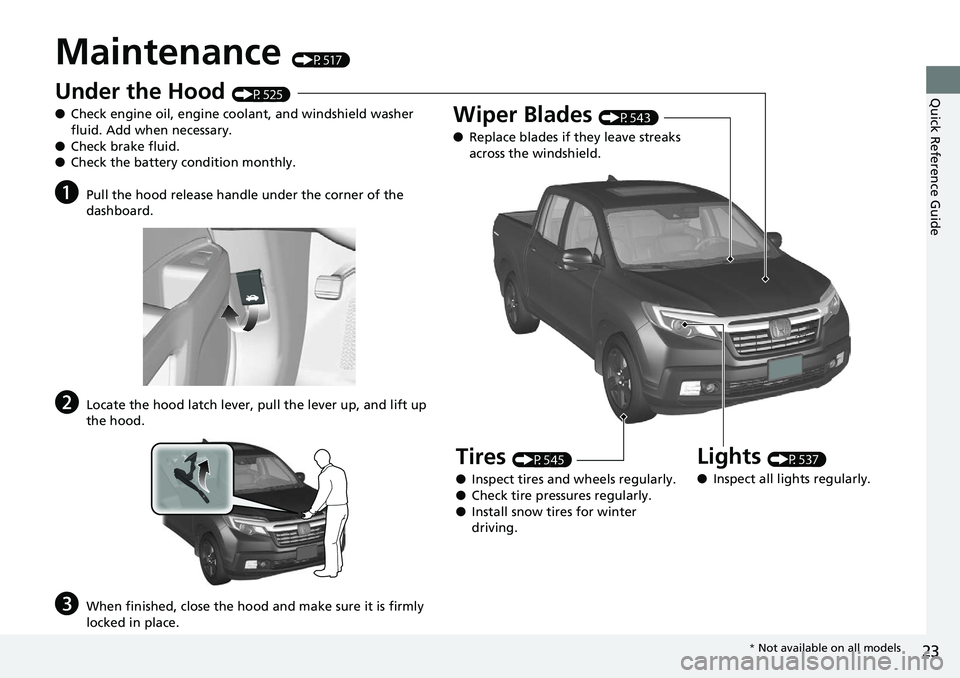
Maintenance (P517)
Under the Hood (P525)
● Check engine oil, engine coolant, and windshield washer
fluid. Add when necessary.
● Check brake fluid.
● Check the battery condition monthly.
aPull the hood release handle under the corner of the
dashboard.
bLocate the hood latch lever, pull the lever up, and lift up
the hood.
cWhen finished, close the hood and make sure it is firmly
locked in place.
Lights (P537)
● Inspect all lights regularly.
Wiper Blades (P543)
● Replace blades if they leave streaks
across the windshield.
Tires (P545)
● Inspect tires and wheels regularly.
● Check tire pressures regularly.
● Install snow tires for winter
driving.
* Not available on all models
Page 26 of 623
24
Quick Reference Guide
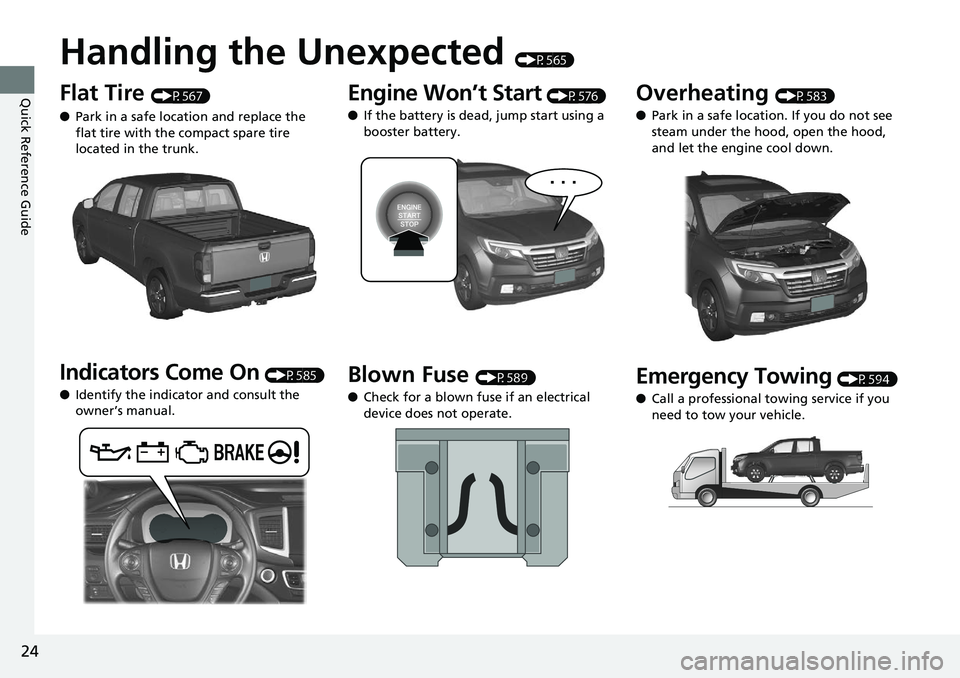
Handling the Unexpected (P565)
Flat Tire (P567)
● Park in a safe location and replace the
flat tire with the compact spare tire
located in the trunk.
Indicators Come On (P585)
● Identify the indicator and consult the
owner’s manual.
Engine Won’t Start (P576)
● If the battery is dead, jump start using a
booster battery.
Blown Fuse (P589)
● Check for a blown fuse if an electrical
device does not operate.
Overheating (P583)
● Park in a safe location. If you do not see
steam under the hood, open the hood,
and let the engine cool down.
Emergency Towing (P594)
● Call a professional towing service if you
need to tow your vehicle.
Page 77 of 623
75
uuIndicators u
Continued
Instrument Panel
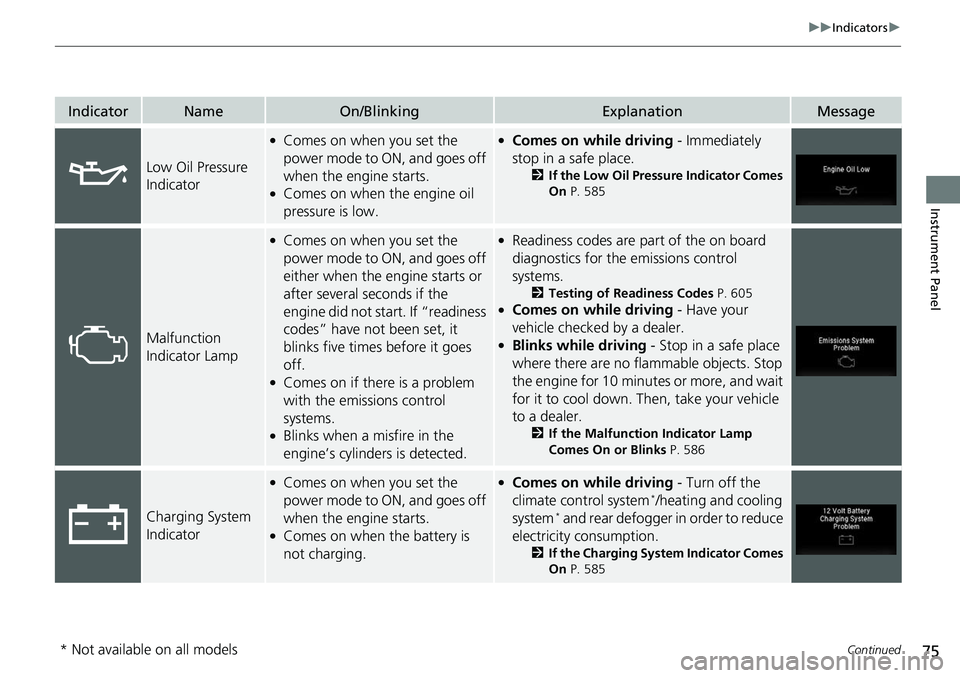
IndicatorNameOn/BlinkingExplanationMessage
Low Oil Pressure
Indicator
●Comes on when you set the
power mode to ON, and goes off
when the engine starts.
●Comes on when the engine oil
pressure is low.
●Comes on while driving - Immediately
stop in a safe place.
2 If the Low Oil Pressure Indicator Comes
On P. 585
Malfunction
Indicator Lamp
●Comes on when you set the
power mode to ON, and goes off
either when the engine starts or
after several seconds if the
engine did not start. If “readiness
codes” have not been set, it
blinks five times before it goes
off.
●Comes on if there is a problem
with the emissions control
systems.
●Blinks when a misfire in the
engine’s cylinders is detected.
●Readiness codes are part of the on board
diagnostics for the emissions control
systems.
2 Testing of Readiness Codes P. 605●Comes on while driving - Have your
vehicle checked by a dealer.
●Blinks while driving - Stop in a safe place
where there are no flammable objects. Stop
the engine for 10 minutes or more, and wait
for it to cool down. Then, take your vehicle
to a dealer.
2 If the Malfunction Indicator Lamp
Comes On or Blinks P. 586
Charging System
Indicator
●Comes on when you set the
power mode to ON, and goes off
when the engine starts.
●Comes on when the battery is
not charging.
●Comes on while driving - Turn off the
climate control system*/heating and cooling
system* and rear defogger in order to reduce
electricity consumption.
2 If the Charging System Indicator Comes
On P. 585
* Not available on all models
Page 94 of 623
92
uuIndicators uMulti-Information Display Warn ing and Information Messages
Instrument Panel
MessageConditionExplanation
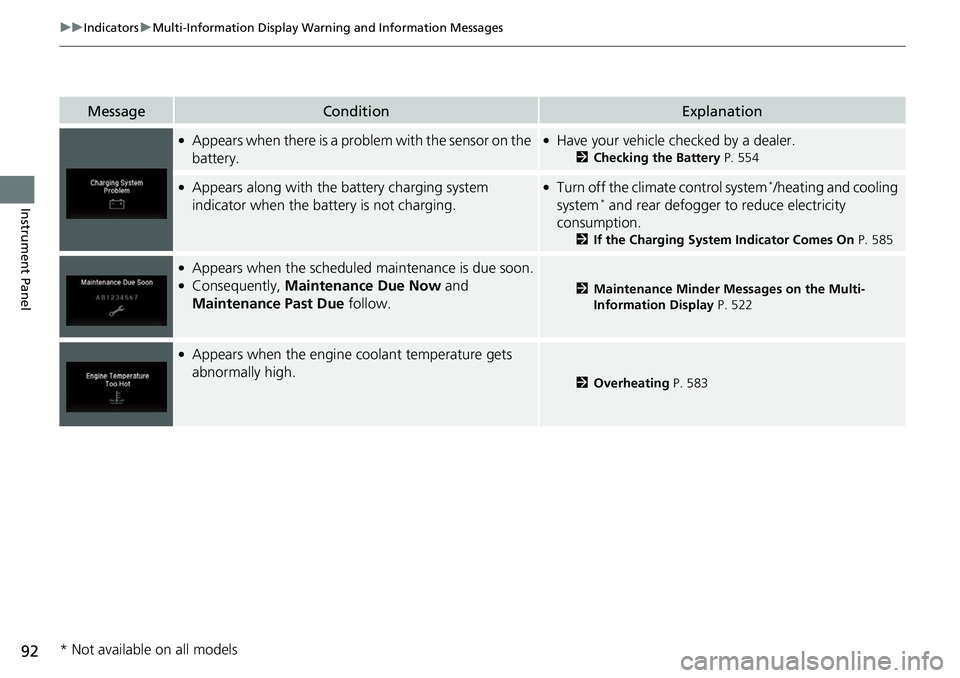
●Appears when there is a problem with the sensor on the
battery.●Have your vehicle checked by a dealer.
2Checking the Battery P. 554
●Appears along with the battery charging system
indicator when the battery is not charging.●Turn off the climate control system*/heating and cooling
system* and rear defogger to reduce electricity
consumption.
2 If the Charging System Indicator Comes On P. 585
●Appears when the scheduled maintenance is due soon.●Consequently, Maintenance Due Now and
Maintenance Past Due follow.2Maintenance Minder Messages on the Multi-
Information Display P. 522
●Appears when the engine coolant temperature gets
abnormally high.
2Overheating P. 583
* Not available on all models
Page 96 of 623
94
uuIndicators uMulti-Information Display Warn ing and Information Messages
Instrument Panel
MessageConditionExplanation
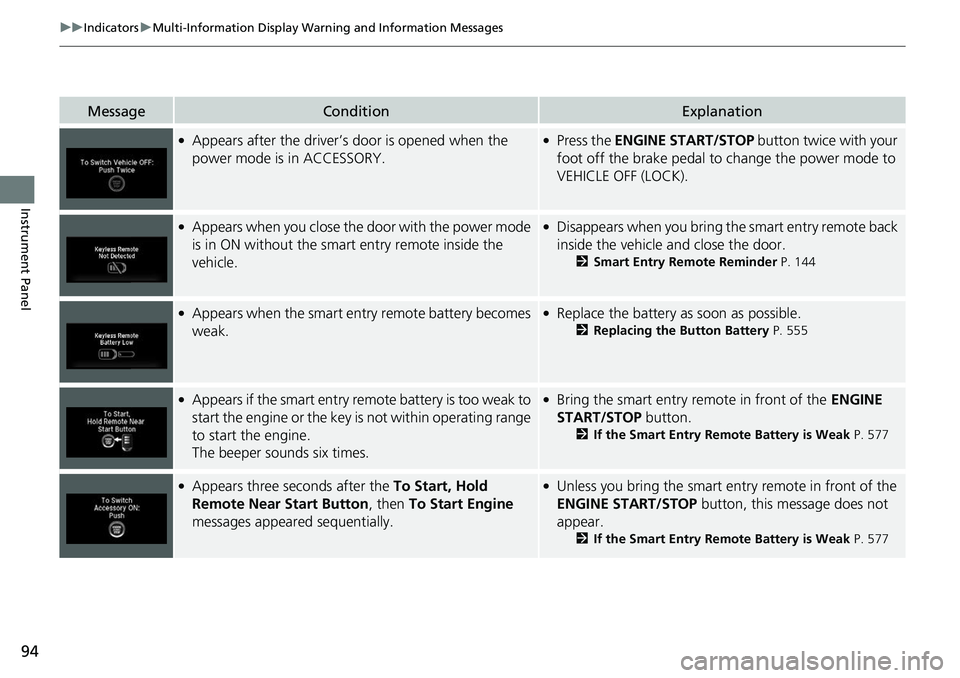
●Appears after the driver’s door is opened when the
power mode is in ACCESSORY.●Press the ENGINE START/STOP button twice with your
foot off the brake pedal to change the power mode to
VEHICLE OFF (LOCK).
●Appears when you close the door with the power mode
is in ON without the smar t entry remote inside the
vehicle.●Disappears when you bring the smart entry remote back
inside the vehicle and close the door.
2 Smart Entry Remote Reminder P. 144
●Appears when the smart entry remote battery becomes
weak.●Replace the battery as soon as possible.
2Replacing the Button Battery P. 555
●Appears if the smart entry remote battery is too weak to
start the engine or the key is not within operating range
to start the engine.
The beeper sounds six times.●Bring the smart entry remote in front of the ENGINE
START/STOP button.
2 If the Smart Entry Remote Battery is Weak P. 577
●Appears three seconds after the To Start, Hold
Remote Near Start Button , then To Start Engine
messages appeared sequentially.●Unless you bring the smart en try remote in front of the
ENGINE START/STOP button, this message does not
appear.
2 If the Smart Entry Remote Battery is Weak P. 577
Page 113 of 623
111Continued
Controls
Locking and Unlocking the Doors
Key Types and Functions
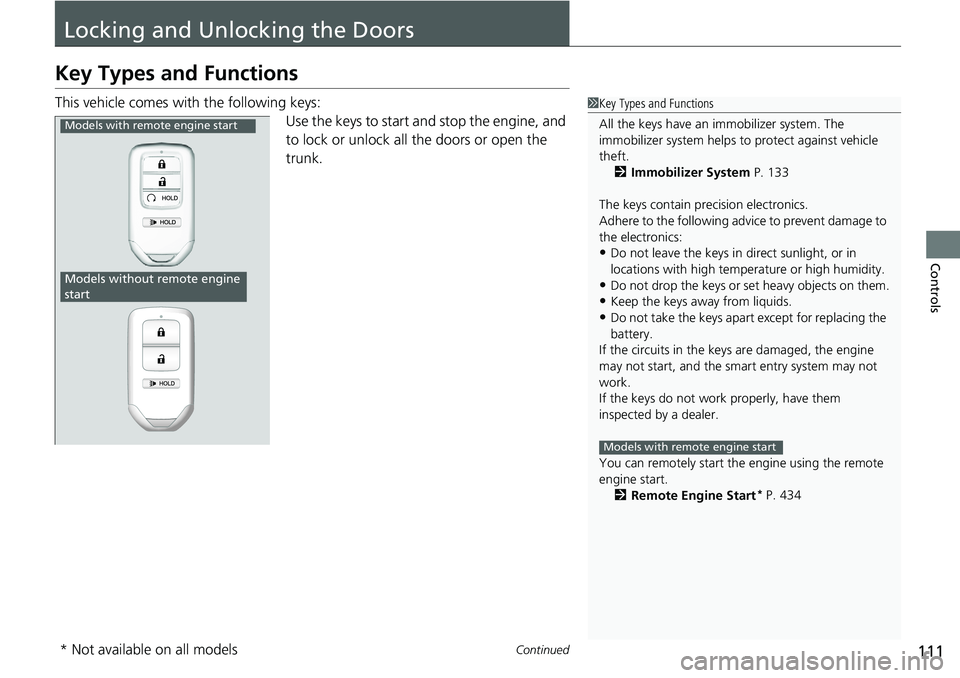
This vehicle comes with the following keys:
Use the keys to start and stop the engine, and
to lock or unlock all the doors or open the
trunk.1Key Types and Functions
All the keys have an immobilizer system. The
immobilizer system helps to protect against vehicle
theft. 2 Immobilizer System P. 133
The keys contain precision electronics.
Adhere to the following advi ce to prevent damage to
the electronics:
•Do not leave the keys in direct sunlight, or in
locations with high temperature or high humidity.
•Do not drop the keys or set heavy objects on them.
•Keep the keys away from liquids.
•Do not take the keys apart except for replacing the
battery.
If the circuits in the keys are damaged, the engine
may not start, and the smart entry system may not
work.
If the keys do not work properly, have them
inspected by a dealer.
You can remotely start the engine using the remote
engine start.
2 Remote Engine Start
* P. 434
Models with remote engine start
Models with remote engine start
Models without remote engine
start
* Not available on all models
Page 114 of 623
uuLocking and Unlocking the Doors uKey Types and Functions
112
Controls
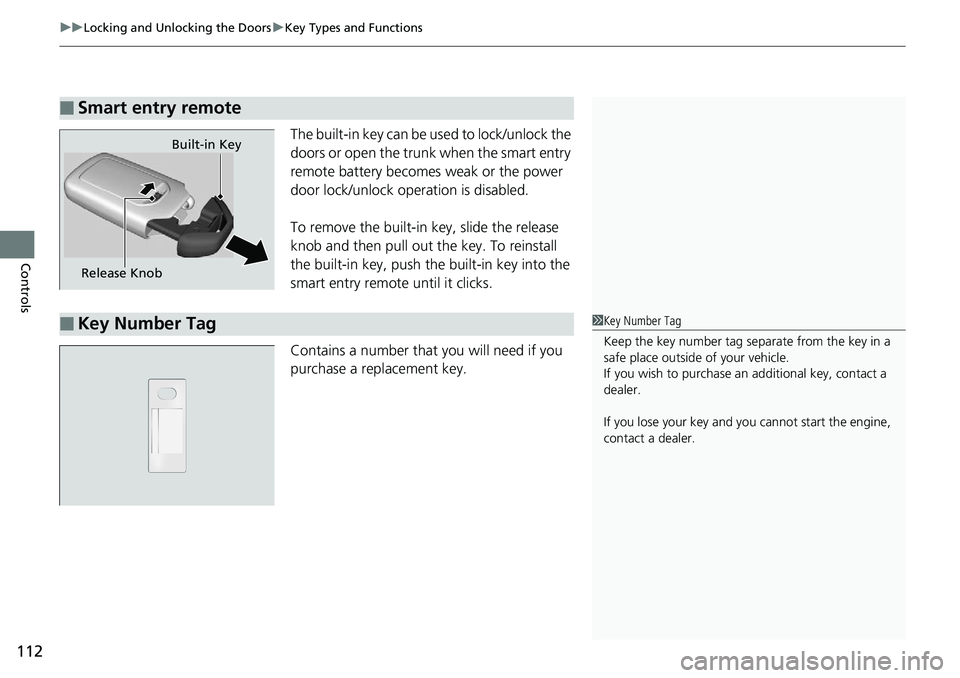
The built-in key can be us ed to lock/unlock the
doors or open the trunk when the smart entry
remote battery becomes weak or the power
door lock/unlock operation is disabled.
To remove the built-in key, slide the release
knob and then pull out the key. To reinstall
the built-in key, push th e built-in key into the
smart entry remote until it clicks.
Contains a number that you will need if you
purchase a replacement key.
■Smart entry remote
Release Knob Built-in Key
■Key Number Tag1
Key Number Tag
Keep the key number tag separate from the key in a
safe place outside of your vehicle.
If you wish to purchase an additional key, contact a
dealer.
If you lose your key and you cannot start the engine,
contact a dealer.
Page 115 of 623
113
uuLocking and Unlocking the Doors uLow Smart Entry Remote Signal Strength
Controls
Low Smart Entry Remote Signal Strength
The vehicle transmits radio waves to loca te the smart entry remote when locking/
unlocking the doors, opening the trunk, or to start the engine.
In the following cases, locking/unlocking the doors, opening the trunk, or starting
the engine may be inhibited or operation may be unstable:
• Strong radio waves are being transmitted by nearby equipment.
• You are carrying the smart entry remo te together with telecommunications
equipment, laptop computers, ce ll phones, or wireless devices.
• A metallic object is touching or covering the smart entry remote.1Low Smart Entry Remote Signal Strength
Communication between the smart entry remote and
the vehicle consumes the smart entry remote’s
battery.
The smart entry remote batte ry lasts about two years.
This changes by how often you use the remote.
The battery is consumed whenever the smart entry
remote is receivi ng strong radio wave s. Avoid placing
it near electrical appliances such as televisions and
personal computers.
Page 121 of 623
Continued119
uuLocking and Unlocking the Doors uLocking/Unlocking the Doors from the Outside
Controls
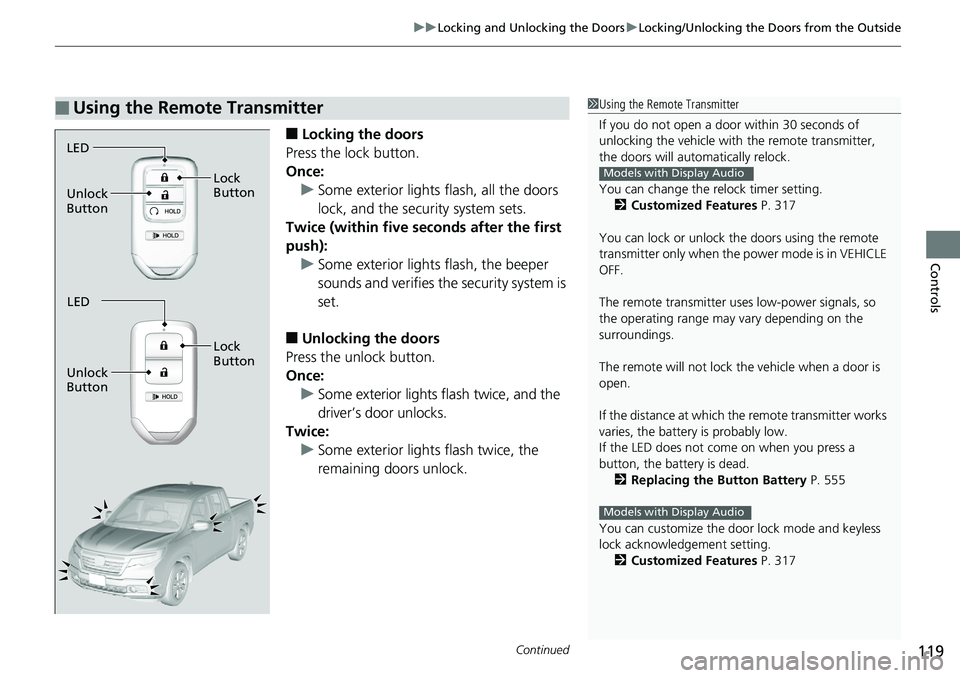
■Locking the doors
Press the lock button.
Once: u Some exterior lights flash, all the doors
lock, and the security system sets.
Twice (within five se conds after the first
push): u Some exterior lights flash, the beeper
sounds and verifies the security system is
set.
■Unlocking the doors
Press the unlock button.
Once: u Some exterior lights flash twice, and the
driver’s door unlocks.
Twice:
u Some exterior light s flash twice, the
remaining doors unlock.
■Using the Remote Transmitter1 Using the Remote Transmitter
If you do not open a door within 30 seconds of
unlocking the vehicle with the remote transmitter,
the doors will auto matically relock.
You can change the relock timer setting. 2 Customized Features P. 317
You can lock or unlock the doors using the remote
transmitter only when the power mode is in VEHICLE
OFF.
The remote transmitter us es low-power signals, so
the operating range may vary depending on the
surroundings.
The remote will not lock th e vehicle when a door is
open.
If the distance at which the remote transmitter works
varies, the batter y is probably low.
If the LED does not come on when you press a
button, the battery is dead.
2 Replacing the Button Battery P. 555
You can customize the door lock mode and keyless
lock acknowledge ment setting.
2 Customized Features P. 317
Models with Display Audio
Models with Display Audio
LED
Unlock
Button Lock
Button
LED
Unlock
Button Lock
Button