Brake system HONDA RIDGELINE 2020 (in English) User Guide
[x] Cancel search | Manufacturer: HONDA, Model Year: 2020, Model line: RIDGELINE, Model: HONDA RIDGELINE 2020Pages: 591, PDF Size: 32.88 MB
Page 100 of 591
98
uuIndicators uMulti-Information Display Warn ing and Information Messages
Instrument Panel
MessageConditionExplanation
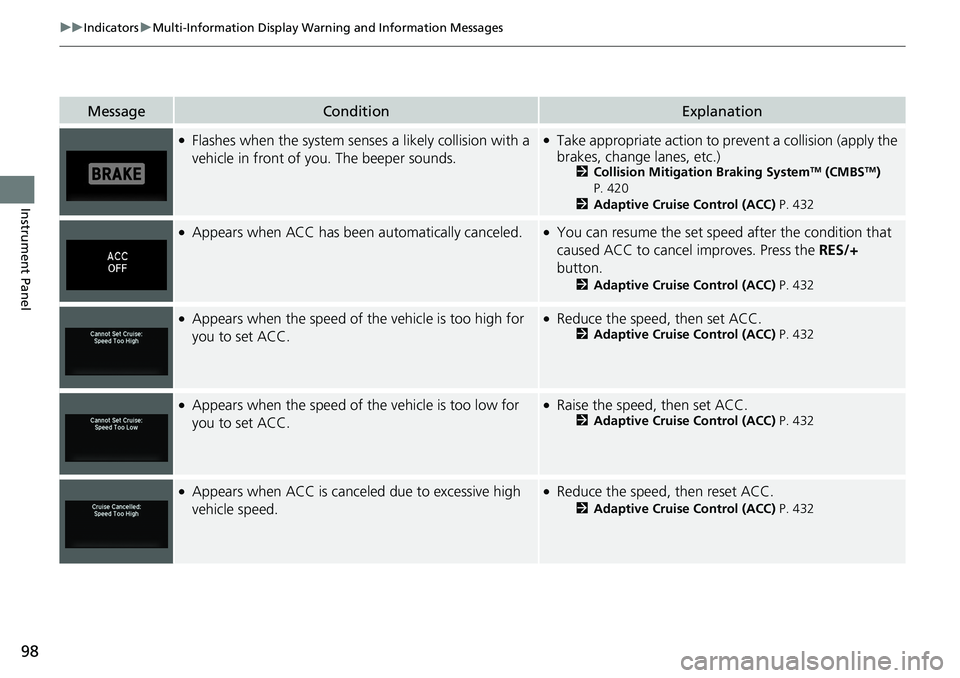
●Flashes when the system senses a likely collision with a
vehicle in front of you. The beeper sounds.●Take appropriate action to prev ent a collision (apply the
brakes, change lanes, etc.)
2 Collision Mitigation Braking SystemTM (CMBSTM)
P. 420
2 Adaptive Cruise Control (ACC) P. 432
●Appears when ACC has been automatically canceled.●You can resume the set speed after the condition that
caused ACC to cancel improves. Press the RES/+
button.
2 Adaptive Cruise Control (ACC) P. 432
●Appears when the speed of th e vehicle is too high for
you to set ACC.●Reduce the speed, then set ACC.2 Adaptive Cruise Control (ACC) P. 432
●Appears when the speed of the vehicle is too low for
you to set ACC.●Raise the speed, then set ACC.2Adaptive Cruise Control (ACC) P. 432
●Appears when ACC is cancel ed due to excessive high
vehicle speed.●Reduce the speed, then reset ACC.
2 Adaptive Cruise Control (ACC) P. 432
Page 103 of 591
101
uuIndicators uMulti-Information Display Warning and Information Messages
Continued
Instrument Panel
MessageConditionExplanation
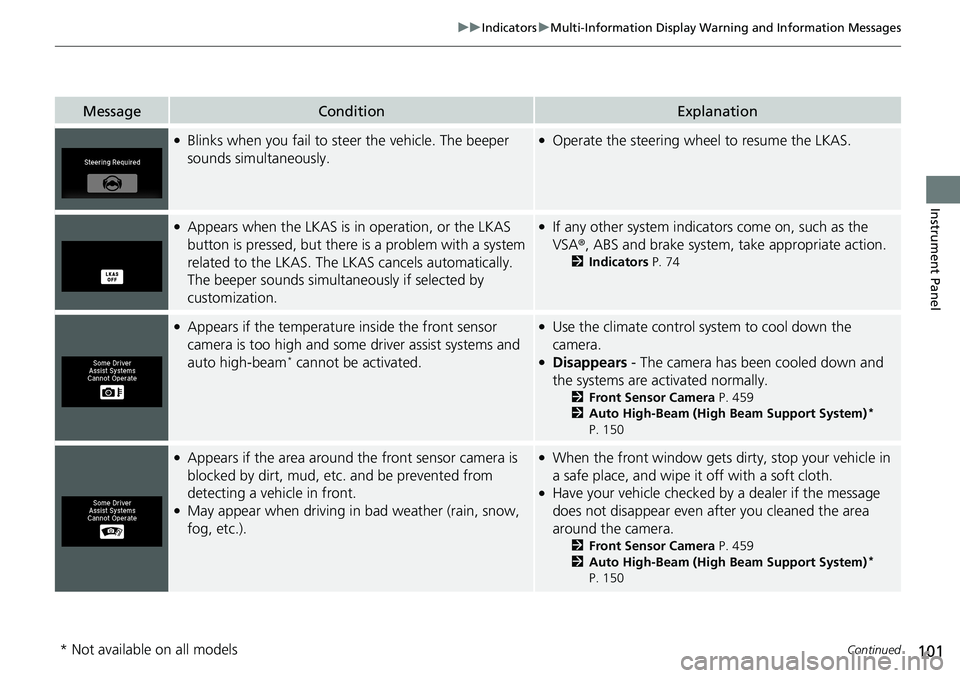
●Blinks when you fail to steer the vehicle. The beeper
sounds simultaneously.●Operate the steering wheel to resume the LKAS.
●Appears when the LKAS is in operation, or the LKAS
button is pressed, but there is a problem with a system
related to the LKAS. The LKAS cancels automatically.
The beeper sounds simultaneously if selected by
customization.●If any other system indicators come on, such as the
VSA ®, ABS and brake system, take appropriate action.
2Indicators P. 74
●Appears if the temperature inside the front sensor
camera is too high and some driver assist systems and
auto high-beam
* cannot be activated.
●Use the climate control sy stem to cool down the
camera.
●Disappears - The camera has been cooled down and
the systems are activated normally.
2 Front Sensor Camera P. 459
2 Auto High-Beam (High Beam Support System)*
P. 150
●Appears if the area around the front sensor camera is
blocked by dirt, mud, etc. and be prevented from
detecting a vehicle in front.
●May appear when driving in bad weather (rain, snow,
fog, etc.).
●When the front window gets dirty, stop your vehicle in
a safe place, and wipe it off with a soft cloth.
●Have your vehicle checked by a dealer if the message
does not disappear even after you cleaned the area
around the camera.
2 Front Sensor Camera P. 459
2 Auto High-Beam (High Beam Support System)*
P. 150
* Not available on all models
Page 105 of 591
103
uuIndicators uMulti-Information Display Warning and Information Messages
Continued
Instrument Panel
MessageConditionExplanation
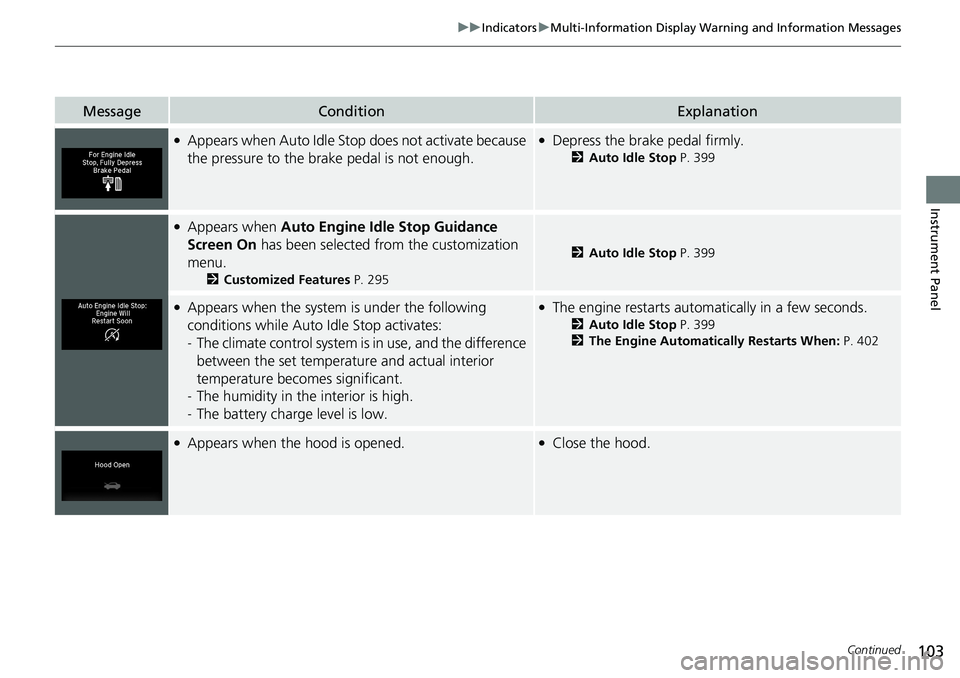
●Appears when Auto Idle Stop does not activate because
the pressure to the brake pedal is not enough.●Depress the brake pedal firmly.
2 Auto Idle Stop P. 399
●Appears when Auto Engine Idle Stop Guidance
Screen On has been selected from the customization
menu.
2 Customized Features P. 295
2Auto Idle Stop P. 399
●Appears when the system is under the following
conditions while Auto Idle Stop activates:
- The climate control system is in use, and the difference
between the set temperature and actual interior
temperature becomes significant.
- The humidity in the interior is high.
- The battery charge level is low.●The engine restarts automatically in a few seconds.
2 Auto Idle Stop P. 399
2 The Engine Automatically Restarts When: P. 402
●Appears when the hood is opened.●Close the hood.
Page 143 of 591
141Continued
Controls
Operating the Switches Around the Steering Wheel
ENGINE START/STOP Button
*1:Canadian models
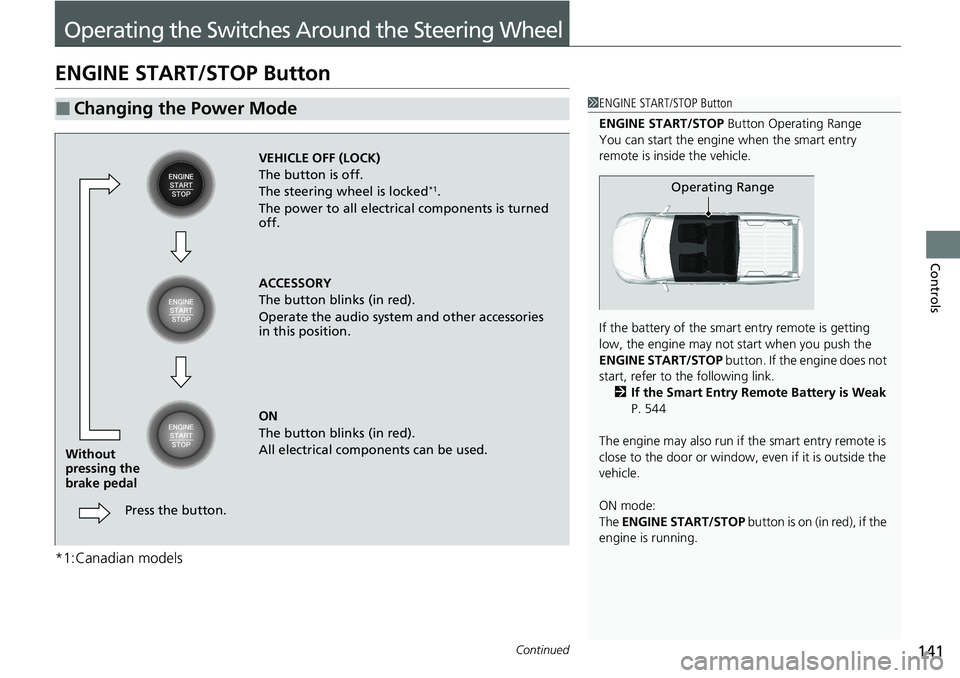
■Changing the Power Mode1ENGINE START/STOP Button
ENGINE START/STOP Button Operating Range
You can start the engine when the smart entry
remote is inside the vehicle.
If the battery of the smar t entry remote is getting
low, the engine may not start when you push the
ENGINE START/STOP button. If the engine does not
start, refer to the following link. 2 If the Smart Entry Remote Battery is Weak
P. 544
The engine may also run if the smart entry remote is
close to the door or window, ev en if it is outside the
vehicle.
ON mode:
The ENGINE START/STOP button is on (in red), if the
engine is running.
Operating Range
VEHICLE OFF (LOCK)
The button is off.
The steering wheel is locked
*1.
The power to all electrical components is turned
off.
ACCESSORY
The button blinks (in red).
Operate the audio system and other accessories
in this position.
ON
The button blinks (in red).
All electrical components can be used.
Press the button.
Without
pressing the
brake pedal
Page 160 of 591
uuOperating the Switches Around the Steering Wheel uDriving Position Memory System*
158
Controls
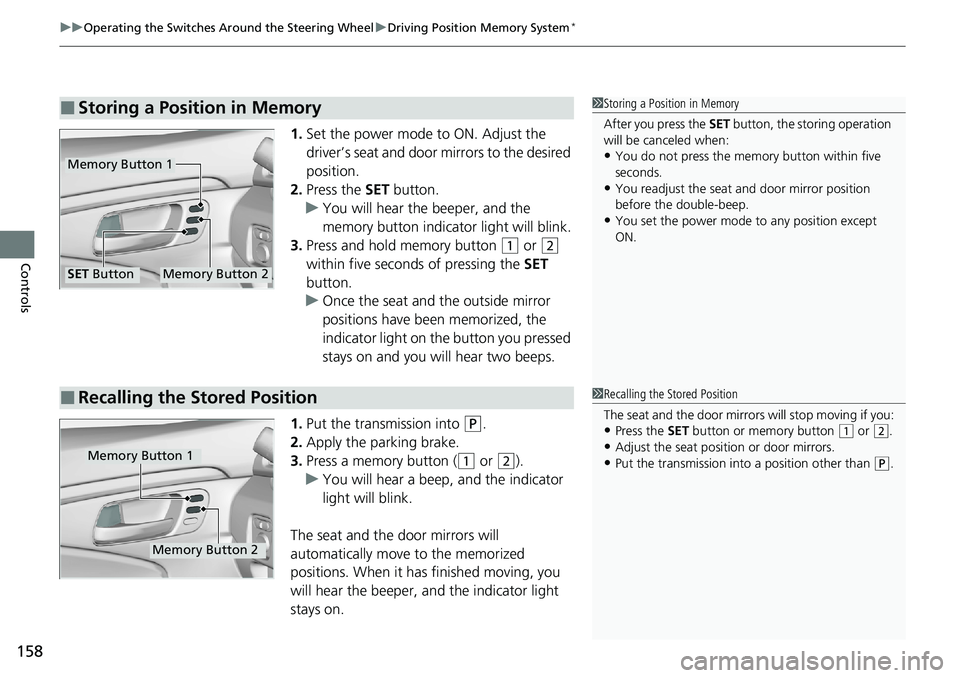
1. Set the power mode to ON. Adjust the
driver’s seat and door mirrors to the desired
position.
2. Press the SET button.
u You will hear the beeper, and the
memory button indicator light will blink.
3. Press and hold memory button
(1 or (2
within five seconds of pressing the SET
button.
u Once the seat and the outside mirror
positions have been memorized, the
indicator light on the button you pressed
stays on and you will hear two beeps.
1. Put the transmission into
(P.
2. Apply the parking brake.
3. Press a memory button (
(1 or (2).
u You will hear a beep, and the indicator
light will blink.
The seat and the door mirrors will
automatically move to the memorized
positions. When it has finished moving, you
will hear the beeper, an d the indicator light
stays on.
■Storing a Position in Memory1 Storing a Position in Memory
After you press the SET button, the storing operation
will be canceled when:
•You do not press the memory button within five
seconds.
•You readjust the seat and door mirror position
before the double-beep.
•You set the power mode to any position except
ON.
Memory Button 1
Memory Button 2SET Button
■Recalling the Stored Position1Recalling the Stored Position
The seat and the door mirrors will stop moving if you:
•Press the SET button or memory button (1 or (2.
•Adjust the seat position or door mirrors.
•Put the transmission into a position other than (P.Memory Button 1
Memory Button 2
Page 359 of 591
357
Driving
This chapter discusses driving and refueling.
Before Driving................................... 358
Towing a Trailer ................................ 366
Off-Highway Driving Guidelines ..... 377
When Driving Starting the Engine .......................... 379
Precautions While Driving................. 385
Automatic Transmission ................... 387
Shifting ............................................ 388
ECON Mode .................................... 396
Intelligent Traction Management...... 397
Auto Idle Stop .................................. 399
Vehicle Stability AssistTM (VSA ®), aka Electronic
Stability Control (ESC), System ..............404
Agile Handling Assist ....................... 406 Intelligent Variable To
rque Management (i-
VTM4
TM) AWD System*.................. 407
Tire Pressure Monitoring System (TPMS) with Tire Fill Assist .......................... 408
Tire Pressure Monitoring System (TPMS) -
Required Federal Explanation ......... 410
Blind spot information System
*........... 412
LaneWatchTM*.................................. 415
Honda Sensing ®................................ 417
Collision Mitigati on Braking System
TM
(CMBSTM) ....................................... 420
Adaptive Cruise Control (ACC)......... 432
Lane Keeping Assist System (LKAS).... 445
Road Departure Mitigation (RDM) System ... 454
Front Sensor Camera ....................... 459
Radar Sensor ................................... 461
Braking Brake System ................................... 462
Anti-lock Brake System (ABS) ........... 464
Brake Assist System ......................... 465
Parking Your Vehicle When Stopped ................................ 466
Parking Sensor System
*................... 467
Cross Traffic Monitor*..................... 471
Multi-View Rear Camera .................. 475
Refueling Fuel Information .............................. 477
How to Refuel ................................. 478
Fuel Economy and CO
2 Emissions .... 480
* Not available on all models
Page 372 of 591
uuTowing a Trailer uTowing Preparation
370
Driving
■Weight distribution hitches
Your vehicle is designed to tow without the need for a load distributing hitch. If you
wish to use one, please consult your trailer maker for proper installation and set-up.
Improper set-up could degrade the handling , stability, and braking performance of
your vehicle.
■Safety chains
Always use safety chains when you tow a trailer. Leave enough slack to allow the
trailer to turn corners easily, but do not allow the chains to drag on the ground.
■Trailer brakes
Recommended for any trailer with a total weight of 1,000 lbs (450 kg) or more:
There are two common types of trailer brake s: surge and electric. Surge brakes are
common for boat trailers, since the brakes will get wet.
If you choose electric brakes, be sure th ey are electronically actuated. Do not
attempt to attach trailer brakes to your ve hicle’s hydraulic system, as it will lower
braking effectiveness and create a potential hazard.
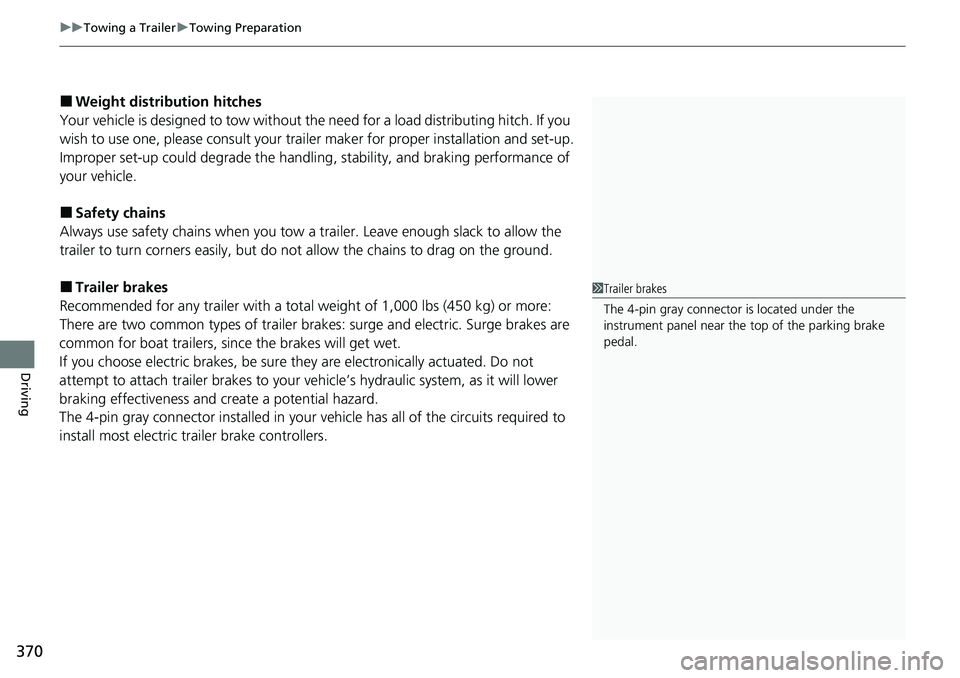
The 4-pin gray connector installed in your ve hicle has all of the circuits required to
install most electric trailer brake controllers.1 Trailer brakes
The 4-pin gray connector is located under the
instrument panel near the top of the parking brake
pedal.
Page 376 of 591
374
uuTowing a Trailer uTrailer Stability Assist
Driving
Trailer Stability Assist
Helps to stabilize the vehicle and tra iler when the trailer severely sways.
■How trailer stability assist works
When the vehicle and trailer become unstab le while driving, trailer stability assist
determines the cause. If the trailer oscill ation is detected as the cause, and the
swaying increases, the system applies the brakes or cont rols engine output to reduce
vehicle speed.
Both the vehicle and trailer brake lights come on automatically if you brake to
reduce vehicle speed.
1 Trailer Stability Assist
Trailer stability assist is not a function that prevents
the vehicle and trailer from swaying. Avoid high
speeds, abrupt steering, improper trailer load, and
sudden braking to keep the trailer from swaying.
When swayed too severely, the system becomes
ineffective, and you may lose control of your vehicle,
causing the trailer to roll over or get damaged. 2 Driving Safely with a Trailer P. 375
Trailer towing sway is caused by:
•Crosswinds
•Improper towbar down load
•Excessive Speed
The VSA ® system indicator blinks during the trailer
stability assist operation. 2 VSA ® Operation P. 404
Page 381 of 591
379Continued
Driving
When Driving
Starting the Engine
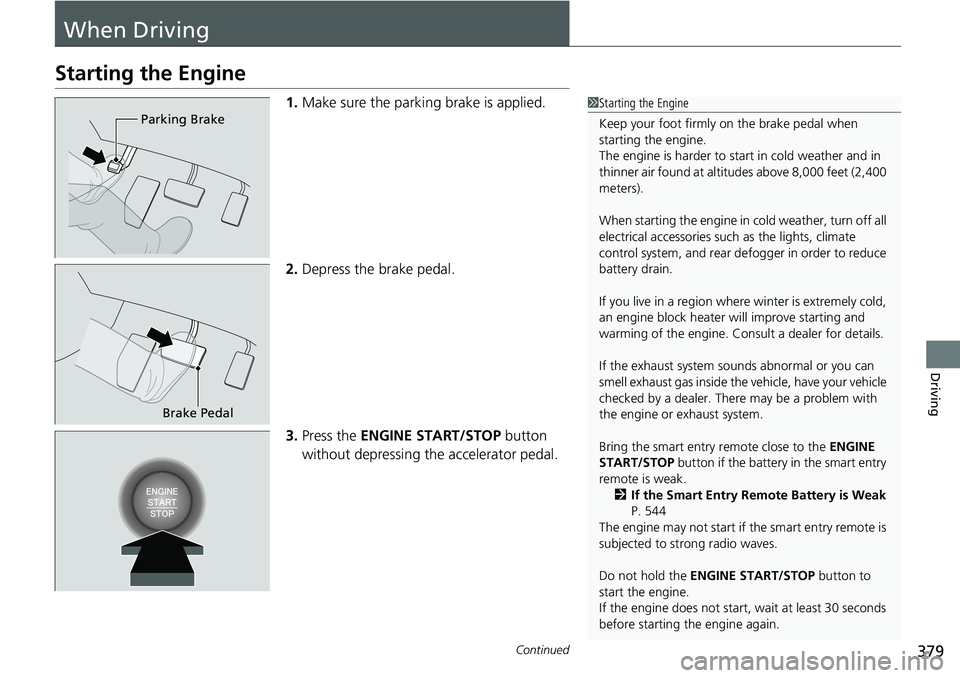
1.Make sure the parkin g brake is applied.
2. Depress the brake pedal.
3. Press the ENGINE START/STOP button
without depressing the accelerator pedal.1 Starting the Engine
Keep your foot firmly on the brake pedal when
starting the engine.
The engine is harder to st art in cold weather and in
thinner air found at altit udes above 8,000 feet (2,400
meters).
When starting the engine in cold weather, turn off all
electrical accessories such as the lights, climate
control system, and rear de fogger in order to reduce
battery drain.
If you live in a region where winter is extremely cold,
an engine block heater will improve starting and
warming of the engine. Cons ult a dealer for details.
If the exhaust system sounds abnormal or you can
smell exhaust gas inside the vehicle, have your vehicle
checked by a dealer. There may be a problem with
the engine or exhaust system.
Bring the smart entry remote close to the ENGINE
START/STOP button if the battery in the smart entry
remote is weak.
2 If the Smart Entry Remote Battery is Weak
P. 544
The engine may not start if the smart entry remote is
subjected to strong radio waves.
Do not hold the ENGINE START/STOP button to
start the engine.
If the engine does not start, wait at least 30 seconds
before starting the engine again.
Parking Brake
Brake Pedal
Page 384 of 591
uuWhen Driving uStarting the Engine
382
Driving
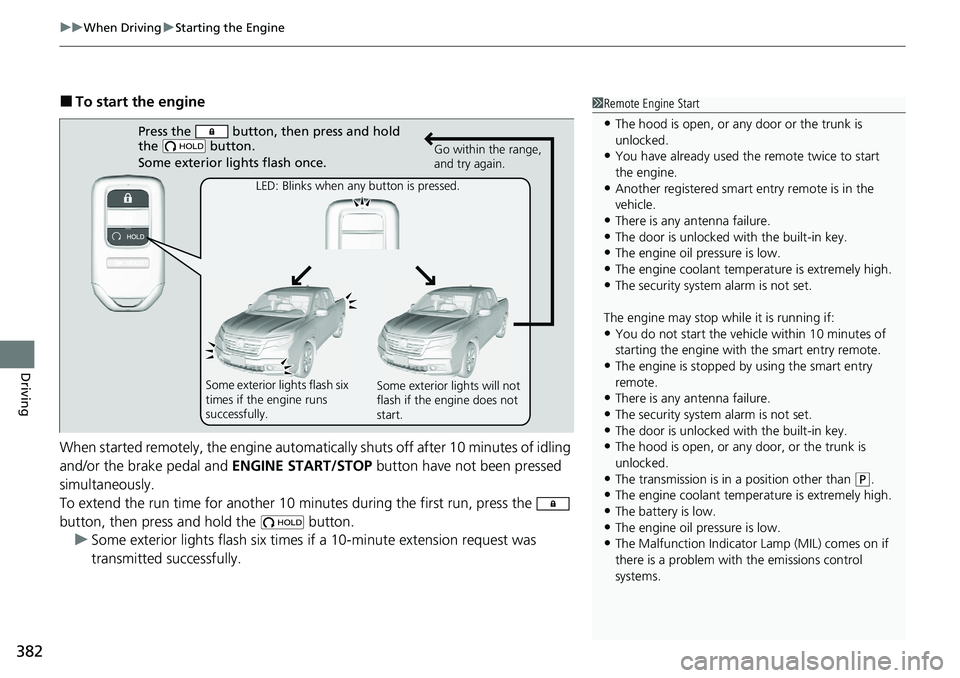
■To start the engine
When started remotely, the engine automati cally shuts off after 10 minutes of idling
and/or the brake pedal and ENGINE START/STOP button have not been pressed
simultaneously.
To extend the run time for another 10 mi nutes during the first run, press the
button, then press and hold the button. u Some exterior lights flash six times if a 10-minute extension request was
transmitted successfully.1Remote Engine Start
•The hood is open, or any door or the trunk is
unlocked.
•You have already used the remote twice to start
the engine.
•Another registered smart entry remote is in the
vehicle.
•There is any antenna failure.•The door is unlocked with the built-in key.
•The engine oil pressure is low.
•The engine coolant temper ature is extremely high.•The security system alarm is not set.
The engine may stop whil e it is running if:
•You do not start the vehicl e within 10 minutes of
starting the engine with the smart entry remote.
•The engine is stopped by using the smart entry
remote.
•There is any antenna failure.
•The security system alarm is not set.
•The door is unlocked with the built-in key.•The hood is open, or any door, or the trunk is
unlocked.
•The transmission is in a position other than ( P.•The engine coolant temper ature is extremely high.
•The battery is low.
•The engine oil pressure is low.•The Malfunction Indicator Lamp (MIL) comes on if
there is a problem with the emissions control
systems.
Press the button, then press and hold
the button.
Some exterior lights flash once.
LED: Blinks when any button is pressed. Go within the range,
and try again.
Some exterior lights flash six
times if the engine runs
successfully. Some exterior lights will not
flash if the engine does not
start.