warning light HONDA RIDGELINE 2021 Owner's Manual (in English)
[x] Cancel search | Manufacturer: HONDA, Model Year: 2021, Model line: RIDGELINE, Model: HONDA RIDGELINE 2021Pages: 597, PDF Size: 12.5 MB
Page 7 of 597
6
Quick Reference Guide
Quick Reference Guide
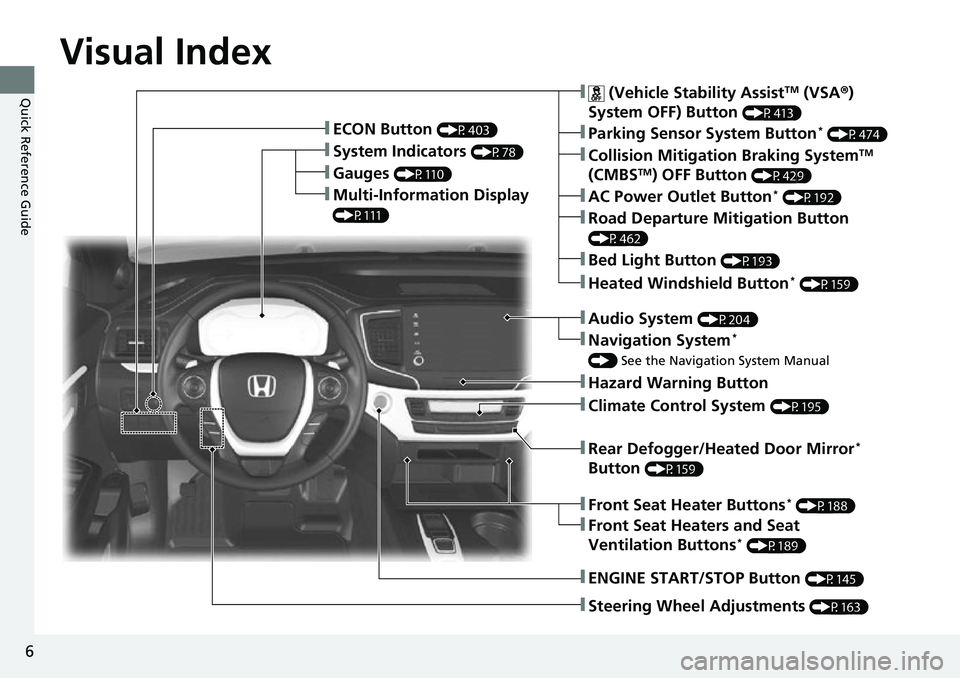
Visual Index
❚Gauges (P110)
❚Multi-Information Display
(P111)
❚System Indicators (P78)
❚ECON Button (P403)
❚Collision Mitigation Braking SystemTM
(CMBSTM) OFF Button (P429)
❚Heated Windshield Button* (P159)
❚Parking Sensor System Button* (P474)
❚Steering Wheel Adjustments (P163)
❚ENGINE START/STOP Button (P145)
❚AC Power Outlet Button* (P192)
❚Road Departure Mitigation Button
(P462)
❚ (Vehicle Stability AssistTM (VSA ®)
System OFF) Button
(P413)
❚Bed Light Button (P193)
❚Audio System (P204)
❚Navigation System*
() See the Navigation System Manual
❚Hazard Warning Button
❚Rear Defogger/Heated Door Mirror*
Button
(P159)
❚Climate Control System (P195)
❚Front Seat Heaters and Seat
Ventilation Buttons* (P189)
❚Front Seat Heater Buttons* (P188)
Page 15 of 597
14
Quick Reference Guide
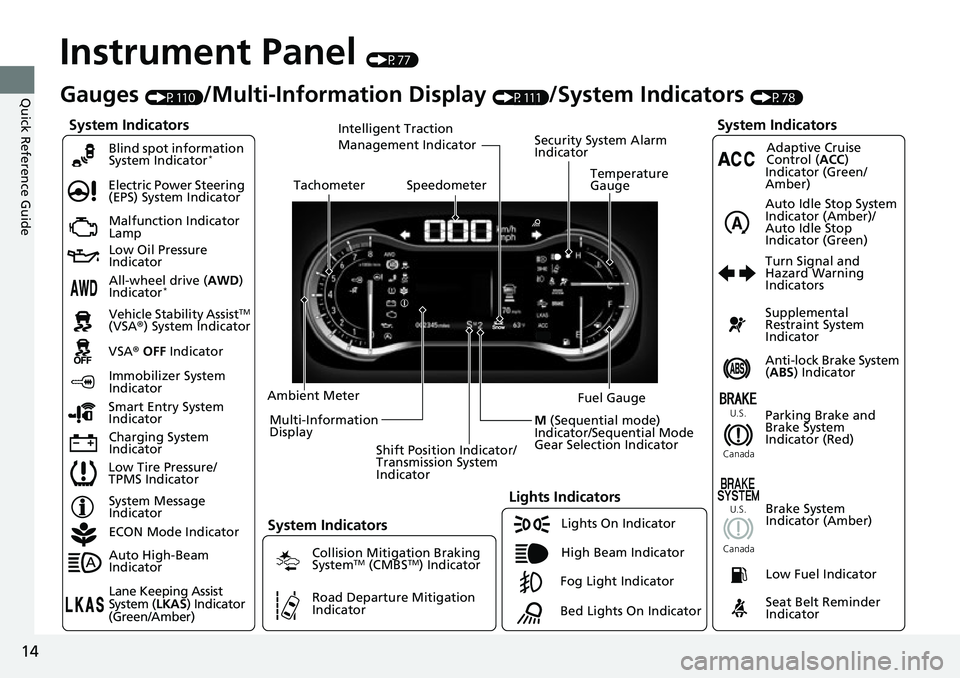
Instrument Panel (P77)
System Indicators
Malfunction Indicator
Lamp
Low Oil Pressure
Indicator
Charging System
IndicatorAnti-lock Brake System
(
ABS ) Indicator
Vehicle Stability Assist
TM
(VSA® ) System Indicator
VSA ® OFF Indicator
Electric Power Steering
(EPS) System Indicator
Lights Indicators
Lights On Indicator
High Beam Indicator
Immobilizer System
Indicator
Seat Belt Reminder
Indicator
System Indicators
System Message
IndicatorParking Brake and
Brake System
Indicator (Red)Supplemental
Restraint System
Indicator
Low Fuel Indicator
Gauges (P110)/Multi-Information Display (P111)/System Indicators (P78)
Low Tire Pressure/
TPMS Indicator Turn Signal and
Hazard Warning
Indicators
Smart Entry System
Indicator Ambient Meter
Shift Position Indicator/
Transmission System
Indicator Fuel Gauge
TachometerTemperature
GaugeSpeedometer
Multi-Information
Display
Brake System
Indicator (Amber)
All-wheel drive (AWD)
Indicator*
Blind spot information
System Indicator*
System Indicators
Collision Mitigation Braking
SystemTM (CMBSTM) Indicator
Road Departure Mitigation
Indicator
Security System Alarm
Indicator
U.S.
Canada U.S.
Canada
Fog Light Indicator
ECON Mode Indicator
Auto High-Beam
Indicator
Lane Keeping Assist
System (
LKAS) Indicator
(Green/Amber)
Adaptive Cruise
Control ( ACC)
Indicator (Green/
Amber)
Intelligent Traction
Management Indicator
Bed Lights On Indicator
Auto Idle Stop System
Indicator (Amber)/
Auto Idle Stop
Indicator (Green)
M (Sequential mode)
Indicator/Sequential Mode
Gear Selection Indicator
Page 86 of 597
85
uuIndicators u
Continued
Instrument Panel
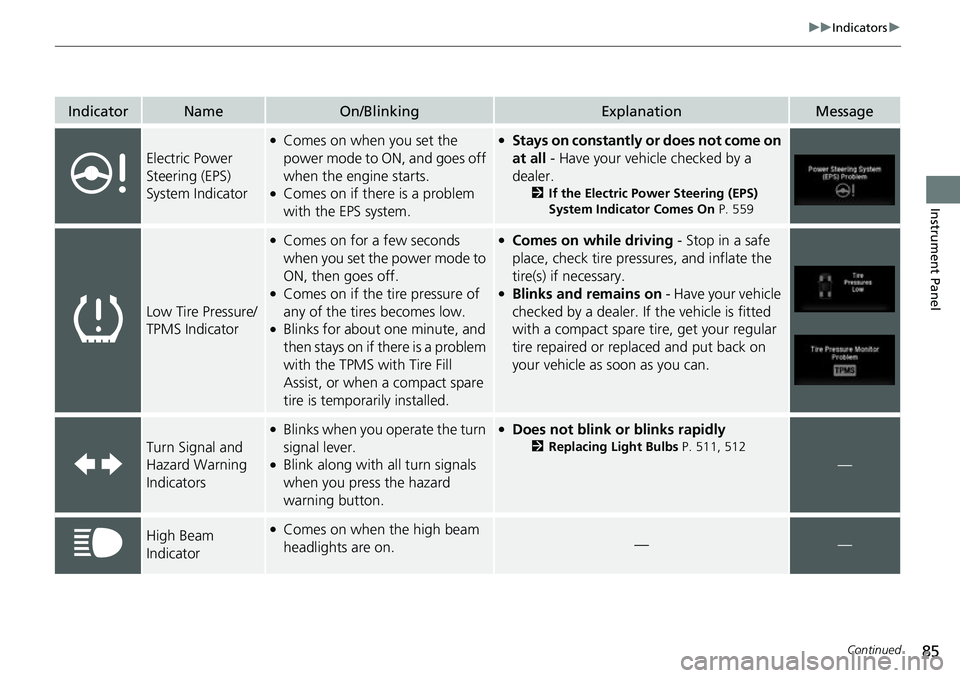
IndicatorNameOn/BlinkingExplanationMessage
Electric Power
Steering (EPS)
System Indicator
●Comes on when you set the
power mode to ON, and goes off
when the engine starts.
●Comes on if there is a problem
with the EPS system.
●Stays on constantly or does not come on
at all - Have your vehicle checked by a
dealer.
2 If the Electric Power Steering (EPS)
System Indicator Comes On P. 559
Low Tire Pressure/
TPMS Indicator
●Comes on for a few seconds
when you set the power mode to
ON, then goes off.
●Comes on if the tire pressure of
any of the tires becomes low.
●Blinks for about one minute, and
then stays on if there is a problem
with the TPMS with Tire Fill
Assist, or when a compact spare
tire is temporarily installed.
●Comes on while driving - Stop in a safe
place, check tire pressures, and inflate the
tire(s) if necessary.
●Blinks and remains on - Have your vehicle
checked by a dealer. If the vehicle is fitted
with a compact spare ti re, get your regular
tire repaired or replaced and put back on
your vehicle as soon as you can.
Turn Signal and
Hazard Warning
Indicators
●Blinks when you operate the turn
signal lever.
●Blink along with all turn signals
when you press the hazard
warning button.
●Does not blink or blinks rapidly
2 Replacing Light Bulbs P. 511, 512
—
High Beam
Indicator●Comes on when the high beam
headlights are on.——
Page 102 of 597
101
uuIndicators uMulti-Information Display Warning and Information Messages
Continued
Instrument Panel
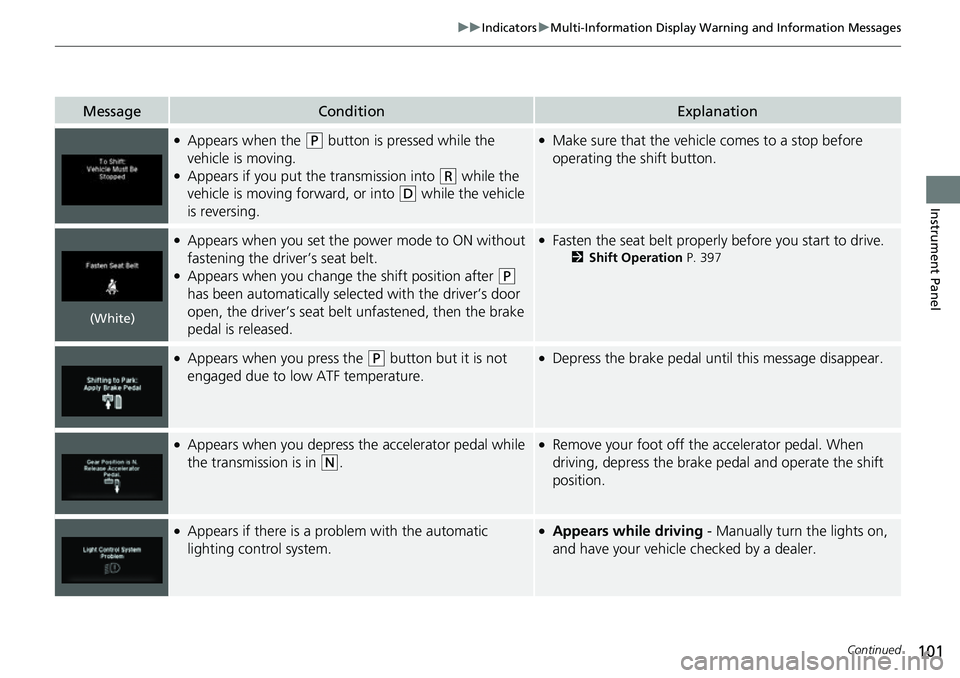
MessageConditionExplanation
●Appears when the (P button is pressed while the
vehicle is moving.
●Appears if you put the transmission into (R while the
vehicle is moving forward, or into
(D while the vehicle
is reversing.
●Make sure that the vehicle comes to a stop before
operating the shift button.
●Appears when you set the power mode to ON without
fastening the driver’s seat belt.
●Appears when you change the shift position after (P
has been automatically selected with the driver’s door
open, the driver’s seat belt unfastened, then the brake
pedal is released.
●Fasten the seat belt properly before you start to drive.
2 Shift Operation P. 397
●Appears when you press the (P button but it is not
engaged due to low ATF temperature.●Depress the brake pedal until this message disappear.
●Appears when you depress the accelerator pedal while
the transmission is in
(N.
●Remove your foot off the accelerator pedal. When
driving, depress the brake pedal and operate the shift
position.
●Appears if there is a problem with the automatic
lighting control system.●Appears while driving - Manually turn the lights on,
and have your vehicle checked by a dealer.
(White)
Page 140 of 597
139Continued
Controls
Windows
Opening/Closing the Power Windows
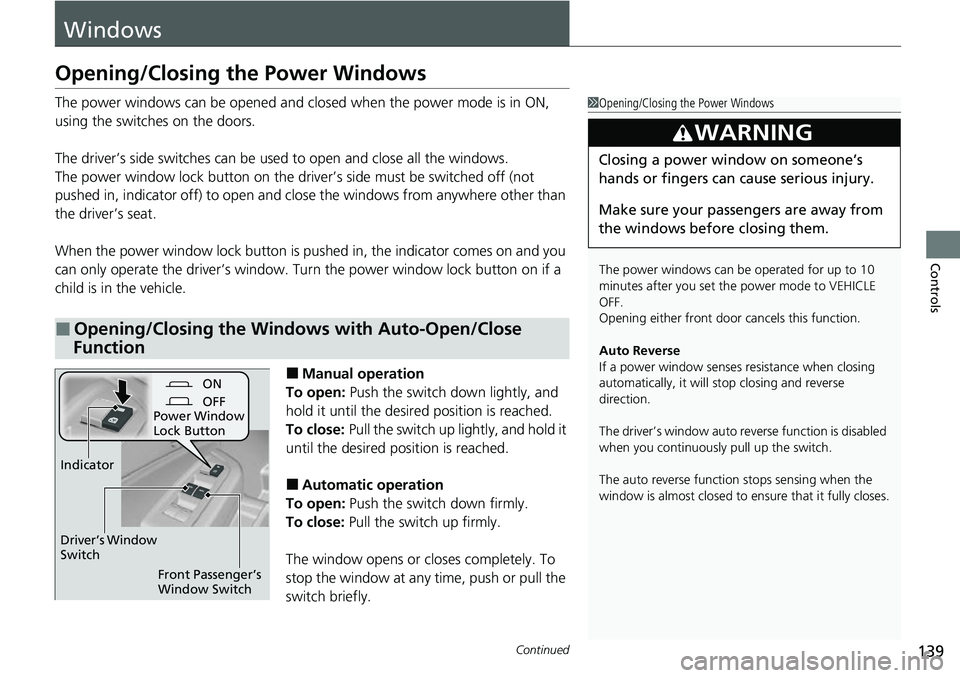
The power windows can be opened and closed when the power mode is in ON,
using the switches on the doors.
The driver’s side switches can be used to open and close all the windows.
The power window lock button on the driver’s side must be switched off (not
pushed in, indicator off) to open and cl ose the windows from anywhere other than
the driver’s seat.
When the power window lock button is pushed in, the indicator comes on and you
can only operate the driver’s window. Turn the power window lock button on if a
child is in the vehicle.
■Manual operation
To open: Push the switch down lightly, and
hold it until the desired position is reached.
To close: Pull the switch up lightly, and hold it
until the desired position is reached.
■Automatic operation
To open: Push the switch down firmly.
To close: Pull the switch up firmly.
The window opens or closes completely. To
stop the window at any time, push or pull the
switch briefly.
■Opening/Closing the Windows with Auto-Open/Close
Function
1 Opening/Closing the Power Windows
The power windows can be operated for up to 10
minutes after you set the power mode to VEHICLE
OFF.
Opening either front door cancels this function.
Auto Reverse
If a power window senses resistance when closing
automatically, it will stop closing and reverse
direction.
The driver’s window auto re verse function is disabled
when you continuously pull up the switch.
The auto reverse function stops sensing when the
window is almost closed to en sure that it fully closes.
3WARNING
Closing a power window on someone’s
hands or fingers can cause serious injury.
Make sure your passengers are away from
the windows before closing them.
ON
OFF
Power Window
Lock Button
Front Passenger’s
Window Switch
Driver’s Window
Switch
Indicator
Page 144 of 597
143Continued
Controls
Moonroof*
Opening/Closing the Moonroof
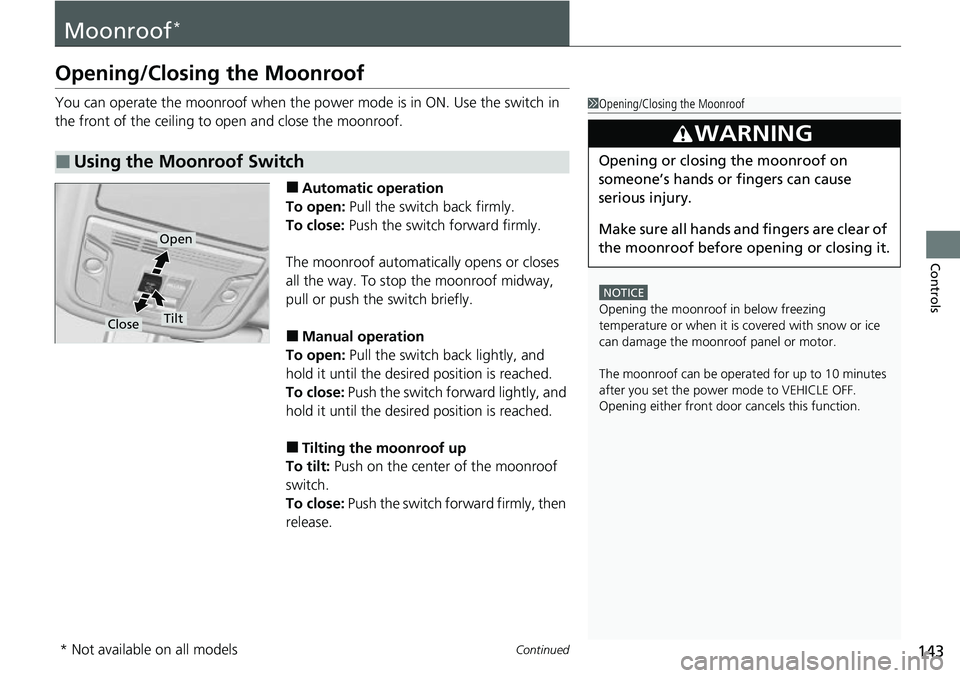
You can operate the moonroof when the power mode is in ON. Use the switch in
the front of the ceiling to open and close the moonroof.
■Automatic operation
To open: Pull the switch back firmly.
To close: Push the switch forward firmly.
The moonroof automatically opens or closes
all the way. To stop the moonroof midway,
pull or push the switch briefly.
■Manual operation
To open: Pull the switch back lightly, and
hold it until the desired position is reached.
To close: Push the switch forward lightly, and
hold it until the desired position is reached.
■Tilting the moonroof up
To tilt: Push on the center of the moonroof
switch.
To close: Push the switch fo rward firmly, then
release.
■Using the Moonroof Switch
1 Opening/Closing the Moonroof
NOTICE
Opening the moonroof in below freezing
temperature or when it is covered with snow or ice
can damage the moonr oof panel or motor.
The moonroof can be opera ted for up to 10 minutes
after you set the power mode to VEHICLE OFF.
Opening either front door cancels this function.
3WARNING
Opening or closing the moonroof on
someone’s hands or fingers can cause
serious injury.
Make sure all hands and fingers are clear of
the moonroof before opening or closing it.
Open
CloseTilt
* Not available on all models
Page 178 of 597
177
uuInterior/Exterior Convenience Items uStorage Items
Continued
Controls
Storage Items
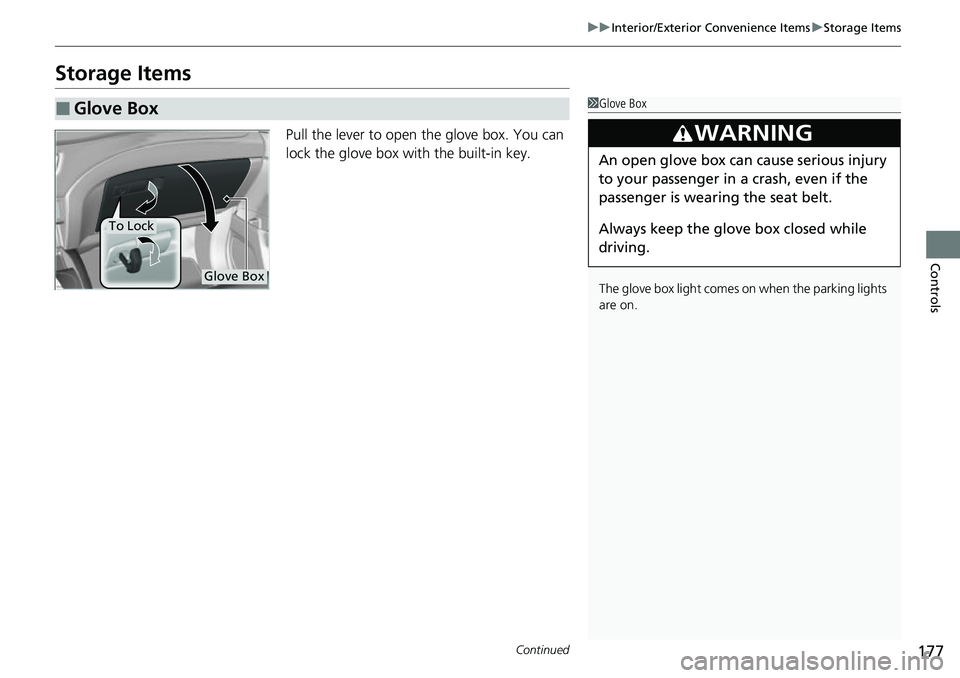
Pull the lever to open the glove box. You can
lock the glove box with the built-in key.
■Glove Box1Glove Box
The glove box light comes on when the parking lights
are on.
3WARNING
An open glove box can cause serious injury
to your passenger in a crash, even if the
passenger is wearing the seat belt.
Always keep the glove box closed while
driving.
Glove Box
To Lock
Page 302 of 597
301
uuCustomized Features u
Continued
Features
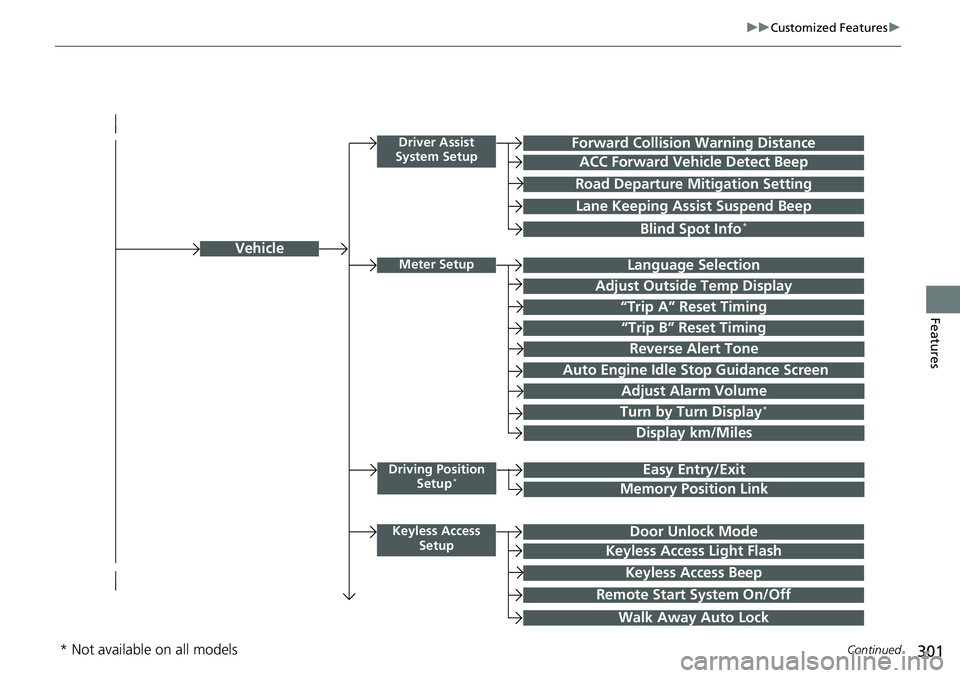
Vehicle
Driver Assist
System SetupForward Collision Warning Distance
ACC Forward Vehicle Detect Beep
Road Departure Mi tigation Setting
Lane Keeping Assist Suspend Beep
Blind Spot Info*
Meter SetupLanguage Selection
Adjust Outside Temp Display
“Trip A” Reset Timing
“Trip B” Reset Timing
Adjust Alarm Volume
Turn by Turn Display*
Display km/Miles
Driving Position
Setup*Easy Entry/Exit
Memory Position Link
Keyless Access SetupDoor Unlock Mode
Keyless Access Light Flash
Keyless Access Beep
Remote Start System On/Off
Walk Away Auto Lock
Reverse Alert Tone
Auto Engine Idle Stop Guidance Screen
* Not available on all models
Page 429 of 597
428
uuHonda Sensing ®u Collision Mitigation Braking SystemTM (CMBSTM)
Driving
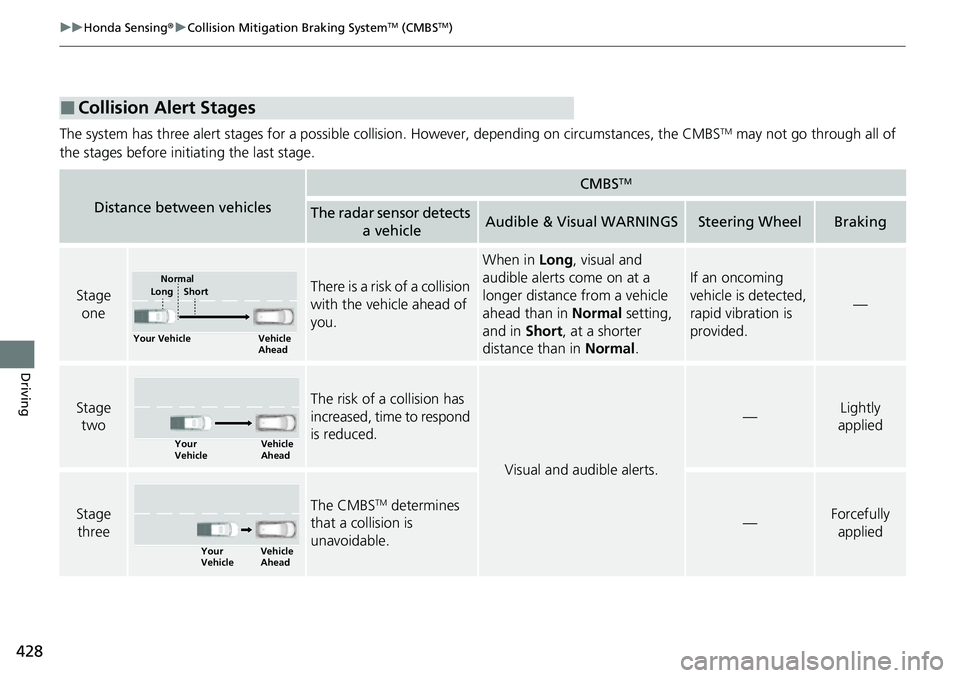
The system has three alert stages for a possible collision. However, depending on circumstances, the CMBSTM may not go through all of
the stages before initiating the last stage.
■Collision Alert Stages
Distance between vehicles
CMBSTM
The radar sensor detects a vehicleAudible & Visual WARNINGSSteering WheelBraking
Stage oneThere is a risk of a collision
with the vehicle ahead of
you.
When in Long, visual and
audible alerts come on at a
longer distance from a vehicle
ahead than in Normal setting,
and in Short, at a shorter
distance than in Normal.
If an oncoming
vehicle is detected,
rapid vibration is
provided.
—
Stage
twoThe risk of a collision has
increased, time to respond
is reduced.
Visual and audible alerts.
—Lightly
applied
Stage
three The CMBSTM determines
that a collision is
unavoidable.
—Forcefully
applied
Your Vehicle Vehicle
Ahead
Normal
Short
Long
Your
Vehicle Vehicle
Ahead
Your
VehicleVehicle
Ahead
Page 444 of 597
Continued443
uuHonda Sensing ®u Adaptive Cruise Control (ACC)
Driving
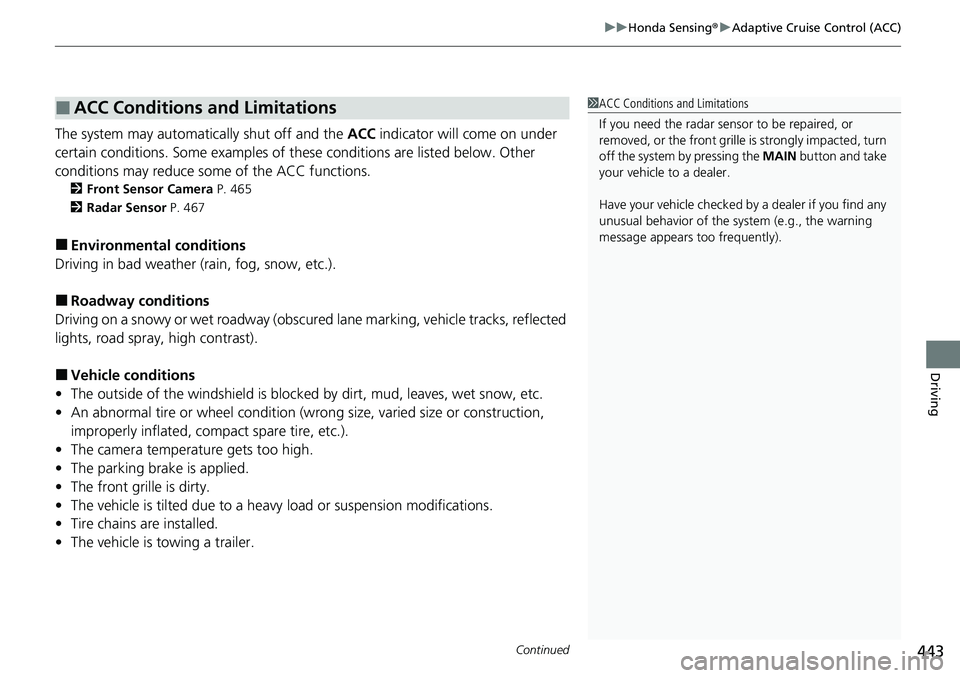
The system may automatically shut off and the ACC indicator will come on under
certain conditions. Some examples of these conditions are listed below. Other
conditions may reduce some of the ACC functions.
2 Front Sensor Camera P. 465
2 Radar Sensor P. 467
■Environmental conditions
Driving in bad weather (r ain, fog, snow, etc.).
■Roadway conditions
Driving on a snowy or wet roadway (obscured lane marking, vehicle tracks, reflected
lights, road spra y, high contrast).
■Vehicle conditions
• The outside of the windshield is blocked by dirt, mud, leaves, wet snow, etc.
• An abnormal tire or wheel condition (wrong size, varied size or construction,
improperly inflated, co mpact spare tire, etc.).
• The camera temperature gets too high.
• The parking brake is applied.
• The front grille is dirty.
• The vehicle is tilted due to a heavy load or suspension modifications.
• Tire chains are installed.
• The vehicle is towing a trailer.
■ACC Conditions and Limitations1ACC Conditions and Limitations
If you need the radar sensor to be repaired, or
removed, or the front grille is strongly impacted, turn
off the system by pressing the MAIN button and take
your vehicle to a dealer.
Have your vehicle checked by a dealer if you find any
unusual behavior of the system (e.g., the warning
message appears too frequently).