adjustment HONDA RIDGELINE 2022 Owners Manual
[x] Cancel search | Manufacturer: HONDA, Model Year: 2022, Model line: RIDGELINE, Model: HONDA RIDGELINE 2022Pages: 598, PDF Size: 12.42 MB
Page 8 of 598
6
Quick Reference Guide
Quick Reference Guide
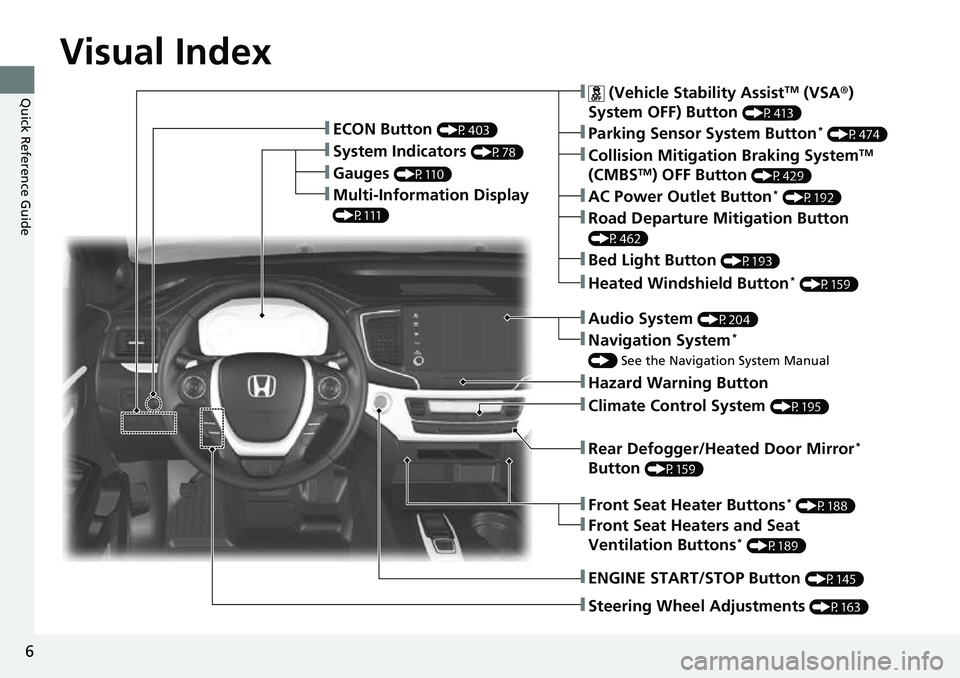
Visual Index
❚Gauges (P110)
❚Multi-Information Display
(P111)
❚System Indicators (P78)
❚ECON Button (P403)
❚Collision Mitigation Braking SystemTM
(CMBSTM) OFF Button (P429)
❚Heated Windshield Button* (P159)
❚Parking Sensor System Button* (P474)
❚Steering Wheel Adjustments (P163)
❚ENGINE START/STOP Button (P145)
❚AC Power Outlet Button* (P192)
❚Road Departure Mitigation Button
(P462)
❚ (Vehicle Stability AssistTM (VSA ®)
System OFF) Button
(P413)
❚Bed Light Button (P193)
❚Audio System (P204)
❚Navigation System*
() See the Navigation System Manual
❚Hazard Warning Button
❚Rear Defogger/Heated Door Mirror*
Button
(P159)
❚Climate Control System (P195)
❚Front Seat Heaters and Seat
Ventilation Buttons* (P189)
❚Front Seat Heater Buttons* (P188)
Page 17 of 598
15
Quick Reference Guide
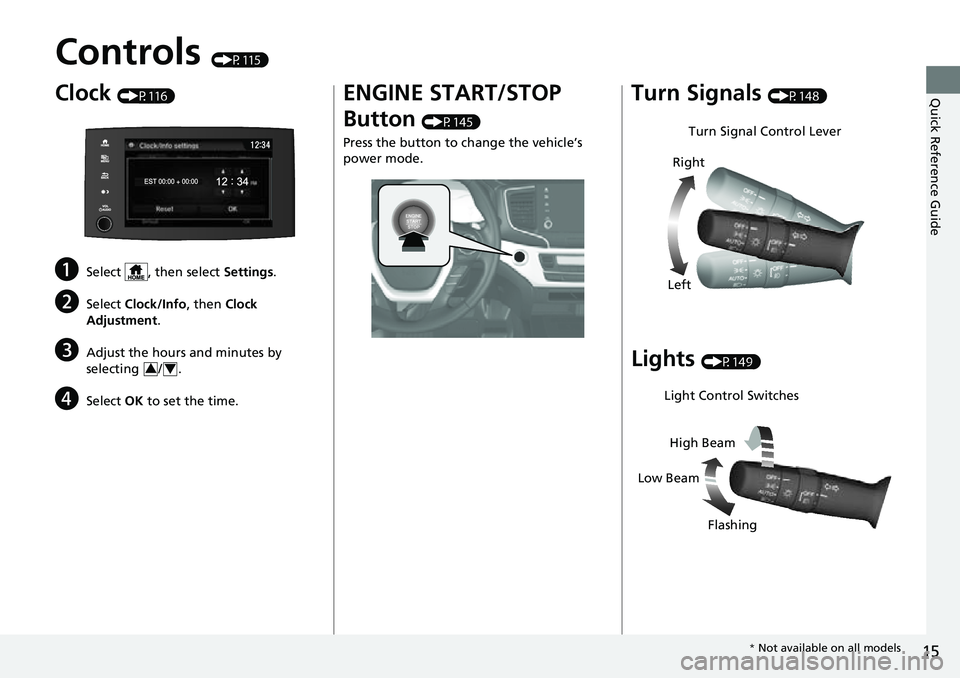
Controls (P115)
Clock (P116)
aSelect , then select Settings.
bSelect Clock/Info , then Clock
Adjustment .
cAdjust the hours and minutes by
selecting / .
dSelect OK to set the time.
34
ENGINE START/STOP
Button
(P145)
Press the button to ch ange the vehicle’s
power mode.
Turn Signals (P148)
Lights (P149)
Turn Signal Control Lever
Right
Left
Light Control Switches
Low Beam High Beam
Flashing
* Not available on all models
Page 18 of 598
16
Quick Reference Guide
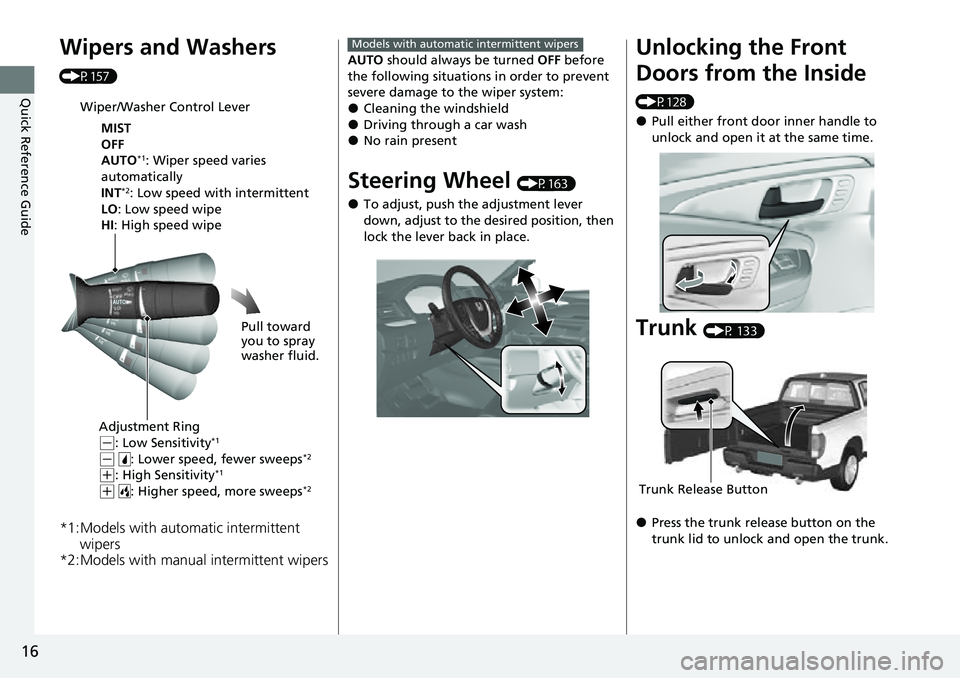
Wipers and Washers
(P157)
*1:Models with automatic intermittent wipers
*2:Models with manual intermittent wipers
Wiper/Washer Control Lever
MIST
OFF
AUTO
*1: Wiper speed varies
automatically
INT
*2: Low speed with intermittent
LO : Low speed wipe
HI: High speed wipe
Pull toward
you to spray
washer fluid.
Adjustment Ring
( -: Low Sensitivity*1
(- : Lower speed, fewer sweeps*2
(+: High Sensitivity*1
(+ : Higher speed, more sweeps*2
AUTO should always be turned OFF before
the following situations in order to prevent
severe damage to the wiper system:
●Cleaning the windshield●Driving through a car wash●No rain present
Steering Wheel (P163)
●To adjust, push the adjustment lever
down, adjust to the desired position, then
lock the lever back in place.
Models with automatic intermittent wipersUnlocking the Front
Doors from the Inside
(P128)
●Pull either front door inner handle to
unlock and open it at the same time.
Trunk (P 133)
●Press the trunk release button on the
trunk lid to unlock and open the trunk.
Trunk Release Button
Page 19 of 598
17
Quick Reference Guide
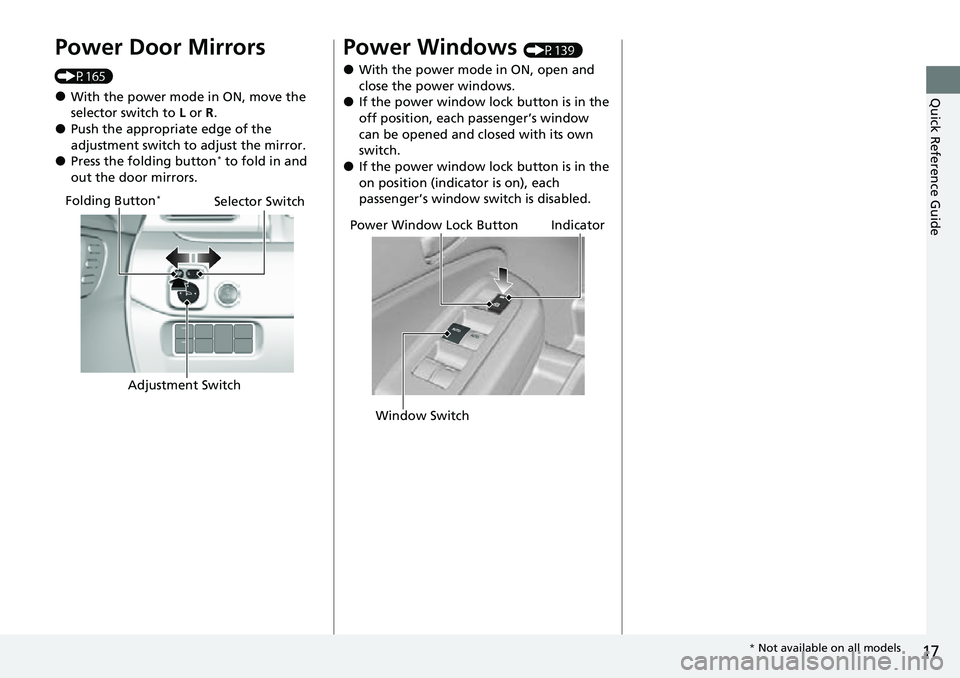
Power Door Mirrors
(P165)
●With the power mode in ON, move the
selector switch to L or R .
●Push the appropriate edge of the
adjustment switch to adjust the mirror.
●Press the folding button* to fold in and
out the door mirrors.
Selector Switch
Adjustment Switch
Folding Button*
Power Windows (P139)
●With the power mode in ON, open and
close the power windows.
●If the power window lock button is in the
off position, each passenger’s window
can be opened and closed with its own
switch.
●If the power window lock button is in the
on position (indicator is on), each
passenger’s window switch is disabled.
Power Window Lock Button
Window SwitchIndicator
* Not available on all models
Page 25 of 598
23
Quick Reference Guide
CMBSTM On and Off
(P429)
●When a possible frontal collision is likely
unavoidable, the CMBSTM can help you to
reduce the vehicle speed and the severity
of the collision.
●The CMBSTM is turned on every time you
start the engine.
●To turn the CMBSTM on or off, press and
hold the button until you hear a beep.
VSA ® On and Off (P413)
●The Vehicle Stability AssistTM (VSA® )
system helps stabilize the vehicle during
cornering, and helps maintain traction
while accelerating on loose or slippery
road surfaces.
●VSA ® comes on automatically every time
you start the engine.
●To partially disable or fully restore VSA®
function, press and ho ld the button until
you hear a beep.
Tire Pressure Monitoring System (TPMS) with Tire
Fill Assist
(P416, 560)
●The TPMS monitors tire pressure.●The TPMS is turned on automatically every time you start the engine.●The TPMS fill assist provides audible and visual guidance during tire pressure adjustment.
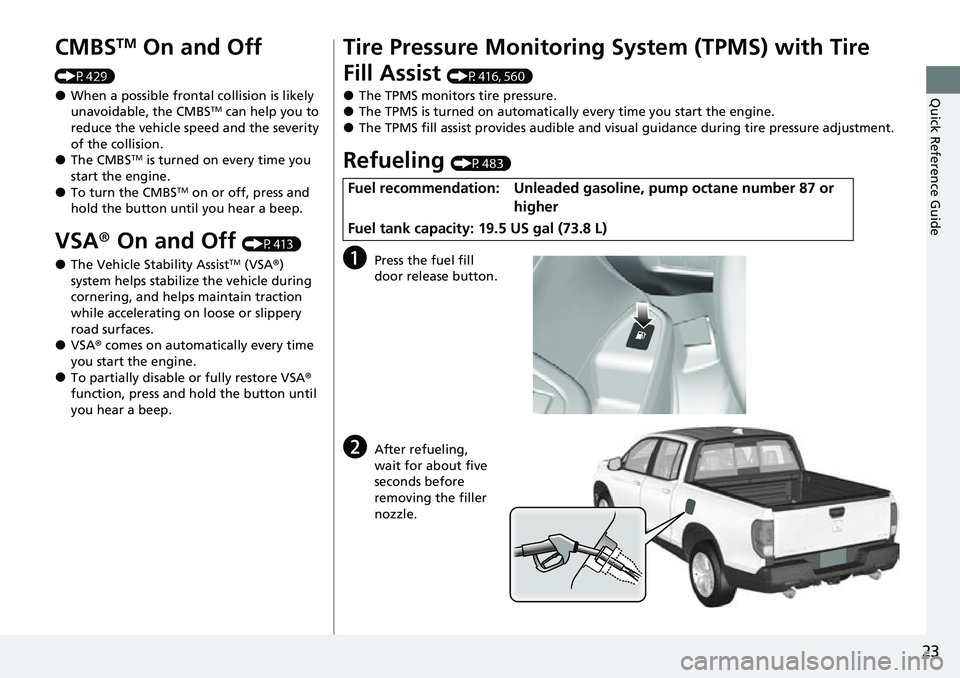
Refueling (P483)
aPress the fuel fill
door release button.
bAfter refueling,
wait for about five
seconds before
removing the filler
nozzle.
Fuel recommendation: Unleaded gaso line, pump octane number 87 or
higher
Fuel tank capacity: 19.5 US gal (73.8 L)
Page 43 of 598
Continued41
uuSeat Belts uFastening a Seat Belt
Safe Driving
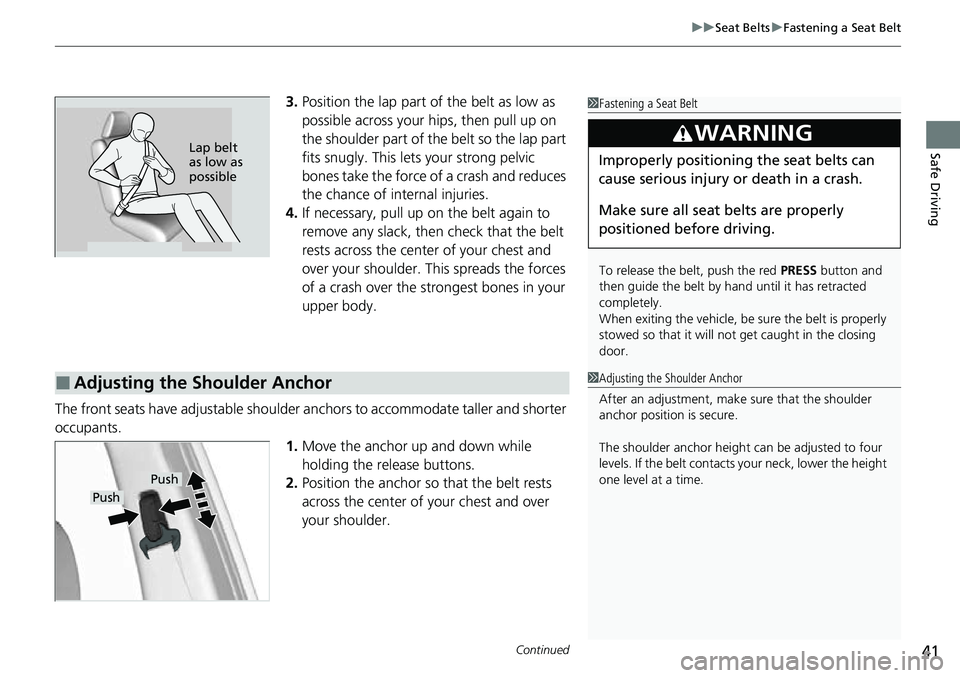
3. Position the lap part of the belt as low as
possible across your hips, then pull up on
the shoulder part of the belt so the lap part
fits snugly. This lets your strong pelvic
bones take the force of a crash and reduces
the chance of internal injuries.
4. If necessary, pull up on the belt again to
remove any slack, then check that the belt
rests across the center of your chest and
over your shoulder. This spreads the forces
of a crash over the strongest bones in your
upper body.
The front seats have adjustab le shoulder anchors to accommodate taller and shorter
occupants.
1.Move the anchor up and down while
holding the release buttons.
2. Position the anchor so that the belt rests
across the center of your chest and over
your shoulder.1 Fastening a Seat Belt
To release the belt, push the red PRESS button and
then guide the belt by hand until it has retracted
completely.
When exiting the vehicle, be sure the belt is properly
stowed so that it will not get caught in the closing
door.
3WARNING
Improperly positioning the seat belts can
cause serious injury or death in a crash.
Make sure all seat belts are properly
positioned be fore driving.Lap belt
as low as
possible
■Adjusting the Shoulder Anchor1Adjusting the Shoulder Anchor
After an adjustment, make sure that the shoulder
anchor position is secure.
The shoulder anchor height can be adjusted to four
levels. If the belt contacts your neck, lower the height
one level at a time.
Push
Push
Page 62 of 598
uuChild Safety uProtecting Child Passengers
60
Safe Driving
• Never hold a child on your lap because it is impossible to protect them in the
event of a collision.
• Never put a seat belt over yourself and a child. During a crash, the belt would
likely press deep into the child an d cause serious or fatal injuries.
• Never let two children use the same seat belt. Both children could be very
seriously injured in a crash.
• Any child who is too small to wear a seat belt correctly must be restrained in an
approved child seat that is properly secu red to the vehicle using either the seat
belt or the lower anchor s of the LATCH system.
• Do not allow children to operate the doors, windows, or seat adjustments.
• Do not leave children in the vehicle unattended, especially in hot weather when
the inside of the vehicle can get hot enough to kill them. They could also activate
vehicle controls causing it to move unexpectedly.1 Protecting Child Passengers
To deactivate a lockable retractor, release the buckle
and allow the seat belt to wind up all the way.
To remind you of the pa ssenger’s front airbag
hazards and child safety, your vehicle has warning
labels on the dashboard (U.S. models) and on the
front visors. Please read and follow the instructions
on these labels. 2 Safety Labels P. 75
3WARNING
Allowing a child to play with a seat belt or
wrap one around their neck can result in
serious injury or death.
Instruct children not to play with any seat
belt and make sure any unused seat belt a
child can reach is buckled, fully retracted,
and locked.
3WARNING
Allowing a child to play on the pickup bed
can result in serious injury or death by
opening or closing the tailgate.
Page 118 of 598
116
Controls
Clock
Adjusting the Clock
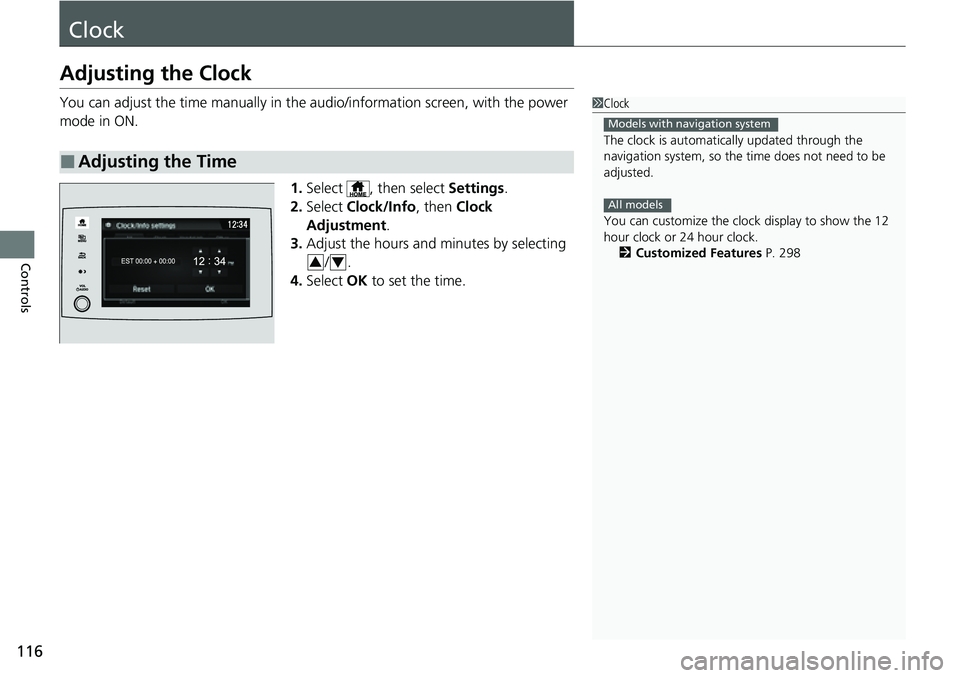
You can adjust the time manually in the audio/information screen, with the power
mode in ON.
1.Select , then select Settings.
2. Select Clock/Info , then Clock
Adjustment .
3. Adjust the hours and minutes by selecting
/.
4. Select OK to set the time.
■Adjusting the Time
1Clock
The clock is automatica lly updated through the
navigation system, so the ti me does not need to be
adjusted.
You can customize the clock display to show the 12
hour clock or 24 hour clock. 2 Customized Features P. 298
Models with navigation system
All models
34
Page 144 of 598
uuWindows uOpening/Closing th e Power Windows
142
Controls
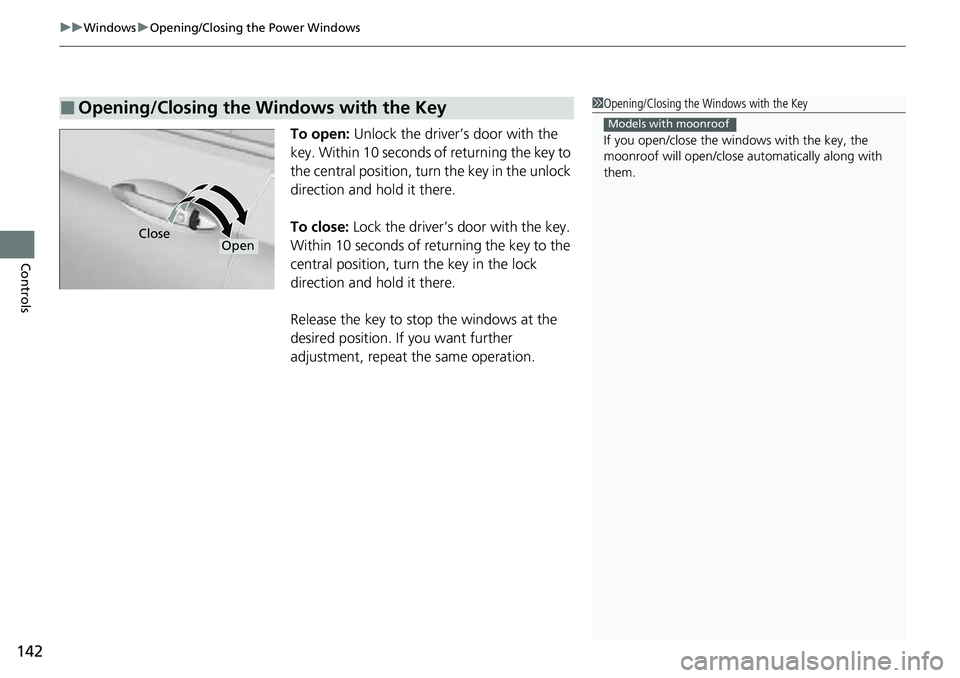
To open: Unlock the driver’s door with the
key. Within 10 seconds of returning the key to
the central position, turn the key in the unlock
direction and hold it there.
To close: Lock the driver’s door with the key.
Within 10 seconds of re turning the key to the
central position, turn the key in the lock
direction and hold it there.
Release the key to stop the windows at the
desired position. If you want further
adjustment, repeat the same operation.
■Opening/Closing the Windows with the Key1 Opening/Closing the Windows with the Key
If you open/close the windows with the key, the
moonroof will open/close au tomatically along with
them.
Models with moonroof
CloseOpen
Page 159 of 598

157
uuOperating the Switches Around the Steering Wheel uWipers and Washers
Continued
Controls
Wipers and Washers
The windshield wipers and washers can be
used when the power mode is in ON.
■MIST
The wipers run at high speed until you release
the lever.
■Wiper switch (OFF, INT*1/AUTO*2, LO, HI)
Move the lever up or down to change the
wiper settings.
■Adjusting wiper operation*
Turn the adjustment ring to adjust the wiper
operation.
■Washer
Sprays while you pull the lever toward you.
When you release the le ver for more than one
second, the spray stops, the wipers sweep two
or three more times to clear the windshield,
then stop.
*1 : Models with manual intermittent wipers
*2 : Models with automatic intermittent wipers
■Windshield Wiper/Washer1 Wipers and Washers
NOTICE
Do not use the wipers when the windshield is dry.
The windshield will get sc ratched, or the rubber
blades will get damaged.
Turn the washers off if no washer fluid comes out.
The pump may get damaged.
The wiper motor may stop motor operation
temporarily to prevent an overload. Wiper operation
will return to normal within a few minutes, once the
circuit has returned to normal.
If the vehicle speeds up while the wipers are
operating intermittently, the length of the wipe
interval shortens.
When the vehicle speeds up, the wiper operation’s
shortest delay setting ( ) and the LO setting become
the same.
NOTICE
In cold weather, the blades may freeze to the
windshield.
Operating the wipers in th is condition may damage
the wipers. Use the defogge r or heated windshield
*
to warm the windshield, then turn the wipers on.
If the wipers st op operating due to an obstacle such
as the build-up of snow, pa rk the vehicle in a safe
place.
Rotate the wiper switch to OFF, and set the power
mode to ACCESSORY or VEHICLE OFF, then remove
the obstacle.
Models with intermittent time adjustment ring
Intermittent Time
Adjustment Ring*
MIST
INT
*1/AUTO*2OFF
LO: Low speed wipe
HI: High speed wipe Pull to
use
washer.
Lower speed, fewer sweeps
Higher speed, more sweeps
* Not available on all models