HONDA RIDGELINE 2023 Owners Manual
Manufacturer: HONDA, Model Year: 2023, Model line: RIDGELINE, Model: HONDA RIDGELINE 2023Pages: 598, PDF Size: 12.34 MB
Page 321 of 598
319
uuCustomized Features u
Continued
Features
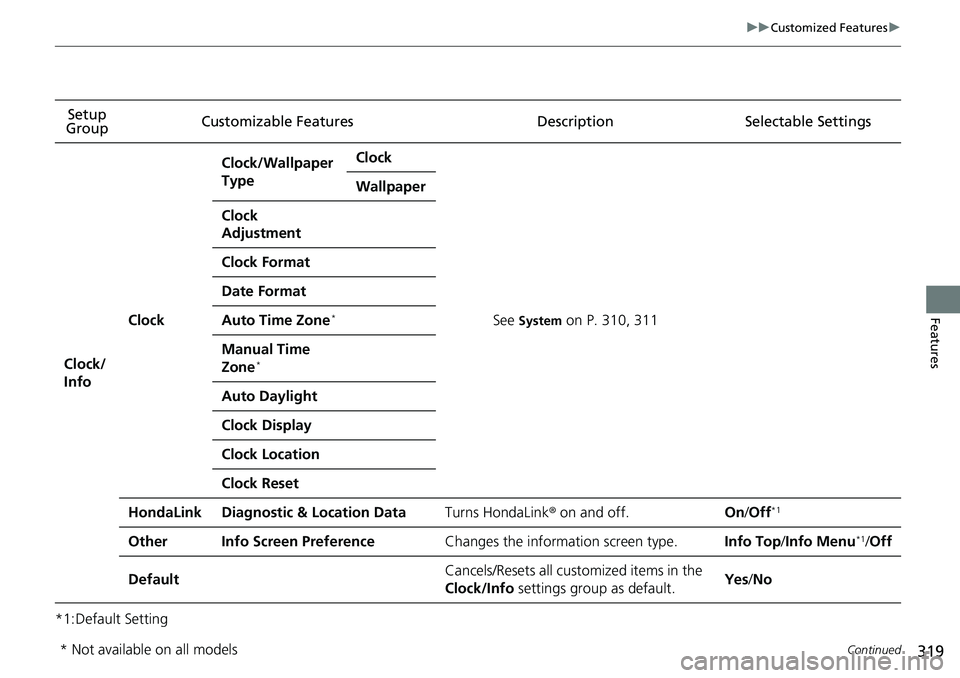
*1:Default SettingSetup
Group Customizable Features Desc
ription Selectable Settings
Clock/
Info
Clock
Clock/Wallpaper
TypeClock
See System on P. 310, 311
Wallpaper
Clock
Adjustment
Clock Format
Date Format
Auto Time Zone*
Manual Time
Zone*
Auto Daylight
Clock Display
Clock Location
Clock Reset
HondaLinkDiagnostic & Location DataTurns HondaLink® on and off.On/Off*1
OtherInfo Screen PreferenceChanges the information screen type.Info Top /Info Menu*1/Off
DefaultCancels/Resets all customized items in the
Clock/Info settings group as default.Yes/No
* Not available on all models
Page 322 of 598
320
uuCustomized Features u
Features
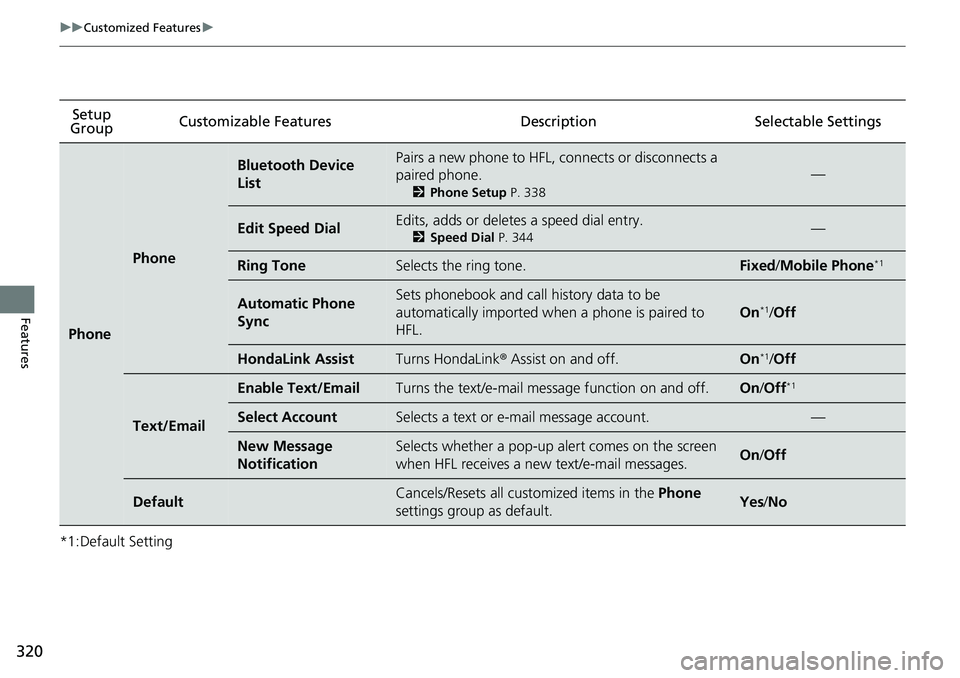
*1:Default SettingSetup
Group Customizable Features Description Selectable Settings
Phone
Phone
Bluetooth Device
ListPairs a new phone to HFL, connects or disconnects a
paired phone.
2
Phone Setup P. 338
—
Edit Speed DialEdits, adds or deletes a speed dial entry.
2Speed Dial P. 344—
Ring ToneSelects the ring tone.Fixed/Mobile Phone*1
Automatic Phone
SyncSets phonebook and call history data to be
automatically imported when a phone is paired to
HFL.
On*1/Off
HondaLink AssistTurns HondaLink ® Assist on and off.On*1/Off
Text/Email
Enable Text/EmailTurns the text/e-mail mess age function on and off.On/Off*1
Select AccountSelects a text or e-mail message account.—
New Message
NotificationSelects whether a pop-up al ert comes on the screen
when HFL receives a new text/e-mail messages.On /Off
DefaultCancels/Resets all cust omized items in the Phone
settings group as default.Yes /No
Page 323 of 598
321
uuCustomized Features u
Continued
Features
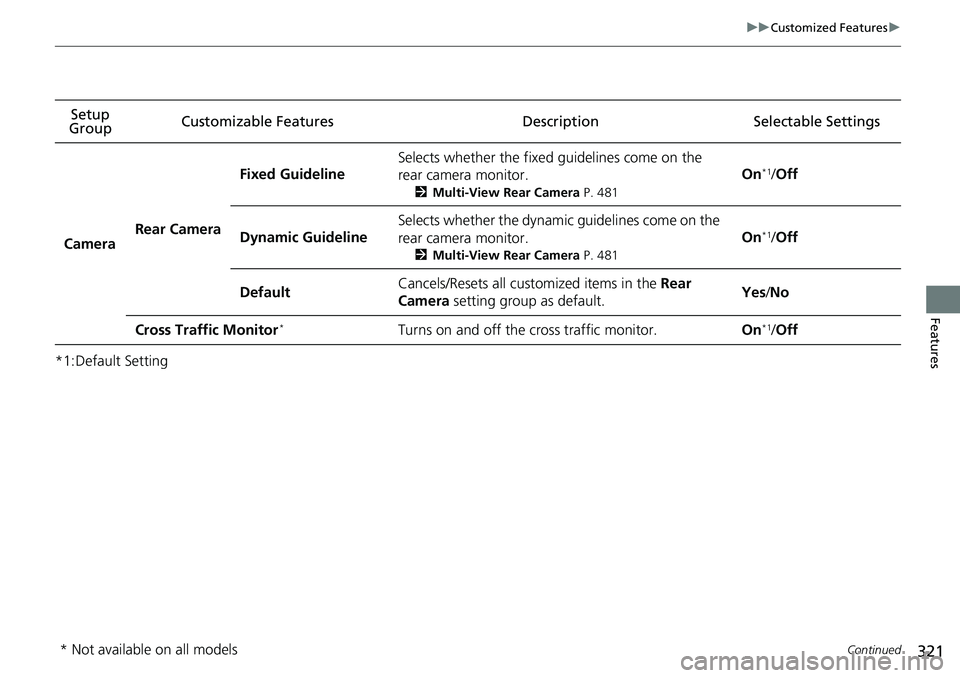
*1:Default SettingSetup
Group Customizable Featur
es Description Selectable Settings
CameraRear Camera
Fixed Guideline
Selects whether the fixed guidelines come on the
rear camera monitor.
2Multi-View Rear Camera P. 481
On*1/Off
Dynamic Guideline
Selects whether the dynamic guidelines come on the
rear camera monitor.
2 Multi-View Rear Camera P. 481
On*1/Off
DefaultCancels/Resets all customized items in the Rear
Camera setting group as default.Yes /No
Cross Traffic Monitor*Turns on and off the cross traffic monitor.On*1/ Off
* Not available on all models
Page 324 of 598
322
uuCustomized Features u
Features
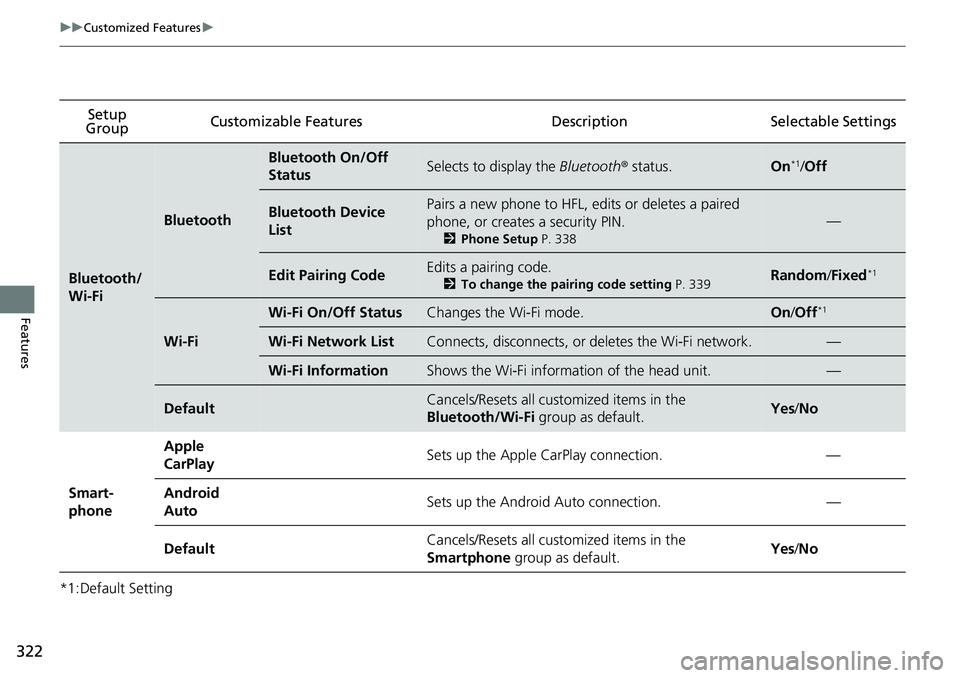
*1:Default SettingSetup
Group Customizable Featur
es Description Sel ectable Settings
Bluetooth/
Wi-Fi
Bluetooth
Bluetooth On/Off
StatusSelects to display the Bluetooth® status.On*1/Off
Bluetooth Device
ListPairs a new phone to HFL, edits or deletes a paired
phone, or creates a security PIN.
2 Phone Setup P. 338
—
Edit Pairing CodeEdits a pairing code.
2To change the pairing code setting P. 339Random /Fixed*1
Wi-Fi
Wi-Fi On/Off StatusChanges the Wi-Fi mode.On /Off*1
Wi-Fi Network ListConnects, disconnects, or deletes the Wi-Fi network.—
Wi-Fi InformationShows the Wi-Fi informat ion of the head unit.—
DefaultCancels/Resets all customized items in the
Bluetooth/Wi-Fi group as default.Yes/No
Smart-
phone Apple
CarPlay
Sets up the Apple CarPlay connection. —
Android
Auto Sets up the Android Auto connection.
—
Default Cancels/Resets all customized items in the
Smartphone
group as default. Yes
/No
Page 325 of 598
323
uuCustomized Features uDefaulting All the Settings
Features
Defaulting All the Settings
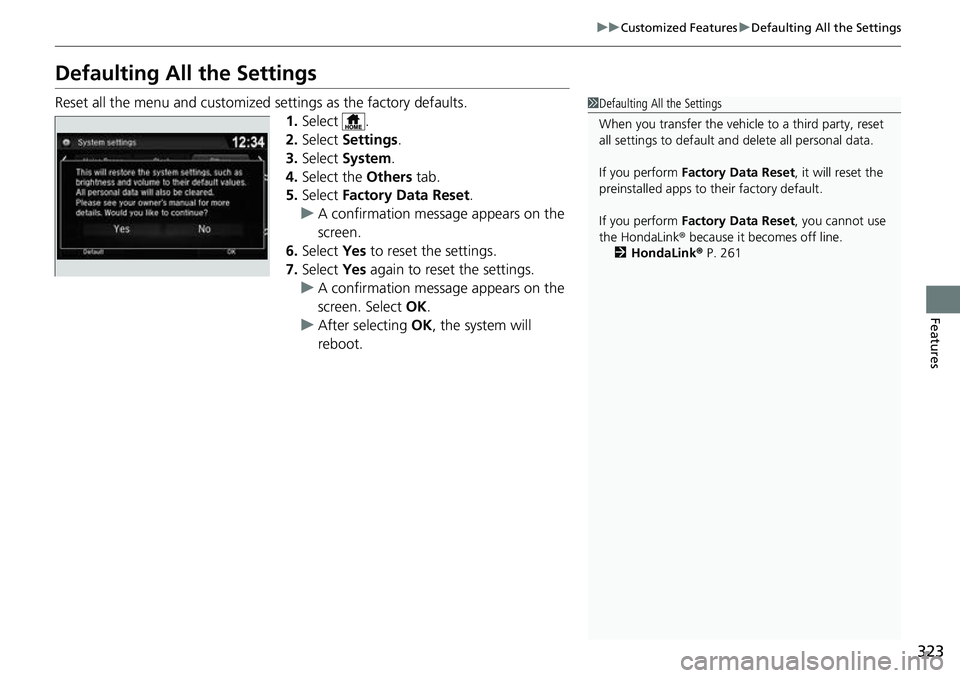
Reset all the menu and customized settings as the factory defaults.
1.Select .
2. Select Settings .
3. Select System.
4. Select the Others tab.
5. Select Factory Data Reset .
u A confirmation message appears on the
screen.
6. Select Yes to reset the settings.
7. Select Yes again to reset the settings.
u A confirmation message appears on the
screen. Select OK.
u After selecting OK, the system will
reboot.1 Defaulting All the Settings
When you transfer the vehicle to a third party, reset
all settings to default a nd delete all personal data.
If you perform Factory Data Reset , it will reset the
preinstalled apps to their factory default.
If you perform Factory Data Reset , you cannot use
the HondaLink ® because it becomes off line.
2 HondaLink® P. 261
Page 326 of 598
324
Features
HomeLink® Universal Transceiver
The HomeLink ® Universal Transceiver can be pr ogrammed to operate up to three
remote controlled devices around your home , such as garage doors, lighting, or
home security systems.
Refer to the safety information that came wi th your garage door opener to test that
the safety features are functioning properly. If you do not have the safety
information, contac t the manufacturer.
Before programming HomeLink, make sure th at people and objects are out of the
way of the garage or gate to prevent potential injury or damage.
When programming a garage door opener, park just outside the garage door’s path.
■Important Safety Precautions
1HomeLink ® Universal Transceiver
Before programming HomeLi nk to operate a garage
door opener, confirm that the opener has an external
entrapment protection system , such as an “electronic
eye,” or other safety and reverse stop features. If it
does not, HomeLink may not be able to operate it.
Page 327 of 598
325
uuHomeLink ® Universal Transceiver uTraining HomeLink
Continued
Features
Training HomeLink
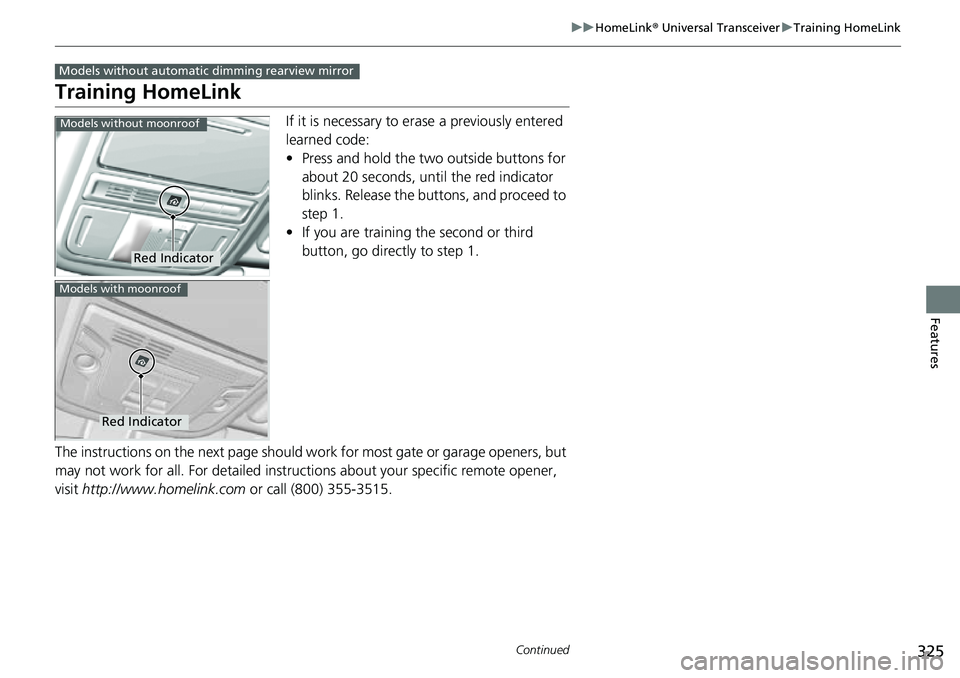
If it is necessary to er ase a previously entered
learned code:
• Press and hold the two outside buttons for
about 20 seconds, until the red indicator
blinks. Release the bu ttons, and proceed to
step 1.
• If you are training the second or third
button, go directly to step 1.
The instructions on the next page should work for most gate or garage openers, but
may not work for all. For detailed instructions about your specific remote opener,
visit http://www.homelink.com or call (800) 355-3515.
Models without automatic dimming rearview mirror
Red Indicator
Models without moonroof
Red Indicator
Models with moonroof
Page 328 of 598
uuHomeLink ® Universal Transceiver uTraining HomeLink
326
Features
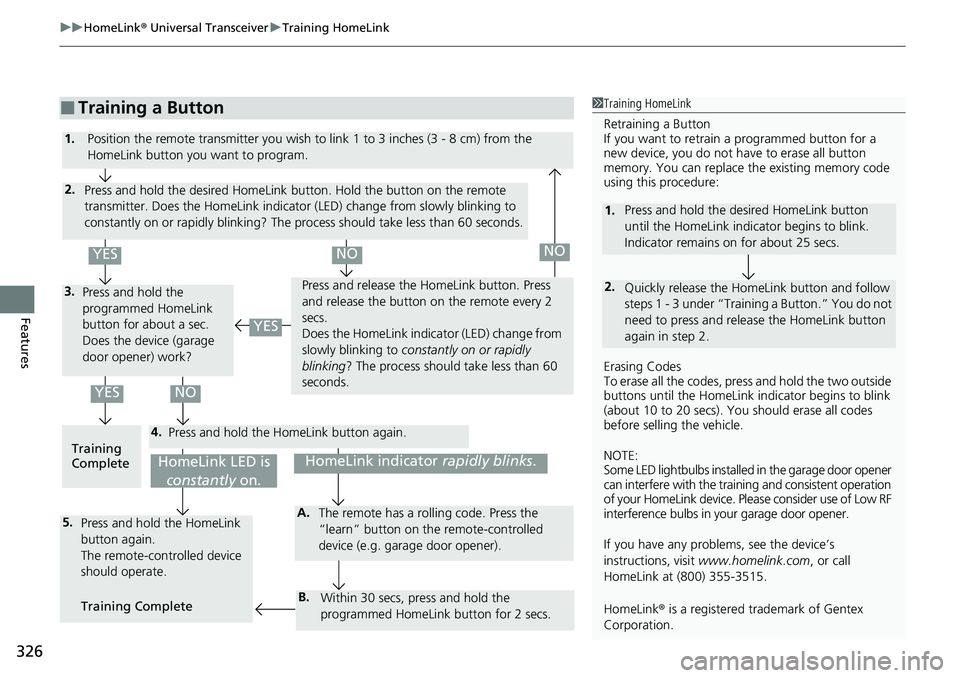
■Training a Button1Training HomeLink
Retraining a Button
If you want to retrain a programmed button for a
new device, you do not ha ve to erase all button
memory. You can replace the existing memory code
using this procedure:
Erasing Codes
To erase all the codes, press and hold the two outside
buttons until the HomeLink i ndicator begins to blink
(about 10 to 20 secs). You should erase all codes
before selling the vehicle.
NOTE:
Some LED lightbulbs installed in the garage door opener
can interfere with the traini ng and consistent operation
of your HomeLink device. Pl ease consider use of Low RF
interference bulbs in your garage door opener.
If you have any problems, see the device’s
instructions, visit www.homelink.com , or call
HomeLink at (800) 355-3515.
HomeLink® is a registered tra demark of Gentex
Corporation.
2.
1. Press and hold the desired HomeLink button
until the HomeLink indi
cator begins to blink.
Indicator remains on for about 25 secs.
Quickly release the Home Link button and follow
steps 1 - 3 under “Training a Button.” You do not
need to press and rel ease the HomeLink button
again in step 2.
4.
3.
2.
5.A.
B.
1. Position the remote transmitter you wish to link 1 to 3 inches (3 - 8 cm) from the
HomeLink button you want to program.
Press and hold the desired HomeLink button. Hold the button on the remote
transmitter. Does the HomeLink indicato r (LED) change from slowly blinking to
constantly on or rapidly blinking? The process should take less than 60 seconds.
Press and hold the
programmed HomeLink
button for about a sec.
Does the device (garage
door opener) work? Press and release the Ho
meLink button. Press
and release the button on the remote every 2
secs.
Does the HomeLink indica tor (LED) change from
slowly blinking to constantly on or rapidly
blinking ? The process should take less than 60
seconds.
Training
Complete Press and hold the HomeLink button again.
Press and hold the HomeLink
button again.
The remote-controlled device
should operate.
Training Complete The remote has a ro
lling code. Press the
“learn” button on the remote-controlled
device (e.g. garage door opener).
Within 30 secs, press and hold the
programmed HomeLink button for 2 secs.
HomeLink indicator rapidly blinks.HomeLink LED is
constantly on.
YESNO
YES
YESNONO
Page 329 of 598
327
uuHomeLink ® Universal Transceiver uTraining HomeLink
Continued
Features
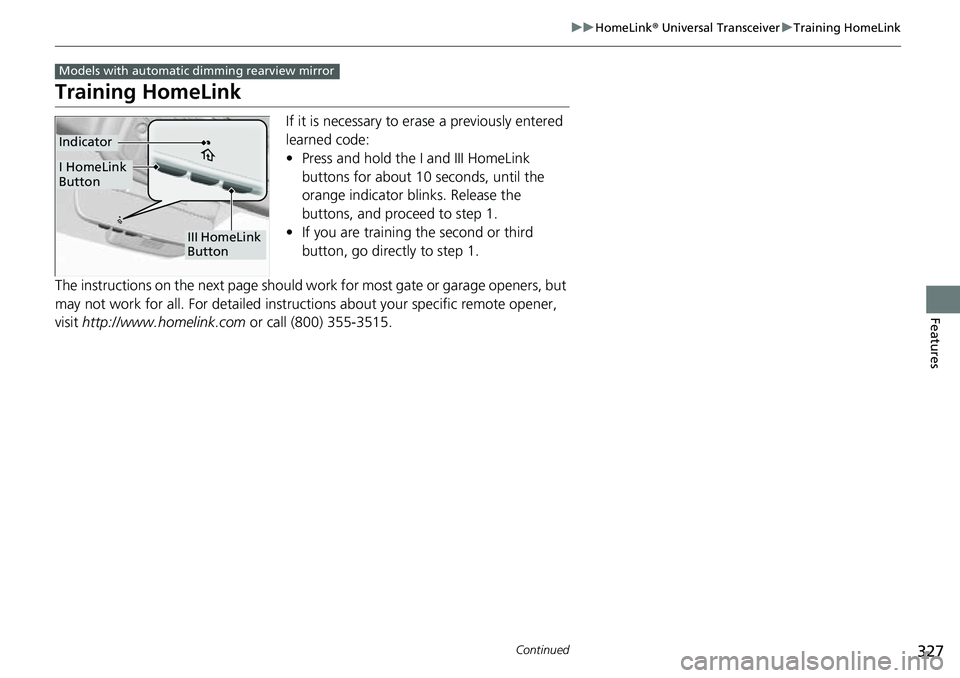
Training HomeLink
If it is necessary to er ase a previously entered
learned code:
• Press and hold the I and III HomeLink
buttons for about 10 seconds, until the
orange indicator blinks. Release the
buttons, and proceed to step 1.
• If you are training the second or third
button, go directly to step 1.
The instructions on the next page should work for most gate or garage openers, but
may not work for all. For detailed instructions about your specific remote opener,
visit http://www.homelink.com or call (800) 355-3515.
Models with automatic dimming rearview mirror
III HomeLink
Button
Indicator
I HomeLink
Button
Page 330 of 598
uuHomeLink ® Universal Transceiver uTraining HomeLink
328
Features
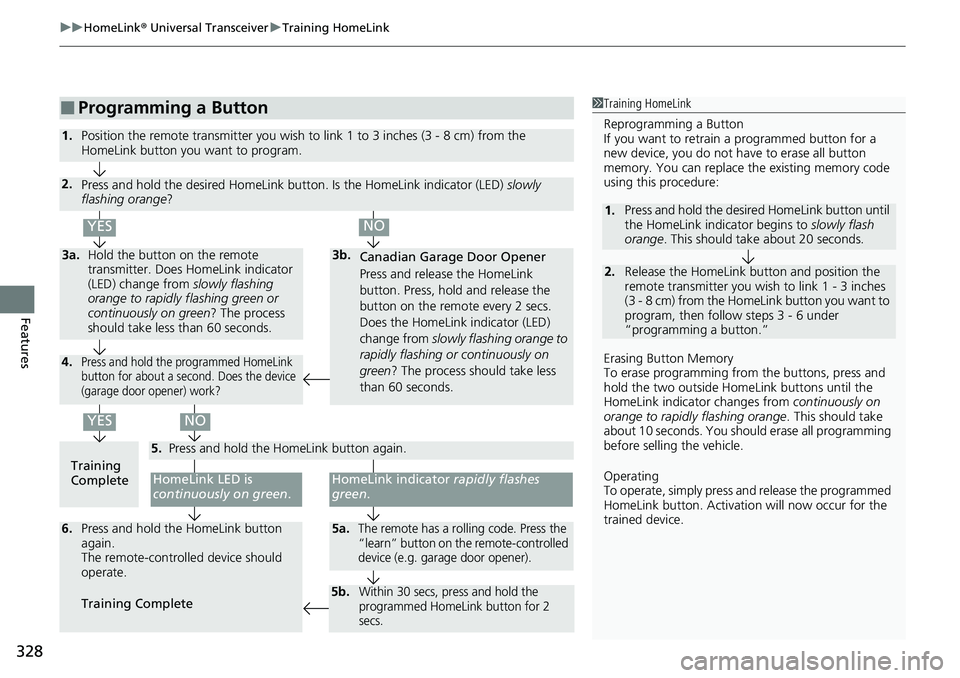
■Programming a Button1Training HomeLink
Reprogramming a Button
If you want to retrain a programmed button for a
new device, you do not ha ve to erase all button
memory. You can replace the existing memory code
using this procedure:
Erasing Button Memory
To erase programming from the buttons, press and
hold the two outside Home Link buttons until the
HomeLink indicator changes from continuously on
orange to rapidly flashing orange . This should take
about 10 seconds. You should erase all programming
before selling the vehicle.
Operating
To operate, simply press and release the programmed
HomeLink button. Activati on will now occur for the
trained device.
2.
1. Press and hold the desired HomeLink button until
the HomeLink indi
cator begins to slowly flash
orange . This should take about 20 seconds.
Release the HomeLink button and position the
remote transmitter you wish to link 1 - 3 inches
(3 - 8 cm) from the Home Link button you want to
program, then follow steps 3 - 6 under
“programming a button.”
Training
CompleteHomeLink LED is
continuously on green .
YES
YES
1.Position the remote transmitter you wish to link 1 to 3 inches (3 - 8 cm) from the
HomeLink button you want to program.
3b.
Canadian Garage Door Opener
Press and release the HomeLink
button. Press, hold and release the
button on the remote every 2 secs.
Does the HomeLink indicator (LED)
change from slowly flashing orange to
rapidly flashing or continuously on
green ? The process should take less
than 60 seconds.
NO
2. Press and hold the desired HomeLink butt on. Is the HomeLink indicator (LED) slowly
flashing orange ?
NO
3a.Hold the button on the remote
transmitter. Does HomeLink indicator
(LED) change from slowly flashing
orange to rapidly flashing green or
continuously on green? The process
should take less than 60 seconds.
5. Press and hold the HomeLink button again.
HomeLink indicator rapidly flashes
green .
5a.The remote has a rolling code. Press the
“learn” button on the remote-controlled
device (e.g. garage door opener).6.Press and hold the HomeLink button
again.
The remote-controll ed device should
operate.
Training Complete
5b.Within 30 secs, press and hold the
programmed HomeLink button for 2
secs.
4.Press and hold the programmed HomeLink
button for about a second. Does the device
(garage door opener) work?