high HONDA S2000 2003 1.G Owner's Guide
[x] Cancel search | Manufacturer: HONDA, Model Year: 2003, Model line: S2000, Model: HONDA S2000 2003 1.GPages: 280, PDF Size: 3.9 MB
Page 164 of 280

To add oil, unscrew and remove the
engine oil f ill cap on top of the lef t
valve cover. Pour in the oil, and
replace the engine oil f ill cap.
Tighten it securely. Wait a f ew
minutes and recheck the oil level. Do
not f ill above the upper mark; you
could damage the engine.Make sure the API Certif ication Seal
says ‘‘For Gasoline Engines.’’
Pour the oil slowly and caref ully so
you do not spill. Clean up any spills
immediately. Spilled oil could damage components in the engine
compartment.
Oil is major contributor to your
engine’s perf ormance and longevity.
Always use a premium-grade
detergent oil displaying the API
Certif ication Seal. This seal indicates
the oil is energy conserving, and that
it meets the American Petroleum
Institute’s latest requirements. It is
highly recommended that you use
Honda Motor Oil in your vehicle f or
as long as you own it.
CONT INUED
A dding Oil
Recommended Oil
Engine Oil
Maint enance161
API CERTIFICATION SEAL
Page 168 of 280
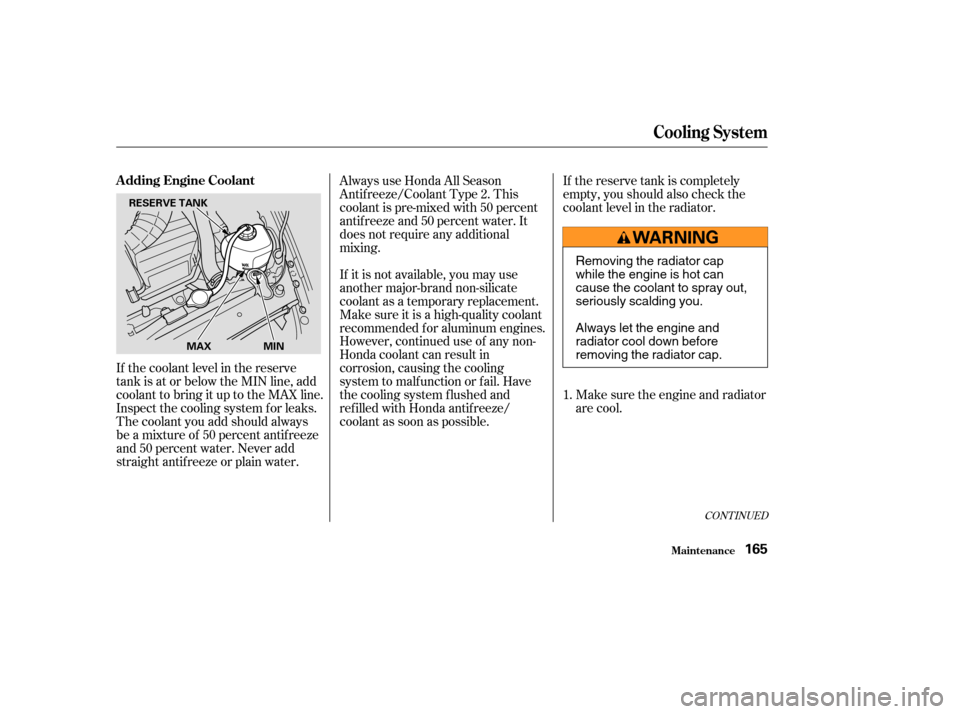
If the coolant level in the reserve
tank is at or below the MIN line, add
coolant to bring it up to the MAX line.
Inspect the cooling system f or leaks.
The coolant you add should always
be a mixture of 50 percent antif reeze
and 50 percent water. Never add
straight antif reeze or plain water.If the reserve tank is completely
empty, you should also check the
coolant level in the radiator.
Make sure the engine and radiator
are cool.
Always use Honda All Season
Antif reeze/Coolant Type 2. This
coolant is pre-mixed with 50 percent
antif reeze and 50 percent water. It
does not require any additional
mixing.
If it is not available, you may use
another major-brand non-silicate
coolant as a temporary replacement.
Make sure it is a high-quality coolant
recommended f or aluminum engines.
However, continued use of any non-
Honda coolant can result in
corrosion, causing the cooling
system to malf unction or f ail. Have
the cooling system f lushed and
ref illed with Honda antif reeze/
coolant as soon as possible.
1.
CONT INUED
A dding Engine Coolant
Cooling Syst em
Maint enance165
RESERVE TANK
MAX MIN
Removing the radiator cap
while the engine is hot can
cause the coolant to spray out,
seriously scalding you.
Always let the engine and
radiator cool down before
removing the radiator cap.
Page 190 of 280
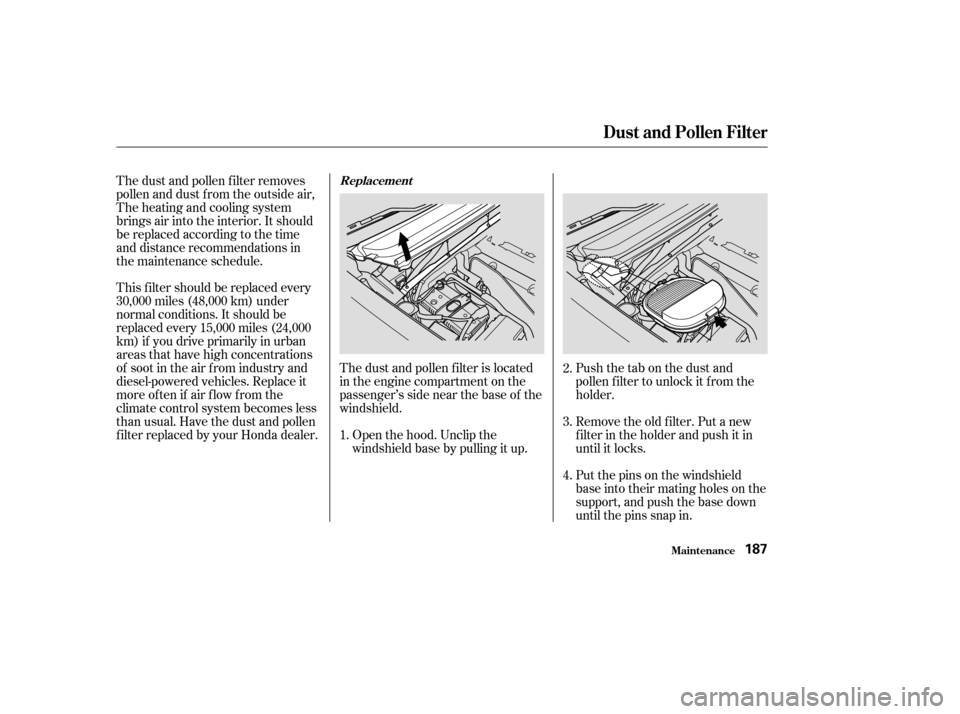
Open the hood. Unclip the
windshield base by pulling it up.Put the pins on the windshield
base into their mating holes on the
support, and push the base down
until the pins snap in. Remove the old f ilter. Put a new
f ilter in the holder and push it in
until it locks.
The dust and pollen f ilter is located
in the engine compartment on the
passenger’s side near the base of the
windshield.
Push the tab on the dust and
pollen f ilter to unlock it f rom the
holder.
This f ilter should be replaced every
30,000 miles (48,000 km) under
normal conditions. It should be
replaced every 15,000 miles (24,000
km) if you drive primarily in urban
areas that have high concentrations
of soot in the air f rom industry and
diesel-powered vehicles. Replace it
more of ten if air f low f rom the
climate control system becomes less
than usual. Have the dust and pollen
f ilter replaced by your Honda dealer. The dust and pollen f ilter removes
pollen and dust f rom the outside air,
The heating and cooling system
brings air into the interior. It should
be replaced according to the time
and distance recommendations in
the maintenance schedule.
1.2.
3.
4.
Maint enance
Replacement
Dust and Pollen Filter
187
Page 193 of 280

Use a gauge to measure the air
pressure at least once a month. Even
tires that are in good condition may
lose one to two psi (10 to 20 kPa, 0.1
to 0.2 kgf /cm ) per month.
Remember to check the spare tire at
thesametimeyoucheckallthe
other tires.Front:
Rear:
Check the pressure in the tires when
they are cold. This means the car
has been parked f or at least three
hours. If you have to drive the car
bef ore checking the tire pressure,
the tires can still be considered
‘‘cold’’ if you drive less than 1 mile
(1.6 km). If you check the pressure when the
tires are hot [the car has been driven
several miles (kilometers)], you will
see readings 4 to 6 psi (30 to 40 kPa,
0.3 to 0.4 kgf /cm ) higher than the
cold reading. This is normal. Do not
let air out to match the specif ied cold
pressure. The tire will be
underinf lated.
Thecompactsparetirepressureis:
Youshouldgetyourowntire
pressure gauge and use it whenever
you check your tire pressures. This
will make it easier f or you to tell if a
pressure loss is due to a tire problem
and not due to a variation between
gauges.
The following chart shows the
recommended cold tire pressures f or
most normal driving conditions and
speeds. Tire pressures f or high
speed driving are the same as f or
normal driving.
Add or release air, if needed, to
match the recommended cold tire
pressuresonthispage.
For convenience, the recommended
tire sizes and cold air pressures are
on a label on the driver’s doorjamb.
For additional technical information
about your tires, see page .
252Tire Size Cold Tire Pressure
for Normal Driving
Tire Size Cold Tire Pressure
for Normal Driving
Tires
Maint enance
Recommended T ire Pressures f or
Normal Driving
190
60 psi (420 kPa , 4.2 kgf/cm)
205/55R16 89W 32 psi (220 kPa , 2.2
kgf/cm
)
225/50R16 92W 32 psi (220 kPa , 2.2 kgf/cm
)
Page 198 of 280

If you mount snow tires on your
Honda, make sure they are radial
tires of the same size and load range
as the original tires. Mount snow
tiresonallfourwheelstobalance
your vehicle’s handling in all weather
conditions. Keep in mind the traction
provided by snow tires on dry roads
may not be as high as your vehicle’s
original equipment tires. You should
drive cautiously even when the roads
areclear.Checkwiththetiredealer
f or maximum speed recommenda-
tions.Because your Honda has limited tire
clearance, mount only SAE Class ‘‘S’’
cable-type traction devices on the
rear tires. Use traction devices only
when required by driving conditions
or local laws. Make sure they are the
correct size f or your tires.
Metal link-type ‘‘chains’’ should not
be used. No matter how tight they
seem to be installed, they can come
into contact with the body and
suspension, causing serious damage.
When installing cables, f ollow the
manuf acturer’s instructions and
mount them as tightly as you can.
Drive slowly with them installed. If
youhearthemcomingincontact
with the body or chassis, stop and
investigate. Make sure the cables are
installed tightly, and that they are
not contacting the brake lines or
suspension. Remove them as soon as
you begin driving on cleared roads.
Snow T ires
T ire Chains
Tires
Maint enance195
Cables that are the wrong size or
improperly installed can damage your
car’s brake lines, suspension, body, and
wheels. Stop driving if they are hitting
any part of the car.
Page 199 of 280

Check the operation of your car’s
exterior lights at least once a month.
A burned out bulb can create an
unsaf e condition by reducing your
car’s visibility and the ability to
signal your intentions to other
drivers.
Maint enance
Lights
196
SIDE TURN SIGNAL LIGHT
TURN SIGNAL
FRONT PARKING AND
SIDE MARKER LIGHTLOW BEAM
HEADLIGHTHIGH BEAM
HEADLIGHT
Page 200 of 280

Check the f ollowing:Headlights (low and high beam)
Parking lights
Taillights
Brake lights
Turn signals
Back-up lights
Hazard light f unction
License plate light
Side marker lights
Daytime running lights
(Canadian cars)
If you f ind any bulbs are burned out,
replace them as soon as possible.
Refer to the chart on page to
determine what type of replacement
bulb is needed. 251
Maint enance
Lights
197
TURN SIGNAL LIGHT
SIDE MARKER LIGHT STOP/TAILLIGHT
BACK-UP LIGHTLICENSE PLATE LIGHT
Page 201 of 280
Halogen bulbs are used f or the high
beam headlight bulbs. When
replacing a high beam headlight bulb,
handle it by its base and protect the
glass from contact with your skin or
hard objects. If you touch the glass,
clean it with denatured alcohol and a
clean cloth.
The low beam headlight bulbs are a
type of high voltage discharge tube.
High voltage can remain in the
circuit even with the light switch of f
and the key removed. Because of
this, you should not attempt to
examine or change a low beam
headlight bulb yourself . If a low
beam headlight bulb fails, take the
cartoyourdealertohaveitreplaced.
Theheadlightswereproperlyaimed
when your car was new. If you
regularly carry heavy items in the
trunk, readjustment may be required.
Adjustment of the headlights should
be perf ormed by a Honda technician
or other qualif ied mechanic.
Lights
Maint enance
Replacing a Headlight Bulb
Headlight A iming
198
Halogen headlight bulbs get very hot
when lit. Oil, perspiration, or a scratch
on the glass can cause the bulb to
overheat and shatter.
Page 202 of 280

Open the hood.
Remove the electrical connector
f rom the bulb by squeezing the
connector to unlock the tab, then
slide the connector of f the bulb.Remove the rubber weather seal
by pulling on the tab.
If you need to change the high
beam headlight bulb on the lef t
side, remove the coolant reserve
tank f rom its holder by pulling it
straight up. Unclip the end of the hold-down
wire f rom its slot. Pivot it out of
the way and remove the bulb
socket.Install the rubber seal over the
back of the headlight assembly.
Make sure it is right side up; it is
marked ‘‘TOP.’’ Insert the socket back into the
headlight assembly. Make sure
the bulb is installed correctly by
looking through the headlight lens.
The pins on the base of the bulb
should f it in the holes in the
headlight assembly. Pivot the hold-
down wire back in place and clip
the end into the slot.
Pull the bulb straight out of its
socket. Push the new bulb straight
into the socket until it bottoms. Push the electrical connector onto
the new bulb. Turn on the
headlights to test the new bulb.
(Lef t side)
Reinstall the radiator reserve tank.
1.
2. 3.
4.
5.6.
7.
8.
9.
Lights
Maint enance199
Page 217 of 280

Repair chips and scratches in the
paint as soon as you discover them.
Inspect and clean out the drain
holes in the bottom of the doors
and body.
Check the floor coverings for
dampness. Carpeting and f loor
mats may remain damp f or a long
time, especially in winter. This
dampness can eventually cause
the f loor panels to corrode.Use a high-pressure spray to clean
the underside of your car. This is
especially important in areas that
useroadsaltinwinter.Itisalsoa
good idea in humid climates and
areas subject to salt air. Be careful
of the ABS wheel sensors and
wiring at each wheel.
Have the corrosion-preventive
coatings on the underside of your
car inspected and repaired
periodically.
Many corrosion-preventive measures
are built into your Honda. You can
help keep your car f rom corroding
by perf orming some simple periodic
maintenance:
Corrosion Prot ect ion
Appearance Care214