service reset HUMMER H2 2004 Owners Manual
[x] Cancel search | Manufacturer: HUMMER, Model Year: 2004, Model line: H2, Model: HUMMER H2 2004Pages: 472, PDF Size: 5.01 MB
Page 178 of 472
Driver Information Center (DIC)
The DIC display is located on the instrument panel
cluster above the steering column. The DIC can display
information such as the trip odometer, fuel economy
and personalization features.
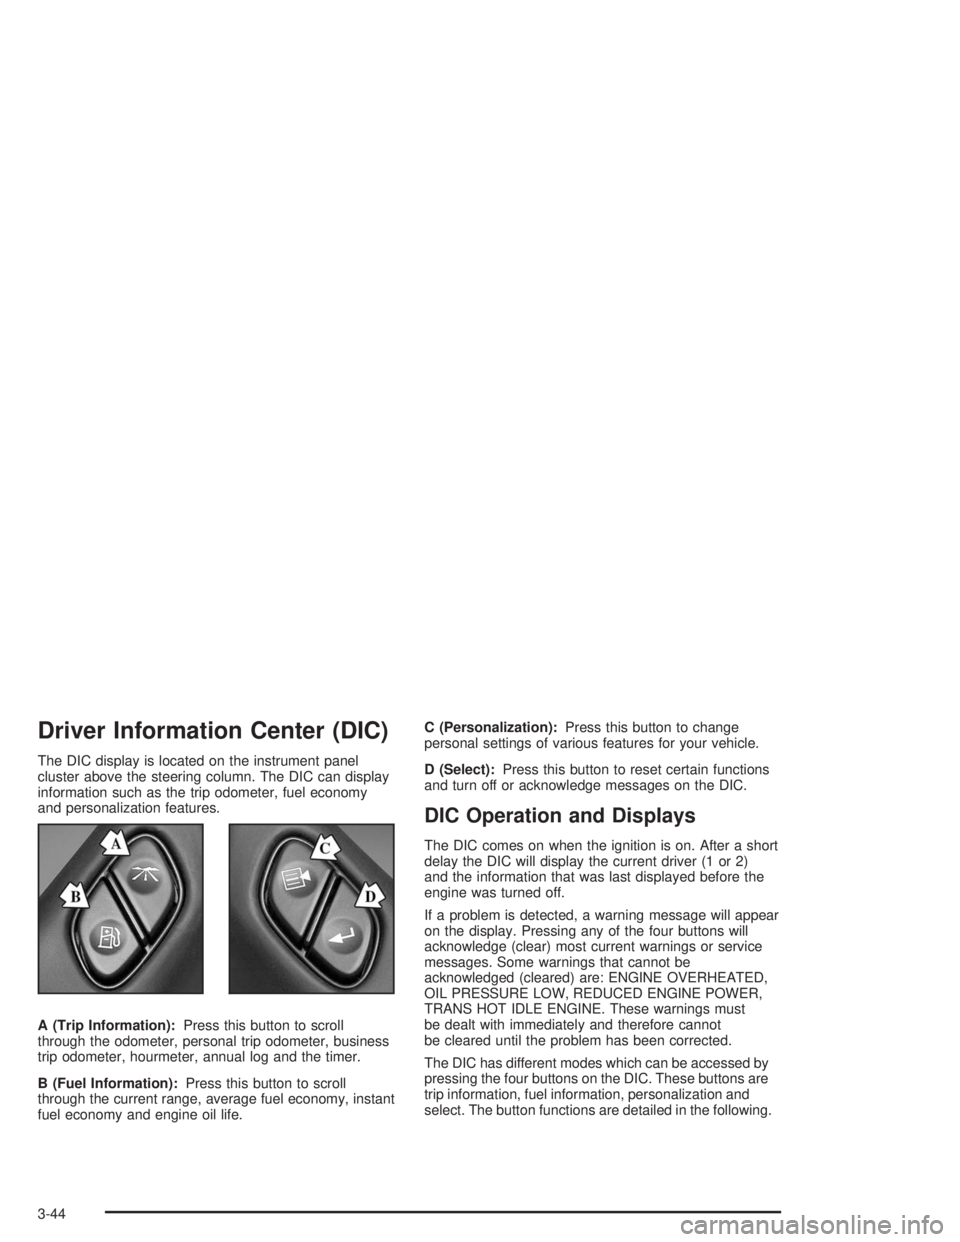
A (Trip Information):Press this button to scroll
through the odometer, personal trip odometer, business
trip odometer, hourmeter, annual log and the timer.
B (Fuel Information):Press this button to scroll
through the current range, average fuel economy, instant
fuel economy and engine oil life.C (Personalization):Press this button to change
personal settings of various features for your vehicle.
D (Select):Press this button to reset certain functions
and turn off or acknowledge messages on the DIC.
DIC Operation and Displays
The DIC comes on when the ignition is on. After a short
delay the DIC will display the current driver (1 or 2)
and the information that was last displayed before the
engine was turned off.
If a problem is detected, a warning message will appear
on the display. Pressing any of the four buttons will
acknowledge (clear) most current warnings or service
messages. Some warnings that cannot be
acknowledged (cleared) are: ENGINE OVERHEATED,
OIL PRESSURE LOW, REDUCED ENGINE POWER,
TRANS HOT IDLE ENGINE. These warnings must
be dealt with immediately and therefore cannot
be cleared until the problem has been corrected.
The DIC has different modes which can be accessed by
pressing the four buttons on the DIC. These buttons are
trip information, fuel information, personalization and
select. The button functions are detailed in the following.
3-44
Page 190 of 472
DIC Warnings and Messages
Warning messages are displayed on the DIC to notify
the driver that the status of the vehicle has changed and
that some action may be needed by the driver to
correct the condition. If there is more than one message
that needs to be displayed they will appear one after
another. Some messages may not require immediate
action but you should press the select button to
acknowledge that you received the message and clear it
from the display. Some messages cannot be cleared
from the display because they are more urgent;
these messages require action before they can be
removed from the DIC display. The following are the
possible messages that can be displayed and some
information about them.
CHANGE ENGINE OIL
This message is displayed when the engine oil needs to
be changed and service is required for your vehicle.
SeeScheduled Maintenance on page 6-4andEngine
Oil on page 5-14for more information. Also see “GM Oil
Life System” previously in this section for information
on how to reset the message. This message will
clear itself after 10 seconds until the next ignition cycle.
CHECK OIL LEVEL
If the oil level in the vehicle is low, this message will
appear on the DIC. Check the oil level and correct it as
necessary. You may need to let the vehicle cool or
warm up and cycle the ignition to be sure this message
will clear. Once the problem is corrected, pressing
the select button will clear this message from the DIC
display. This message will clear itself after 10 seconds
until the next ignition cycle.
OIL LIFE RESET
This message will appear on the display for about
10 seconds after resetting the change engine oil
message.
OIL PRESSURE LOW
If low oil pressure levels occur, this message will be
displayed on the DIC and a chime will sound. Stop the
vehicle as soon as safely possible and do not operate
it until the cause of the low oil pressure has been
corrected. Check your oil as soon as possible and have
your vehicle serviced.
3-56
Page 225 of 472

When cleaning the cassette tape player with the
recommended non-abrasive cleaning cassette, it is
possible that the cassette may eject, because the cut
tape detection feature on your radio may recognize it as
a broken tape, in error. To prevent the cleaning
cassette from being ejected, use the following steps:
1. Turn the ignition on.
2. Turn the radio off.
3. Press and hold the TAPE DISC button for �ve
seconds. READY will appear on the display and
the cassette symbol will �ash for �ve seconds.
4. Insert the scrubbing action cleaning cassette.
5. Eject the cleaning cassette after the manufacturer’s
recommended cleaning time.
When the cleaning cassette has been ejected, the cut
tape detection feature is active again.You may also choose a non-scrubbing action, wet-type
cleaner which uses a cassette with a fabric belt to
clean the tape head. This type of cleaning cassette will
not eject on its own. A non-scrubbing action cleaner
may not clean as thoroughly as the scrubbing type
cleaner. The use of a non-scrubbing action, dry-type
cleaning cassette is not recommended.
After you clean the player, press and hold the eject
button for �ve seconds to reset the CLEAN indicator.
The radio will display --- or CLEANED to show the
indicator was reset.
Cassettes are subject to wear and the sound quality
may degrade over time. Always make sure the cassette
tape is in good condition before you have your tape
player serviced.
3-91
Page 331 of 472
Notice:Use only engine oil identi�ed as meeting
GM Standard GM6094M and showing the American
Petroleum Institute Certi�ed For Gasoline Engines
starburst symbol. Failure to use the recommended
oil can result in engine damage not covered by
your warranty.
GM Goodwrench
®oil meets all the requirements for
your vehicle.
If you are in an area of extreme cold, where the
temperature falls below−20°F (−29°C), it is
recommended that you use either an SAE 5W-30
synthetic oil or an SAE 0W-30 oil. Both will provide
easier cold starting and better protection for your engine
at extremely low temperatures.
Engine Oil Additives
Do not add anything to your oil. The recommended oils
with the starburst symbol that meet GM Standard
GM6094M are all you will need for good performance
and engine protection.
When to Change Engine Oil
(GM Oil Life System)
Your vehicle has a computer system that lets you know
when to change the engine oil and �lter. This is based on
engine revolutions and engine temperature, and not on
mileage. Based on driving conditions, the mileage at
which an oil change will be indicated can vary
considerably. For the oil life system to work properly, you
must reset the system every time the oil is changed.
When the system has calculated that oil life has been
diminished, it will indicate that an oil change is necessary.
A CHANGE ENGINE OIL message will come on. Change
your oil as soon as possible within the next two times you
stop for fuel. It is possible that, if you are driving under the
best conditions, the oil life system may not indicate that
an oil change is necessary for over a year. However, your
engine oil and �lter must be changed at least once a year
and at this time the system must be reset. Your dealer
has GM-trained service people who will perform this work
using genuine GM parts and reset the system. It is also
important to check your oil regularly and keep it at the
proper level.
If the system is ever reset accidentally, you must
change your oil at 3,000 miles (5 000 km) since your
last oil change. Remember to reset the oil life system
whenever the oil is changed.
5-17
Page 332 of 472
How to Reset the CHANGE ENGINE OIL
Message
The GM Oil Life System calculates when to change
your engine oil and �lter based on vehicle use. Anytime
your oil is changed, reset the system so it can
calculate when the next oil change is required. If a
situation occurs where you change your oil prior to a
CHANGE ENGINE OIL message being turned on, reset
the system.
To reset the CHANGE ENGINE OIL message, see “GM
Oil Life System” underDIC Operation and Displays
on page 3-44for vehicles equipped with the DIC, or do
the following:
1. Turn the ignition key to RUN with the engine off.
2. Fully press and release the accelerator pedal slowly
three times within �ve seconds.
If the OIL LIFE RESET message �ashes for
10 seconds, the system is resetting.
3. Turn the key to LOCK.
If the CHANGE ENGINE OIL message comes back on
when you start your vehicle, the engine oil life system
has not reset. Repeat the procedure. If it still does
not reset, see your dealer for service.
What to Do with Used Oil
Used engine oil contains certain elements that may be
unhealthy for your skin and could even cause cancer.
Do not let used oil stay on your skin for very long. Clean
your skin and nails with soap and water, or a good
hand cleaner. Wash or properly dispose of clothing or
rags containing used engine oil. See the manufacturer’s
warnings about the use and disposal of oil products.
Used oil can be a threat to the environment. If you
change your own oil, be sure to drain all the oil from the
�lter before disposal. Never dispose of oil by putting it in
the trash, pouring it on the ground, into sewers, or into
streams or bodies of water. Instead, recycle it by taking it
to a place that collects used oil. If you have a problem
properly disposing of your used oil, ask your dealer, a
service station or a local recycling center for help.
5-18
Page 430 of 472

Some maintenance services can be complex. So,
unless you are technically quali�ed and have the
necessary equipment, you should have your GM
Goodwrench dealer do these jobs.
When you go to your GM Goodwrench dealer for your
service needs, you will know that GM-trained and
supported service technicians will perform the work
using genuine GM parts.
If you want to get service information, seeService
Publications Ordering Information on page 7-11.
Owner Checks and Services on page 6-9tells you what
should be checked, when to check it and what you
can easily do to help keep your vehicle in good
condition.
The proper replacement parts, �uids and lubricants to
use are listed inRecommended Fluids and Lubricants
on page 6-12andNormal Maintenance Replacement
Parts on page 6-14. When your vehicle is serviced,
make sure these are used. All parts should be replaced
and all necessary repairs done before you or anyone
else drives the vehicle. We recommend the use of
genuine GM parts.Scheduled Maintenance
When the CHANGE ENGINE OIL light in the Driver
Information Center (DIC) comes on, it means that service
is required for your vehicle. Have your vehicle serviced as
soon as possible within the next 600 miles (1 000 km). It
is possible that, if you are driving under the best
conditions, the engine oil life system may not indicate that
vehicle service is necessary for over a year. However,
your engine oil and �lter must be changed at least once a
year and at this time the system must be reset. Your GM
Goodwrench dealer has GM-trained service technicians
who will perform this work using genuine GM parts and
reset the system.
If the engine oil life system is ever reset accidentally,
you must service your vehicle within 3,000 miles
(5 000 km) since your last service. Remember to reset
the oil life system whenever the oil is changed. See
Engine Oil on page 5-14for information on the Engine
Oil Life System and resetting the system.
6-4
Page 431 of 472
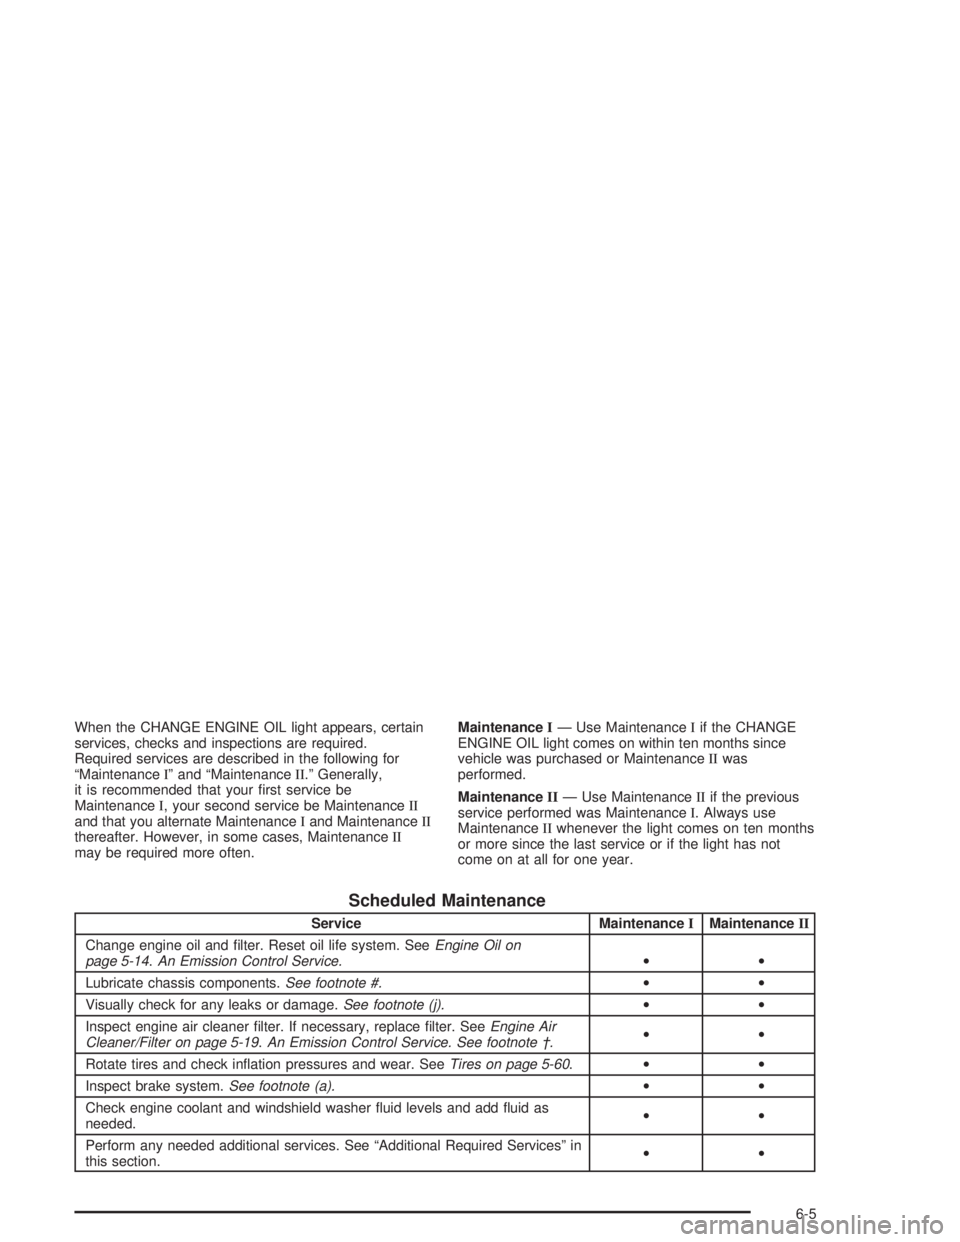
When the CHANGE ENGINE OIL light appears, certain
services, checks and inspections are required.
Required services are described in the following for
“MaintenanceI” and “MaintenanceII.” Generally,
it is recommended that your �rst service be
MaintenanceI, your second service be MaintenanceII
and that you alternate MaintenanceIand MaintenanceII
thereafter. However, in some cases, MaintenanceII
may be required more often.MaintenanceI— Use MaintenanceIif the CHANGE
ENGINE OIL light comes on within ten months since
vehicle was purchased or MaintenanceIIwas
performed.
MaintenanceII— Use MaintenanceIIif the previous
service performed was MaintenanceI. Always use
MaintenanceIIwhenever the light comes on ten months
or more since the last service or if the light has not
come on at all for one year.
Scheduled Maintenance
Service MaintenanceIMaintenanceII
Change engine oil and �lter. Reset oil life system. SeeEngine Oil on
page 5-14.An Emission Control Service.••
Lubricate chassis components.See footnote #.••
Visually check for any leaks or damage.See footnote (j).••
Inspect engine air cleaner �lter. If necessary, replace �lter. SeeEngine Air
Cleaner/Filter on page 5-19.An Emission Control Service. See footnote †.••
Rotate tires and check in�ation pressures and wear. SeeTires on page 5-60.••
Inspect brake system.See footnote (a).••
Check engine coolant and windshield washer �uid levels and add �uid as
needed.••
Perform any needed additional services. See “Additional Required Services” in
this section.••
6-5
Page 466 of 472
Off-Road Recovery..........................................4-14
Oil
Engine.......................................................5-14
Pressure Gage............................................3-41
OIL LIFE RESET............................................3-56
OIL PRESSURE LOW.....................................3-56
Older Children, Restraints................................1-38
Online Owner Center........................................ 7-3
OnStar
®Personal Calling.................................2-41
OnStar®Services............................................2-40
OnStar®Steering Wheel Controls......................2-41
OnStar®System.............................................2-40
Other Warning Devices...................................... 3-5
Outlet Adjustment............................................3-25
Outside
Automatic Dimming Mirror with Curb View
Assist.....................................................2-39
Convex Mirror.............................................2-38
Heated Mirrors............................................2-39
Power Mirrors.............................................2-37
Overheated Engine Protection Operating Mode . . . 5-28
Overload and Overheat Protection.....................4-74
Overseas – Customer Assistance........................ 7-4
Owner Checks and Services.............................. 6-9
Owners, Canadian............................................... ii
Owner’s Information........................................7-11
P
Park (P)
Shifting Into................................................2-30
Shifting Out of............................................2-32
Parking
Brake........................................................2-29
Over Things That Burn.................................2-32
Parking on Hills..............................................4-83
PASSENGER DOOR AJAR..............................3-61
Passing.................................................4-14, 4-82
Passlock
®......................................................2-18
Personalization Button.....................................3-48
Personalization, Climate Controls......................3-25
Plan Ahead When Possible................................ 7-7
Playing a Cassette Tape..................................3-69
Playing a CD.........................................3-72, 3-80
Playing a Speci�c Loaded CD..........................3-82
Playing the Radio...................................3-63, 3-74
Power
Accessory Outlets........................................3-18
Door Locks.................................................. 2-8
Electrical System.......................................5-102
Lumbar Controls........................................... 1-3
Seat............................................................ 1-2
Steering Fluid.............................................5-36
Windows....................................................2-15
10
Page 469 of 472
Seats (cont.)
Memory.....................................................2-51
Power Lumbar.............................................. 1-3
Power Seats................................................. 1-2
Rear Seat Operation...................................... 1-7
Reclining Seatbacks...................................... 1-5
Third Row Seat...........................................1-10
Securing a Child Restraint
Designed for the LATCH System...................1-52
Rear Seat Position......................................1-53
Right Front Seat Position..............................1-55
Security Light.................................................3-42
Security While You Travel.................................. 7-5
Select Button.................................................3-55
Selectable Extended Rear Ride Height...............4-73
Service........................................................... 5-3
Adding Equipment to the Outside of Your
Vehicle..................................................... 5-5
Doing Your Own Work................................... 5-4
Engine Soon Light.......................................3-38
Publications Ordering Information...................7-11
SERVICE 4WD...............................................3-58
SERVICE AIR BAG.........................................3-58
SERVICE AIR SUSPENSION...........................3-58
SERVICE BRAKE SYSTEM.............................3-58
Service Bulletins.............................................7-11
Service Manuals.............................................7-11
Servicing Your Air Bag-Equipped Vehicle............1-72
Setting Preset PTYs........................................3-79Setting Preset PTYs (RDS Only).......................3-67
Setting Preset Stations............................3-64, 3-76
Setting the Time.............................................3-62
Setting the Tone (Bass/Treble)..................3-65, 3-76
Sheet Metal Damage.......................................5-98
Shifting Into Park (P).......................................2-30
Shifting Out of Park (P)...................................2-32
Skidding........................................................4-16
Some Other Rainy Weather Tips.......................4-45
Spare Tire.....................................................5-92
Speci�cations, Capacities...............................5-111
Speedometer..................................................3-28
Split Bench Seat (60/40).................................... 1-8
Stalling on an Incline.......................................4-38
Starting Your Engine.......................................2-20
Steering........................................................4-12
Steering in Emergencies..................................4-13
Steering Tips..................................................4-12
Steering Wheel Controls, Audio.........................3-89
Steering Wheel, Tilt Wheel................................. 3-5
Storage Areas
Center Console Storage Area........................2-46
Center Overhead Console.............................2-46
Glove Box..................................................2-45
Luggage Carrier..........................................2-46
Rear Seat Armrest.......................................2-49
Storing a Flat or Spare Tire and Tools...............5-90
Stuck in Sand, Mud, Ice or Snow......................4-56
Sun Visors.....................................................2-16
13