fuses HUMMER H2 2006 Owners Manual
[x] Cancel search | Manufacturer: HUMMER, Model Year: 2006, Model line: H2, Model: HUMMER H2 2006Pages: 502, PDF Size: 3.35 MB
Page 161 of 502

When the System Does Not Seem To
Work Properly
The rear vision camera system may not work properly
or display a clear image in the following situations:
In the dark.
When the sun or the beam of headlights is shining
directly into the camera lens.
If ice, snow, mud, or anything else builds up on the
camera lens. Clean the lens, rinse it with water,
and wipe it with a soft cloth.
If the back of the vehicle is in an accident, the
position and mounting angle of the camera
may change or the camera may be affected. Be
sure to have the camera and its position and
mounting angle checked at your dealer.
Extreme high or low temperatures or extreme
temperature changes can affect the image
displayed.
Accessory Power Outlet(s)
Your vehicle may be equipped with up to �ve accessory
power outlets. The two front outlets, if equipped, are
located under the OnStar
®buttons on the instrument
panel behind hinged doors.
The two middle outlets, if equipped, are located on the
back of the center console.
There may also be an outlet located in the rear of the
vehicle near the liftgate. Remove the cap to use the
outlet. Replace the cap when the outlet is not in use.
If your vehicle is the SUT model, there is an outlet in the
rear cargo area on the passenger’s side of the vehicle.
Notice:Adding any electrical equipment to your
vehicle may damage it or keep other components
from working as they should. The repairs would not
be covered by your warranty. Do not use equipment
exceeding maximum amperage rating. Check
with your dealer before adding electrical equipment.
Certain power accessory plugs may not be compatible
to the accessory power outlets and could result in blown
vehicle or adapter fuses. If you experience a problem,
see your dealer for additional information on the
accessory power plugs.
Notice:Improper use of the power outlet can cause
damage not covered by your warranty. Do not
hang any type of accessory or accessory bracket
from the plug because the power outlets are
designed for accessory power plugs only.
3-21
Page 192 of 502

REPLACE LIFTGATE FUSE (SUV)
This message will be displayed if the liftgate lock
malfunctions and/or the liftgate fuse blows. For more
information on fuses, seeInstrument Panel Fuse Block
on page 5-116andUnderhood Fuse Block on
page 5-119.
If the message returns after replacing the fuse, see your
dealer for service.
RIGHT REAR DOOR AJAR
If the passenger’s side rear door is not fully closed and
the vehicle is in a drive gear, this message will
appear on the display and you will hear a chime. Stop
and turn off the vehicle, check the door for obstacles,
and close the door again. Check to see if the
message still appears on the DIC. Pressing any of
the four DIC buttons or the trip odometer reset stem will
clear the message from the DIC display.
SERVICE 4WD (Full-Time
Four-Wheel Drive)
If a problem occurs with the Full-Time Four-Wheel Drive
system, this message will appear on the DIC. If this
message appears, stop as soon as possible and turn off
the vehicle. Restart the vehicle and check for the
message on the DIC display. If the message is still
displayed, or appears again when you begin driving,
there is a problem with the Full-Time Four-Wheel Drive
system. See your dealer for service. Pressing any of
the four DIC buttons or the trip odometer reset stem will
clear the message from the DIC display.
SERVICE AIR BAG
If there is a problem with the airbag system, this
message will be displayed on the DIC. Have your dealer
inspect the system for problems. Pressing any of the
four DIC buttons or the trip odometer reset stem
will clear the message from the DIC display. SeeAirbag
Readiness Light on page 3-32andAirbag System on
page 1-58for more information.
3-52
Page 332 of 502
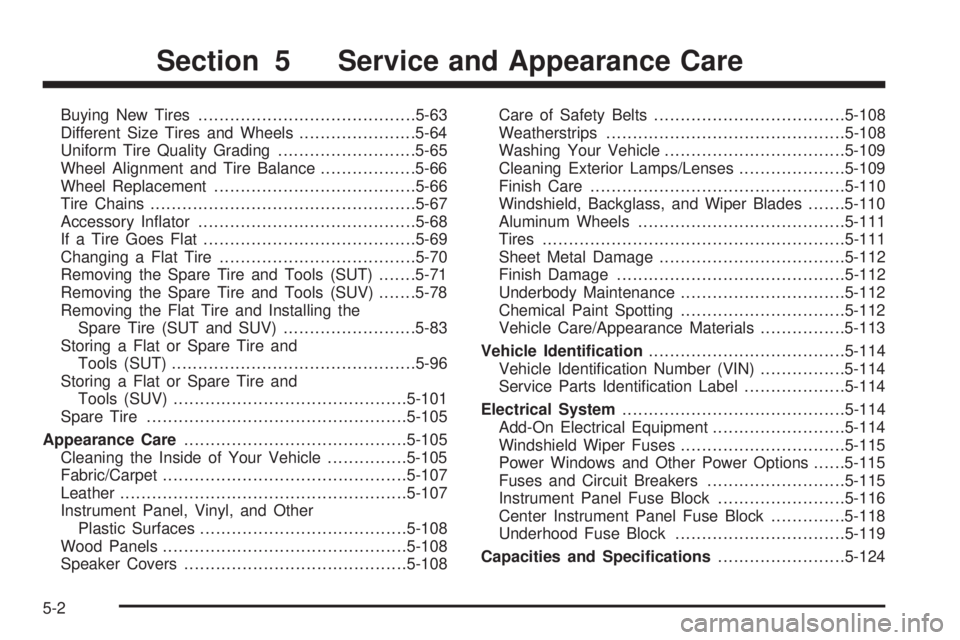
Buying New Tires.........................................5-63
Different Size Tires and Wheels......................5-64
Uniform Tire Quality Grading..........................5-65
Wheel Alignment and Tire Balance..................5-66
Wheel Replacement......................................5-66
Tire Chains..................................................5-67
Accessory In�ator.........................................5-68
If a Tire Goes Flat........................................5-69
Changing a Flat Tire.....................................5-70
Removing the Spare Tire and Tools (SUT).......5-71
Removing the Spare Tire and Tools (SUV).......5-78
Removing the Flat Tire and Installing the
Spare Tire (SUT and SUV).........................5-83
Storing a Flat or Spare Tire and
Tools (SUT)..............................................5-96
Storing a Flat or Spare Tire and
Tools (SUV)............................................5-101
Spare Tire.................................................5-105
Appearance Care..........................................5-105
Cleaning the Inside of Your Vehicle...............5-105
Fabric/Carpet..............................................5-107
Leather......................................................5-107
Instrument Panel, Vinyl, and Other
Plastic Surfaces.......................................5-108
Wood Panels..............................................5-108
Speaker Covers..........................................5-108Care of Safety Belts....................................5-108
Weatherstrips.............................................5-108
Washing Your Vehicle..................................5-109
Cleaning Exterior Lamps/Lenses....................5-109
Finish Care................................................5-110
Windshield, Backglass, and Wiper Blades.......5-110
Aluminum Wheels.......................................5-111
Tires.........................................................5-111
Sheet Metal Damage...................................5-112
Finish Damage...........................................5-112
Underbody Maintenance...............................5-112
Chemical Paint Spotting...............................5-112
Vehicle Care/Appearance Materials................5-113
Vehicle Identi�cation.....................................5-114
Vehicle Identi�cation Number (VIN)................5-114
Service Parts Identi�cation Label...................5-114
Electrical System..........................................5-114
Add-On Electrical Equipment.........................5-114
Windshield Wiper Fuses...............................5-115
Power Windows and Other Power Options......5-115
Fuses and Circuit Breakers..........................5-115
Instrument Panel Fuse Block........................5-116
Center Instrument Panel Fuse Block..............5-118
Underhood Fuse Block................................5-119
Capacities and Speci�cations........................5-124
Section 5 Service and Appearance Care
5-2
Page 445 of 502
Windshield Wiper Fuses
The windshield wiper motor is protected by an internal
circuit breaker and a fuse. If the motor overheats due to
heavy snow, etc., the wiper will stop until the motor
cools. If the overload is caused by some electrical
problem and not snow, etc., be sure to get it �xed.
Power Windows and Other
Power Options
Circuit breakers protect the power windows and other
power accessories. When the current load is too heavy,
the circuit breaker opens and closes, protecting the
circuit until the problem is �xed or goes away.
Fuses and Circuit Breakers
The wiring circuits in your vehicle are protected from
short circuits by a combination of fuses, circuit breakers
and fusible thermal links. This greatly reduces the
chance of �res caused by electrical problems.
Look at the silver-colored band inside the fuse. If the
band is broken or melted, replace the fuse. Be sure you
replace a bad fuse with a new one of the identical
size and rating.
If you ever have a problem on the road and don’t have
a spare fuse, you can borrow one that has the same
amperage. Just pick some feature of your vehicle
that you can get along without – like the radio or
cigarette lighter – and use its fuse, if it is the correct
amperage. Replace it as soon as you can.
5-115
Page 446 of 502
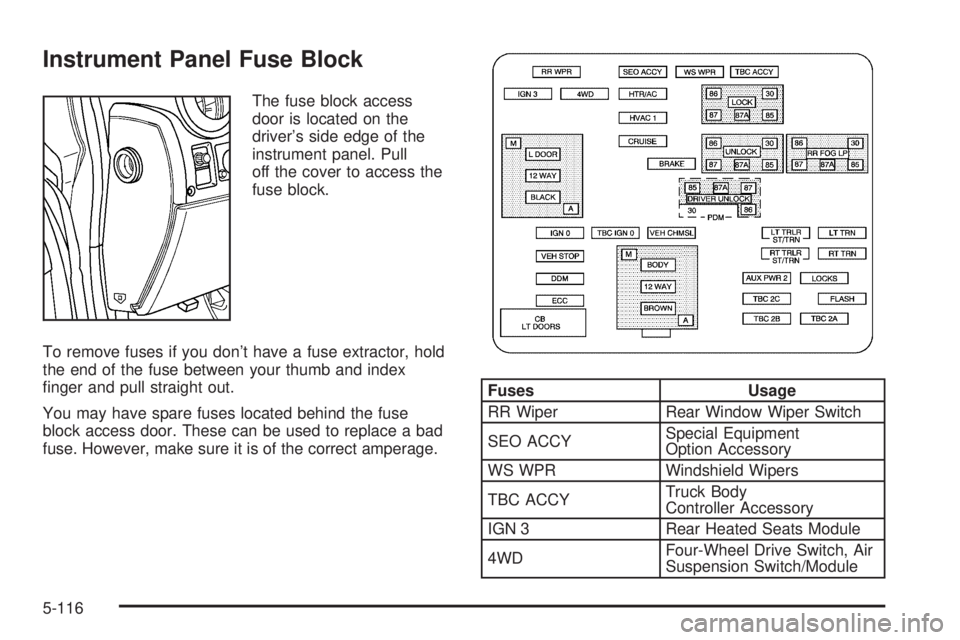
Instrument Panel Fuse Block
The fuse block access
door is located on the
driver’s side edge of the
instrument panel. Pull
off the cover to access the
fuse block.
To remove fuses if you don’t have a fuse extractor, hold
the end of the fuse between your thumb and index
�nger and pull straight out.
You may have spare fuses located behind the fuse
block access door. These can be used to replace a bad
fuse. However, make sure it is of the correct amperage.
Fuses Usage
RR Wiper Rear Window Wiper Switch
SEO ACCYSpecial Equipment
Option Accessory
WS WPR Windshield Wipers
TBC ACCYTruck Body
Controller Accessory
IGN 3 Rear Heated Seats Module
4WDFour-Wheel Drive Switch, Air
Suspension Switch/Module
5-116
Page 447 of 502
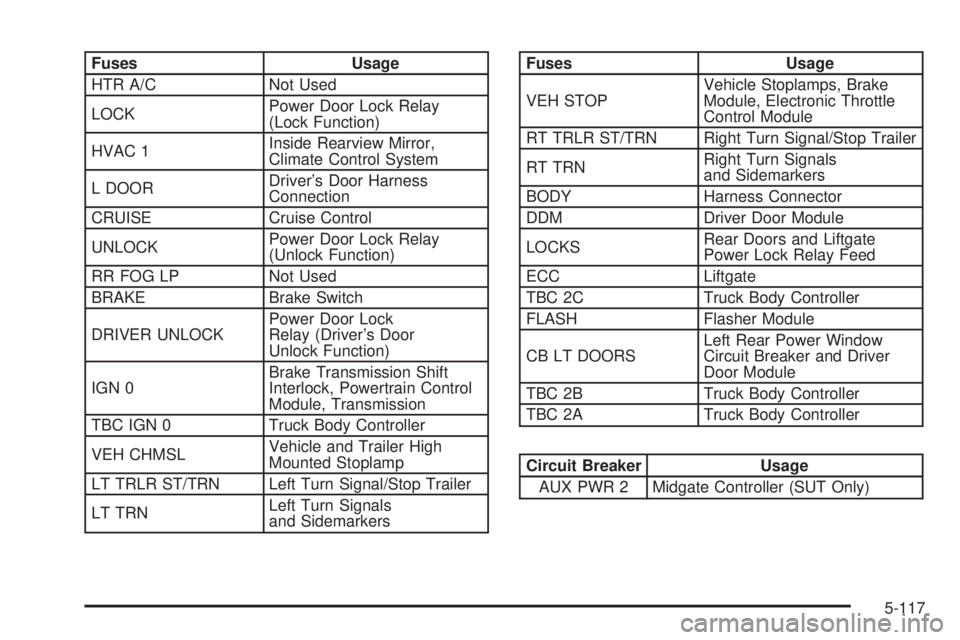
Fuses Usage
HTR A/C Not Used
LOCKPower Door Lock Relay
(Lock Function)
HVAC 1Inside Rearview Mirror,
Climate Control System
L DOORDriver’s Door Harness
Connection
CRUISE Cruise Control
UNLOCKPower Door Lock Relay
(Unlock Function)
RR FOG LP Not Used
BRAKE Brake Switch
DRIVER UNLOCKPower Door Lock
Relay (Driver’s Door
Unlock Function)
IGN 0Brake Transmission Shift
Interlock, Powertrain Control
Module, Transmission
TBC IGN 0 Truck Body Controller
VEH CHMSLVehicle and Trailer High
Mounted Stoplamp
LT TRLR ST/TRN Left Turn Signal/Stop Trailer
LT TRNLeft Turn Signals
and SidemarkersFuses Usage
VEH STOPVehicle Stoplamps, Brake
Module, Electronic Throttle
Control Module
RT TRLR ST/TRN Right Turn Signal/Stop Trailer
RT TRNRight Turn Signals
and Sidemarkers
BODY Harness Connector
DDM Driver Door Module
LOCKSRear Doors and Liftgate
Power Lock Relay Feed
ECC Liftgate
TBC 2C Truck Body Controller
FLASH Flasher Module
CB LT DOORSLeft Rear Power Window
Circuit Breaker and Driver
Door Module
TBC 2B Truck Body Controller
TBC 2A Truck Body Controller
Circuit Breaker Usage
AUX PWR 2 Midgate Controller (SUT Only)
5-117
Page 449 of 502
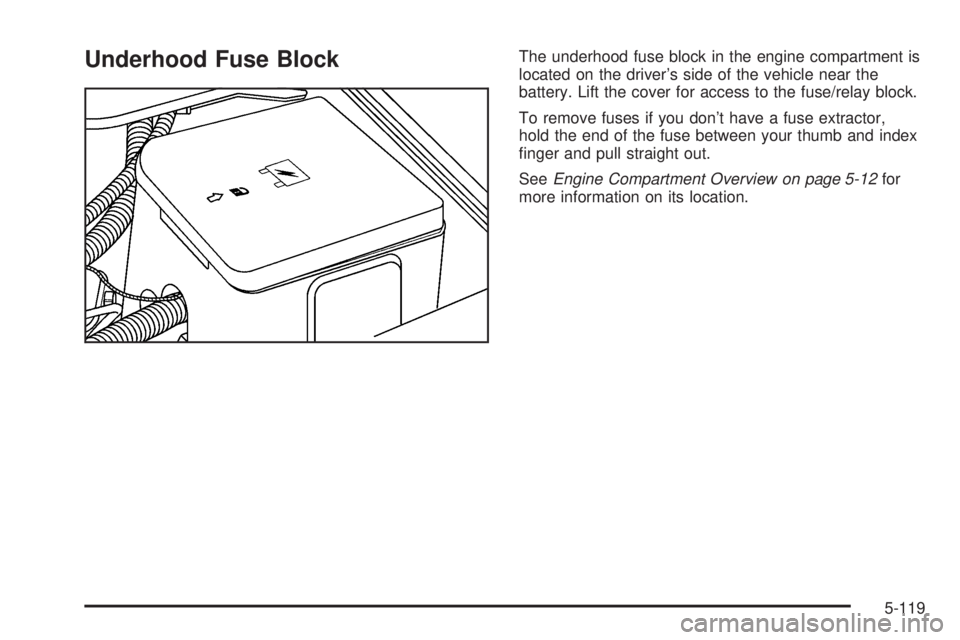
Underhood Fuse BlockThe underhood fuse block in the engine compartment is
located on the driver’s side of the vehicle near the
battery. Lift the cover for access to the fuse/relay block.
To remove fuses if you don’t have a fuse extractor,
hold the end of the fuse between your thumb and index
�nger and pull straight out.
SeeEngine Compartment Overview on page 5-12for
more information on its location.
5-119
Page 451 of 502
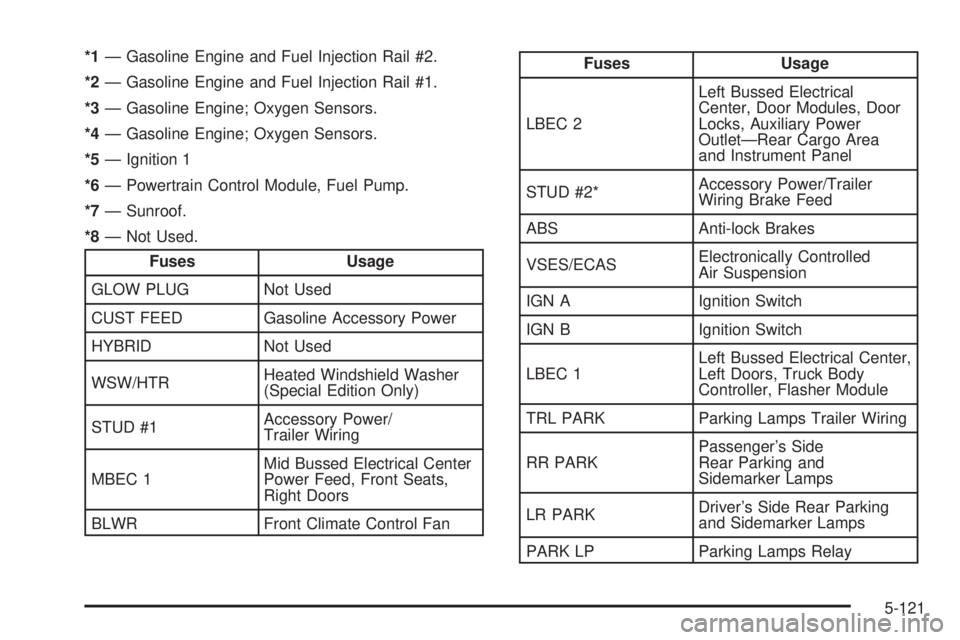
*1— Gasoline Engine and Fuel Injection Rail #2.
*2— Gasoline Engine and Fuel Injection Rail #1.
*3— Gasoline Engine; Oxygen Sensors.
*4— Gasoline Engine; Oxygen Sensors.
*5— Ignition 1
*6— Powertrain Control Module, Fuel Pump.
*7— Sunroof.
*8— Not Used.
Fuses Usage
GLOW PLUG Not Used
CUST FEED Gasoline Accessory Power
HYBRID Not Used
WSW/HTRHeated Windshield Washer
(Special Edition Only)
STUD #1Accessory Power/
Trailer Wiring
MBEC 1Mid Bussed Electrical Center
Power Feed, Front Seats,
Right Doors
BLWR Front Climate Control Fan
Fuses Usage
LBEC 2Left Bussed Electrical
Center, Door Modules, Door
Locks, Auxiliary Power
Outlet—Rear Cargo Area
and Instrument Panel
STUD #2*Accessory Power/Trailer
Wiring Brake Feed
ABS Anti-lock Brakes
VSES/ECASElectronically Controlled
Air Suspension
IGN A Ignition Switch
IGN B Ignition Switch
LBEC 1Left Bussed Electrical Center,
Left Doors, Truck Body
Controller, Flasher Module
TRL PARK Parking Lamps Trailer Wiring
RR PARKPassenger’s Side
Rear Parking and
Sidemarker Lamps
LR PARKDriver’s Side Rear Parking
and Sidemarker Lamps
PARK LP Parking Lamps Relay
5-121
Page 452 of 502
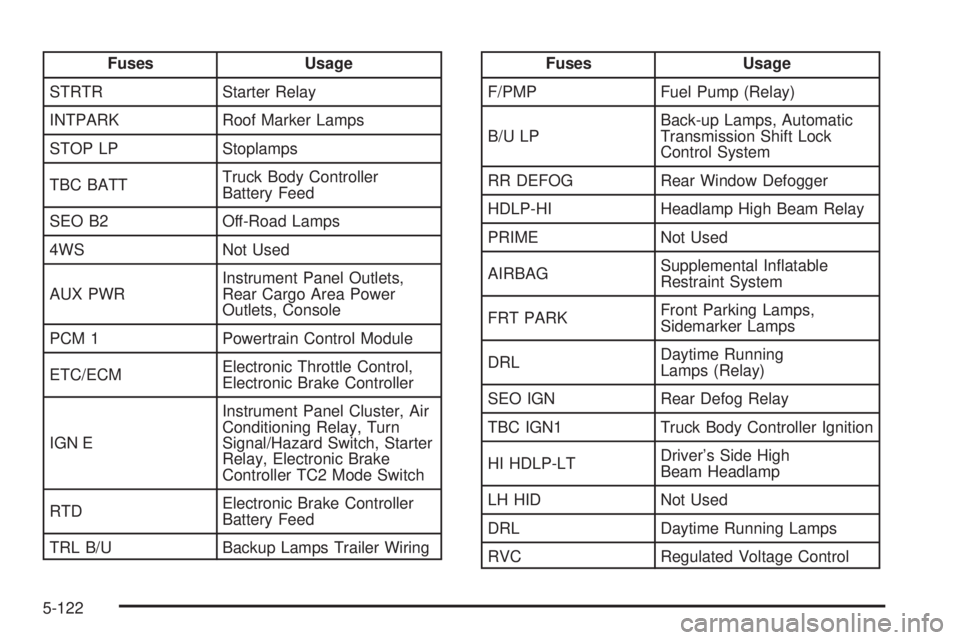
Fuses Usage
STRTR Starter Relay
INTPARK Roof Marker Lamps
STOP LP Stoplamps
TBC BATTTruck Body Controller
Battery Feed
SEO B2 Off-Road Lamps
4WS Not Used
AUX PWRInstrument Panel Outlets,
Rear Cargo Area Power
Outlets, Console
PCM 1 Powertrain Control Module
ETC/ECMElectronic Throttle Control,
Electronic Brake Controller
IGN EInstrument Panel Cluster, Air
Conditioning Relay, Turn
Signal/Hazard Switch, Starter
Relay, Electronic Brake
Controller TC2 Mode Switch
RTDElectronic Brake Controller
Battery Feed
TRL B/U Backup Lamps Trailer WiringFuses Usage
F/PMP Fuel Pump (Relay)
B/U LPBack-up Lamps, Automatic
Transmission Shift Lock
Control System
RR DEFOG Rear Window Defogger
HDLP-HI Headlamp High Beam Relay
PRIME Not Used
AIRBAGSupplemental In�atable
Restraint System
FRT PARKFront Parking Lamps,
Sidemarker Lamps
DRLDaytime Running
Lamps (Relay)
SEO IGN Rear Defog Relay
TBC IGN1 Truck Body Controller Ignition
HI HDLP-LTDriver’s Side High
Beam Headlamp
LH HID Not Used
DRL Daytime Running Lamps
RVC Regulated Voltage Control
5-122
Page 453 of 502
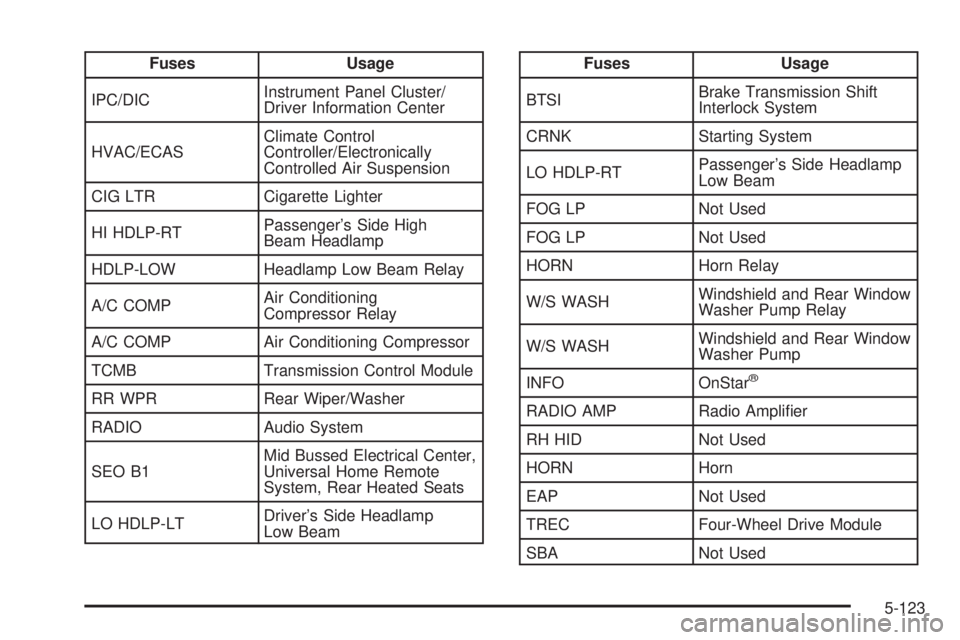
Fuses Usage
IPC/DICInstrument Panel Cluster/
Driver Information Center
HVAC/ECASClimate Control
Controller/Electronically
Controlled Air Suspension
CIG LTR Cigarette Lighter
HI HDLP-RTPassenger’s Side High
Beam Headlamp
HDLP-LOW Headlamp Low Beam Relay
A/C COMPAir Conditioning
Compressor Relay
A/C COMP Air Conditioning Compressor
TCMB Transmission Control Module
RR WPR Rear Wiper/Washer
RADIO Audio System
SEO B1Mid Bussed Electrical Center,
Universal Home Remote
System, Rear Heated Seats
LO HDLP-LTDriver’s Side Headlamp
Low BeamFuses Usage
BTSIBrake Transmission Shift
Interlock System
CRNK Starting System
LO HDLP-RTPassenger’s Side Headlamp
Low Beam
FOG LP Not Used
FOG LP Not Used
HORN Horn Relay
W/S WASHWindshield and Rear Window
Washer Pump Relay
W/S WASHWindshield and Rear Window
Washer Pump
INFO OnStar
®
RADIO AMP Radio Ampli�er
RH HID Not Used
HORN Horn
EAP Not Used
TREC Four-Wheel Drive Module
SBA Not Used
5-123