seat memory HUMMER H2 2006 Owners Manual
[x] Cancel search | Manufacturer: HUMMER, Model Year: 2006, Model line: H2, Model: HUMMER H2 2006Pages: 502, PDF Size: 3.35 MB
Page 8 of 502

Front Seats
Power Seats
The power seat controls are located on the outboard
edge of the front seats.Horizontal Control:This control adjusts the
seat cushion.
Raise or lower the front of the seat by raising or
lowering the forward edge of the control. Raise
or lower the rear of the seat by raising or lowering
the rear edge of the control.
Move the seat forward or rearward by moving the
whole control toward the front or toward the rear
of the vehicle.
Lower or raise the entire seat cushion by moving
the whole control up or down.
Vertical Control:This control adjusts the seatback.
Move the reclining front seatback rearward or forward by
moving the control toward the rear or toward the front
of the vehicle. This adjusts the angle of the seatback.
For more information on the reclining seatbacks,
seeReclining Seatbacks on page 1-4.
Your vehicle has a memory function which allows seat
settings to be saved and recalled. SeeMemory Seat
on page 2-63for more information.
1-2
Page 9 of 502

Power Lumbar
Your vehicle’s seats have power lumbar.
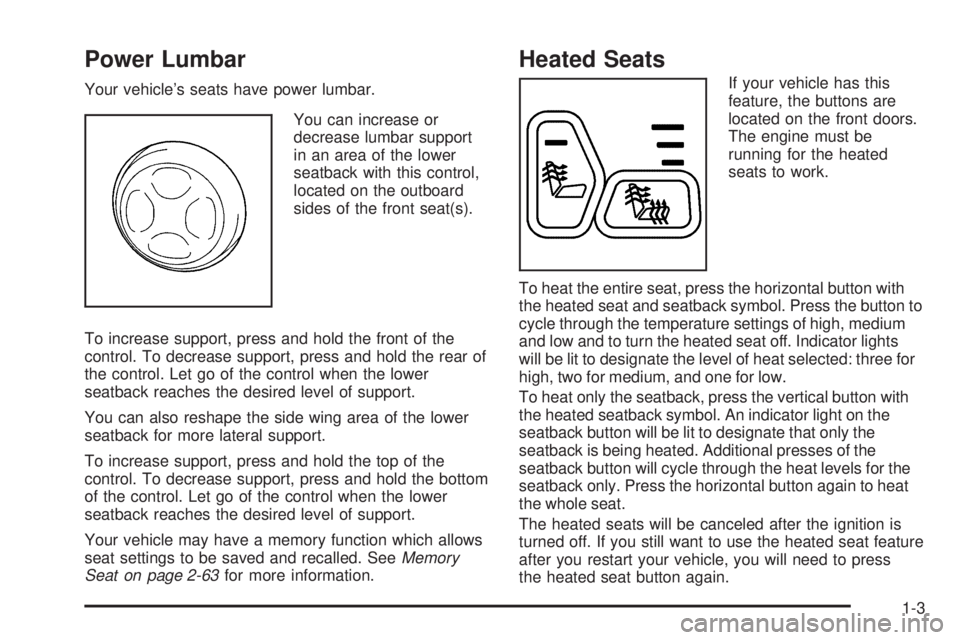
You can increase or
decrease lumbar support
in an area of the lower
seatback with this control,
located on the outboard
sides of the front seat(s).
To increase support, press and hold the front of the
control. To decrease support, press and hold the rear of
the control. Let go of the control when the lower
seatback reaches the desired level of support.
You can also reshape the side wing area of the lower
seatback for more lateral support.
To increase support, press and hold the top of the
control. To decrease support, press and hold the bottom
of the control. Let go of the control when the lower
seatback reaches the desired level of support.
Your vehicle may have a memory function which allows
seat settings to be saved and recalled. SeeMemory
Seat on page 2-63for more information.
Heated Seats
If your vehicle has this
feature, the buttons are
located on the front doors.
The engine must be
running for the heated
seats to work.
To heat the entire seat, press the horizontal button with
the heated seat and seatback symbol. Press the button to
cycle through the temperature settings of high, medium
and low and to turn the heated seat off. Indicator lights
will be lit to designate the level of heat selected: three for
high, two for medium, and one for low.
To heat only the seatback, press the vertical button with
the heated seatback symbol. An indicator light on the
seatback button will be lit to designate that only the
seatback is being heated. Additional presses of the
seatback button will cycle through the heat levels for the
seatback only. Press the horizontal button again to heat
the whole seat.
The heated seats will be canceled after the ignition is
turned off. If you still want to use the heated seat feature
after you restart your vehicle, you will need to press
the heated seat button again.
1-3
Page 78 of 502

OnStar®System.............................................2-48
Universal Home Remote System......................2-50
Universal Home Remote System Operation......2-50
Storage Areas................................................2-54
Glove Box...................................................2-54
Center Overhead Console..............................2-54
Center Console Storage Area.........................2-54
Luggage Carrier...........................................2-54Rear Seat Armrest........................................2-58
Cargo Tie Downs (SUT)................................2-58
All-Weather Cargo Area.................................2-58
Tonneau Cover (SUT)...................................2-60
Sunroof.........................................................2-61
Vehicle Personalization...................................2-63
Memory Seat...............................................2-63
Section 2 Features and Controls
2-2
Page 121 of 502

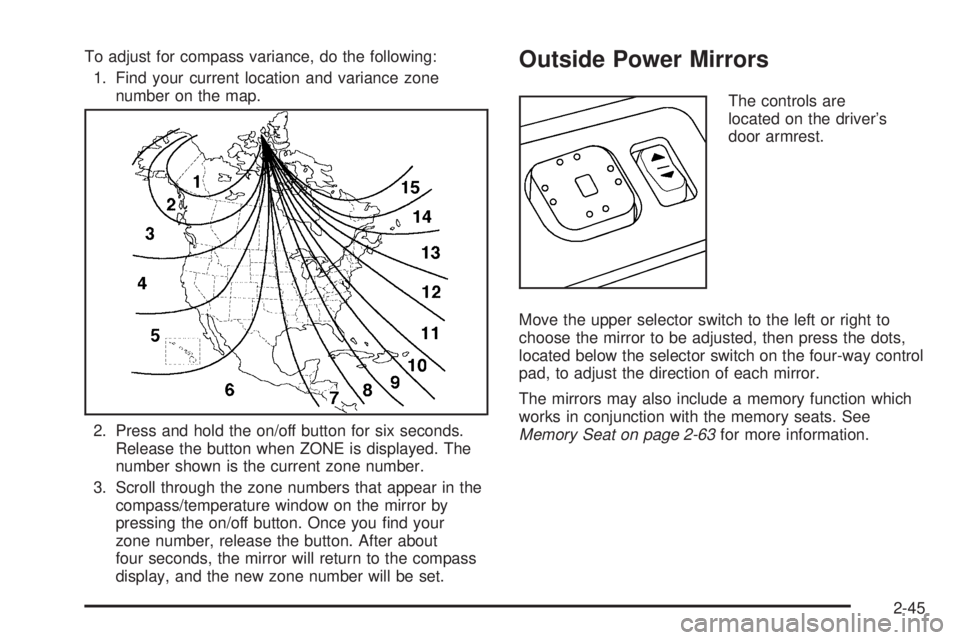
To adjust for compass variance, do the following:
1. Find your current location and variance zone
number on the map.
2. Press and hold the on/off button for six seconds.
Release the button when ZONE is displayed. The
number shown is the current zone number.
3. Scroll through the zone numbers that appear in the
compass/temperature window on the mirror by
pressing the on/off button. Once you �nd your
zone number, release the button. After about
four seconds, the mirror will return to the compass
display, and the new zone number will be set.Outside Power Mirrors
The controls are
located on the driver’s
door armrest.
Move the upper selector switch to the left or right to
choose the mirror to be adjusted, then press the dots,
located below the selector switch on the four-way control
pad, to adjust the direction of each mirror.
The mirrors may also include a memory function which
works in conjunction with the memory seats. See
Memory Seat on page 2-63for more information.
2-45
Page 139 of 502

Vehicle Personalization
In addition to the following features, your vehicle may
also have features that can be programmed through the
Driver Information Center (DIC). SeeDIC Vehicle
Customization on page 3-55for more information.
Memory Seat
If your vehicle has this
feature, the controls for
the memory function
are located on the
driver’s door.
These buttons are used to program and recall memory
settings for the driver’s seat and both the driver’s
and passenger’s outside mirrors. The settings for these
features can be saved for up to two drivers.To store the memory settings, do the following:
1. While the vehicle is in PARK (P), adjust the driver’s
seat, including the seatback recliner, lumbar, and
side wing area, and both outside mirrors to
your preference.
2. Press and hold the 1 or 2 button of the memory
control for three seconds. A double chime will
sound to let you know that the position has
been stored.
To repeat the procedure for a second driver, follow the
preceding steps, but press the other numbered
memory control button.
Each time button 1 or 2 is pressed and released while
the vehicle is in PARK (P), a single chime will sound and
the memory position will be recalled.
To stop recall movement of the memory seat feature at
any time, press one of the memory buttons or power
seat controls.
2-63
Page 140 of 502

Easy Exit Seat
The controls for this memory function are located on the
driver’s door.
B(Easy Exit Seat):This button is used to program
and recall the desired driver’s seat position when exiting
or entering the vehicle. The seat position can be
saved for up to two drivers.
To store the seat exit position, do the following:
1. Press and release the 1 or 2 button. The seat will
move to the stored memory position.
2. Adjust the seat to the desired exit position.3. Press and hold the exit button of the memory
control for three seconds. A double chime will sound
to let you know that the position has been stored
for the selected button 1 or 2.
To repeat the procedure for a second driver, follow
the preceding steps, but press the other numbered
memory control button.
To use the seat exit position, do one of the following:
Press the exit button on the memory control, or
If this feature is activated in the DIC, removing the
key from the ignition will move the seat to the exit
position.
See “Easy Exit Seat” underDIC Vehicle Customization
on page 3-55for more information on activating this
feature in the DIC.
2-64
Page 199 of 502

Easy Exit Seat
Press the customization button until EASY EXIT SEAT
appears in the display. To select your preference for
seat position exit, press the select button while
EASY EXIT SEAT is displayed on the DIC. Pressing the
select button will scroll through the following choices:
EASY EXIT SEAT: OFF (default):No seat exit
recall will occur.
EASY EXIT SEAT: ON:The driver’s seat will move
to the exit position when the key is removed from
the ignition.
Choose one of the available options and press the
customization button while it is displayed on the DIC to
select it and move on to the next feature. For more
information on seat position exit, seeMemory Seat on
page 2-63.
Curb View
Press the customization button until CURB VIEW
appears in the display. To select your preference for
curb view, press the select button while CURB VIEW is
displayed on the DIC. Pressing the select button will
scroll through the following choices:
CURB VIEW: OFF (default):Neither outside mirror will
be tilted down when the vehicle is shifted into
REVERSE (R).CURB VIEW: PASSENGER:The passenger’s outside
mirror will be tilted down when the vehicle is shifted
into REVERSE (R).
CURB VIEW: DRIVER:The driver’s outside mirror will
be tilted down when the vehicle is shifted into
REVERSE (R).
CURB VIEW: BOTH:The driver’s and passenger’s
outside mirrors will be tilted down when the vehicle is
shifted into REVERSE (R).
Choose one of the available options and press the
customization button while it is displayed on the DIC to
select it and move on to the next feature. For more
information on tilt mirror in reverse, seeOutside
Automatic Dimming Mirror with Curb View Assist on
page 2-47.
Alarm Warning
Press the customization button until ALARM WARNING
appears in the display. To select your preference for
alarm warning, press the select button while ALARM
WARNING is displayed on the DIC. Pressing the select
button will scroll through the following choices:
ALARM WARNING: BOTH (default):The headlamps
will �ash and the horn will chirp when the alarm is active.
ALARM WARNING: OFF:There will be no alarm
warning on activation.
3-59
Page 496 of 502

M
Maintenance Schedule
Additional Required Services........................... 6-6
At Each Fuel Fill........................................... 6-8
At Least Once a Month.................................. 6-9
At Least Once a Year..................................6-10
Introduction.................................................. 6-2
Maintenance Footnotes.................................. 6-7
Maintenance Record....................................6-16
Maintenance Requirements............................. 6-2
Normal Maintenance Replacement Parts.........6-14
Owner Checks and Services........................... 6-8
Recommended Fluids and Lubricants.............6-12
Scheduled Maintenance................................. 6-4
Using.......................................................... 6-2
Your Vehicle and the Environment................... 6-2
Malfunction Indicator Light................................3-39
Memory Seat.................................................2-63
Message
DIC Warnings and Messages........................3-48
Midgate.........................................................2-12
Mirrors
Automatic Dimming Rearview with Compass....2-43
Automatic Dimming Rearview with OnStar
®
and Compass..........................................2-39
Automatic Dimming Rearview with OnStar®,
Compass and Temperature Display.............2-41
Outside Automatic Dimming Mirror with Curb
View Assist.............................................2-47Mirrors (cont.)
Outside Convex Mirror.................................2-46
Outside Heated Mirrors................................2-47
Outside Power Mirrors..................................2-45
MyGMLink.com................................................ 7-3
N
Navigation/Radio System, see Navigation
Manual......................................................3-88
New Vehicle Break-In......................................2-24
Normal Maintenance Replacement Parts............6-14
O
Odometer......................................................3-31
Odometer, Trip...............................................3-31
Off-Road Driving.............................................4-16
Off-Road Lamps.............................................3-17
Off-Road Recovery..........................................4-13
Oil
Engine.......................................................5-14
Pressure Gage............................................3-41
Oil, Engine Oil Life System..............................5-17
Older Children, Restraints................................1-32
Online Owner Center........................................ 7-3
OnStar
®System, see OnStar®Manual...............2-48
Other Warning Devices...................................... 3-6
Outlet Adjustment............................................3-28
8
Page 499 of 502

Safety Belts (cont.)
Rear Safety Belt Comfort Guides...................1-29
Rear Seat Passengers.................................1-27
Right Front Passenger Position......................1-27
Safety Belt Extender....................................1-31
Safety Belt Use During Pregnancy.................1-26
Safety Belts Are for Everyone.......................1-14
Safety Warnings and Symbols.............................. iii
Scheduled Maintenance..................................... 6-4
Seats
60/40 Split Bench Seat.................................. 1-6
Head Restraints............................................ 1-5
Heated Seats............................................... 1-3
Heated Seats - Rear..................................... 1-6
Memory.....................................................2-63
Power Lumbar.............................................. 1-3
Power Seats................................................. 1-2
Reclining Seatbacks...................................... 1-4
Third Row Seat............................................ 1-7
Securing a Child Restraint
Rear Seat Position......................................1-52
Right Front Seat Position..............................1-54
Security Light.................................................3-42
Selectable Extended Rear Ride Height...............4-61
Service........................................................... 5-3
Accessories and Modi�cations......................... 5-3
Adding Equipment to the Outside of Your
Vehicle..................................................... 5-5Service (cont.)
California Proposition 65 Warning.................... 5-3
Doing Your Own Work................................... 5-4
Engine Soon Light.......................................3-39
Publications Ordering Information...................7-15
Servicing Your Airbag-Equipped Vehicle..............1-68
Setting the Time.............................................3-62
Sheet Metal Damage.....................................5-112
Shifting Into Park (P).......................................2-35
Shifting Out of Park (P)...................................2-36
Signals, Turn and Lane-Change.......................... 3-7
Spare Tire....................................................5-105
Accessory In�ator........................................5-68
Carrier, Tailgate...........................................2-14
Installing....................................................5-83
Removing...........................................5-71, 5-78
Storing.............................................5-96, 5-101
Speci�cations, Capacities...............................5-124
Speedometer..................................................3-31
Split Bench Seat (60/40).................................... 1-6
Starting Your Engine.......................................2-25
Steering........................................................4-11
Steering Wheel Controls, Audio.......................3-110
Steering Wheel, Tilt Wheel................................. 3-6
Storage Areas
All-Weather Cargo Area................................2-58
Center Console Storage Area........................2-54
11
Page 501 of 502

Traction
Control System (TCS).................................... 4-9
Off Light.....................................................3-36
Trailer
Recommendations.......................................4-76
Transmission
Fluid, Automatic...........................................5-22
Temperature Gage.......................................3-37
Transmission Operation, Automatic....................2-27
Trip Odometer................................................3-31
Turn and Lane-Change Signals.......................... 3-7
Turn Signal/Multifunction Lever........................... 3-7
U
Understanding Radio Reception.......................3-111
Uniform Tire Quality Grading............................5-65
Universal Home Remote System.......................2-50
Operation...................................................2-50
V
Vehicle
Control........................................................ 4-5
Damage Warnings........................................... iv
Loading......................................................4-55
Symbols......................................................... iv
Vehicle Customization, DIC..............................3-55
Vehicle Data Collection and Event Data
Recorders..................................................7-10
Vehicle Identi�cation
Number (VIN)............................................5-114
Service Parts Identi�cation Label..................5-114
Vehicle Personalization....................................2-63
Memory Seat..............................................2-63
Ventilation Adjustment......................................3-28
Visors...........................................................2-21
Voltmeter Gage..............................................3-34
13