sensor HUMMER H2 2006 Owners Manual
[x] Cancel search | Manufacturer: HUMMER, Model Year: 2006, Model line: H2, Model: HUMMER H2 2006Pages: 502, PDF Size: 3.35 MB
Page 75 of 502

Adding Equipment to Your
Airbag-Equipped Vehicle
Q:Is there anything I might add to the front of the
vehicle that could keep the airbags from
working properly?
A:Yes. If you add things that change your vehicle’s
frame, bumper system, front end sheet metal or
height, they may keep the airbag system from
working properly. Also, the airbag system may not
work properly if you relocate any of the airbag
sensors. If you have any questions about this, you
should contact Customer Assistance before you
modify your vehicle. The phone numbers and
addresses for Customer Assistance are in Step Two
of theCustomer Satisfaction Procedure on
page 7-2.
Restraint System Check
Checking the Restraint Systems
Now and then, make sure the safety belt reminder light
and all your belts, buckles, latch plates, retractors
and anchorages are working properly. Look for any other
loose or damaged safety belt system parts. If you see
anything that might keep a safety belt system from doing
its job, have it repaired.
Torn or frayed safety belts may not protect you in a
crash. They can rip apart under impact forces. If a belt
is torn or frayed, get a new one right away.
Also look for any opened or broken airbag covers, and
have them repaired or replaced. (The airbag system
does not need regular maintenance.)
Notice:If you damage the covering for the driver’s
or the right front passenger’s airbag, the airbag
may not work properly. You may have to replace the
airbag module in the steering wheel or both the
airbag module and the instrument panel for the right
front passenger’s airbag. Do not open or break
the airbag coverings.
1-69
Page 155 of 502
;(Parking Lamps):Turn the control to this position to
turn on the parking lamps, together with the following:
Sidemarker Lamps
Taillamps
License Plate Lamps
Roof Marker Lamps
Instrument Panel Lights
2(Headlamps):Turn the control to this position to
turn on the headlamps, together with the previously
listed lamps and lights.
When the vehicle is turned off and the headlamps are in
AUTO, the headlamps may automatically remain on
for a set time. You can change this delay time using the
DIC. SeeDriver Information Center (DIC) on page 3-45.
You can switch your headlamps from low to high-beam
by pushing the turn signal/multifunction lever toward
the instrument panel.
Headlamps on Reminder
If a door is open, a reminder chime will sound when your
headlamps or parking lamps are manually turned on and
your key is out of the ignition. To turn off the chime, turn
the headlamp switch to off or AUTO and then back on. In
the AUTO mode, the headlamps turn off once the ignition
is in LOCK or may remain on until the headlamp delay
ends (if enabled in the DIC).
Daytime Running Lamps (DRL)
Daytime Running Lamps (DRL) can make it easier for
others to see the front of your vehicle during the
day. DRL can be helpful in many different driving
conditions, but they can be especially helpful in the short
periods after dawn and before sunset. Fully functional
daytime running lamps are required on all vehicles
�rst sold in Canada.
The DRL system will come on when the following
conditions are met:
The ignition is on,
the exterior lamps control is in AUTO, if enabled,
the transmission is not in PARK (P), and
the light sensor determines it is daytime.
3-15
Page 156 of 502

When the DRL are on, only your DRL lamps will be on.
The taillamps, sidemarker and other lamps won’t be
on. The instrument panel won’t be lit up either.
When it begins to get dark, the automatic headlamp
system will switch from DRL to the headlamps.
As with any vehicle, you should turn on the regular
headlamp system when you need it.
Automatic Headlamp System
When it is dark enough outside and the headlamp
switch is in AUTO, your automatic headlamp system will
turn on your headlamps at the normal brightness
along with other lamps such as the taillamps,
sidemarker, parking lamps, roof marker lamps and the
instrument panel lights. The radio lights will also be dim.
To turn off the automatic headlamp system, turn the
exterior lamps switch to the off position and then
release. Turning off the automatic headlamp system
with the headlamp switch is not available for vehicles
�rst sold in Canada. For vehicles �rst sold in Canada,
you can turn off the automatic headlamp system
when parked at night by applying the parking brake
before starting your vehicle. The headlamps will remain
off once the vehicle is started for as long as you are
parked. If you release the parking brake, the lights willturn on. If the parking brake is not released before you
begin to drive, the exterior lamps will turn on above
2 mph (3.2 km/h).
Your vehicle has a light sensor located on the top of the
instrument panel. Be sure it is not covered, or the
system will be on whenever the ignition is on.
The system may also turn on your headlamps when
driving through a parking garage, heavy overcast
weather or a tunnel. This is normal.
There is a delay in the transition between the daytime
and nighttime operation of the Daytime Running
Lamps (DRL) and the automatic headlamp systems so
that driving under bridges or bright overhead street
lights does not affect the system. The DRL and
automatic headlamp system will only be affected when
the light sensor sees a change in lighting lasting
longer than the delay.
If you start your vehicle in a dark garage, the automatic
headlamp system will come on immediately. Once
you leave the garage, it will take approximately
one minute for the automatic headlamp system to
change to DRL if it is light outside. During that delay,
your instrument panel cluster may not be as bright
as usual. Make sure your instrument panel brightness
control is in the full bright position. SeeInstrument Panel
Brightness on page 3-17.
3-16
Page 164 of 502

Use the steps below to place the entire system in
automatic mode:
1. Press the AUTO button.
When AUTO is selected, the display will change to
show the current driver’s set temperature, delivery
mode and fan speed. Press the AUTO button again
within �ve seconds to display the passenger’s set
temperature.
If the driver and passenger’s temperature
settings are not the same, the opposite side
temperature setting will be displayed for an
additional �ve seconds. To make the passenger’s
temperature the same as the driver’s press and hold
the AUTO button for about four seconds.
When auto is selected, the air conditioning operation
and air inlet will be automatically controlled. The
air conditioning compressor will run when the
outside temperature is over about 40°F (4°C). The
air inlet will normally be set to outside air. If it’s
hot outside, the air inlet may automatically switch to
recirculate inside air to help quickly cool down
your vehicle. The light on the button will illuminate
in recirculation.
2. Set the driver’s and passenger’s temperature.
To �nd your comfort setting, start with a 74°F (23°C)
temperature setting and allow about 20 minutes
for the system to regulate. Turn the driver’s orpassenger’s side temperature knob to adjust the
temperature setting as necessary. If you choose the
temperature setting of 60°F (15°C) the system
will remain at the maximum cooling setting. If you
choose the temperature setting of 90°F (32°C)
the system will remain at the maximum heat setting.
Choosing either maximum setting will not cause
the vehicle to heat or cool any faster.
Be careful not to cover the sensor located on the
top of the instrument panel near the windshield. This
sensor regulates air temperature based on sun
load, and also turns on your headlamps.
To avoid blowing cold air in cold weather, the
system will delay turning on the fan until warm air is
available. The length of delay depends on the
engine coolant temperature. Pressing the fan switch
will override this delay and change the fan to a
selected speed.
9(Off):Press this button to turn off the entire climate
control system. Outside air will still enter the vehicle, and
will be directed to the �oor. This direction can be changed
by pressing the mode button. The temperature can also
be adjusted using either temperature knob. Press the up
or down arrows on the fan switch, the defrost button, the
AUTO button, or the air conditioning button to turn the
system on when it is off.
3-24
Page 172 of 502

Airbag Readiness Light
There is an airbag readiness light on the instrument
panel, which shows the airbag symbol. The system
checks the airbag’s electrical system for malfunctions.
The light tells you if there is an electrical problem.
The system check includes the airbag sensors, the
airbag modules, the wiring and the crash sensing and
diagnostic module. For more information on the
airbag system, seeAirbag System on page 1-58.
This light will come on
when you start your
vehicle, and it will �ash for
a few seconds. Then the
light should go out. This
means the system is ready.
If the airbag readiness light stays on after you start the
vehicle or comes on when you are driving, your airbag
system may not work properly. Have your vehicle
serviced right away.{CAUTION:
If the airbag readiness light stays on after you
start your vehicle, it means the airbag system
may not be working properly. The airbags in
your vehicle may not in�ate in a crash, or they
could even in�ate without a crash. To help avoid
injury to yourself or others, have your vehicle
serviced right away if the airbag readiness light
stays on after you start your vehicle.
The airbag readiness light should �ash for a few
seconds when you turn the ignition key to RUN. If the
light doesn’t come on then, have it �xed so it will
be ready to warn you if there is a problem.
Airbag Off Light
When you turn the right front passenger’s airbag off,
this light will come on and stay on to remind you that the
airbag has been turned off. This light will go off when
you turn the airbag back on again. SeeAirbag Off
Switch on page 1-65for more on this, including
important safety information.
3-32
Page 233 of 502
AUX (Auxiliary):The monitor-mounted auxiliary input
jack is an AV 2 input jack. This auxiliary input jack allows
viewing of auxiliary sources such as portable DVD
units, game stations, video cameras, etc., on each
individual monitor. The sources connected to these
inputs cannot be shared between the monitors.
Press the SOURCE button on either monitor, or the
SEL button on the system remote control to select the
desired auxiliary source. See “SOURCE” under
Video Screens earlier in this section.
X(Wired Headphone Jack):This type of headphone
jack is used with universal wired headphones. The
wired headphone volume is adjusted using the up and
down arrow buttons. See “Wired Headphones” earlier in
this section.
Infrared Remote Sensor:The infrared remote sensor
receives light signals from the system’s remote
control. This type of sensor works as a line-of-sight
signal as the transmitted signals are received. In order
for the sensor to work properly, it must remain
unobstructed at all times.
DVD Player
The DVD player is located in the center console.
The DVD player can be controlled by the buttons on the
DVD player or by the buttons on the remote control.
See “Remote Control” later in this section for more
information.
The RSE system DVD player is only compatible with
DVDs of the appropriate region code for the country
where the vehicle was sold. The DVD region code is
printed on the jacket of most DVDs.
DVDs, Standard audio CDs, CD-R, CD-RW, enhanced
CDs, video CDs, and CD-ROM with MP3 media are
supported by this DVD player. DVD+R, DVD+RW, and
copy protected CDs may or may not be supported by the
DVD player. The DVD player does not support
DVD-RAM, DVD-ROM, DVD-R, DVD-R/W, and DVD
audio media. An error message will appear on the display
if this type of media is inserted into the DVD player.
If an error message appears on the video screen, see
“DVD Messages” later in this section.
3-93
Page 235 of 502
If a disc is already in the player, make sure that the
DVD player is on, then press the PLAY button on the
player faceplate or on the remote control to start playing
a disc.
Some DVDs will not allow fast forwarding or skipping of
the copyright information or previews. Some DVDs
will begin playing after the previews have �nished. If the
DVD does not begin playing at the main title, refer to
the on-screen instructions.
Ejecting a Disc
Press the eject button on the DVD player faceplate, to
eject the disc. As the disc is ejected, the display on
the video screen will indicate Open.
If a disc is ejected from the player, but not removed, the
disc will not reload until it is pushed back into the
player. Another way to reload a disc that has been
ejected, but not removed from the DVD player, is
to either press the eject button or the PLAY button. The
DVD player will automatically reload the disc and
display Close on the video screen.
Remote Control
The system’s remote control combines the control of all
monitor and DVD player functions. To use the remote
control, aim at the remote sensor located on the
upper right side of the monitor and press the desired
button on the remote control. The remote works
best when held at a comfortable distance from the
monitors.
Direct sunlight or very bright light may affect the ability
of the transmitter to receive signals from the remote
control. If the remote control does not seem to be
working, the batteries may need to be replaced. See
“Battery Replacement” later in this section. Objects
blocking the line-of-sight will affect the function of the
remote control.
Notice:Storing the remote control in a hot area or
in direct sunlight may damage it, and the repairs
will not be covered by your warranty. Keep the
remote control stored in a cool, dry place.
3-95
Page 246 of 502

Problem Recommended Action
The fast forward, fast
reverse, previous,
and next functions
do not work.
Some commands that
do one thing for
DVDs will not always
work or perform the
same function for
audio, audio discs, or
games. These
functions may also be
disabled when the
DVD is playing the
copyright information
or the previews.
Picture color is poor.
Spots or dotted
lines/stripes appear.
Set brightness/
color/tint controls to
the proper settings.
Change the location
of the vehicle. Poor
picture color can be
caused by neon
signs, high-voltage
power lines, CB
transmitter, and
neighboring vehicle’s
ignition plugs, cell
phones, etc.
Problem Recommended Action
No remote control
operation or unstable
operation.
Remove any obstacle
between the system
remote control and
the remote sensor on
the monitor.
Replace batteries
with new ones.
� Make sure the
batteries are
inserted correctly.
No rear seat
entertainment audio
sound from vehicle radio.
Turn on the POWER
to the radio, turn up
the volume.
Turn on the POWER
to the FM Modulator.
Tune FM Modulator
and vehicle radio to
the same FM
frequency.
Make sure the
driver’s side monitor
is switched to on.
3-106
Page 316 of 502
Press the height control button to raise the rear of the
vehicle.
A light in the button will begin to �ash as the rear of the
vehicle rises. Once the extended height has been
reached (this may take up to a minute), the warning
light will stop �ashing and will stay lit while the vehicle is
at the extended height.
To lower the vehicle to the normal ride height, press the
button again. The light in the button will �ash as the
suspension lowers. When the light in the button stops
�ashing and goes out, the suspension has reached
the normal ride height.
This feature will lower the vehicle to the normal height if
vehicle speed exceeds 40 mph (64 km/h).
You may also want to use this feature when ascending,
descending or cresting a steep hill as this can help
prevent the rear bumper from dragging on the base of
the hill or prevent the vehicle from grounding out
(high centering) on the crest of the hill.
Do not use this feature when towing a trailer.Electronically Controlled Air
Suspension System
The electronically controlled air suspension, if equipped,
keeps the rear of your vehicle level as you load and
unload it. The system includes a compressor, two height
sensor and two air springs supporting the vehicle.
The engine must be running for the system to level the
vehicle after loading or unloading. The system will
suspend leveling if any of the doors are open. Once the
doors are closed, system leveling will continue.
You may hear the compressor running when you load
your vehicle, and periodically as the system adjusts
the vehicle to the standard ride height. You may
also hear the release of air similar to a hissing sound
during suspension operation. This is normal.
Load leveling will not function normally with the in�ator
hose attached to the in�ator outlet. Remove the
in�ater hose from the outlet when it is not in use. See
Accessory In�ator on page 5-68.
4-62
Page 451 of 502
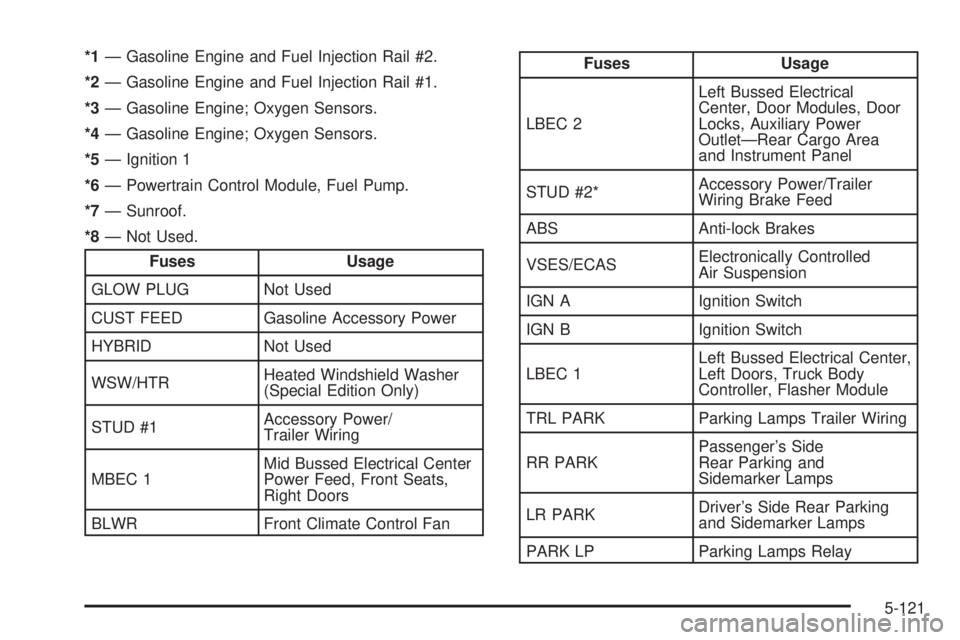
*1— Gasoline Engine and Fuel Injection Rail #2.
*2— Gasoline Engine and Fuel Injection Rail #1.
*3— Gasoline Engine; Oxygen Sensors.
*4— Gasoline Engine; Oxygen Sensors.
*5— Ignition 1
*6— Powertrain Control Module, Fuel Pump.
*7— Sunroof.
*8— Not Used.
Fuses Usage
GLOW PLUG Not Used
CUST FEED Gasoline Accessory Power
HYBRID Not Used
WSW/HTRHeated Windshield Washer
(Special Edition Only)
STUD #1Accessory Power/
Trailer Wiring
MBEC 1Mid Bussed Electrical Center
Power Feed, Front Seats,
Right Doors
BLWR Front Climate Control Fan
Fuses Usage
LBEC 2Left Bussed Electrical
Center, Door Modules, Door
Locks, Auxiliary Power
Outlet—Rear Cargo Area
and Instrument Panel
STUD #2*Accessory Power/Trailer
Wiring Brake Feed
ABS Anti-lock Brakes
VSES/ECASElectronically Controlled
Air Suspension
IGN A Ignition Switch
IGN B Ignition Switch
LBEC 1Left Bussed Electrical Center,
Left Doors, Truck Body
Controller, Flasher Module
TRL PARK Parking Lamps Trailer Wiring
RR PARKPassenger’s Side
Rear Parking and
Sidemarker Lamps
LR PARKDriver’s Side Rear Parking
and Sidemarker Lamps
PARK LP Parking Lamps Relay
5-121