tire type HUMMER H2 2006 Owners Manual
[x] Cancel search | Manufacturer: HUMMER, Model Year: 2006, Model line: H2, Model: HUMMER H2 2006Pages: 502, PDF Size: 3.35 MB
Page 220 of 502

To turn alternate frequency off, press and hold BAND
again for two seconds. AF OFF will appear on the
display. The radio will not switch to other stations.
This function does not apply for XM™ Satellite
Radio Service.
Setting Preset PTYs (RDS Only)
These pushbuttons have factory PTY presets. Up to
12 PTYs (six FM1 and six FM2), can be programmed on
the six numbered pushbuttons, by performing the
following steps:
1. Press BAND to select FM1 or FM2.
2. Press the TYPE button to activate program type
select mode. P-TYPE and the last selected PTY
will appear on the display.
3. Turn the TYPE knob or press and release the
TYPE button to select a PTY.
4. Press and hold one of the six numbered
pushbuttons until you hear a beep. Whenever that
numbered pushbutton is pressed (while in PTY
mode), the PTY that was set will return.
5. Repeat the steps for each pushbutton.
RDS Messages
INFO (Information):If the current station has a
message, INFO will appear on the display. Press this
knob to see the message. The message may display the
artist, song title, call in phone numbers, etc.
If the entire message is not displayed, parts of the
message will appear every three seconds. To scroll
through the message, press and release the INFO button.
A new group of words will appear on the display after
every press of this button. Once the complete message
has been displayed, INFO will disappear from the display
until another new message is received. The last message
can be displayed by pressing the INFO button. You can
view the last message until a new message is received or
a different station is tuned to.
Radio Messages
CAL ERR (Calibration Error):The audio system has
been calibrated for your vehicle from the factory. If
CAL ERR appears on the display, it means that the radio
has not been con�gured properly for the vehicle and
must be returned to your GM dealer for service.
LOCKED:This message is displayed when the
THEFTLOCK
®system has locked up. Take the vehicle
to your GM dealer for service.
If any error occurs repeatedly, or if an error cannot be
corrected, contact your GM dealer.
3-80
Page 227 of 502

4. Press and hold the SONG LIST button to save
the track into memory. When SONG LIST is
pressed, one beep will be heard immediately. After
two seconds of continuously pressing the SONG
LIST button, two beeps will sound to con�rm
the track has been saved.
5. Repeat Steps 3 and 4 for saving other selections.
S-LIST FULL will appear on the display if you try to save
more than 20 selections.
To play the song list, press the SONG LIST button.
One beep will be heard and S-LIST will appear on the
display. The recorded tracks will begin to play in
the order they were saved.
Seek through the song list by using the SEEK or TYPE
arrows. Seeking past the last saved track will return
to the �rst saved track.
To delete tracks from the song list, perform the
following steps:
1. Turn the CD player on.
2. Press the SONG LIST button to turn song list on.
S-LIST will appear on the display.
3. Press either SEEK or TYPE arrow to select the
desired track to be deleted.
4. Press and hold the SONG LIST button for
two seconds. When SONG LIST is pressed,
one beep will be heard immediately. After
two seconds of continuously pressing the SONG
LIST button, two beeps will be heard to con�rm that
the track has been deleted.After a track has been deleted, the remaining tracks are
moved up the list. When another track is added to the
song list, the track will be added to the end of the list.
To delete the entire song list, perform the
following steps:
1. Turn the CD player on.
2. Press the SONG LIST button to turn song list on.
S-LIST will appear on the display.
3. Press and hold the SONG LIST button for more
than four seconds. One beep will be heard,
followed by two beeps after two seconds, and a
�nal beep will be heard after four seconds. S-LIST
EMPTY will appear on the display indicating the
song list has been deleted.
If a CD is ejected, and the song list contains saved
tracks from that CD, those tracks are automatically
deleted from the song list. Any tracks saved to the song
list again are added to the bottom of the list.
To end song list mode, press the SONG LIST button.
One beep will be heard and S-LIST will be removed from
the display.
3-87
Page 237 of 502

Remote Control Buttons
(DVD Control Functions)
DVD POWER:Press this button to turn the DVD player
on and off.
ENTER:Press this button to enter a selected function.
Q,R,q,r(Directional Arrows):Press these
buttons to move through the DVD menus.
The up and down arrows will move through
MP3 folders.
RETURN
%:Press this button to go back one step in
the RSE On-Screen Display (OSD) menu and some
DVD menus. Press this button to exit the current menu
and to move to the previous menu.
SETUP:Press this button to modify default settings to
suit your personal preferences. For further information
on modifying the default settings, see “RSE On-Screen
Display (OSD) Menu” later in this section.
TITLE:Press this button to enter the disc title mode
with a disc loaded. The title feature is disc-speci�c, and
may not be available with the disc that is currently
loaded in the DVD player.
MENU:Press this button to enter the DVD disc menu
while the disc is playing. The type of menu displayed
depends on the disc.−VOLUME +
RQ:Press the minus sign to decrease
the audio volume. Press and hold this button, or
press and release multiple times to change the volume
level from a range of 20 to 0.
Press the plus sign to increase the audio volume. Press
and hold this button, or press and release multiple times
to change the volume level from a range of 0 to 20.
If distortion occurs, decrease the volume. The DVD
player will retain the last selected volume position
in memory.
S-TITLE (Subtitle):Press this button to switch between
the default language set on the DVD player and up to
any alternate language that may be recorded on
the DVD disc itself. Press this button again to turn the
subtitle function off.
AUDIO:Press this button to switch between the default
language set on the DVD player or to any alternate
language that may be recorded on the DVD disc itself.
REPEAT
$:Press this button to switch between
repeat functions of title, chapter, track, entire disc, or off.
A-B:This button is used to repeat prede�ned sections.
Press this button once while the disc is playing to
select the starting position. Press a second time to
select the end position. Press a third time to turn
the function off.
3-97
Page 269 of 502

Loss of Control
Let us review what driving experts say about what
happens when the three control systems — brakes,
steering, and acceleration — do not have enough
friction where the tires meet the road to do what the
driver has asked.
In any emergency, do not give up. Keep trying to
steer and constantly seek an escape route or area
of less danger.
Skidding
In a skid, a driver can lose control of the vehicle.
Defensive drivers avoid most skids by taking reasonable
care suited to existing conditions, and by not overdriving
those conditions. But skids are always possible.
The three types of skids correspond to your vehicle’s
three control systems. In the braking skid, your wheels
are not rolling. In the steering or cornering skid, too much
speed or steering in a curve causes tires to slip and lose
cornering force. And in the acceleration skid, too much
throttle causes the driving wheels to spin.
A cornering skid is best handled by easing your foot off
the accelerator pedal.If your vehicle starts to slide, ease your foot off the
accelerator pedal and quickly steer the way you want
the vehicle to go. If you start steering quickly enough,
your vehicle may straighten out. Always be ready
for a second skid if it occurs.
Of course, traction is reduced when water, snow, ice,
gravel, or other material is on the road. For safety, you
will want to slow down and adjust your driving to
these conditions. It is important to slow down on slippery
surfaces because stopping distance will be longer and
vehicle control more limited.
While driving on a surface with reduced traction, try
your best to avoid sudden steering, acceleration,
or braking, including engine braking by shifting to a
lower gear. Any sudden changes could cause the tires
to slide. You may not realize the surface is slippery
until your vehicle is skidding. Learn to recognize warning
clues — such as enough water, ice, or packed snow
on the road to make a mirrored surface — and
slow down when you have any doubt.
Remember: Any Anti-Lock Brake System (ABS) helps
avoid only the braking skid.
4-15
Page 288 of 502

After Off-Road Driving
Remove any brush or debris that has collected on the
underbody, chassis, or under the hood. These
accumulations can be a �re hazard.
After operation in mud or sand, have the brake linings
cleaned and checked. These substances can cause
glazing and uneven braking. Check the engine and oil
coolers for mud accumulation. Thoroughly and carefully
clean these devices to allow proper cooling. Check
the body structure, steering, suspension, wheels, tires,
and exhaust system for damage. Also, check the
fuel lines and cooling system for any leakage.
Your vehicle will require more frequent service due to
off-road use. See the Maintenance Schedule for
additional information.
Assist Steps
Your vehicle may be equipped with removable side steps.
Remove the steps prior to off-roading to give your
vehicle more ground clearance and to prevent damage
to the vehicle from the side steps dragging and/or
catching on obstacles.
Notice:Do not drive off-road with the side steps
attached to your vehicle. You can damage the side
steps and/or your vehicle’s frame if they get caught
or drag against an obstacle. This damage would not
be covered by your vehicle’s warranty. Always
remove the side steps prior to any off-road driving.
U-Type Side Steps
The following instructions show how to install the
optional U-type steps. If you want to remove them, just
reverse the instructions:
1. Start with the side step brackets pointing up and
away from you, or just make sure the HUMMER
logo faces up.
2. For the front step, use the �rst and third brackets
on the vehicle from the front tire. For the rear step,
use the �rst and third brackets on the vehicle
from the rear tire.
You will notice that the side steps have pins on
both sides of the step brackets. This is because the
steps are interchangeable between front/back
and the driver/passenger sides of the vehicle. Use
the pins as follows:
Driver Side:Look at the side step with the
HUMMER logo facing you. You will use the pins
which are on the right side of each side step
bracket. This works for the front or rear of
the vehicle.
Passenger Side:Look at the side step with the
HUMMER logo facing you. You will use the pins
which are on the left side of each side step
bracket. This works for the front or rear of
the vehicle.
4-34
Page 322 of 502

Do not exceed the maximum allowable tongue weight
for your vehicle. Choose the shortest hitch extension
that will position the hitch ball closest to the vehicle. This
will help reduce the effect of trailer tongue weight on
the rear axle.
Your spare tire carrier is behind the tailgate. If your
hitch extension is too short, the spare tire may interfere
with trailer coupling or trailer tongue jack operation
on some types of trailers.
After you’ve loaded your trailer, weigh the trailer and
then the tongue, separately, to see if the weights
are proper. If they aren’t, you may be able to get
them right simply by moving some items around in
the trailer.
Trailering may also be limited by the vehicle’s ability to
carry tongue weight. Tongue weight cannot cause
the vehicle to exceed the GVWR (Gross Vehicle Weight
Rating) or the RGAWR (Rear Gross Axle Weight
Rating). The effect of additional weight may reduce
your trailering capacity more than the total of the
additional weight.Consider the following example:
A vehicle model base weight is 5,500 lbs (2 495 kg);
2,800 lbs (1 270 kg) at the front axle and 2,700 lbs
(1 225 kg) at the rear axle. It has a GVWR of 7,200 lbs
(3 266 kg), a RGAWR of 4,000 lbs (1 814 kg) and a
GCWR (Gross Combination Weight Rating) of
14,000 lbs (6 350 kg). The trailer rating should be:
You can expect tongue weight to be at least 10 percent
of trailer weight (850 lbs (386 kg)) and because the
weight is applied well behind the rear axle, the effect on
the rear axle will be greater than just the weight
itself, as much as 1.5 times as much. The weight at the
rear axle could be 850 lbs (386 kg) X 1.5 = 1,275 lbs
(578 kg). Since the rear axle already weighs 2,700 lbs
(1 225 kg), adding 1,275 lbs (578 kg) brings the
total to 3,975 lbs (1 803 kg). This is very close to, but
within the limit for RGAWR as well. The vehicle is set to
trailer up to 8,500 lbs (3 856 kg).
4-68
Page 384 of 502

Tire Sidewall Labeling
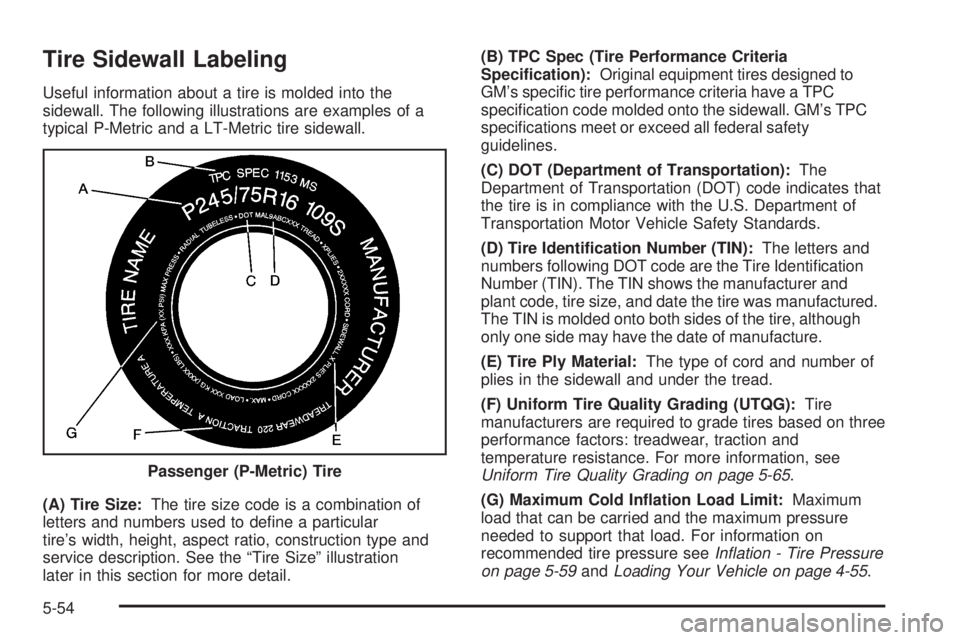
Useful information about a tire is molded into the
sidewall. The following illustrations are examples of a
typical P-Metric and a LT-Metric tire sidewall.
(A) Tire Size:The tire size code is a combination of
letters and numbers used to de�ne a particular
tire’s width, height, aspect ratio, construction type and
service description. See the “Tire Size” illustration
later in this section for more detail.(B) TPC Spec (Tire Performance Criteria
Speci�cation):Original equipment tires designed to
GM’s speci�c tire performance criteria have a TPC
speci�cation code molded onto the sidewall. GM’s TPC
speci�cations meet or exceed all federal safety
guidelines.
(C) DOT (Department of Transportation):The
Department of Transportation (DOT) code indicates that
the tire is in compliance with the U.S. Department of
Transportation Motor Vehicle Safety Standards.
(D) Tire Identi�cation Number (TIN):The letters and
numbers following DOT code are the Tire Identi�cation
Number (TIN). The TIN shows the manufacturer and
plant code, tire size, and date the tire was manufactured.
The TIN is molded onto both sides of the tire, although
only one side may have the date of manufacture.
(E) Tire Ply Material:The type of cord and number of
plies in the sidewall and under the tread.
(F) Uniform Tire Quality Grading (UTQG):Tire
manufacturers are required to grade tires based on three
performance factors: treadwear, traction and
temperature resistance. For more information, see
Uniform Tire Quality Grading on page 5-65.
(G) Maximum Cold In�ation Load Limit:Maximum
load that can be carried and the maximum pressure
needed to support that load. For information on
recommended tire pressure seeIn�ation - Tire Pressure
on page 5-59andLoading Your Vehicle on page 4-55. Passenger (P-Metric) Tire
5-54
Page 385 of 502

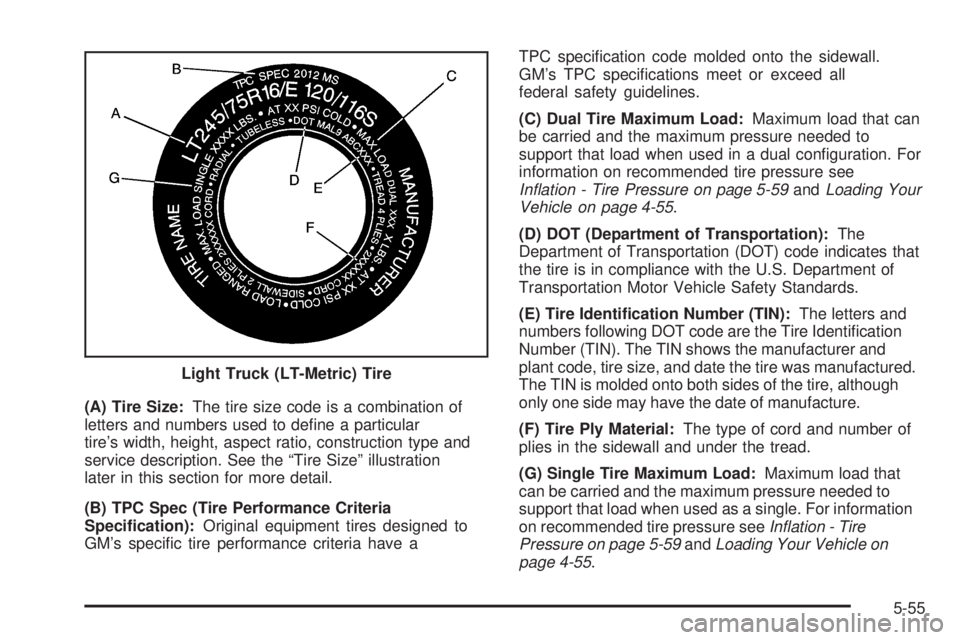
(A) Tire Size:The tire size code is a combination of
letters and numbers used to de�ne a particular
tire’s width, height, aspect ratio, construction type and
service description. See the “Tire Size” illustration
later in this section for more detail.
(B) TPC Spec (Tire Performance Criteria
Speci�cation):Original equipment tires designed to
GM’s speci�c tire performance criteria have aTPC speci�cation code molded onto the sidewall.
GM’s TPC speci�cations meet or exceed all
federal safety guidelines.
(C) Dual Tire Maximum Load:Maximum load that can
be carried and the maximum pressure needed to
support that load when used in a dual con�guration. For
information on recommended tire pressure see
In�ation - Tire Pressure on page 5-59andLoading Your
Vehicle on page 4-55.
(D) DOT (Department of Transportation):The
Department of Transportation (DOT) code indicates that
the tire is in compliance with the U.S. Department of
Transportation Motor Vehicle Safety Standards.
(E) Tire Identi�cation Number (TIN):The letters and
numbers following DOT code are the Tire Identi�cation
Number (TIN). The TIN shows the manufacturer and
plant code, tire size, and date the tire was manufactured.
The TIN is molded onto both sides of the tire, although
only one side may have the date of manufacture.
(F) Tire Ply Material:The type of cord and number of
plies in the sidewall and under the tread.
(G) Single Tire Maximum Load:Maximum load that
can be carried and the maximum pressure needed to
support that load when used as a single. For information
on recommended tire pressure seeIn�ation - Tire
Pressure on page 5-59andLoading Your Vehicle on
page 4-55. Light Truck (LT-Metric) Tire
5-55
Page 386 of 502

Tire Size
The following examples show the different parts of a
tire size.
(A) Passenger (P-Metric) Tire:The United States
version of a metric tire sizing system. The letter P as the
�rst character in the tire size means a passenger
vehicle tire engineered to standards set by the U.S. Tire
and Rim Association.(A) Light Truck (LT-Metric) Tire:The United States
version of a metric tire sizing system. The letters LT as
the �rst two characters in the tire size means a light
truck tire engineered to standards set by the U.S. Tire
and Rim Association.
(B) Tire Width:The three-digit number indicates the
tire section width in millimeters from sidewall to sidewall.
(C) Aspect Ratio:A two-digit number that indicates
the tire height-to-width measurements. For example, if
the tire size aspect ratio is 75, as shown in item C of the
light truck (LT-Metric) tire illustration, it would mean
that the tire’s sidewall is 75% as high as it is wide.
(D) Construction Code:A letter code is used to
indicate the type of ply construction in the tire. The letter
R means radial ply construction; the letter D means
diagonal or bias ply construction; and the letter B means
belted-bias ply construction.
(E) Rim Diameter:Diameter of the wheel in inches.
(F) Service Description:The service description
indicates the load range and speed rating of a tire. The
load index can range from 1 to 279. Speed ratings
range from A to Z. Passenger (P-Metric) Tire
Light Truck (LT-Metric) Tire
5-56
Page 390 of 502

A Tire and Loading Information label is attached to the
vehicle’s center pillar (B-pillar), below the driver’s
door latch. This label shows your vehicle’s original
equipment tires and the correct in�ation pressures for
your tires when they are cold. The recommended
cold tire in�ation pressure, shown on the label, is the
minimum amount of air pressure needed to support your
vehicle’s maximum load carrying capacity.
For additional information regarding how much weight
your vehicle can carry, and an example of the tire
and loading information label, seeLoading Your Vehicle
on page 4-55. How you load your vehicle affects
vehicle handling and ride comfort, never load your
vehicle with more weight than it was designed to carry.
When to Check
Check your tires once a month or more.
Also, check the tire pressure of the spare tire.
How to Check
Use a good quality pocket-type gage to check tire
pressure. You cannot tell if your tires are properly in�ated
simply by looking at them. Radial tires may look properly
in�ated even when they’re underin�ated. Check the tire’s
in�ation pressure when the tires are cold. Cold means
your vehicle has been sitting for at least three hours or
driven no more than 1 mile (1.6 km).
Remove the valve cap from the tire valve stem. Press
the tire gage �rmly onto the valve to get a pressure
measurement. If the cold tire in�ation pressure matches
the recommended pressure on the tire and loading
information label, no further adjustment is necessary. If
the pressure is low, add air until you reach the
recommended amount.
If you over�ll the tire, release air by pushing on the
metal stem in the center of the tire valve. Recheck the
tire pressure with the tire gage.
Be sure to put the valve caps back on the valve
stems. They help prevent leaks by keeping out dirt
and moisture.
5-60