ESP HUMMER H2 2008 Owner's Guide
[x] Cancel search | Manufacturer: HUMMER, Model Year: 2008, Model line: H2, Model: HUMMER H2 2008Pages: 504, PDF Size: 7.12 MB
Page 414 of 504
If a Tire Goes Flat
It is unusual for a tire to blowout while you are driving,
especially if you maintain your vehicle’s tires properly.
If air goes out of a tire, it is much more likely to leak out
slowly. But if you should ever have a blowout, here
are a few tips about what to expect and what to do:
If a front tire fails, the �at tire creates a drag that pulls
the vehicle toward that side. Take your foot off the
accelerator pedal and grip the steering wheel �rmly.
Steer to maintain lane position, and then gently brake to
a stop well out of the traffic lane.
A rear blowout, particularly on a curve, acts much like a
skid and may require the same correction you would
use in a skid. In any rear blowout remove your foot from
the accelerator pedal. Get the vehicle under control
by steering the way you want the vehicle to go. It may
be very bumpy and noisy, but you can still steer.
Gently brake to a stop, well off the road if possible.{CAUTION:
Lifting a vehicle and getting under it to do
maintenance or repairs is dangerous without
the appropriate safety equipment and training.
The jack provided with your vehicle is
designed only for changing a �at tire. If it is
used for anything else, you or others could be
badly injured or killed if the vehicle slips off
the jack. Use the jack provided with your
vehicle only for changing a �at tire.
If a tire goes �at, the next part shows how to use the
jacking equipment to change a �at tire safely.
Changing a Flat Tire
If a tire goes �at, avoid further tire and wheel damage
by driving slowly to a level place. Turn on your
hazard warning �ashers.
5-78
Page 416 of 504
Removing the Spare Tire and
Tools (SUT)
The jack is stored in the rear cargo compartment on
the passenger side of the vehicle. The tools for the
jack are stored under the rear passenger’s seat.
To remove the tools:
1. Locate the tools by lifting the driver’s side
second row seat up to expose the �oor.
SeeSplit Folding Rear Seat on page 1-8for
more information.
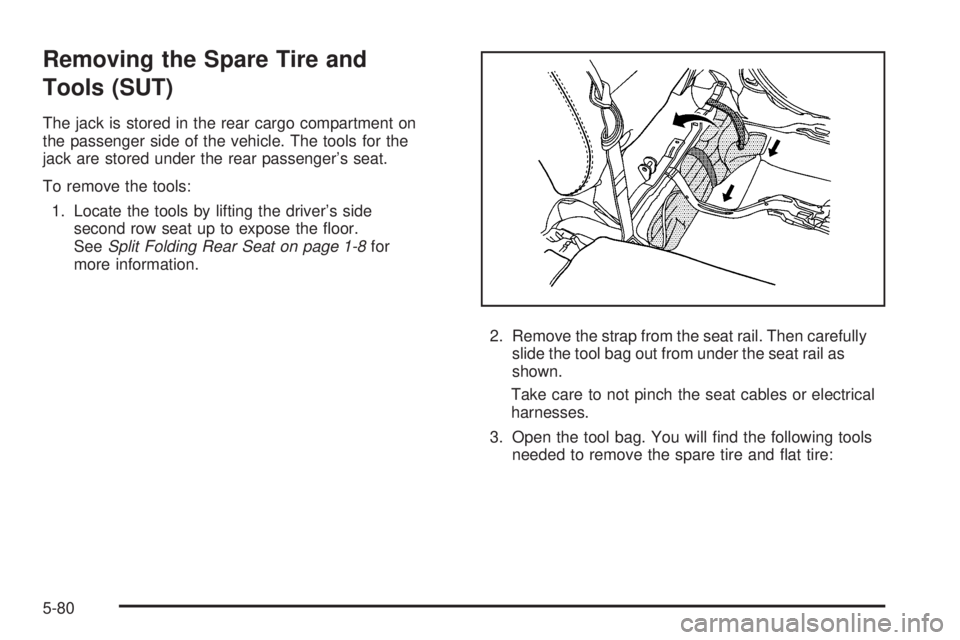
2. Remove the strap from the seat rail. Then carefully
slide the tool bag out from under the seat rail as
shown.
Take care to not pinch the seat cables or electrical
harnesses.
3. Open the tool bag. You will �nd the following tools
needed to remove the spare tire and �at tire:
5-80
Page 420 of 504
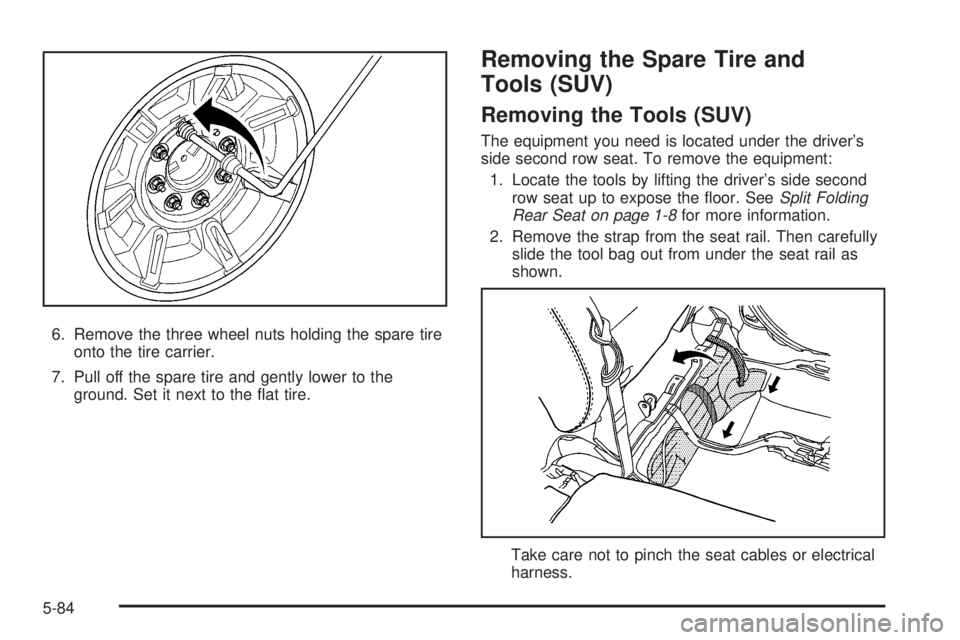
6. Remove the three wheel nuts holding the spare tire
onto the tire carrier.
7. Pull off the spare tire and gently lower to the
ground. Set it next to the �at tire.
Removing the Spare Tire and
Tools (SUV)
Removing the Tools (SUV)
The equipment you need is located under the driver’s
side second row seat. To remove the equipment:
1. Locate the tools by lifting the driver’s side second
row seat up to expose the �oor. SeeSplit Folding
Rear Seat on page 1-8for more information.
2. Remove the strap from the seat rail. Then carefully
slide the tool bag out from under the seat rail as
shown.
Take care not to pinch the seat cables or electrical
harness.
5-84
Page 432 of 504
7. Make sure nothing is located under or in front of the
seat and then lift the rear driver’s seat so that the
�oor is exposed. SeeSplit Folding Rear Seat
on page 1-8for more information.
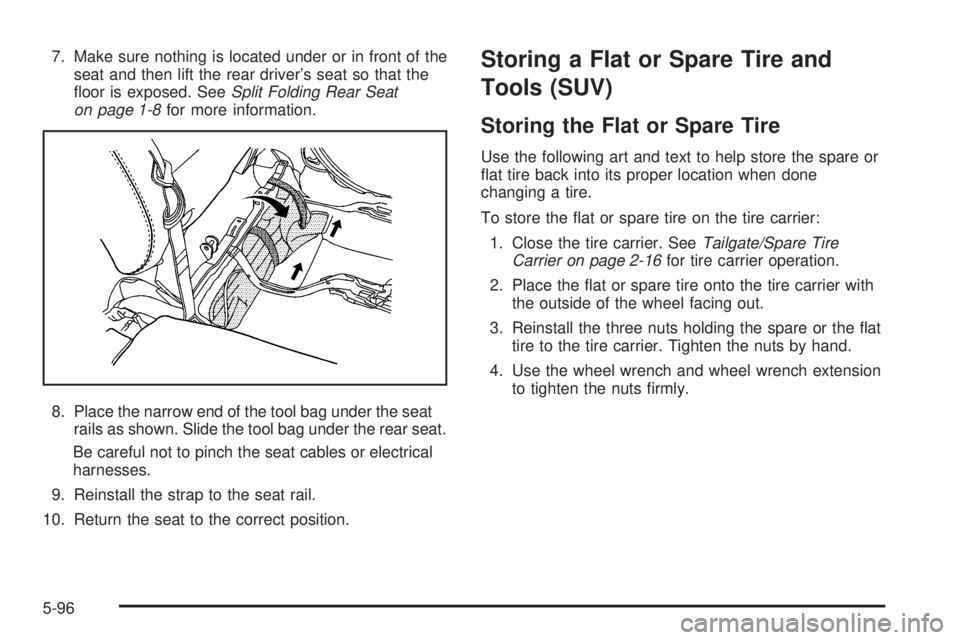
8. Place the narrow end of the tool bag under the seat
rails as shown. Slide the tool bag under the rear seat.
Be careful not to pinch the seat cables or electrical
harnesses.
9. Reinstall the strap to the seat rail.
10. Return the seat to the correct position.Storing a Flat or Spare Tire and
Tools (SUV)
Storing the Flat or Spare Tire
Use the following art and text to help store the spare or
�at tire back into its proper location when done
changing a tire.
To store the �at or spare tire on the tire carrier:
1. Close the tire carrier. SeeTailgate/Spare Tire
Carrier on page 2-16for tire carrier operation.
2. Place the �at or spare tire onto the tire carrier with
the outside of the wheel facing out.
3. Reinstall the three nuts holding the spare or the �at
tire to the tire carrier. Tighten the nuts by hand.
4. Use the wheel wrench and wheel wrench extension
to tighten the nuts �rmly.
5-96
Page 435 of 504
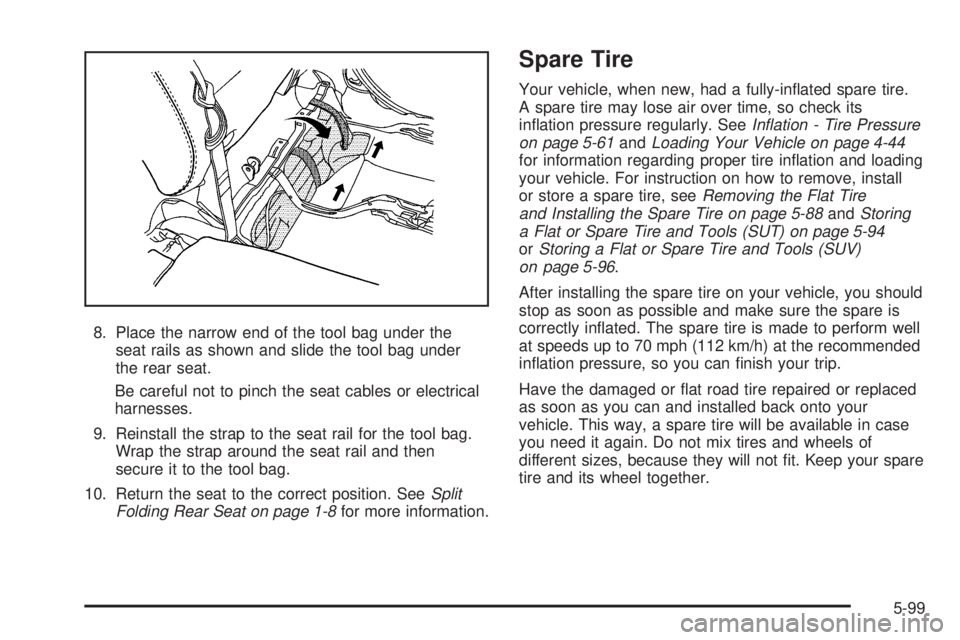
8. Place the narrow end of the tool bag under the
seat rails as shown and slide the tool bag under
the rear seat.
Be careful not to pinch the seat cables or electrical
harnesses.
9. Reinstall the strap to the seat rail for the tool bag.
Wrap the strap around the seat rail and then
secure it to the tool bag.
10. Return the seat to the correct position. SeeSplit
Folding Rear Seat on page 1-8for more information.
Spare Tire
Your vehicle, when new, had a fully-in�ated spare tire.
A spare tire may lose air over time, so check its
in�ation pressure regularly. SeeInflation - Tire Pressure
on page 5-61andLoading Your Vehicle on page 4-44
for information regarding proper tire in�ation and loading
your vehicle. For instruction on how to remove, install
or store a spare tire, seeRemoving the Flat Tire
and Installing the Spare Tire on page 5-88andStoring
a Flat or Spare Tire and Tools (SUT) on page 5-94
orStoring a Flat or Spare Tire and Tools (SUV)
on page 5-96.
After installing the spare tire on your vehicle, you should
stop as soon as possible and make sure the spare is
correctly in�ated. The spare tire is made to perform well
at speeds up to 70 mph (112 km/h) at the recommended
in�ation pressure, so you can �nish your trip.
Have the damaged or �at road tire repaired or replaced
as soon as you can and installed back onto your
vehicle. This way, a spare tire will be available in case
you need it again. Do not mix tires and wheels of
different sizes, because they will not �t. Keep your spare
tire and its wheel together.
5-99
Page 466 of 504
Recommended Fluids and
Lubricants
Fluids and lubricants identi�ed below by name, part
number, or speci�cation can be obtained from your
dealer/retailer.
Usage Fluid/Lubricant
Engine OilEngine oil which meets
GM Standard GM6094M and
displays the American Petroleum
Institute Certi�ed for Gasoline
Engines starburst symbol. To
determine the proper viscosity for
your vehicle’s engine, seeEngine
Oil on page 5-13.
Engine Coolant50/50 mixture of clean, drinkable
water and use only DEX-COOL
®
Coolant. SeeEngine Coolant on
page 5-24.
Hydraulic Brake
SystemDelco
®Supreme 11 Brake Fluid or
equivalent DOT-3 brake �uid.
Windshield
WasherOptikleen
®Washer Solvent.
Usage Fluid/Lubricant
Power Steering
SystemGM Power Steering Fluid
(GM Part No. U.S. 89021184,
in Canada 89021186).
Automatic
TransmissionDEXRON
®-VI Automatic
Transmission Fluid.
Key Lock
CylindersMulti-Purpose Lubricant, Superlube
(GM Part No. U.S. 12346241, in
Canada 10953474).
Chassis
LubricationChassis Lubricant
(GM Part No. U.S. 12377985, in
Canada 88901242) or lubricant
meeting requirements of NLGI #2,
Category LB or GC-LB.
Front and
Rear AxleSAE 75W-90
Synthetic Axle Lubricant
(GM Part No. U.S. 89021677,
in Canada 89021678) meeting
GM Speci�cation 9986115.
Transfer CaseDEXRON
®-VI Automatic
Transmission Fluid.
Front Axle
Propshaft
SplineSpline Lubricant, Special Lubricant
(GM Part No. U.S. 12345879,
in Canada 10953511) or
lubricant meeting requirements
of GM 9985830.
6-12
Page 474 of 504
Customer Assistance and
Information
Customer Satisfaction Procedure
Your satisfaction and goodwill are important to
your dealer and to HUMMER. Normally, any concerns
with the sales transaction or the operation of your
vehicle will be resolved by your dealer’s sales or service
departments. Sometimes, however, despite the best
intentions of all concerned, misunderstandings can
occur. If your concern has not been resolved to your
satisfaction, the following steps should be taken:
STEP ONE:Discuss your concern with a member of
dealership management. Normally, concerns can
be quickly resolved at that level. If the matter has
already been reviewed with the sales, service or parts
manager, contact the owner of the dealership or
the general manager.
STEP TWO:If after contacting a member of dealership
management, it appears your concern cannot be
resolved by the dealership without further help, contact
the HUMMER Consumer Relations Manager by calling
1-866-HUMMER6 (486-6376), Customer Assistance
prompt. In Canada, contact GM of Canada Customer
Communication Centre in Oshawa by calling
1-800-263-3777 (English) or 1-800-263-7854 (French).We encourage you to call the toll-free number in order to
give your inquiry prompt attention. Please have the
following information available to give the Customer
Assistance Representative:
Vehicle Identi�cation Number (VIN). This is available
from the vehicle registration or title, or the plate at the
top left of the instrument panel and visible through
the windshield.
Dealership name and location
Vehicle delivery date and present mileage
When contacting HUMMER, please remember that your
concern will likely be resolved at a dealer’s facility.
That is why we suggest you follow Step One �rst if you
have a concern.
STEP THREE — U.S. Owners:Both General Motors
and your dealer are committed to making sure you
are completely satis�ed with your new vehicle. However,
if you continue to remain unsatis�ed after following
the procedure outlined in Steps One and Two,
you should �le with the Better Business Bureau (BBB)
Auto Line Program to enforce any additional rights
you may have.
The BBB Auto Line Program is an out of court program
administered by the Council of Better Business Bureaus
to settle automotive disputes regarding vehicle repairs or
the interpretation of the New Vehicle Limited Warranty.
7-2
Page 479 of 504
Services Provided
The following services are provided in the U.S. and
Canada up to 5 years/100,000 miles (160 000 km),
whichever occurs �rst, and, in Canada only, up
to a maximum coverage of $100. These services are
provided at a nominal charge if the vehicle is no longer
in the Powertrain warranty.
Fuel Delivery:Delivery of enough fuel for the
vehicle to get to the nearest service station
(approximately $5 in Canada). For safety reasons,
propane and other alternate fuels will not be
provided through this service.
Lock-out Service:Lock-out service will be covered
at no charge if you are unable to gain entry into your
vehicle. A remote unlock may be available if you
have an active OnStar
®subscription. To ensure
security, the driver must present personal
identi�cation before lock-out service is provided.
In Canada, the vehicle registration is also required.
Emergency Tow from a Public Roadway or
Highway:Tow to the nearest dealership for warranty
service or in the event of a vehicle-disabling crash.
Flat Tire Change:Installation of a spare tire in good
condition, when equipped and properly in�ated,
will be covered at no charge. The customer is
responsible for the repair or replacement of the
tire if not covered by a warrantable failure.
Jump Start:A battery jump start is covered at no
charge if the vehicle does not start.
Trip Routing Service:Upon request, Roadside
Assistance will send you detailed, computer
personalized maps, highlighting your choice of either
the most direct route or the most scenic route to your
destination, anywhere in North America, along with
helpful travel information pertaining to your trip.
Please allow three weeks before your planned
departure date. In Canada, trip routing requests will
be limited to six per calendar year.
Trip Interruption Bene�ts and Assistance:If your
trip is interrupted due to a warranty failure, incidental
expenses may be reimbursed during the 5 years/
100,000 miles (160 000 km) warranty period. Items
covered are hotel, meals, and rental car.
HUMMER and General Motors of Canada Limited
reserve the right to limit services or reimbursement to
an owner or driver when, in their sole discretion,
the claims become excessive in frequency or type of
occurrence.
7-7
Page 482 of 504
Courtesy Rental Vehicle
Your dealer may arrange to provide you with a courtesy
rental vehicle or reimburse you for a rental vehicle that
you obtain if your vehicle is kept for a warranty repair. If
you obtain a rental vehicle on your own, please see your
dealer for the maximum number of days allowed and the
allowance per rental day. Rental reimbursement must be
supported by original receipts. This requires that you sign
and complete a rental agreement and meet state, local,
and rental vehicle provider requirements. Requirements
vary and may include minimum age requirements,
insurance coverage, credit card, etc. You are responsible
for fuel usage charges and may also be responsible for
taxes, levies, usage fees, excessive mileage, or rental
usage beyond the completion of the repair.
It may not be possible to provide a like-vehicle as a
courtesy rental.
Additional Program Information
All program options, such as shuttle service, may not be
available at every dealer. Please contact your dealer
for speci�c information about availability. All Courtesy
Transportation arrangements will be administered
by appropriate dealer personnel.General Motors reserves the right to unilaterally modify,
change, or discontinue Courtesy Transportation at
any time and to resolve all questions of claim eligibility
pursuant to the terms and conditions described
herein at its sole discretion.
Collision Damage Repair
If your vehicle is involved in a collision and it is
damaged, have the damage repaired by a quali�ed
technician using the proper equipment and quality
replacement parts. Poorly performed collision repairs
diminish your vehicle’s resale value, and safety
performance can be compromised in subsequent
collisions.
Collision Parts
Genuine GM Collision parts are new parts made with the
same materials and construction methods as the parts
with which your vehicle was originally built. Genuine GM
Collision parts are your best choice to ensure that your
vehicle’s designed appearance, durability, and safety are
preserved. The use of Genuine GM parts can help
maintain your GM New Vehicle Warranty.
7-10
Page 484 of 504
If a Crash Occurs
Here is what to do if you are involved in a crash.
Try to relax and then check to make sure you are
all right. If you are uninjured, make sure that no
one else in your vehicle, or the other vehicle,
is injured.
If there has been an injury, call emergency services
for help. Do not leave the scene of a crash until
all matters have been taken care of. Move
your vehicle only if its position puts you in danger
or you are instructed to move it by a police officer.
Give only the necessary and requested information
to police and other parties involved in the crash.
Do not discuss your personal condition, mental
frame of mind, or anything unrelated to the crash.
This will help guard against post-crash legal action.
If you need roadside assistance, call GM Roadside
Assistance. SeeRoadside Assistance Program on
page 7-6for more information.
If your vehicle cannot be driven, know where the
towing service will be taking it. Get a card from
the tow truck operator or write down the driver’s
name, the service’s name, and the phone number.
Remove any valuables from your vehicle before it is
towed away. Make sure this includes your insurance
information and registration if you keep these items
in your vehicle.
Gather the important information you will need from
the other driver. Things like name, address, phone
number, driver’s license number, vehicle license
plate, vehicle make, model and model year, Vehicle
Identi�cation Number (VIN), insurance company and
policy number, and a general description of the
damage to the other vehicle.
If possible, call your insurance company from the
scene of the crash. They will walk you through the
information they will need. If they ask for a police
report, phone or go to the police department
headquarters the next day and you can get a copy of
the report for a nominal fee. In some states/provinces
with “no fault” insurance laws, a report may not be
necessary. This is especially true if there are no
injuries and both vehicles are driveable.
7-12