oil temperature HUMMER H2 2008 Owners Manual
[x] Cancel search | Manufacturer: HUMMER, Model Year: 2008, Model line: H2, Model: HUMMER H2 2008Pages: 504, PDF Size: 7.12 MB
Page 92 of 504
Once two remote starts, or a single remote start with
one time extension has been done, the vehicle must be
started with the key.
After the key is removed from the ignition, the vehicle
can be remote started again.
The vehicle cannot be remote started if the key is in the
ignition, the hood is not closed, or if there is an
emission control system malfunction.
Also, the engine will turn off during a remote vehicle
start if the coolant temperature gets too high or if the
oil pressure gets low.
Vehicles that have the remote vehicle start feature are
shipped from the factory with the remote vehicle
start system enabled. The system may be enabled or
disabled through the DIC. See “REMOTE START” under
DIC Vehicle Customization (With DIC Buttons) on
page 3-63for additional information. If your vehicle
does not have DIC buttons, see your dealer/retailer to
enable or disable the remote vehicle start system.Doors and Locks
Door Locks
{CAUTION:
Unlocked doors can be dangerous.
Passengers, especially children, can easily
open the doors and fall out of a moving
vehicle. When a door is locked, the handle
will not open it. You increase the chance
of being thrown out of the vehicle in a
crash if the doors are not locked. So, wear
safety belts properly and lock the doors
whenever you drive.
Young children who get into unlocked
vehicles may be unable to get out. A child
can be overcome by extreme heat and can
suffer permanent injuries or even death
from heat stroke. Always lock your vehicle
whenever you leave it.
CAUTION: (Continued)
2-10
Page 113 of 504
Notice:The engine is designed to work with the
electronics in your vehicle. If you add electrical
parts or accessories, you could change the way the
engine operates. Before adding electrical equipment,
check with your dealer/retailer. If you do not, your
engine might not perform properly. Any resulting
damage would not be covered by your vehicle’s
warranty.
Engine Coolant Heater
The engine coolant heater, if available, can help in cold
weather conditions at or below 0°F (−18°C) for easier
starting and better fuel economy during engine warm-up.
Plug in the coolant heater at least four hours before
starting your vehicle. An internal thermostat in the
plug-end of the cord may exist which will prevent
engine coolant heater operation at temperatures
above 0°F (−18°C).
To Use the Engine Coolant Heater
1. Turn off the engine.
2. Locate the electrical cord near the front recovery
loop on the driver’s side of the vehicle.
3. Plug it into a normal, grounded 110-volt AC outlet.
{CAUTION:
Plugging the cord into an ungrounded outlet
could cause an electrical shock. Also, the
wrong kind of extension cord could overheat
and cause a �re. You could be seriously
injured. Plug the cord into a properly grounded
three-prong 110-volt AC outlet. If the cord will
not reach, use a heavy-duty three-prong
extension cord rated for at least 15 amps.
4. Before starting the engine, be sure to unplug and
store the cord as it was before to keep it away
from moving engine parts. If you do not, it could be
damaged.
How long should you keep the coolant heater plugged
in? The answer depends on the outside temperature, the
kind of oil you have, and some other things. Instead
of trying to list everything here, we ask that you contact
your dealer/retailer in the area where you will be
parking your vehicle. The dealer/retailer can give you
the best advice for that particular area.
2-31
Page 151 of 504
Instrument Panel Overview...............................3-4
Hazard Warning Flashers................................3-6
Other Warning Devices...................................3-6
Horn.............................................................3-6
Tilt Wheel.....................................................3-6
Turn Signal/Multifunction Lever.........................3-7
Turn and Lane-Change Signals........................3-8
Headlamp High/Low-Beam Changer..................3-8
Flash-to-Pass.................................................3-9
Windshield Wipers..........................................3-9
Windshield Washer.......................................3-10
Rear Window Wiper/Washer...........................3-11
Cruise Control..............................................3-12
Exterior Lamps.............................................3-15
Headlamps on Reminder................................3-17
Daytime Running Lamps (DRL).......................3-17
Automatic Headlamp System..........................3-18
Instrument Panel Brightness...........................3-18
Dome Lamps...............................................3-19
Dome Lamp Override....................................3-19
Entry/Exit Lighting.........................................3-19
Reading Lamps............................................3-19
Battery Run-Down Protection..........................3-19
Accessory Power Outlet(s).............................3-20
Ashtray(s) and Cigarette Lighter......................3-21
Analog Clock...............................................3-21Climate Controls............................................3-22
Dual Automatic Climate Control System...........3-22
Outlet Adjustment.........................................3-29
Rear Air Conditioning and Heating System
and Electronic Climate Controls...................3-29
Warning Lights, Gages, and Indicators............3-31
Instrument Panel Cluster................................3-32
Speedometer and Odometer...........................3-33
Trip Odometer
..............................................3-33
Tachometer.................................................3-33
Safety Belt Reminders...................................3-33
Airbag Readiness Light..................................3-34
Airbag Off Light............................................3-35
Charging System Light..................................3-37
Voltmeter Gage............................................3-37
Brake System Warning Light..........................3-38
Antilock Brake System Warning Light...............3-39
StabiliTrak
®Indicator Light..............................3-40
Engine Coolant Temperature Gage..................3-40
Tire Pressure Light.......................................3-41
Malfunction Indicator Lamp.............................3-42
Oil Pressure Gage........................................3-45
Oil Pressure Light.........................................3-46
Security Light...............................................3-46
Cruise Control Light......................................3-46
Section 3 Instrument Panel
3-1
Page 195 of 504
Oil Pressure Gage
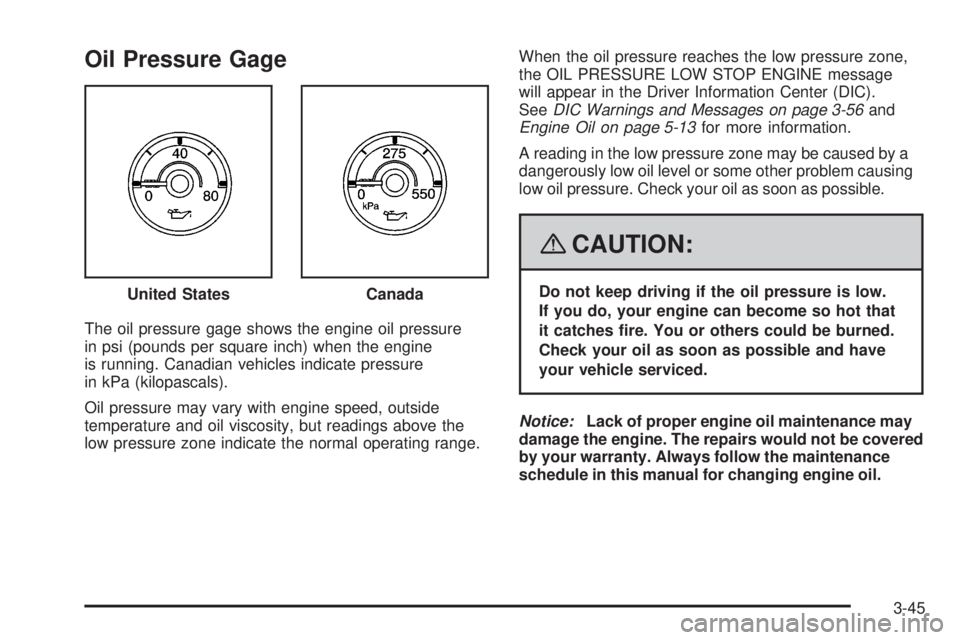
The oil pressure gage shows the engine oil pressure
in psi (pounds per square inch) when the engine
is running. Canadian vehicles indicate pressure
in kPa (kilopascals).
Oil pressure may vary with engine speed, outside
temperature and oil viscosity, but readings above the
low pressure zone indicate the normal operating range.When the oil pressure reaches the low pressure zone,
the OIL PRESSURE LOW STOP ENGINE message
will appear in the Driver Information Center (DIC).
SeeDIC Warnings and Messages on page 3-56and
Engine Oil on page 5-13for more information.
A reading in the low pressure zone may be caused by a
dangerously low oil level or some other problem causing
low oil pressure. Check your oil as soon as possible.
{CAUTION:
Do not keep driving if the oil pressure is low.
If you do, your engine can become so hot that
it catches �re. You or others could be burned.
Check your oil as soon as possible and have
your vehicle serviced.
Notice:Lack of proper engine oil maintenance may
damage the engine. The repairs would not be covered
by your warranty. Always follow the maintenance
schedule in this manual for changing engine oil. United StatesCanada
3-45
Page 200 of 504
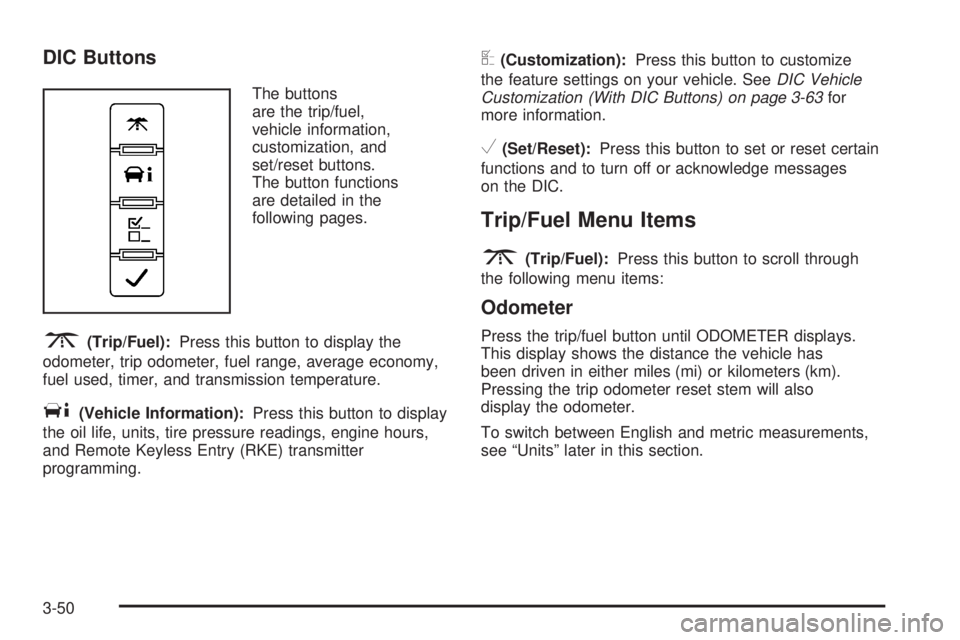
DIC Buttons
The buttons
are the trip/fuel,
vehicle information,
customization, and
set/reset buttons.
The button functions
are detailed in the
following pages.
3(Trip/Fuel):Press this button to display the
odometer, trip odometer, fuel range, average economy,
fuel used, timer, and transmission temperature.
T(Vehicle Information):Press this button to display
the oil life, units, tire pressure readings, engine hours,
and Remote Keyless Entry (RKE) transmitter
programming.
U(Customization):Press this button to customize
the feature settings on your vehicle. SeeDIC Vehicle
Customization (With DIC Buttons) on page 3-63for
more information.
V(Set/Reset):Press this button to set or reset certain
functions and to turn off or acknowledge messages
on the DIC.
Trip/Fuel Menu Items
3
(Trip/Fuel):Press this button to scroll through
the following menu items:
Odometer
Press the trip/fuel button until ODOMETER displays.
This display shows the distance the vehicle has
been driven in either miles (mi) or kilometers (km).
Pressing the trip odometer reset stem will also
display the odometer.
To switch between English and metric measurements,
see “Units” later in this section.
3-50
Page 202 of 504

Average Economy
Press the trip/fuel button until AVG ECONOMY displays.
This display shows the approximate average miles
per gallon (mpg) or liters per 100 kilometers (L/100 km).
This number is calculated based on the number of
mpg (L/100 km) recorded since the last time this
menu item was reset. To reset AVG ECONOMY,
press and hold the set/reset button.
Fuel Used
Press the trip/fuel button until FUEL USED displays.
This display shows the number of gallons (gal) or
liters (L) of fuel used since the last reset of this menu
item. To reset the fuel used information, press and hold
the set/reset button while FUEL USED is displayed.
Timer
Press the trip/fuel button until TIMER displays.
This display can be used as a timer.
To start the timer, press the set/reset button while
TIMER is displayed. The display will show the amount
of time that has passed since the timer was last
reset, not including time the ignition is off. Time will
continue to be counted as long as the ignition is
on, even if another display is being shown on the
DIC. The timer will record up to 99 hours, 59 minutes
and 59 seconds (99:59:59) after which the display
will return to zero.To stop the timer, press the set/reset button brie�y
while TIMER is displayed.
To reset the timer to zero, press and hold the set/reset
button while TIMER is displayed.
Transmission Temperature
Press the trip/fuel button until TRANS TEMP displays.
This display shows the temperature of the automatic
transmission �uid in either degrees Fahrenheit (°F)
or degrees Celsius (°C).
Blank Display
This display shows no information.
Vehicle Information Menu Items
T
(Vehicle Information):Press this button to scroll
through the following menu items:
Oil Life
Press the vehicle information button until OIL LIFE
REMAINING displays. This display shows an estimate
of the oil’s remaining useful life. If you see 99% OIL
LIFE REMAINING on the display, that means 99% of the
current oil life remains. The engine oil life system will
alert you to change the oil on a schedule consistent
with your driving conditions.
3-52
Page 302 of 504
Before Leaving on a Long Trip
To prepare your vehicle for a long trip, consider having
it serviced by your dealer/retailer before departing.
Things to check on your own include:
Windshield Washer Fluid:Reservoir full? Windows
clean — inside and outside?
Wiper Blades:In good shape?
Fuel, Engine Oil, Other Fluids:All levels checked?
Lamps:Do they all work and are lenses clean?
Tires:Are treads good? Are tires in�ated to
recommended pressure?
Weather and Maps:Safe to travel? Have
up-to-date maps?
Highway Hypnosis
Always be alert and pay attention to your surroundings
while driving. If you become tired or sleepy, �nd a
safe place to park your vehicle and rest.
Other driving tips include:
Keep the vehicle well ventilated.
Keep interior temperature cool.
Keep your eyes moving — scan the road ahead
and to the sides.
Check the rearview mirror and vehicle
instruments often.
4-34
Page 332 of 504
Making Turns
Notice:Making very sharp turns while trailering
could cause the trailer to come in contact with the
vehicle. Your vehicle could be damaged. Avoid
making very sharp turns while trailering.
When you are turning with a trailer, make wider turns
than normal. Do this so your trailer will not strike
soft shoulders, curbs, road signs, trees or other objects.
Avoid jerky or sudden maneuvers. Signal well in
advance.
Turn Signals When Towing a Trailer
The arrows on your instrument panel will �ash whenever
you signal a turn or lane change. Properly hooked up,
the trailer lamps will also �ash, telling other drivers
you’re about to turn, change lanes or stop.
When towing a trailer, the arrows on your instrument
panel will �ash for turns even if the bulbs on the trailer
are burned out. Thus, you may think drivers behind
you are seeing your signal when they are not. It is
important to check occasionally to be sure the trailer
bulbs are still working.
Driving On Grades
Reduce speed and shift to a lower gearbeforeyou start
down a long or steep downgrade. If you do not shift down,
you might have to use your brakes so much that they
would get hot and no longer work well.
You can tow in DRIVE (D). You may want to shift the
transmission to THIRD (3) or, if necessary, a lower gear
selection if the transmission shifts too often (e.g., under
heavy loads and/or hilly conditions).
You may also want to activate the tow/haul mode if the
transmission shifts too often. See “Tow/Haul Mode”
earlier.
When towing at high altitude on steep uphill grades,
consider the following: Engine coolant will boil at a lower
temperature than at normal altitudes. If you turn your
engine off immediately after towing at high altitude on
steep uphill grades, your vehicle may show signs similar
to engine overheating. To avoid this, let the engine run
while parked (preferably on level ground) with the
automatic transmission in PARK (P) for a few minutes
before turning the engine off. If you do get the overheat
warning, seeEngine Overheating on page 5-27.
4-64
Page 352 of 504
If you are in an area of extreme cold, where the
temperature falls below−20°F (−29°C), it is
recommended that you use either an SAE 5W-30
synthetic oil or an SAE 0W-30 oil. Both provide easier
cold starting and better protection for the engine at
extremely low temperatures.
Engine Oil Additives
Do not add anything to the oil. The recommended oils
with the starburst symbol that meet GM Standard
GM6094M are all you need for good performance and
engine protection.
Engine Oil Life System
When to Change Engine Oil
Your vehicle has a computer system that lets you know
when to change the engine oil and �lter. This is based
on engine revolutions and engine temperature, and not
on mileage. Based on driving conditions, the mileage
at which an oil change will be indicated can vary
considerably. For the oil life system to work properly,
you must reset the system every time the oil is changed.When the system has calculated that oil life has been
diminished, it will indicate that an oil change is
necessary. A CHANGE ENGINE OIL SOON message
will come on. SeeDIC Warnings and Messages on
page 3-56. Change the oil as soon as possible within the
next 600 miles (1 000 km). It is possible that, if you
are driving under the best conditions, the oil life system
might not indicate that an oil change is necessary for
over a year. However, the engine oil and �lter must be
changed at least once a year and at this time the
system must be reset. Your dealer/retailer has trained
service people who will perform this work using genuine
parts and reset the system. It is also important to
check the oil regularly and keep it at the proper level.
If the system is ever reset accidentally, you must change
the oil at 3,000 miles (5 000 km) since your last oil
change. Remember to reset the oil life system whenever
the oil is changed.
5-16
Page 360 of 504
Consistency of Readings
Always check the �uid level at least twice using the
procedures described. Consistency (repeatable
readings) is important to maintaining proper �uid level.
If �uid is added, it may take 15 minutes or longer to
obtain an accurate reading because of residual
�uid draining down the dipstick tube. If inconsistent
readings persist, check the transmission breather to be
sure it is clean and not clogged. If readings are still
inconsistent, contact your dealer/retailer.
Engine Coolant
The cooling system in your vehicle is �lled with
DEX-COOL®engine coolant. This coolant is designed
to remain in your vehicle for �ve years or 150,000 miles
(240 000 km), whichever occurs �rst, if you add only
DEX-COOL
®extended life coolant.
The following explains your cooling system and how to
add coolant when it is low. If you have a problem
with engine overheating, seeEngine Overheating on
page 5-27.A 50/50 mixture of clean, drinkable water and
DEX-COOL
®coolant will:
Give freezing protection down to−34°F (−37°C).
Give boiling protection up to 265°F (129°C).
Protect against rust and corrosion.
Help keep the proper engine temperature.
Let the warning lights and gages work as they
should.
Notice:Using coolant other than DEX-COOL
®may
cause premature engine, heater core, or radiator
corrosion. In addition, the engine coolant may
require changing sooner, at the �rst maintenance
service after each 30,000 miles (50 000 km) or
24 months, whichever occurs �rst. Any repairs
would not be covered by your warranty. Always use
DEX-COOL
®(silicate-free) coolant in your vehicle.
5-24