fuse HUMMER H3 2008 User Guide
[x] Cancel search | Manufacturer: HUMMER, Model Year: 2008, Model line: H3, Model: HUMMER H3 2008Pages: 416, PDF Size: 5.66 MB
Page 262 of 416
California Proposition 65 Warning
Most motor vehicles, including this one, contain and/or
emit chemicals known to the State of California to
cause cancer and birth defects or other reproductive
harm. Engine exhaust, many parts and systems
(including some inside the vehicle), many �uids, and
some component wear by-products contain and/or emit
these chemicals.
California Perchlorate Materials
Requirements
Certain types of automotive applications, such as airbag
initiators, seat belt pretensioners, and lithium batteries
contained in remote keyless entry transmitters, may
contain perchlorate materials. Special handling may
be necessary. For additional information, see
www.dtsc.ca.gov/hazardouswaste/perchlorate.
Doing Your Own Service Work
{CAUTION:
You can be injured and your vehicle could be
damaged if you try to do service work on a
vehicle without knowing enough about it.
Be sure you have sufficient knowledge,
experience, the proper replacement parts,
and tools before you attempt any vehicle
maintenance task.
Be sure to use the proper nuts, bolts, and
other fasteners. English and metric
fasteners can be easily confused. If you
use the wrong fasteners, parts can later
break or fall off. You could be hurt.
If you want to do some of your own service work, you
should use the proper service manual. It tells you much
more about how to service your vehicle than this
manual can. To order the proper service manual, see
Service Publications Ordering Information on page 7-15.
5-4
Page 271 of 416
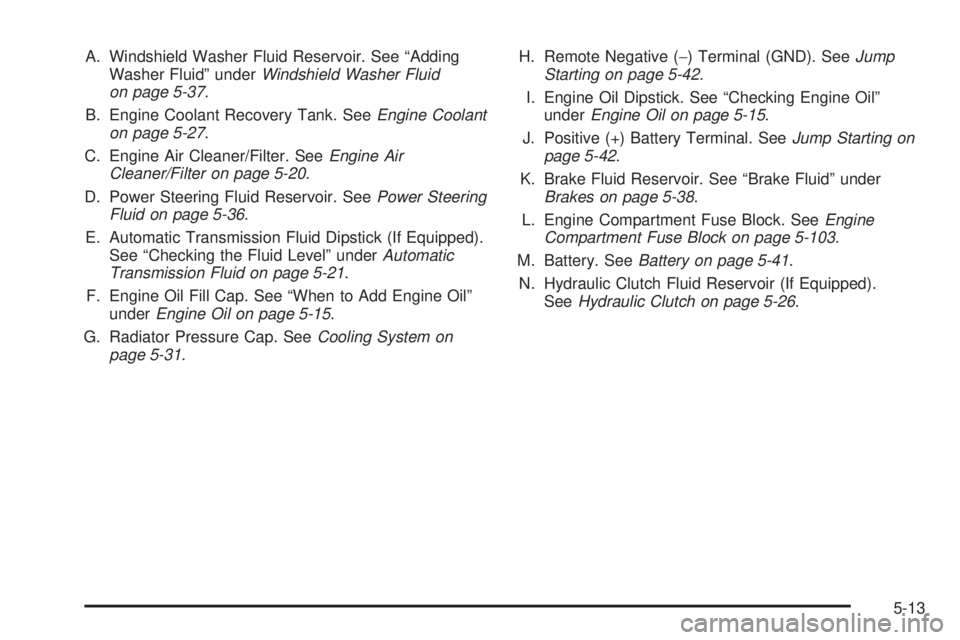
A. Windshield Washer Fluid Reservoir. See “Adding
Washer Fluid” underWindshield Washer Fluid
on page 5-37.
B. Engine Coolant Recovery Tank. SeeEngine Coolant
on page 5-27.
C. Engine Air Cleaner/Filter. SeeEngine Air
Cleaner/Filter on page 5-20.
D. Power Steering Fluid Reservoir. SeePower Steering
Fluid on page 5-36.
E. Automatic Transmission Fluid Dipstick (If Equipped).
See “Checking the Fluid Level” underAutomatic
Transmission Fluid on page 5-21.
F. Engine Oil Fill Cap. See “When to Add Engine Oil”
underEngine Oil on page 5-15.
G. Radiator Pressure Cap. SeeCooling System on
page 5-31.H. Remote Negative (−) Terminal (GND). SeeJump
Starting on page 5-42.
I. Engine Oil Dipstick. See “Checking Engine Oil”
underEngine Oil on page 5-15.
J. Positive (+) Battery Terminal. SeeJump Starting on
page 5-42.
K. Brake Fluid Reservoir. See “Brake Fluid” under
Brakes on page 5-38.
L. Engine Compartment Fuse Block. SeeEngine
Compartment Fuse Block on page 5-103.
M. Battery. SeeBattery on page 5-41.
N. Hydraulic Clutch Fluid Reservoir (If Equipped).
SeeHydraulic Clutch on page 5-26.
5-13
Page 273 of 416
A. Engine Air Cleaner/Filter. SeeEngine Air
Cleaner/Filter on page 5-20.
B. Air Filter Restriction Indicator (If Equipped).
SeeEngine Air Cleaner/Filter on page 5-20.
C. Windshield Washer Fluid Reservoir. See “Adding
Washer Fluid” underWindshield Washer Fluid
on page 5-37.
D. Engine Coolant Recovery Tank. SeeEngine Coolant
on page 5-27.
E. Automatic Transmission Fluid Dipstick (If Equipped).
See “Checking the Fluid Level” underAutomatic
Transmission Fluid on page 5-21.
F. Engine Oil Dipstick. See “Checking Engine Oil”
underEngine Oil on page 5-15.
G. Engine Oil Fill Cap. See “When to Add Engine Oil”
underEngine Oil on page 5-15.
H. Brake Fluid Reservoir. See “Brake Fluid” under
Brakes on page 5-38.
I. Battery. SeeBattery on page 5-41.
J. Power Steering Fluid Reservoir. SeePower Steering
Fluid on page 5-36.
K. Radiator Pressure Cap. SeeCooling System on
page 5-31.
L. Engine Compartment Fuse Block. SeeEngine
Compartment Fuse Block on page 5-103.Engine Oil
Checking Engine Oil
It is a good idea to check the engine oil every time you
get fuel. In order to get an accurate reading, the oil
must be warm and the vehicle must be on level ground.
The engine oil dipstick handle is a yellow loop. See
Engine Compartment Overview on page 5-12for
the location of the engine oil dipstick.
1. Turn off the engine and give the oil several minutes
to drain back into the oil pan. If you do not do this,
the oil dipstick might not show the actual level.
2. Pull out the dipstick and clean it with a paper towel
or cloth, then push it back in all the way. Remove it
again, keeping the tip down, and check the level.
5-15
Page 359 of 416
Engine Identi�cation
The eighth character in the VIN is the engine code.
This code helps you identify your vehicle’s engine,
speci�cations, and replacement parts. SeeCapacities
and Specifications on page 5-107for your vehicle’s
engine code.
Service Parts Identi�cation Label
This label is on the inside of the glove box. It is
very helpful if you ever need to order parts. The label
has the following information:
Vehicle Identi�cation Number (VIN)
Model designation
Paint information
Production options and special equipment
Do not remove this label from the vehicle.
Electrical System
Add-On Electrical Equipment
Notice:Do not add anything electrical to your
vehicle unless you check with your dealer/retailer
�rst. Some electrical equipment can damage your
vehicle and the damage would not be covered by
your warranty. Some add-on electrical equipment can
keep other components from working as they should.
Add-on equipment can drain your vehicle’s battery, even
if your vehicle is not operating.
Your vehicle has an airbag system. Before attempting to
add anything electrical to your vehicle, seeServicing
Your Airbag-Equipped Vehicle on page 1-67.
Windshield Wiper Fuses
The windshield wiper motor is protected by a circuit
breaker and a fuse. If the motor overheats due to heavy
snow, etc., the wiper will stop until the motor cools. If
the overload is caused by some electrical problem,
have it �xed.
5-101
Page 360 of 416
Power Windows and Other Power
Options
Circuit breakers protect the power windows and other
power accessories. When the current load is too heavy,
the circuit breaker opens and closes, protecting the
circuit until the problem is �xed or goes away.
Power and Heated Seat Circuit
Breakers
There is a circuit breaker located underneath the
driver’s side front seat that controls the power and
heated seat functions.
Fuses and Circuit Breakers
The wiring circuits in your vehicle are protected from
short circuits by a combination of fuses and circuit
breakers. This greatly reduces the chance of �res
caused by electrical problems.
Look at the silver-colored band inside the fuse. If the
band is broken or melted, replace the fuse. Be sure you
replace a bad fuse with a new one of the identical
size and rating.
If you ever have a problem on the road and do not have
a spare fuse, you can borrow one that has the same
amperage. Just pick some feature of your vehicle
that you can get along without — like the radio or
cigarette lighter — and use its fuse, if it is the correct
amperage. Replace it as soon as you can.
5-102
Page 361 of 416
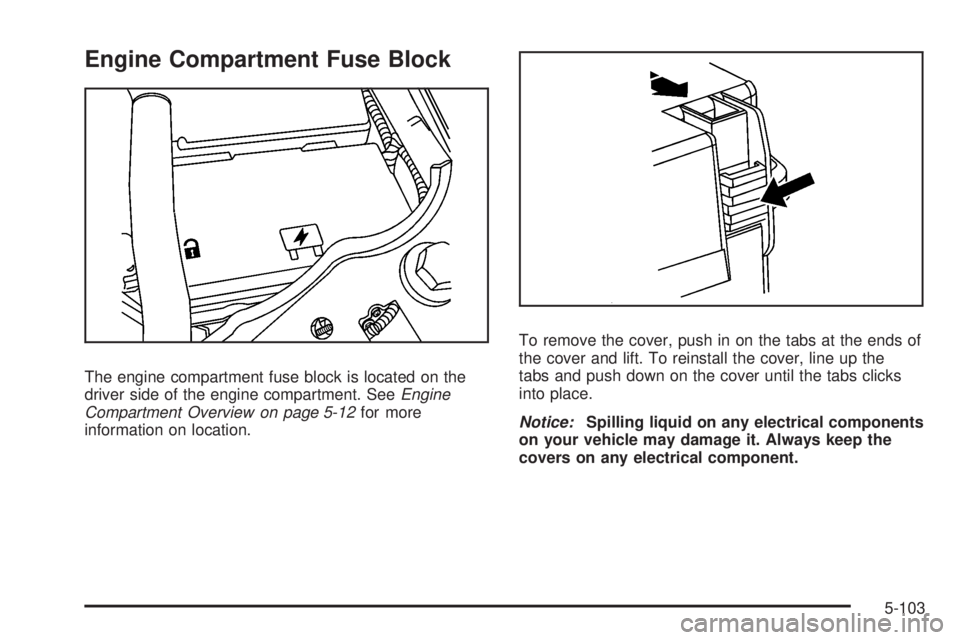
Engine Compartment Fuse Block
The engine compartment fuse block is located on the
driver side of the engine compartment. SeeEngine
Compartment Overview on page 5-12for more
information on location.To remove the cover, push in on the tabs at the ends of
the cover and lift. To reinstall the cover, line up the
tabs and push down on the cover until the tabs clicks
into place.
Notice:Spilling liquid on any electrical components
on your vehicle may damage it. Always keep the
covers on any electrical component.
5-103
Page 362 of 416

Fuse Usage
1 Heated Seats
2 Grille Guard
3 Fuel PumpFuse Usage
4 Roof Lamp
5 Battery Ignition Switch
6 Front Wiper
5-104
Page 363 of 416

Fuse Usage
7 Regulated Voltage Control Power
8 Power Locks
9 Sunroof, Front Washer Pump
10 Accessories (SPO)
11 Air Compressor
12 Transfer Case Control Module
13Radio, Heating, Ventilation, Air
Conditioning Display
14 Body Control Module
15 Rear Wiper Motor
16 Rear Wiper Pump Switch
17 Air Injection Reactor (AIR) Solenoid
18 Spare 6
19 Cluster
20 Rear Turn Signal, Hazard Signal
21 Powertrain Control Module 1
22Mass Air Flow Sensor, Purge
Solenoid
23 Injector
24 Fog Lamp
25 Powertrain Control Module B
26 Transmission Control Module (TCM)
27 Airbags
28 Back-up LampsFuse Usage
29 Antilock Brakes, StabiliTrak®
30 Rear Window Defogger
31 Canister Vent
32 Regulated Voltage Control VSense+
33 Ignition 1
34 Transmission
35 Cruise, Inside Rearview Mirror
36 Horn
37 Driver Side Rear Park Lamp
38 Ampli�er
39Reduced Intensity Low-Beam
Daytime Running Lamps
40 Passenger Side Headlamp
41 Driver Side Headlamp
42 Trailer Back-Up Lamp
43 Front Park Lamps
44 Air Injection Reactor (AIR) Solenoid
45 Auxiliary Power 2
46 Electronic Throttle Control
47 Oxygen Sensor
48 Air Conditioning Clutch
49 Passenger Side Rear Park Lamp
50 Spare
51 Auxiliary Power 1
5-105
Page 364 of 416
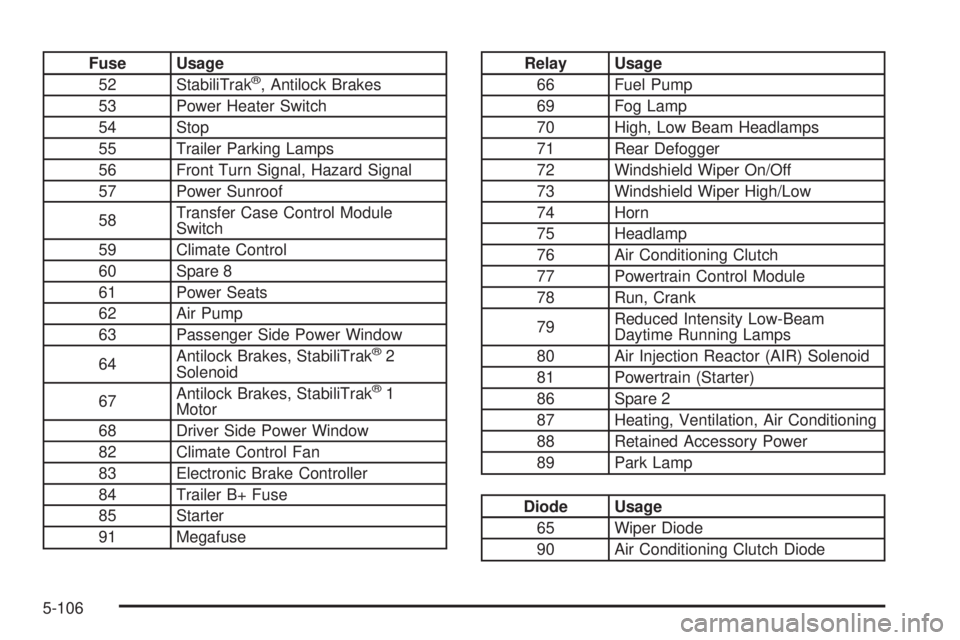
Fuse Usage
52 StabiliTrak®, Antilock Brakes
53 Power Heater Switch
54 Stop
55 Trailer Parking Lamps
56 Front Turn Signal, Hazard Signal
57 Power Sunroof
58Transfer Case Control Module
Switch
59 Climate Control
60 Spare 8
61 Power Seats
62 Air Pump
63 Passenger Side Power Window
64Antilock Brakes, StabiliTrak
®2
Solenoid
67Antilock Brakes, StabiliTrak
®1
Motor
68 Driver Side Power Window
82 Climate Control Fan
83 Electronic Brake Controller
84 Trailer B+ Fuse
85 Starter
91 Megafuse
Relay Usage
66 Fuel Pump
69 Fog Lamp
70 High, Low Beam Headlamps
71 Rear Defogger
72 Windshield Wiper On/Off
73 Windshield Wiper High/Low
74 Horn
75 Headlamp
76 Air Conditioning Clutch
77 Powertrain Control Module
78 Run, Crank
79Reduced Intensity Low-Beam
Daytime Running Lamps
80 Air Injection Reactor (AIR) Solenoid
81 Powertrain (Starter)
86 Spare 2
87 Heating, Ventilation, Air Conditioning
88 Retained Accessory Power
89 Park Lamp
Diode Usage
65 Wiper Diode
90 Air Conditioning Clutch Diode
5-106
Page 406 of 416
D
Daytime Running Lamps..................................3-17
Defensive Driving............................................. 4-2
Doing Your Own Service Work........................... 5-4
Dome Lamp...................................................3-19
Dome Lamp Override......................................3-20
Door
Locks.......................................................... 2-7
Power Door Locks......................................... 2-8
Programmable Automatic Door Locks............... 2-8
Rear Door Security Locks............................... 2-9
Driver Information Center (DIC).........................3-40
DIC Operation and Displays..........................3-40
DIC Warnings and Messages........................3-43
Driving
At Night.....................................................4-32
Before a Long Trip......................................4-34
Defensive..................................................... 4-2
Drunken....................................................... 4-2
Highway Hypnosis.......................................4-34
Hill and Mountain Roads..............................4-34
In Rain and on Wet Roads...........................4-33
Off-Road....................................................4-12
Recovery Loops..........................................4-40
Rocking Your Vehicle to Get it Out.................4-40
Winter........................................................4-35
E
EDR .............................................................7-16
Electrical System
Add-On Equipment.....................................5-101
Engine Compartment Fuse Block.................5-103
Fuses and Circuit Breakers.........................5-102
Power Windows and Other Power Options....5-102
Windshield Wiper Fuses.............................5-101
Engine
Air Cleaner/Filter.........................................5-20
Check and Service Engine Soon Light............3-36
Coolant......................................................5-27
Coolant Heater............................................2-22
Coolant Temperature Gage...........................3-35
Drive Belt Routing.......................................6-15
Engine Compartment Overview......................5-12
Exhaust.....................................................2-36
Fan Noise..................................................5-36
Oil .............................................................5-15
Oil Life System...........................................5-18
Overheating................................................5-29
Running While Parked..................................2-37
Starting......................................................2-20
Event Data Recorders.....................................7-17
Exit Lighting...................................................3-20
Extender, Safety Belt.......................................1-30
Exterior Lamps...............................................3-15
4