wheel HUMMER H3 2010 Owners Manual
[x] Cancel search | Manufacturer: HUMMER, Model Year: 2010, Model line: H3, Model: HUMMER H3 2010Pages: 410, PDF Size: 2.24 MB
Page 345 of 410
Vehicle Care 10-79
Raise the vehicle far enough off
the ground so there is enough
room for the spare tire to clear
the ground.
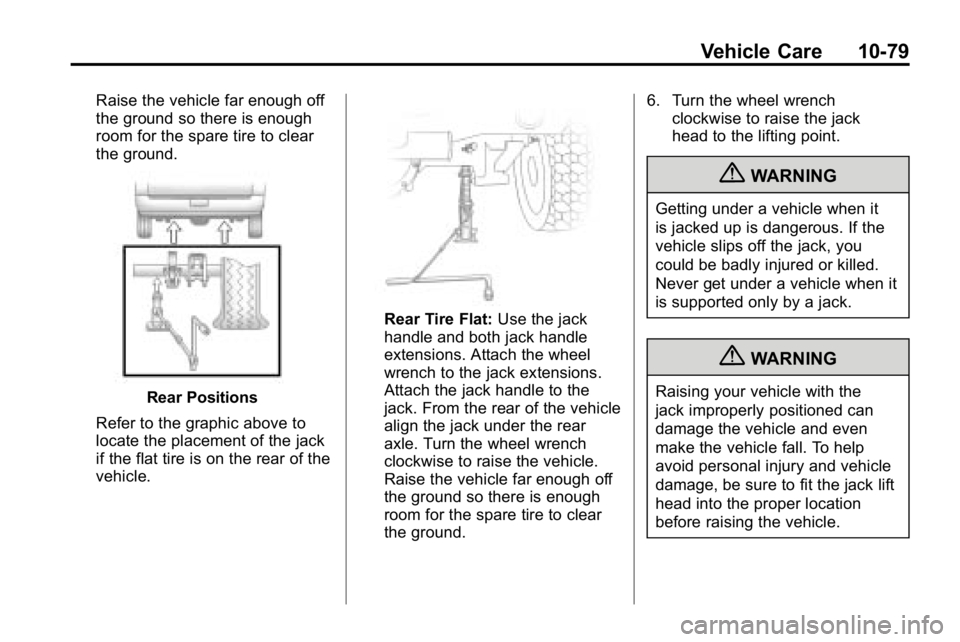
Rear Positions
Refer to the graphic above to
locate the placement of the jack
if the flat tire is on the rear of the
vehicle.
Rear Tire Flat: Use the jack
handle and both jack handle
extensions. Attach the wheel
wrench to the jack extensions.
Attach the jack handle to the
jack. From the rear of the vehicle
align the jack under the rear
axle. Turn the wheel wrench
clockwise to raise the vehicle.
Raise the vehicle far enough off
the ground so there is enough
room for the spare tire to clear
the ground. 6. Turn the wheel wrench
clockwise to raise the jack
head to the lifting point.
{WARNING
Getting under a vehicle when it
is jacked up is dangerous. If the
vehicle slips off the jack, you
could be badly injured or killed.
Never get under a vehicle when it
is supported only by a jack.
{WARNING
Raising your vehicle with the
jack improperly positioned can
damage the vehicle and even
make the vehicle fall. To help
avoid personal injury and vehicle
damage, be sure to fit the jack lift
head into the proper location
before raising the vehicle.
Page 346 of 410

10-80 Vehicle Care
7. Remove all the wheel nuts andtake off the flat tire.
{WARNING
Rust or dirt on a wheel, or on the
parts to which it is fastened, can
make wheel nuts become loose
after time. The wheel could come
off and cause an accident. When
changing a wheel, remove any
rust or dirt from places where the
wheel attaches to the vehicle. In
an emergency, use a cloth or a
paper towel to do this; but be sure
to use a scraper or wire brush
later, if needed, to get all the rust
or dirt off. See If a Tire Goes Flat
on page 10‑64. 8. Remove any rust or dirt from the
wheel bolts, mounting surfaces
and spare wheel.
{WARNING
Never use oil or grease on bolts
or nuts because the nuts might
come loose. The vehicle's wheel
could fall off, causing a crash.
9. Put the spare tire on the mounting surface.
10. Put the wheel nuts back on with the rounded end of the
nuts toward the wheel after
mounting the spare. 11. Tighten each wheel nut by
hand. Then use the wheel
wrench to tighten the nuts until
the wheel is held against
the hub.
12. Turn the wheel wrench counterclockwise to lower
the vehicle. Lower the jack
completely.
Page 347 of 410
Vehicle Care 10-81
{WARNING
Wheel nuts that are improperly or
incorrectly tightened can cause
the wheels to become loose or
come off. The wheel nuts should
be tightened with a torque wrench
to the proper torque specification
after replacing. Follow the torque
specification supplied by the
aftermarket manufacturer when
using accessory locking wheel
nuts. SeeCapacities and
Specifications
on page 12‑2for
original equipment wheel nut
torque specifications. Notice:
Improperly tightened
wheel nuts can lead to brake
pulsation and rotor damage. To
avoid expensive brake repairs,
evenly tighten the wheel nuts in
the proper sequence and to the
proper torque specification. See
Capacities and Specifications
on
page 12‑2for the wheel nut
torque specification.
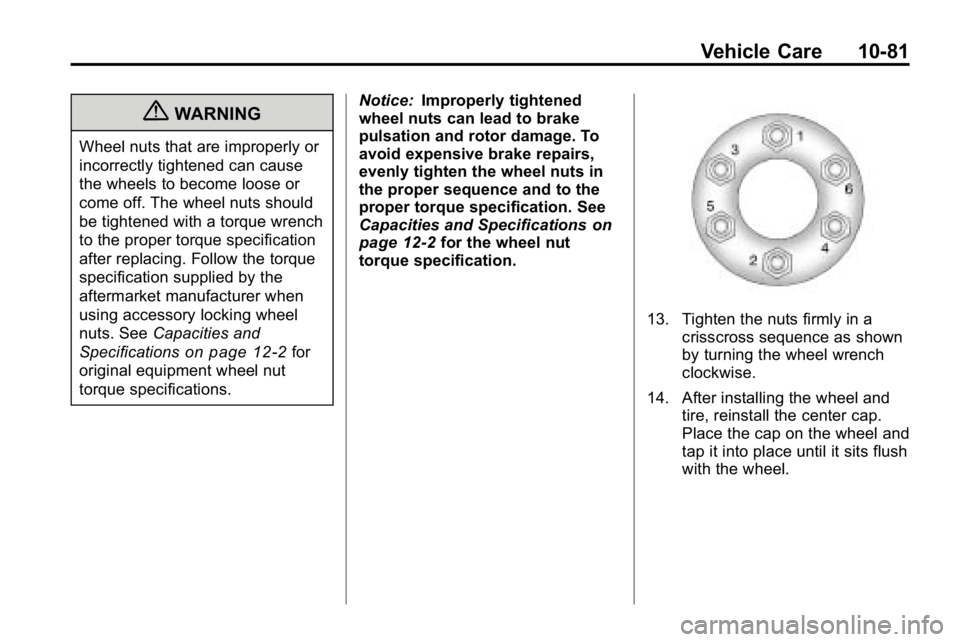
13. Tighten the nuts firmly in a crisscross sequence as shown
by turning the wheel wrench
clockwise.
14. After installing the wheel and tire, reinstall the center cap.
Place the cap on the wheel and
tap it into place until it sits flush
with the wheel.
Page 348 of 410
10-82 Vehicle Care
Storing a Flat or Spare Tire
and Tools
{WARNING
Storing a jack, a tire, or other
equipment in the passenger
compartment of the vehicle could
cause injury. In a sudden stop or
collision, loose equipment could
strike someone. Store all these in
the proper place.
To store the flat or spare tire on the
spare tire mount:
1. Slide the flat or spare tire onto the swing-gate.
You may need assistance to
do this.
2. Reinstall the nuts to retain the flat or spare tire.
3. Tighten the nuts by hand.
{WARNING
Wheel nuts that are improperly or
incorrectly tightened can cause
the wheels to become loose or
come off. The wheel nuts should
be tightened with a torque wrench
to the proper torque specification
after replacing. Follow the torque
specification supplied by the
aftermarket manufacturer when
using accessory locking wheel
nuts. See Capacities and
Specifications
on page 12‑2for
original equipment wheel nut
torque specifications.
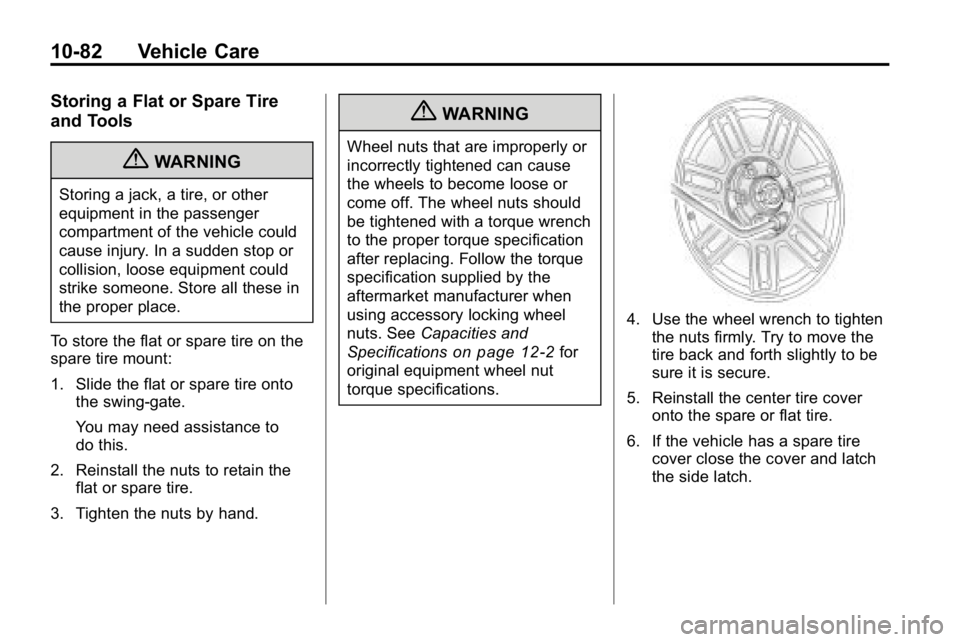
4. Use the wheel wrench to tighten the nuts firmly. Try to move the
tire back and forth slightly to be
sure it is secure.
5. Reinstall the center tire cover onto the spare or flat tire.
6. If the vehicle has a spare tire cover close the cover and latch
the side latch.
Page 351 of 410
Vehicle Care 10-85
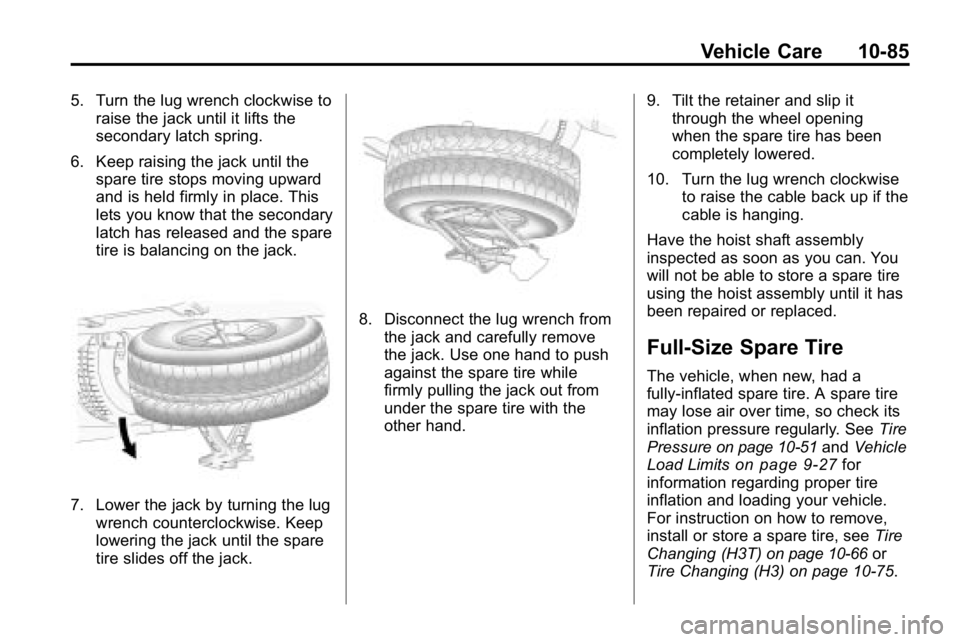
5. Turn the lug wrench clockwise toraise the jack until it lifts the
secondary latch spring.
6. Keep raising the jack until the spare tire stops moving upward
and is held firmly in place. This
lets you know that the secondary
latch has released and the spare
tire is balancing on the jack.
7. Lower the jack by turning the lugwrench counterclockwise. Keep
lowering the jack until the spare
tire slides off the jack.
8. Disconnect the lug wrench fromthe jack and carefully remove
the jack. Use one hand to push
against the spare tire while
firmly pulling the jack out from
under the spare tire with the
other hand. 9. Tilt the retainer and slip it
through the wheel opening
when the spare tire has been
completely lowered.
10. Turn the lug wrench clockwise to raise the cable back up if the
cable is hanging.
Have the hoist shaft assembly
inspected as soon as you can. You
will not be able to store a spare tire
using the hoist assembly until it has
been repaired or replaced.
Full-Size Spare Tire
The vehicle, when new, had a
fully-inflated spare tire. A spare tire
may lose air over time, so check its
inflation pressure regularly. See Tire
Pressure
on page 10‑51and Vehicle
Load Limitson page 9‑27for
information regarding proper tire
inflation and loading your vehicle.
For instruction on how to remove,
install or store a spare tire, see Tire
Changing (H3T)
on page 10‑66or
Tire Changing (H3) on page 10‑75.
Page 352 of 410
10-86 Vehicle Care
After installing the spare tire on your
vehicle, you should stop as soon as
possible and make sure the spare is
correctly inflated.
The spare tire does not have a Tire
Pressure Monitor System sensor.
You may get a low pressure warning
light. SeeTire Pressure Monitor
Operation
on page 10‑53. Have the
damaged or flat road tire repaired or
replaced as soon as you can.
Do not mix tires and wheels of
different sizes, because they will
not fit. Keep your spare tire and its
wheel together.
Jump Starting
If the vehicle's battery has run
down, you may want to use another
vehicle and some jumper cables to
start your vehicle. Be sure to use
the following steps to do it safely.
{WARNING
Batteries can hurt you. They can
be dangerous because:
.They contain acid that can
burn you.
.They contain gas that can
explode or ignite.
.They contain enough
electricity to burn you.
If you do not follow these steps
exactly, some or all of these
things can hurt you. Notice:
Ignoring these steps
could result in costly damage to
the vehicle that would not be
covered by the warranty.
Trying to start the vehicle by
pushing or pulling it will not
work, and it could damage the
vehicle.
1. Check the other vehicle. It must
have a 12‐volt battery with a
negative ground system.
Notice: If the other vehicle's
system is not a 12-volt system
with a negative ground, both
vehicles can be damaged. Only
use vehicles with 12-volt systems
with negative grounds to jump
start your vehicle.
2. Get the vehicles close enough so the jumper cables can reach,
but be sure the vehicles are not
touching each other. If they
are, it could cause a ground
connection you do not want.
Page 353 of 410
Vehicle Care 10-87
You would not be able to start
your vehicle, and the bad
grounding could damage the
electrical systems.
To avoid the possibility of the
vehicles rolling, set the parking
brake firmly on both vehicles
involved in the jump start
procedure. Put an automatic
transmission in P (Park) or a
manual transmission in Neutral
before setting the parking brake.
If you have a four-wheel-drive
vehicle, be sure the transfer
case is not in Neutral.
Notice: If you leave the radio or
other accessories on during the
jump starting procedure, they
could be damaged. The repairs
would not be covered by the
warranty. Always turn off the
radio and other accessories
when jump starting the vehicle. 3. Turn off the ignition on both
vehicles. Unplug unnecessary
accessories plugged into the
cigarette lighter or the accessory
power outlets. Turn off the radio
and all lamps that are not
needed. This will avoid sparks
and help save both batteries.
And it could save the radio!
4. Open the hoods and locate the batteries on both vehicles. You
will use the positive (+) battery
terminal and the remote
negative (−) jump starting
terminal to jump start your
vehicle. To access the
positive (+) battery terminal,
open the terminal cover. See
Engine Compartment Overview
on page 10‑6for more
information on the terminal
locations.
{WARNING
Using a match near a battery can
cause battery gas to explode.
People have been hurt doing this,
and some have been blinded.
Use a flashlight if you need more
light.
Be sure the batteries have
enough water. You do not need
to add water to the ACDelco
®
battery (or batteries) installed in
your new vehicle. But if a battery
has filler caps, be sure the right
amount of fluid is there. If it is low,
add water to take care of that
first. If you do not, explosive gas
could be present.
Battery fluid contains acid that
can burn you. Do not get it on
you. If you accidentally get it in
your eyes or on your skin, flush
the place with water and get
medical help immediately.
Page 356 of 410
10-90 Vehicle Care
Towing
Towing the Vehicle
To avoid damage, the disabled
vehicle should be towed with all
four wheels off the ground. Consult
your dealer or a professional towing
service if the disabled vehicle must
be towed. SeeRoadside Service
on
page 13‑5.
To tow the vehicle behind
another vehicle for recreational
purposes —such as behind a
motorhome, see “Recreational
Vehicle Towing” following.
Recreational Vehicle
Towing
Recreational vehicle towing
means towing the vehicle behind
another vehicle–such as behind
a motorhome. The two most
common types of recreational
vehicle towing are known as “dinghy
towing” — towing the vehicle with
all four wheels on the ground, and “dolly towing” —
towing the vehicle
with two wheels on the ground and
two wheels up on a device known
as a “dolly”.
Here are some important things to
consider before recreational vehicle
towing:
.What is the towing capacity of
the tow vehicle? Be sure to read
the tow vehicle manufacturer's
recommendations.
.What is the distance that will be
travelled? Some vehicles have
restrictions on how far and how
long they can tow.
.Is the proper towing equipment
going to be used? See your
dealer or trailering professional
for additional advice and
equipment recommendations.
.Is the vehicle ready to be
towed? Just as preparing the
vehicle for a long trip, make sure
the vehicle is prepared to be
towed.
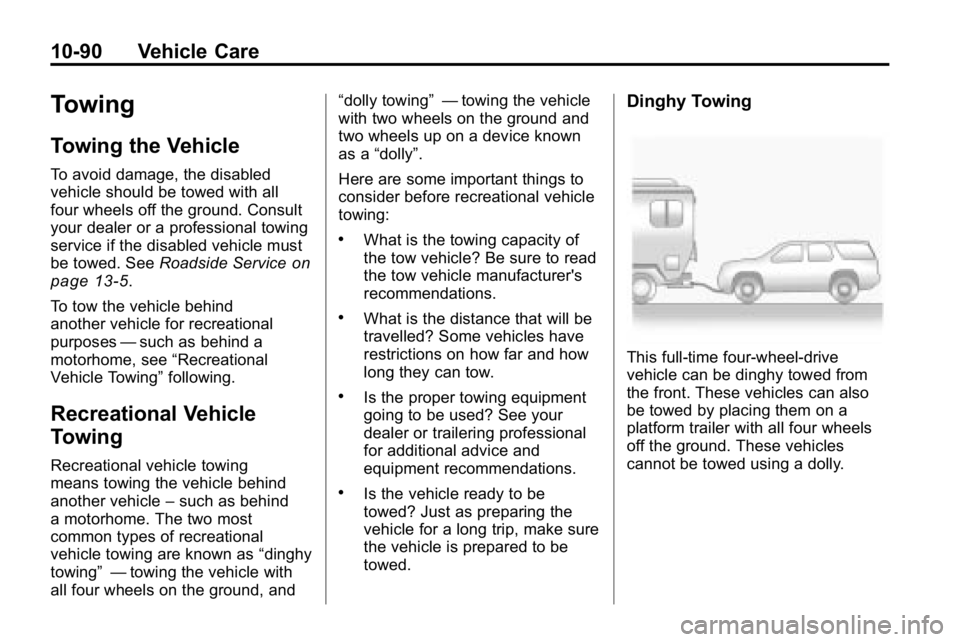
Dinghy Towing
This full‐time four‐wheel‐drive
vehicle can be dinghy towed from
the front. These vehicles can also
be towed by placing them on a
platform trailer with all four wheels
off the ground. These vehicles
cannot be towed using a dolly.
Page 357 of 410
Vehicle Care 10-91
Use the following procedure to tow
the vehicle:
1. Put the transmission in P (Park)for an automatic transmission
or in 1 (First) for a manual
transmission.
2. Turn the engine off, but leave the ignition in ACC/
ACCESSORY.
3. Firmly set the parking brake.
4. Securely attach the vehicle being towed to the tow vehicle.
{WARNING
Shifting a full‐time four‐wheel‐
drive vehicle's transfer case into
N (Neutral) can cause the vehicle
to roll even if the automatic
transmission is in P (Park) or the
manual transmission is in any
gear. You or others could be
injured. Make sure the parking
brake is firmly set before the
transfer case is shifted to
N (Neutral). 5. Shift the transfer case to
N (Neutral). See Four-Wheel
Drive
on page 9‑46for the
proper procedure to select the
N (Neutral) position for the
vehicle.
6. Release the parking brake only after the vehicle being towed
is firmly attached to the tow
vehicle.
7. Make sure the ignition is in ACC/ACCESSORY.
When towing the vehicle for
extended periods of time, start the
vehicle as often as possible to
prevent battery drain. This should
only be done when the tow vehicle
is parked.
After towing, see “Shifting Out of
NEUTRAL” underFour-Wheel Drive
on page 9‑46.
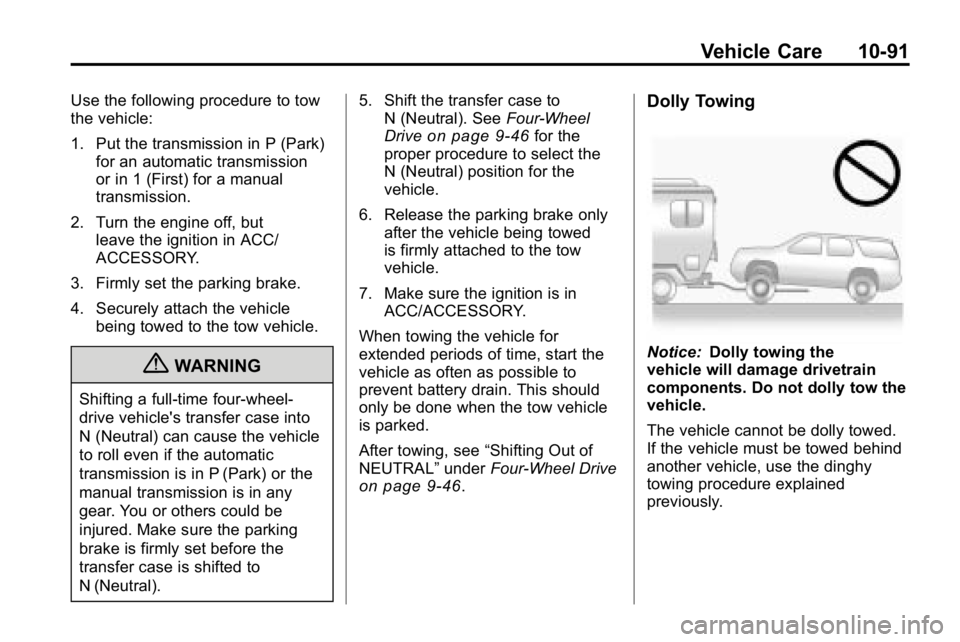
Dolly Towing
Notice: Dolly towing the
vehicle will damage drivetrain
components. Do not dolly tow the
vehicle.
The vehicle cannot be dolly towed.
If the vehicle must be towed behind
another vehicle, use the dinghy
towing procedure explained
previously.
Page 360 of 410
10-94 Vehicle Care
Wheels and Trim—Aluminum
or Chrome
The vehicle may have either
aluminum or chrome-plated wheels.
Keep the wheels clean using a soft
clean cloth with mild soap and
water. Rinse with clean water. After
rinsing thoroughly, dry with a soft
clean towel. A wax may then be
applied.
Notice: Chrome wheels and other
chrome trim may be damaged if
the vehicle is not washed after
driving on roads that have been
sprayed with magnesium, calcium
or sodium chloride. These
chlorides are used on roads
for conditions such as ice and
dust. Always wash the vehicle's
chrome with soap and water after
exposure. Notice:
Using strong soaps,
chemicals, abrasive polishes,
cleaners, brushes, or cleaners
that contain acid on aluminum
or chrome-plated wheels, could
damage the surface of the
wheel(s). The repairs would not
be covered by the vehicle
warranty. Use only approved
cleaners on aluminum or
chrome-plated wheels.
The surface of these wheels is
similar to the painted surface of the
vehicle. Do not use strong soaps,
chemicals, abrasive polishes,
abrasive cleaners, cleaners with
acid, or abrasive cleaning brushes
on them because the surface could
be damaged. Do not use chrome
polish on aluminum wheels. Notice:
Using chrome polish on
aluminum wheels could damage
the wheels. The repairs would
not be covered by the vehicle
warranty. Use chrome polish on
chrome wheels only.
Use chrome polish only on
chrome-plated wheels, but avoid
any painted surface of the wheel,
and buff off immediately after
application.
Notice: Driving the vehicle
through an automatic car wash
that has silicone carbide tire
cleaning brushes, could damage
the aluminum or chrome-plated
wheels. The repairs would not be
covered by the vehicle warranty.
Never drive a vehicle that has
aluminum or chrome-plated
wheels through an automatic car
wash that uses silicone carbide
tire cleaning brushes.