maintenance HUMMER H3 2010 Owner's Manual
[x] Cancel search | Manufacturer: HUMMER, Model Year: 2010, Model line: H3, Model: HUMMER H3 2010Pages: 410, PDF Size: 2.24 MB
Page 282 of 410
10-16 Vehicle Care
4. If the fluid level is good, installthe plug and be sure it is fully
seated. If the fluid level is low,
add more fluid as described in
the next steps.
How to Add Fluid
Refer to the Maintenance Schedule
to determine what kind of fluid to
use. See Recommended Fluids and
Lubricants on page 11‑8.
1. Remove the filler plug.
2. Add fluid at the filler plug hole. Add only enough fluid to bring
the fluid level up to the bottom of
the filler plug hole.
3. Install the filler plug. Be sure the plug is fully seated.
Hydraulic Clutch
The hydraulic clutch linkage in the
vehicle is self-adjusting. The clutch
master cylinder reservoir is filled
with hydraulic clutch fluid.
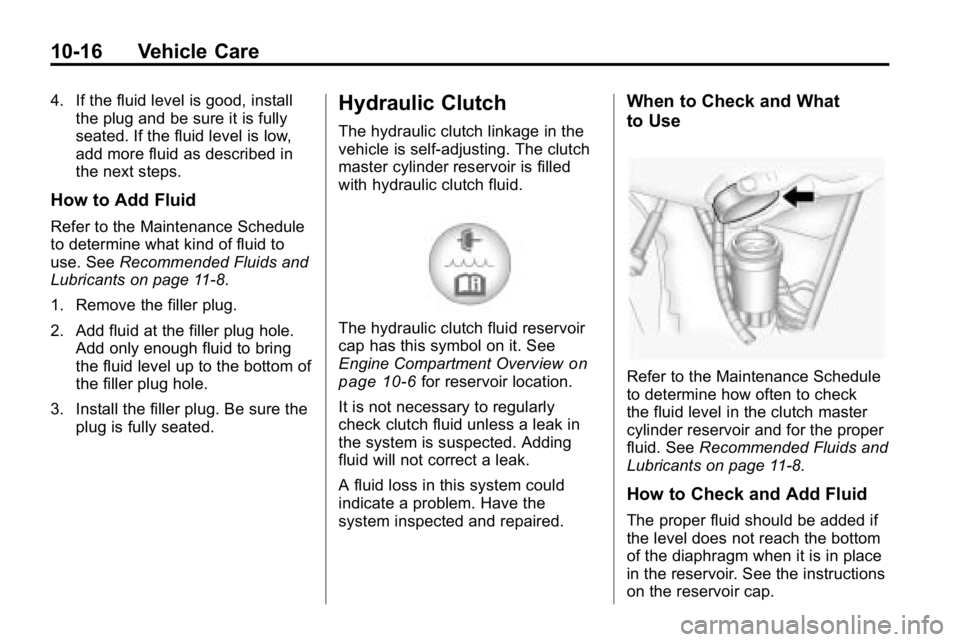
The hydraulic clutch fluid reservoir
cap has this symbol on it. See
Engine Compartment Overview
on
page 10‑6for reservoir location.
It is not necessary to regularly
check clutch fluid unless a leak in
the system is suspected. Adding
fluid will not correct a leak.
A fluid loss in this system could
indicate a problem. Have the
system inspected and repaired.
When to Check and What
to Use
Refer to the Maintenance Schedule
to determine how often to check
the fluid level in the clutch master
cylinder reservoir and for the proper
fluid. See Recommended Fluids and
Lubricants on page 11‑8.
How to Check and Add Fluid
The proper fluid should be added if
the level does not reach the bottom
of the diaphragm when it is in place
in the reservoir. See the instructions
on the reservoir cap.
Page 283 of 410
Vehicle Care 10-17
Engine Air Cleaner/Filter
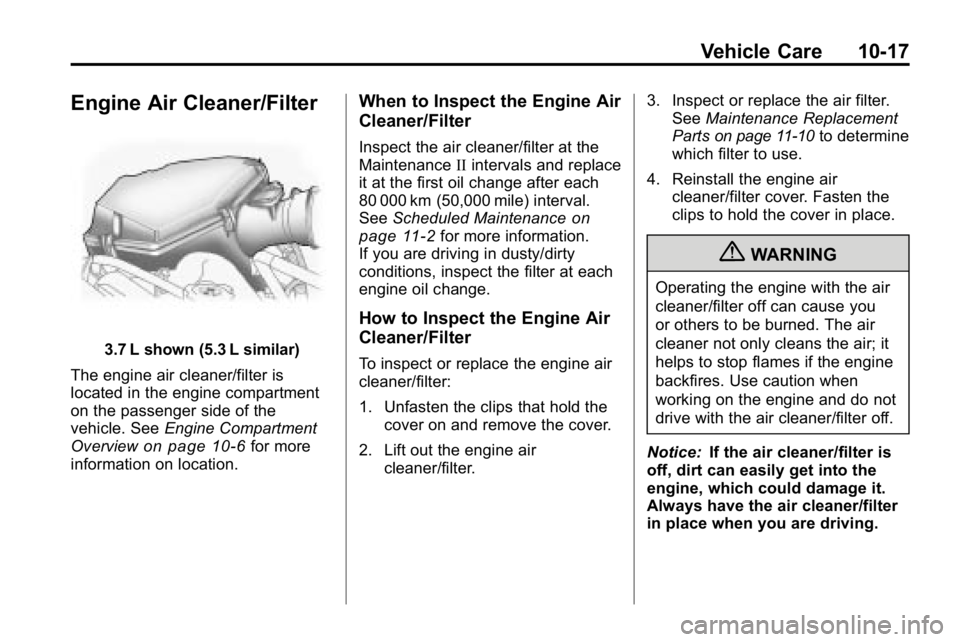
3.7 L shown (5.3 L similar)
The engine air cleaner/filter is
located in the engine compartment
on the passenger side of the
vehicle. See Engine Compartment
Overview
on page 10‑6for more
information on location.
When to Inspect the Engine Air
Cleaner/Filter
Inspect the air cleaner/filter at the
Maintenance IIintervals and replace
it at the first oil change after each
80 000 km (50,000 mile) interval.
See Scheduled Maintenance
on
page 11‑2for more information.
If you are driving in dusty/dirty
conditions, inspect the filter at each
engine oil change.
How to Inspect the Engine Air
Cleaner/Filter
To inspect or replace the engine air
cleaner/filter:
1. Unfasten the clips that hold the cover on and remove the cover.
2. Lift out the engine air cleaner/filter. 3. Inspect or replace the air filter.
See Maintenance Replacement
Parts
on page 11‑10to determine
which filter to use.
4. Reinstall the engine air cleaner/filter cover. Fasten the
clips to hold the cover in place.
{WARNING
Operating the engine with the air
cleaner/filter off can cause you
or others to be burned. The air
cleaner not only cleans the air; it
helps to stop flames if the engine
backfires. Use caution when
working on the engine and do not
drive with the air cleaner/filter off.
Notice: If the air cleaner/filter is
off, dirt can easily get into the
engine, which could damage it.
Always have the air cleaner/filter
in place when you are driving.
Page 298 of 410
10-32 Vehicle Care
Wiper Blade Replacement
Windshield wiper blades should be
inspected for wear and cracking.
SeeScheduled Maintenance
on
page 11‑2for more information.
Replacement blades come in
different types and are removed
in different ways. For proper type
and length, see Maintenance
Replacement Parts on page 11‑10. To replace the windshield wiper
blade:
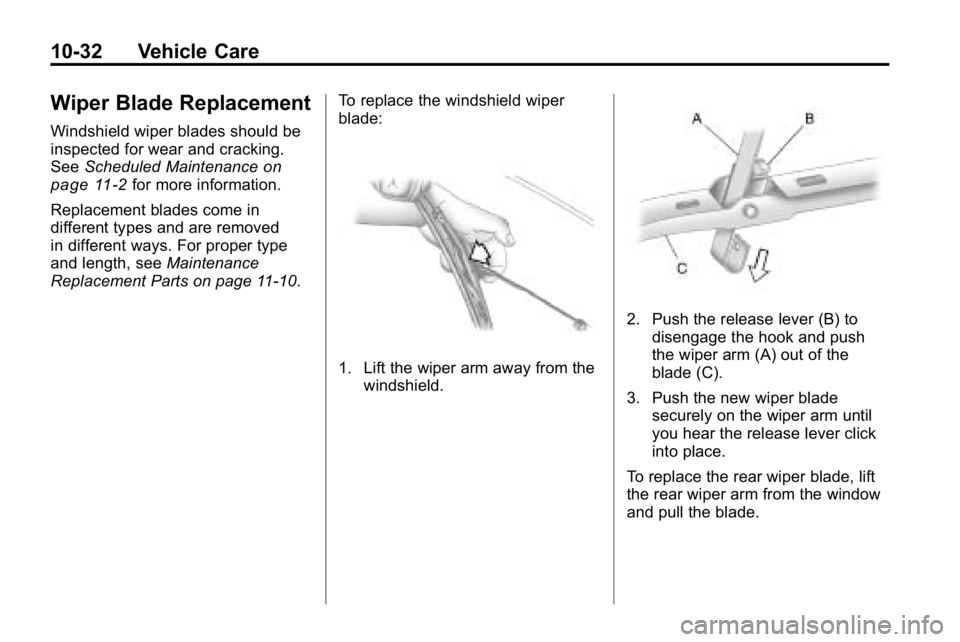
1. Lift the wiper arm away from the
windshield.
2. Push the release lever (B) to
disengage the hook and push
the wiper arm (A) out of the
blade (C).
3. Push the new wiper blade securely on the wiper arm until
you hear the release lever click
into place.
To replace the rear wiper blade, lift
the rear wiper arm from the window
and pull the blade.
Page 319 of 410

Vehicle Care 10-53
Please note that the TPMS is
not a substitute for proper tire
maintenance, and it is the driver's
responsibility to maintain correct tire
pressure, even if under‐inflation
has not reached the level to trigger
illumination of the TPMS low tire
pressure telltale.
Your vehicle has also been
equipped with a TPMS malfunction
indicator to indicate when the
system is not operating properly.
The TPMS malfunction indicator is
combined with the low tire pressure
telltale. When the system detects a
malfunction, the telltale will flash for
approximately one minute and then
remain continuously illuminated.
This sequence will continue upon
subsequent vehicle start‐ups as
long as the malfunction exists.
When the malfunction indicator
is illuminated, the system may
not be able to detect or signal
low tire pressure as intended.TPMS malfunctions may occur for
a variety of reasons, including the
installation of replacement or
alternate tires or wheels on the
vehicle that prevent the TPMS
from functioning properly. Always
check the TPMS malfunction
telltale after replacing one or more
tires or wheels on your vehicle to
ensure that the replacement or
alternate tires and wheels allow
the TPMS to continue to function
properly.
See
Tire Pressure Monitor
Operation
on page 10‑53for
additional information.
Federal Communications
Commission (FCC) and
Industry Canada
See Radio Frequency Statementon
page 13‑16for information
regarding Part 15 of the Federal
Communications Commission (FCC)
Rules and RSS-210/211 of Industry
Canada.
Tire Pressure Monitor
Operation
This vehicle may have a Tire
Pressure Monitor System (TPMS).
The TPMS is designed to warn the
driver when a low tire pressure
condition exists. TPMS sensors are
mounted onto each tire and wheel
assembly on the vehicle, excluding
the spare tire. The TPMS sensors
monitor the air pressure in the
vehicle's tires and transmit the tire
pressure readings to a receiver
located in the vehicle.
When a low tire pressure
condition is detected, the TPMS
illuminates the low tire pressure
warning light located on the
instrument panel cluster.
Page 320 of 410

10-54 Vehicle Care
If the warning light comes on,
stop as soon as possible and
inflate the tires to the recommended
pressure shown on the tire loading
information label. SeeVehicle Load
Limits on page 9‑27.
At the same time, a Driver
Information Center (DIC) message
is displayed on the DIC display
screen. The low tire pressure
warning light and the DIC warning
message come on at each ignition
cycle until the tires are inflated to
the correct inflation pressure. For
additional information and details
about the DIC operation and
displays see Tire Messages
on
page 5‑25.
The low tire pressure warning light
may come on in cool weather when
the vehicle is first started, and then
turn off as you start to drive. This
could be an early indicator that the
air pressure in the tire(s) are getting
low and need to be inflated to the
proper pressure. A Tire and Loading Information
label, attached to the vehicle, shows
the size of the vehicle's original
equipment tires and the correct
inflation pressure for the vehicle's
tires when they are cold. See
Vehicle Load Limits
on page 9‑27,
for an example of the Tire and
Loading Information label and its
location on the vehicle. Also see
Tire Pressure on page 10‑51.
The vehicle's TPMS can warn you
about a low tire pressure condition
but it does not replace normal tire
maintenance. See Tire Inspection
on page 10‑57,Tire Rotationon
page 10‑57and Tires on
page 10‑44.
Notice: Liquid tire sealants could
damage the Tire Pressure Monitor
System (TPMS) sensors. Sensor
damage caused by using a tire
sealant is not covered by your
warranty. Do not use liquid tire
sealants.
TPMS Malfunction Light and
Message
The TPMS will not function properly
if one or more of the TPMS sensors
are missing or inoperable. When the
system detects a malfunction, the
low tire warning light flashes for
about one minute and then stays on
for the remainder of the ignition
cycle. A DIC warning message is
also displayed. The low tire warning
light and DIC warning message
come on at each ignition cycle until
the problem is corrected. Some of
the conditions that can cause the
malfunction light and DIC message
to come on are:
.One of the road tires has been
replaced with the spare tire.
The spare tire does not have
a TPMS sensor. The TPMS
malfunction light and DIC
message should go off once you
re‐install the road tire containing
the TPMS sensor.
Page 323 of 410
Vehicle Care 10-57
10. Set all four tires to therecommended air pressure
level as indicated on the Tire
and Loading Information label.
11. Put the valve caps back on the valve stems.
Tire Inspection
We recommend that you
regularly inspect your vehicle's
tires, including the spare tire,
if the vehicle has one, for
signs of wear or damage. See
When It Is Time for New Tires
on
page 10‑58
for more information.
Tire Rotation
Tires should be rotated every
5,000 to 8,000 miles (8 000 to
13 000 km). See Scheduled
Maintenance
on page 11‑2. The purpose of a regular tire
rotation is to achieve a uniform
wear for all tires on the vehicle.
This will ensure that the vehicle
continues to perform most like it
did when the tires were new.
The first rotation is the most
important. See
Scheduled
Maintenance
on page 11‑2.
Any time you notice unusual
wear, rotate the tires as soon
as possible and check wheel
alignment. Also check for
damaged tires or wheels.
See When It Is Time for New
Tires
on page 10‑58and Wheel
Replacement
on page 10‑63.
Make sure the spare tire is
stored securely. Push, pull and
then try to rotate or turn the tire.
If it moves, use the wheel
wrench/hoist shaft to tighten the
cable. See If a Tire Goes Flat
on
page 10‑64
.
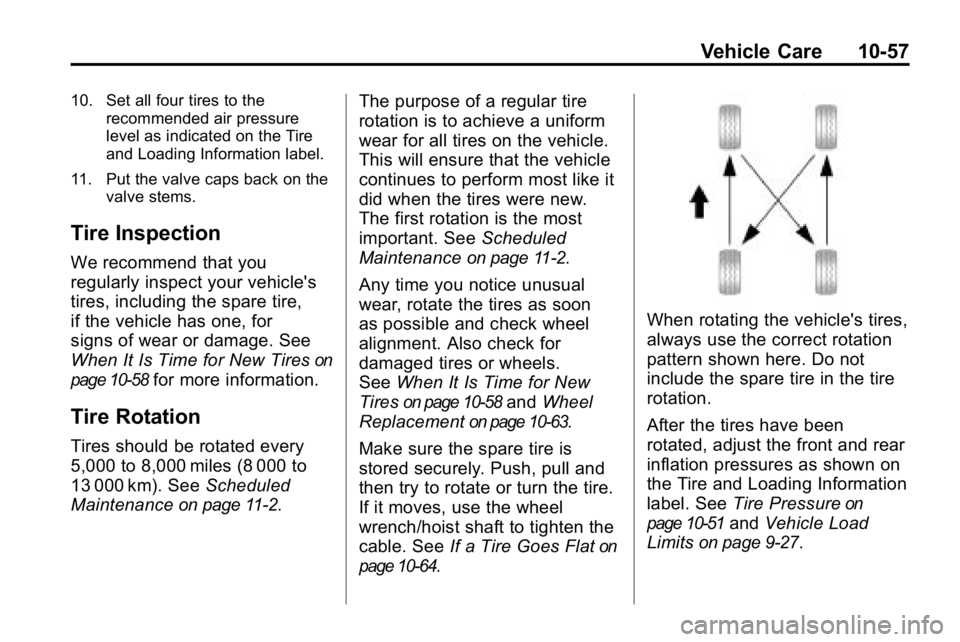
When rotating the vehicle's tires,
always use the correct rotation
pattern shown here. Do not
include the spare tire in the tire
rotation.
After the tires have been
rotated, adjust the front and rear
inflation pressures as shown on
the Tire and Loading Information
label. See Tire Pressure
on
page 10‑51
and Vehicle Load
Limits
on page 9‑27.
Page 324 of 410
10-58 Vehicle Care
Reset the Tire Pressure Monitor
System. SeeTire Pressure
Monitor Operation
on page 10‑53.
Make certain that all wheel nuts
are properly tightened. See
“Wheel Nut Torque” under
Capacities and Specifications
on
page 12‑2
.
{WARNING
Rust or dirt on a wheel, or on the
parts to which it is fastened, can
make wheel nuts become loose
after time. The wheel could come
off and cause an accident. When
changing a wheel, remove any
rust or dirt from places where the
wheel attaches to the vehicle. In
an emergency, use a cloth or a
paper towel to do this; but be sure
to use a scraper or wire brush
later, if needed, to get all the rust
or dirt off. See If a Tire Goes Flat
on page 10‑64.
When It Is Time for New
Tires
Various factors, such as
maintenance, temperatures, driving
speeds, vehicle loading, and road
conditions influence when you need
new tires.
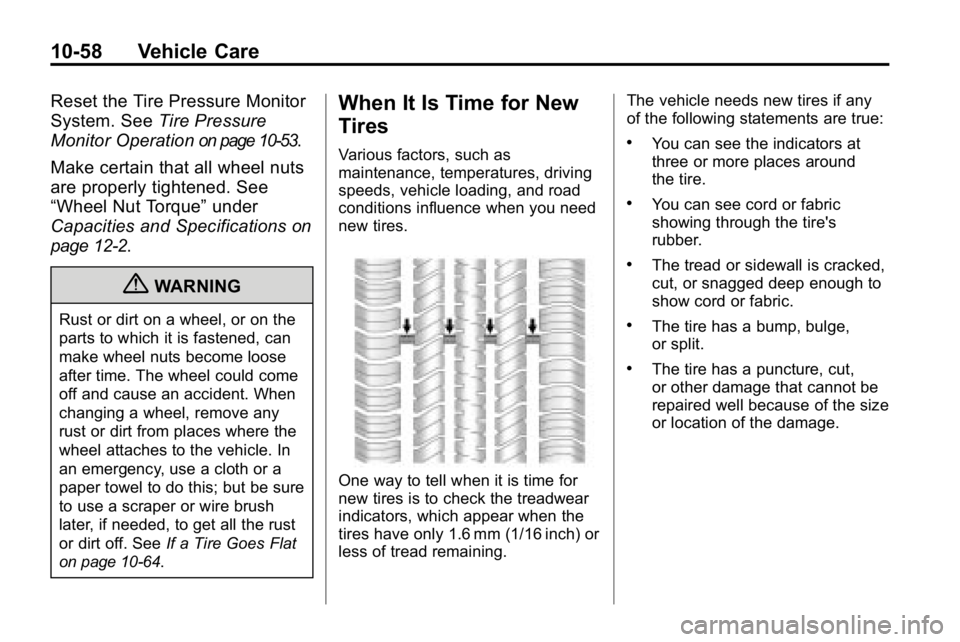
One way to tell when it is time for
new tires is to check the treadwear
indicators, which appear when the
tires have only 1.6 mm (1/16 inch) or
less of tread remaining. The vehicle needs new tires if any
of the following statements are true:
.You can see the indicators at
three or more places around
the tire.
.You can see cord or fabric
showing through the tire's
rubber.
.The tread or sidewall is cracked,
cut, or snagged deep enough to
show cord or fabric.
.The tire has a bump, bulge,
or split.
.The tire has a puncture, cut,
or other damage that cannot be
repaired well because of the size
or location of the damage.
Page 325 of 410
Vehicle Care 10-59
The rubber in tires degrades over
time. This is also true for the spare
tire, if the vehicle has one, even
if it is not being used. Multiple
conditions affect how fast this
aging takes place, including
temperatures, loading conditions,
and inflation pressure maintenance.
With proper care and maintenance
tires typically wear out before they
degrade due to age. If you are
unsure about the need to replace
the tires as they get older, consult
the tire manufacturer for more
information.
Buying New Tires
GM has developed and matched
specific tires for your vehicle.
The original equipment tires
installed on your vehicle, when
it was new, were designed tomeet General Motors Tire
Performance Criteria
Specification (TPC spec)
system rating. If you need
replacement tires, GM strongly
recommends that you get tires
with the same TPC Spec rating.
This way, your vehicle will
continue to have tires that are
designed to give the same
performance and vehicle safety,
during normal use, as the
original tires.
GM's exclusive TPC Spec
system considers over a
dozen critical specifications that
impact the overall performance
of your vehicle, including brake
system performance, ride and
handling, traction control, and
tire pressure monitoring
performance. GM's TPC Spec
number is molded onto the tire's
sidewall near the tire size. If the
tires have an all‐season tread
design, the TPC spec number
will be followed by a MS, for
mud and snow. See
Tire
Sidewall Labeling
on page 10‑44
for additional information.
GM recommends replacing tires
in sets of four. This is because
uniform tread depth on all tires
will help keep your vehicle
performing most like it did when
the tires were new. Replacing
less than a full set of tires can
affect the braking and handling
performance of your vehicle.
Page 331 of 410
Vehicle Care 10-65
A rear blowout, particularly on a
curve, acts much like a skid and
may require the same correction
you would use in a skid. In any rear
blowout remove your foot from the
accelerator pedal. Get the vehicle
under control by steering the way
you want the vehicle to go. It may
be very bumpy and noisy, but you
can still steer. Gently brake to a
stop, well off the road if possible.
{WARNING
Lifting a vehicle and getting
under it to do maintenance or
repairs is dangerous without the
appropriate safety equipment and
training. If a jack is provided with
the vehicle, it is designed only for
changing a flat tire. If it is used for
anything else, you or others could
be badly injured or killed if the
vehicle slips off the jack. If a jack
is provided with the vehicle, only
use it for changing a flat tire.If a tire goes flat, avoid further
tire and wheel damage by driving
slowly to a level place. Turn on
your hazard warning flashers.
See
Hazard Warning Flashers
on
page 6‑5.
{WARNING
Changing a tire can be
dangerous. The vehicle can slip
off the jack and roll over or fall
on you or other people. You and
they could be badly injured or
even killed. Find a level place to
change your tire. To help prevent
the vehicle from moving:
1. Set the parking brake firmly.
2. Put the shift lever in P (Park).
3. If you have a four-wheel-drive vehicle,
be sure the transfer case
is in a drive gear –not in
N (Neutral).
(Continued)
WARNING (Continued)
4. Turn off the engine and donot restart while the vehicle
is raised.
5. Do not allow passengers to remain in the vehicle.
To be even more certain the
vehicle will not move, put blocks
at the front and rear of the tire
farthest away from the one being
changed. That would be the tire
on the other side, at the opposite
end of the vehicle.
When the vehicle has a flat tire, the
wheel blocks need to be set up
before changing it. The wheel
blocks are located in the tool bag in
the swing-gate for H3 models or
below the rear seat for H3T models.
Page 359 of 410
Vehicle Care 10-93
Washing the Vehicle
To preserve the vehicle's finish,
keep it clean by washing it often.
Do not wash the vehicle in direct
sunlight and use a car
washing soap.
Notice:Certain cleaners contain
chemicals that can damage the
emblems or nameplates on the
vehicle. Check the cleaning
product label. If it states that it
should not be used on plastic
parts, do not use it on the vehicle
or damage may occur and it
would not be covered by the
warranty.
Do not use cleaning agents that are
petroleum based or that contain
acid or abrasives, as they can
damage the paint, metal or plastic
on the vehicle. Approved cleaning
products can be obtained from your
dealer. Follow all manufacturer
directions regarding correct product
usage, necessary safety precautions and appropriate
disposal of any vehicle care
product.
Rinse the vehicle well, before
washing and after to remove all
cleaning agents completely. If they
are allowed to dry on the surface,
they could stain.
Dry the finish with a soft, clean
chamois or an all-cotton towel to
avoid surface scratches and water
spotting.
High pressure car washes could
cause water to enter the vehicle.
Avoid using high pressure washes
closer than 30 cm (12 inches) to the
surface of the vehicle. Use of power
washers exceeding 8,274 kPa
(1,200 psi) can result in damage or
removal of paint and decals.
Notice:
Conveyor systems on
some automatic car washes could
damage the vehicle. There may
not be enough clearance for the
undercarriage. Check with the car
wash manager before using the
automatic car wash.
Weatherstrips
Silicone grease on weatherstrips will
make them last longer, seal better,
and not stick or squeak. Apply
silicone grease with a clean cloth.
During very cold, damp weather
frequent application may be
required. See “Fluids and
Lubricants” in the Index of the
“Maintenance and Warranty and
Owner assistance Information”
manual.