headlamp HUMMER H3 2010 Owners Manual
[x] Cancel search | Manufacturer: HUMMER, Model Year: 2010, Model line: H3, Model: HUMMER H3 2010Pages: 410, PDF Size: 2.24 MB
Page 1 of 410

2010 HUMMER H3/H3T Owner ManualM
In Brief. . . . . . . . . . . . . . . . . . . . . . . . 1-1
Instrument Panel . . . . . . . . . . . . . . 1-2
Initial Drive Information . . . . . . . . 1-3
Vehicle Features . . . . . . . . . . . . . 1-13
Performance and Maintenance . . . . . . . . . . . . . . . . 1-16
Keys, Doors and Windows . . . 2-1
Keys and Locks . . . . . . . . . . . . . . . 2-2
Doors . . . . . . . . . . . . . . . . . . . . . . . . . . 2-7
Vehicle Security . . . . . . . . . . . . . . . . 2-9
Exterior Mirrors . . . . . . . . . . . . . . . 2-13
Interior Mirrors . . . . . . . . . . . . . . . . 2-14
Windows . . . . . . . . . . . . . . . . . . . . . 2-15
Roof . . . . . . . . . . . . . . . . . . . . . . . . . . 2-17
Seats and Restraints . . . . . . . . . 3-1
Head Restraints . . . . . . . . . . . . . . . 3-2
Front Seats . . . . . . . . . . . . . . . . . . . . 3-3
Rear Seats . . . . . . . . . . . . . . . . . . . . 3-7
Safety Belts . . . . . . . . . . . . . . . . . . 3-10
Airbag System . . . . . . . . . . . . . . . . 3-27
Child Restraints . . . . . . . . . . . . . . 3-42 Storage
. . . . . . . . . . . . . . . . . . . . . . . 4-1
Storage Compartments . . . . . . . . 4-1
Additional Storage Features . . . 4-2
Roof Rack System . . . . . . . . . . . . . 4-4
Instruments and Controls . . . . 5-1
Controls . . . . . . . . . . . . . . . . . . . . . . . 5-2
Warning Lights, Gauges, and
Indicators . . . . . . . . . . . . . . . . . . . . 5-6
Information Displays . . . . . . . . . . 5-18
Vehicle Messages . . . . . . . . . . . . 5-21
Universal Remote System . . . . 5-26
Lighting . . . . . . . . . . . . . . . . . . . . . . . 6-1
Exterior Lighting . . . . . . . . . . . . . . . 6-1
Interior Lighting . . . . . . . . . . . . . . . . 6-7
Lighting Features . . . . . . . . . . . . . . 6-8
Infotainment System . . . . . . . . . 7-1
Introduction . . . . . . . . . . . . . . . . . . . . 7-1
Radio . . . . . . . . . . . . . . . . . . . . . . . . . . 7-5
Audio Players . . . . . . . . . . . . . . . . 7-10
Phone . . . . . . . . . . . . . . . . . . . . . . . . 7-15
Climate Controls . . . . . . . . . . . . . 8-1
Climate Control Systems . . . . . . 8-1
Air Vents . . . . . . . . . . . . . . . . . . . . . . . 8-4 Driving and Operating
. . . . . . . . 9-1
Driving Information . . . . . . . . . . . . . 9-2
Starting and Operating . . . . . . . 9-33
Engine Exhaust . . . . . . . . . . . . . . 9-40
Automatic Transmission . . . . . . 9-41
Manual Transmission . . . . . . . . . 9-44
Drive Systems . . . . . . . . . . . . . . . . 9-46
Brakes . . . . . . . . . . . . . . . . . . . . . . . 9-50
Ride Control Systems . . . . . . . . 9-52
Cruise Control . . . . . . . . . . . . . . . . 9-57
Object Detection Systems . . . . 9-60
Fuel . . . . . . . . . . . . . . . . . . . . . . . . . . 9-64
Towing . . . . . . . . . . . . . . . . . . . . . . . 9-70
Conversions and Add-Ons . . . 9-81
Vehicle Care . . . . . . . . . . . . . . . . . 10-1
General Information . . . . . . . . . . 10-2
Vehicle Checks . . . . . . . . . . . . . . . 10-4
Headlamp Aiming . . . . . . . . . . . 10-33
Bulb Replacement . . . . . . . . . . 10-35
Electrical System . . . . . . . . . . . . 10-38
Wheels and Tires . . . . . . . . . . . 10-44
Jump Starting . . . . . . . . . . . . . . . 10-86
Towing . . . . . . . . . . . . . . . . . . . . . . 10-90
Appearance Care . . . . . . . . . . . 10-92
Page 4 of 410

iv Introduction
{WARNING
These mean there is something
that could hurt you or other
people.
Notice: This means there is
something that could result in
property or vehicle damage.
This would not be covered by
the vehicle's warranty.
A circle with a slash through it
is a safety symbol which means
“Do Not,” “Do not do this” or
“Do not let this happen.”
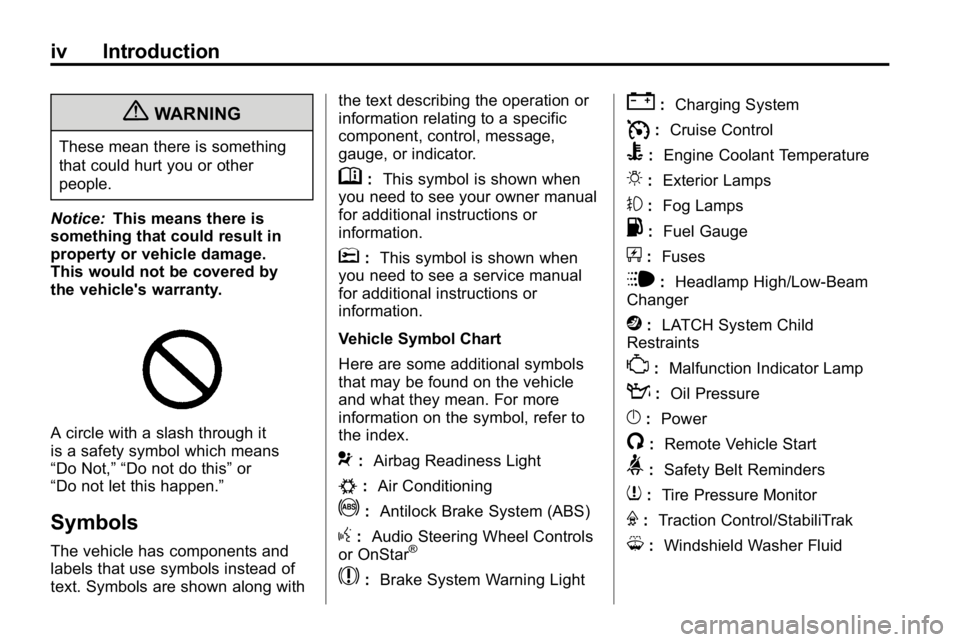
Symbols
The vehicle has components and
labels that use symbols instead of
text. Symbols are shown along with the text describing the operation or
information relating to a specific
component, control, message,
gauge, or indicator.
M:
This symbol is shown when
you need to see your owner manual
for additional instructions or
information.
*: This symbol is shown when
you need to see a service manual
for additional instructions or
information.
Vehicle Symbol Chart
Here are some additional symbols
that may be found on the vehicle
and what they mean. For more
information on the symbol, refer to
the index.
9: Airbag Readiness Light
#:Air Conditioning
!:Antilock Brake System (ABS)
g:Audio Steering Wheel Controls
or OnStar®
$: Brake System Warning Light
":Charging System
I:Cruise Control
B: Engine Coolant Temperature
O:Exterior Lamps
#:Fog Lamps
.: Fuel Gauge
+:Fuses
i: Headlamp High/Low-Beam
Changer
j: LATCH System Child
Restraints
*: Malfunction Indicator Lamp
::Oil Pressure
}:Power
/:Remote Vehicle Start
>:Safety Belt Reminders
7:Tire Pressure Monitor
F:Traction Control/StabiliTrak
M:Windshield Washer Fluid
Page 13 of 410

In Brief 1-9
Sensing System for
Passenger Airbag
United States
Canada
The passenger sensing system will
turn off the right front passenger
frontal airbag under certain
conditions. The driver airbag and
roof‐rail airbags (if equipped) are not
affected by the passenger sensing
system. See Passenger Airbag
Status Indicator
on page 5‑11for
more information. The passenger airbag status
indicator will be visible on the
instrument panel when the vehicle
is started.
Mirror Adjustment
Exterior Mirrors
H3 shown, H3T similar
Controls for the outside power
mirrors are located on the
driver door. To adjust the power mirrors:
1. Press the left or right side of the
selector switch to choose the
driver or passenger side mirror.
2. Press the round, four-way control pad to adjust the mirror.
Interior Mirror
The vehicle has an automatic
dimming rearview mirror with a
compass and temperature display.
Automatic dimming reduces the
glare from the headlamps of the
vehicle behind you. The dimming
feature comes on and the indicator
light illuminates each time the
ignition is turned to start.
z:Press to turn the dimming
feature and/or compass display on
or off.
For more information, see
.Automatic Dimming Rearview
Mirror on page 2‑14.
.Driver Information Center (DIC)on page 5‑18.
Page 15 of 410

In Brief 1-11
Exterior Lighting
9:Turns off all exterior lamps
including the Daytime Running
Lamps (DRL).
AUTO: Automatic operation of
the headlamps and other exterior
lamps.
;: Manual operation of the parking
lamps and other exterior lamps,
except headlamps.
2: Manual operation of the
headlamps and other exterior
lamps. For more information, see:
.Exterior Lamp Controlson
page 6‑1.
.Daytime Running Lamps (DRL)on page 6‑3.
.Fog Lamps on page 6‑6.
.Automatic Headlamp Systemon
page 6‑4.
.Off-Road Lamps on page 6‑6.
Washer and Wiper
Systems
8: Use for a single wiping cycle.
6:Delays wiping cycle. Move the
band to adjust the frequency of
wipes.
6 :Slow wipes.
1 :Fast wipes.
9: Turns the wipers off.
Windshield Washer: Push the
paddle on top of the turn signal/lane
change lever to spray washer fluid
on the windshield.
See Windshield Wiper/Washer
on
page 5‑2and Rear Window
Wiper/Washer on page 5‑3.
Page 25 of 410

In Brief 1-21
The vehicle must have a working
electrical system, including
adequate battery power, for the
OnStar equipment to operate. There
are other problems OnStar cannot
control that may prevent OnStar
from providing OnStar service at
any particular time or place. Some
examples are damage to important
parts of the vehicle in a crash, hills,
tall buildings, tunnels, weather or
wireless phone network congestion.Additional OnStar Controls
The vehicle may have a button,
located on the driver side of the
instrument panel near the headlamp
controls, that can be used to interact
with OnStar.
Use this button to dial numbers into
voicemail systems or to dial phone
number extensions. See the OnStar
Owner's Guide for more information.
Your Responsibility
Increase the volume of the radio if
the OnStar advisor cannot be heard.
If the light next to the OnStar
buttons is red, the system may
not be functioning properly.
Press
Qand request a vehicle
diagnostic. If the light appears clear
(no light is appearing), your OnStar
subscription has expired and all
services have been deactivated.
Press
Qto confirm that the OnStar
equipment is active.
Page 29 of 410

Keys, Doors and Windows 2-3
If there is a decrease in the RKE
operating range:
.Check the distance.
The transmitter may be
too far from the vehicle.
.Check the location. Other
vehicles or objects may be
blocking the signal.
.Check the transmitter's battery.
See“Battery Replacement” later
in this section.
.If the transmitter is still not
working correctly, see your
dealer or a qualified technician
for service.
Remote Keyless Entry
(RKE) System Operation
The Remote Keyless Entry (RKE)
transmitter functions work up to 9 m
(30 feet) away from the vehicle.
There are other conditions which
can affect the performance of the
transmitter. See Remote Keyless
Entry (RKE) System on page 2‑2.
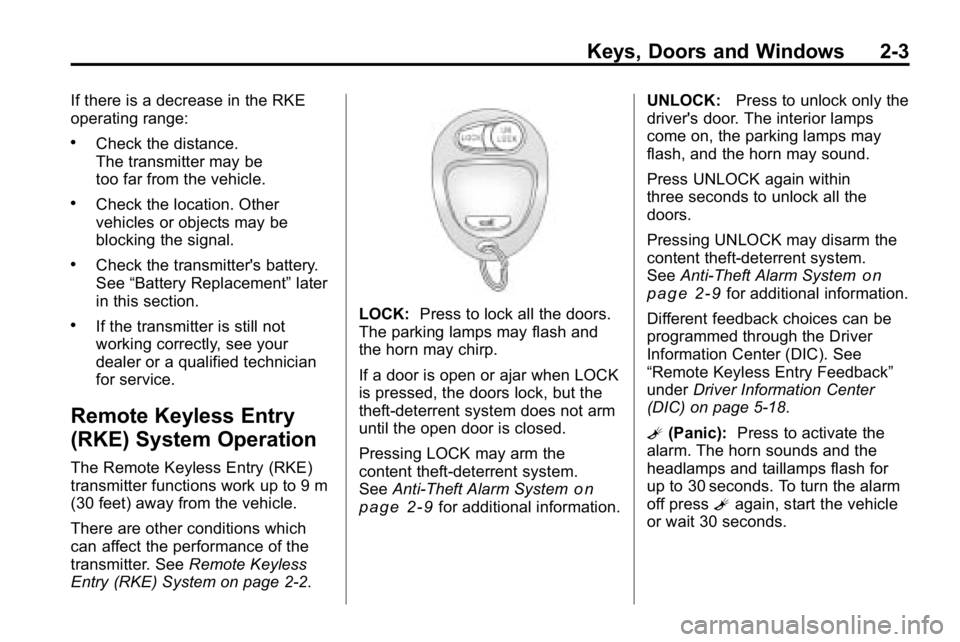
LOCK: Press to lock all the doors.
The parking lamps may flash and
the horn may chirp.
If a door is open or ajar when LOCK
is pressed, the doors lock, but the
theft-deterrent system does not arm
until the open door is closed.
Pressing LOCK may arm the
content theft-deterrent system.
See Anti-Theft Alarm System
on
page 2‑9for additional information. UNLOCK:
Press to unlock only the
driver's door. The interior lamps
come on, the parking lamps may
flash, and the horn may sound.
Press UNLOCK again within
three seconds to unlock all the
doors.
Pressing UNLOCK may disarm the
content theft-deterrent system.
See Anti-Theft Alarm System
on
page 2‑9for additional information.
Different feedback choices can be
programmed through the Driver
Information Center (DIC). See
“Remote Keyless Entry Feedback”
under Driver Information Center
(DIC) on page 5‑18.
L (Panic): Press to activate the
alarm. The horn sounds and the
headlamps and taillamps flash for
up to 30 seconds. To turn the alarm
off press Lagain, start the vehicle
or wait 30 seconds.
Page 40 of 410

2-14 Keys, Doors and Windows
Interior Mirrors
Automatic Dimming
Rearview Mirror
The vehicle has an automatic
dimming rearview mirror with a
compass and temperature display.
Vehicles with OnStar
®have
three additional control buttons
for the OnStar
®system. See your
dealer for more information about
OnStar
®and how to subscribe to it.
See the OnStar®owner guide for
more information about the services
OnStar
®provides.
z(On/Off): Press to turn the
dimming feature on or off.
The vehicle may also have a Rear
Vision Camera (RVC). See Rear
Vision Camera (RVC)
on page 9‑60for more information.
Automatic Dimming Mirror
Operation
Automatic dimming reduces the
glare from the headlamps of the
vehicle behind you. The dimming
feature comes on and the indicator
light illuminates each time the
ignition is turned to start.
Temperature Display
To adjust between Fahrenheit and
Celsius:
.Presszfor approximately
four seconds to toggle the
display from F (Fahrenheit)
to C (Celsius) to OFF. Release
the button after the display has
toggled to the next state.
The temperature display will
remain in its current state each
time the ignition goes through its
cycle.
.At start up, if the vehicle has
been off for less than two and
a half hours, and the last stored
temperature was less than
the current temperature, the
sensor will increase 1°F every
two minutes until the correct
temperature is displayed.
.If the vehicle has been off more
than two and a half hours, or
the last stored temperature
is greater than the current
temperature, the current
temperature immediately
displays.
.If the temperature is 37°F (3°C)
or lower, ICE will flash on the
temperature display. This display
will flash every two seconds for a
period of one minute.
If an abnormal temperature reading
is displayed for an extended period
of time, see your dealer. Under
certain circumstances, a delay in
updating the temperature is normal.
Page 131 of 410

Instruments and Controls 5-17
Engine Oil Pressure Light
{WARNING
Do not keep driving if the oil
pressure is low. The engine can
become so hot that it catches fire.
Someone could be burned. Check
the oil as soon as possible and
have the vehicle serviced.
Notice: Lack of proper engine
oil maintenance can damage the
engine. The repairs would not be
covered by the vehicle warranty.
Always follow the maintenance
schedule in this manual for
changing engine oil.
The oil pressure light should come
on briefly as the engine is started.
If it does not come on have the
vehicle serviced by your dealer.
If the light comes on and stays on, it
means that oil is not flowing through
the engine properly. The vehicle
could be low on oil and might
have some other system problem.
See your dealer.
Security Light
This light flashes when the security
system is activated.
For more information, see Anti-Theft
Alarm System on page 2‑9.
High-Beam on Light
The high-beam on light comes on
when the high-beam headlamps are
in use.
See Headlamp High/Low-Beam
Changer
on page 6‑3for more
information.
Page 145 of 410

Lighting 6-1
Lighting
Exterior Lighting
Exterior Lamp Controls . . . . . . . . 6-1
Exterior Lamps OffReminder . . . . . . . . . . . . . . . . . . . . 6-3
Headlamp High/Low-Beam Changer . . . . . . . . . . . . . . . . . . . . . 6-3
Flash-to-Pass . . . . . . . . . . . . . . . . . 6-3
Daytime Running Lamps (DRL) . . . . . . . . . . . . . . . . 6-3
Automatic Headlamp System . . . . . . . . . . . . . . . . . . . . . . 6-4
Hazard Warning Flashers . . . . . 6-5 Turn and Lane-Change
Signals . . . . . . . . . . . . . . . . . . . . . . 6-5
Fog Lamps . . . . . . . . . . . . . . . . . . . . 6-6
Off-Road Lamps . . . . . . . . . . . . . . 6-6Interior Lighting
Instrument Panel Illumination Control . . . . . . . . . . . . . . . . . . . . . . 6-7
Dome Lamps . . . . . . . . . . . . . . . . . 6-7
Reading Lamps . . . . . . . . . . . . . . . 6-8
Lighting Features
Exit Lighting . . . . . . . . . . . . . . . . . . . 6-8
Battery Load Management . . . . 6-8
Battery Power Protection . . . . . . 6-9
Exterior Lighting
Exterior Lamp Controls
The exterior lamps control is on the
instrument panel to the left of the
steering wheel.
O (Exterior Lamps): Turn the
control to select one of the
four exterior lamp positions.
Page 146 of 410

6-2 Lighting
9(Off):Turns all exterior lamps
and the Daytime Running Lamps
(DRL) off. This is a momentary
control that returns to AUTO when
released. The DRL does not turn off
on vehicles first sold in Canada,
unless the following conditions
are met:
.The vehicle has an automatic
transmission.
.The gear position is in P (Park).
.The headlamp switch is turned
to
9.
AUTO (Automatic): Turns the
headlamps on and off automatically,
together with the following:
.Sidemarker Lamps
.Taillamps
.Parking Lamps
.Instrument Panel Lights
Due to the momentary control, the
automatic headlamps may be
disabled even if the control is in the
AUTO position. To enable automatic lighting, do any
of the following:
.Turn the headlamp control from
AUTO to off and release the
control. It returns to the AUTO
position by itself.
.Turn the headlamp control from
the parking lamp or headlamp
position to AUTO.
To disable automatic lighting, do any
of the following:
.Turn the headlamp control from
AUTO to off and release the
control. It returns back to the
AUTO position by itself.
.Turn the headlamp control from
AUTO to the parking lamp or
headlamp position.
See Automatic Headlamp System
on page 6‑4for more information.
Vehicles first sold in Canada with an
automatic transmission cannot turn
off automatic headlamps unless the
gear position is in P (Park) and the
headlamp control is turned to
O. Vehicles first sold in Canada with a
manual transmission can turn off
the automatic headlamps with the
headlamp control; however, the
parking lamps will remain on.
;
(Parking Lamps): Turns on the
parking lamps, together with the
following:
.Sidemarker Lamps
.Taillamps
.License Plate Lamps
.Instrument Panel Lights
2 (Headlamps): Turns on the
headlamps together with the
previously listed lamps and lights.
The headlamps can be switched
from low to high beam by pushing
the turn signal/lane change lever
toward the instrument panel.