window Hyundai Accent 2003 User Guide
[x] Cancel search | Manufacturer: HYUNDAI, Model Year: 2003, Model line: Accent, Model: Hyundai Accent 2003Pages: 186, PDF Size: 11.36 MB
Page 74 of 186
FEATURES OF YOUR HYUNDAI 1- 61
B690A02A-AAT
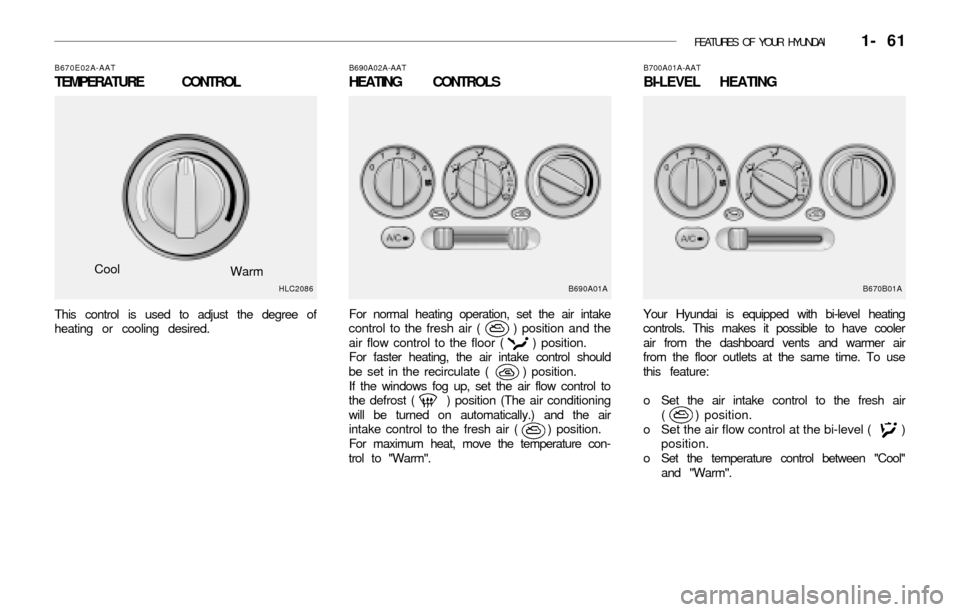
HEATING CONTROLS
B670E02A-AAT
TEMPERATURE CONTROL
Cool
Warm
This control is used to adjust the degree of
heating or cooling desired.
HLC2086
For normal heating operation, set the air intake
control to the fresh air ( ) position and the
air flow control to the floor ( ) position.
For faster heating, the air intake control should
be set in the recirculate ( ) position.
If the windows fog up, set the air flow control to
the defrost ( ) position (The air conditioning
will be turned on automatically.) and the air
intake control to the fresh air ( ) position.
For maximum heat, move the temperature con-
trol to "Warm".
B700A01A-AAT
BI-LEVEL HEATING
Your Hyundai is equipped with bi-level heating
controls. This makes it possible to have cooler
air from the dashboard vents and warmer air
from the floor outlets at the same time. To use
this feature:
o Set the air intake control to the fresh air
( ) position.
o Set the air flow control at the bi-level ( )
position.
o Set the temperature control between "Cool"
and "Warm".
B690A01AB670B01A
Page 76 of 186
FEATURES OF YOUR HYUNDAI 1- 63
B740B02A-AAT
AIR CONDITIONING OPERATION
(If Installed)
Cooling
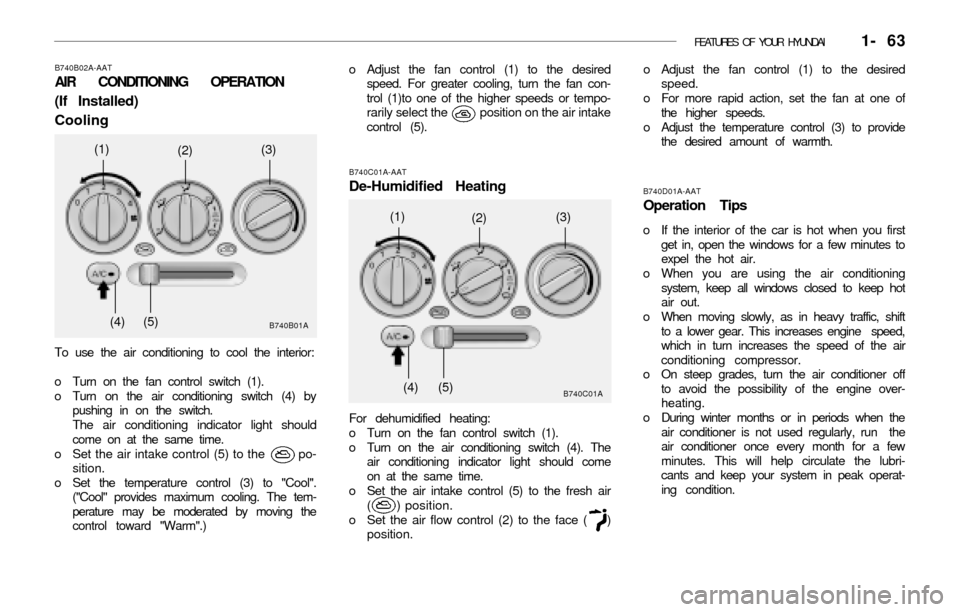
To use the air conditioning to cool the interior:
o Turn on the fan control switch (1).
o Turn on the air conditioning switch (4) by
pushing in on the switch.
The air conditioning indicator light should
come on at the same time.
o Set the air intake control (5) to the po-
sition.
o Set the temperature control (3) to "Cool".
("Cool" provides maximum cooling. The tem-
perature may be moderated by moving the
control toward "Warm".)
B740B01A
(1)(2)(3)
(4) (5)
B740D01A-AAT
Operation Tips
o If the interior of the car is hot when you first
get in, open the windows for a few minutes to
expel the hot air.
o When you are using the air conditioning
system, keep all windows closed to keep hot
air out.
o When moving slowly, as in heavy traffic, shift
to a lower gear. This increases engine speed,
which in turn increases the speed of the air
conditioning compressor.
o On steep grades, turn the air conditioner off
to avoid the possibility of the engine over-
heating.
o During winter months or in periods when the
air conditioner is not used regularly, run the
air conditioner once every month for a few
minutes. This will help circulate the lubri-
cants and keep your system in peak operat-
ing condition.
B740C01A-AAT
De-Humidified Heating
For dehumidified heating:
o Turn on the fan control switch (1).
o Turn on the air conditioning switch (4). The
air conditioning indicator light should come
on at the same time.
o Set the air intake control (5) to the fresh air
( ) position.
o Set the air flow control (2) to the face ( )
position.
B740C01A
(1)(2)(3)
(4) (5)
o Adjust the fan control (1) to the desired
speed. For greater cooling, turn the fan con-
trol (1)to one of the higher speeds or tempo-
rarily select the position on the air intake
control (5).o Adjust the fan control (1) to the desired
speed.
o For more rapid action, set the fan at one of
the higher speeds.
o Adjust the temperature control (3) to provide
the desired amount of warmth.
Page 98 of 186
2- 2 DRIVING YOUR HYUNDAI
C010A01A-AAT
WARNING: ENGINE EXHAUST CAN BE DANGEROUS!
Engine exhaust fumes can be extremely dangerous. If, at any time, you smell exhaust fumes inside the vehicle, open the windows
immediately.
o Do not inhale exhaust fumes.
Exhaust fumes contain carbon monoxide, a colorless, odorless gas that can cause unconsciousness and death by asphyxiation.
o Be sure the exhaust system does not leak.
The exhaust system should be checked whenever the vehicle is raised to change the oil or for any other purpose. If you hear a
change in the sound of the exhaust or if you drive over something that strikes the underneath side of the car, have the exhaust
system checked as soon as possible by your Hyundai dealer.
o Do not run the engine in an enclosed area.
Letting the engine idle in your garage, even with the garage door open, is a hazardous practice. Never run the engine in your garage
any longer than it takes to start the engine and back the car out.
o Avoid idling the engine for prolonged periods with people inside the car.
If it is necessary to idle the engine for a prolonged period with people inside the car, be sure to do so only in an open area with
the air intake set at "Fresh" and fan operating at one of the higher speeds so fresh air is drawn into the interior.
If you must drive with the trunk lid / tail gate open because you are carrying objects that make this necessary:
1. Close all windows.
2. Open side vents.
3. Set the air intake control at "Fresh", the air flow control at "Floor" or "Face" and the fan at one of the higher speeds.
To assure proper operation of the ventilation system, be sure the ventilation air intakes located just in front of the windshield are
kept clear of snow, ice, leaves or other obstructions.
!
Page 99 of 186
DRIVING YOUR HYUNDAI 2- 3
C020A01A-AATBEFORE STARTING THE ENGINE
Before you start the engine, you should always:
1. Look around the vehicle to be sure there are
no flat tires, puddles of oil or water or other
indications of possible trouble.
2. After entering the car, check to be sure the
parking brake is engaged.
3. Check that all windows, and lights are clean.
4. Check that the interior and exterior mirrors
are clean and in position.
5. Check your seat, seatback and headrest to
be sure they are in their proper positions.
6. Lock all the doors.
7. Fasten your seat belt and be sure that all
other occupants have fastened theirs.
8. Turn off all lights and accessories that are
not needed.
9. When you turn the ignition switch to "ON",
check that all appropriate warning lights are
operating and that you have sufficient fuel.
10. Check the operation of warning lights and all
bulbs when key is in the "ON" position.
C030A01A-AATCOMBINATION IGNITION SWITCH
To Start the Engine
o If your Hyundai is equipped with a manual
transaxle, place the shift lever in neutral and
depress the clutch pedal fully.
o If your Hyundai has an automatic transaxle,
place the shift lever in "P" (park).
o To start the engine, insert the ignition key
and turn it to the "START" position. Release
it as soon as the engine starts. Do not hold
the key in the "START" position for more
than 15 seconds.
NOTE:o For safety, the engine will not start if the
clutch pedal is not depressed fully (Manual
Transaxle) or the shift lever is not in "P"
or "N" Position (Automatic Transaxle).
o The ignition key cannot be turned from
"ACC" position to "LOCK" position un-
less the shift lever is in the "P" (Park)
position or the negative battery terminal
is disconnected from the battery. (For
Automatic Transaxle)
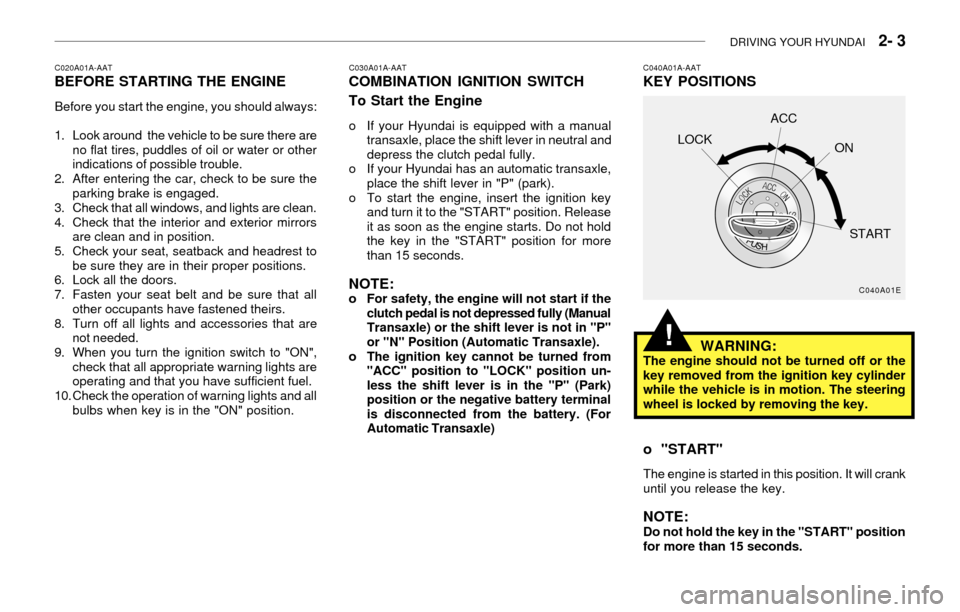
C040A01A-AATKEY POSITIONS
C040A01E
LOCKACC
ON
START
WARNING:The engine should not be turned off or the
key removed from the ignition key cylinder
while the vehicle is in motion. The steering
wheel is locked by removing the key.
o "START"
The engine is started in this position. It will crank
until you release the key.
NOTE:Do not hold the key in the "START" position
for more than 15 seconds.
!
Page 109 of 186
DRIVING YOUR HYUNDAI 2- 13
C160H01A-AAT
Use Approved Anti-Freeze in Window
Washer System
To keep the water in the window washer system
from freezing, add an approved anti-freeze so-
lution in accordance with instructions on the
container. Window washer anti-freeze is avail-
able from Hyundai dealers and most auto parts
outlets. Do not use engine coolant or other types
of anti-freeze as these may damage the finish.
C160F01A-AATCheck Spark Plugs and Ignition
System
Inspect your spark plugs as described in Sec-
tion 6 and replace them if necessary. Also
check all ignition wiring and components to be
sure they are not cracked, worn or damaged in
any way.
C160G01A-AAT
To Keep Locks from Freezing
To keep the locks from freezing, squirt an ap-
proved de-icer fluid or glycerine into the key
opening. If a lock is covered with ice, squirt it
with an approved de-icing fluid to remove the
ice. If the lock is frozen internally, you may be
able to thaw it out by using a heated key. Handle
the heated key with care to avoid burning the
fingers.
C160I01A-AATDon't Let Your Parking Brake Freeze
Under some conditions your parking brake can
freeze in the engaged position. This is most
likely to happen when there is an accumulation
of snow or ice around or near the rear brakes or
if the brakes are wet. If you think the parking
brake may freeze, apply it only temporarily while
you put the gear selector lever in "P" (automatic)
or in first or reverse gear (manual transaxle) and
block the rear wheels so the car cannot roll.
Then release the parking brake.
C160K01A-AATCarry Emergency Equipment
Depending on the severity of the weather where
you drive your car, you should carry appropriate
emergency equipment. Some of the items you
may want to carry include tire chains, tow straps
or chains, flashlight, emergency flares, sand, a
shovel, jumper cables, a window scraper, gloves,
ground cloth, coveralls, a blanket, etc.
C160J01A-AAT
Don't Let Ice and Snow Accumulate
Underneath
Under some conditions, snow and ice can build
up under the fenders and interfere with the
steering. When driving in severe winter condi-
tions where this may happen, you should peri-
odically check underneath the car to be sure the
movement of the front wheels and the steering
components is not obstructed.
C170A01A-AAT
HIGHER SPEED MOTORING
Pre-Trip Inspections
1. Tires:
Adjust the tire inflation pressures for highway
driving. Low tire inflation pressures will result in
overheating and possible failure of the tires.
Avoid using worn or damaged tires which may
result in reduced traction or tire failure.
NOTE:Never exceed the maximum tire inflation pres-
sure shown on the tires.
2. Fuel, engine coolant and engine oil:
High speed travel consumes 1.5 times more fuel
than urban motoring. Do not forget to check both
engine coolant and engine oil.
3. Drive belt:
A loose or damaged drive belt may result in
overheating of the engine.
Page 127 of 186
CORROSION PREVENTION AND APPEARANCE CARE 4- 5
E050A01A-AAT
Any Questions?
If you have any questions about the care of your
car, consult your Hyundai dealer.
E040D01A-AATCleaning the Seat Belts
To clean the seat belts, use a cloth or sponge
with mild soap or detergent and warm water. Do
not use strong detergents, dye, bleach or abra-
sive materials on the seat belts as this may
weaken the fabric.
While cleaning the belts, inspect them for ex-
cessive wear, cuts, fraying or other signs of
damage and replace them if necessary.
E040E01A-AATCleaning the Windows
You may use any household window cleaner on
the windows. However, when cleaning the in-
side of the rear window be careful not to damage
the rear window defroster wiring.
Page 164 of 186
6- 28 DO-IT-YOURSELF MAINTENANCE
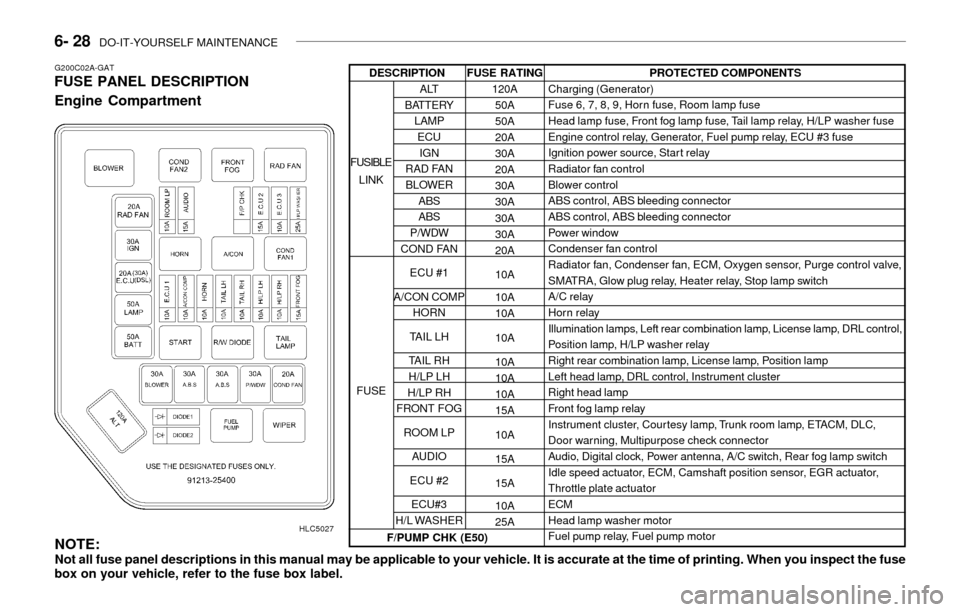
G200C02A-GATFUSE PANEL DESCRIPTION
Engine Compartment
HLC5027
NOTE:Not all fuse panel descriptions in this manual may be applicable to your vehicle. It is accurate at the time of printing. When you inspect the fuse
box on your vehicle, refer to the fuse box label.
FUSE RATING
120A
50A
50A
20A
30A
20A
30A
30A
30A
30A
20A
10A
10A
10A
10A
10A
10A
10A
15A
10A
15A
15A
10A
25APROTECTED COMPONENTS
Charging (Generator)
Fuse 6, 7, 8, 9, Horn fuse, Room lamp fuse
Head lamp fuse, Front fog lamp fuse, Tail lamp relay, H/LP washer fuse
Engine control relay, Generator, Fuel pump relay, ECU #3 fuse
Ignition power source, Star t relay
Radiator fan control
Blower control
ABS control, ABS bleeding connector
ABS control, ABS bleeding connector
Power window
Condenser fan control
Radiator fan, Condenser fan, ECM, Oxygen sensor, Purge control valve,
SMATRA, Glow plug relay, Heater relay, Stop lamp switch
A/C relay
Horn relay
Illumination lamps, Left rear combination lamp, License lamp, DRL control,
Position lamp, H/LP washer relay
Right rear combination lamp, License lamp, Position lamp
Left head lamp, DRL control, Instrument cluster
Right head lamp
Front fog lamp relay
Instrument cluster, Courtesy lamp, Trunk room lamp, ETACM, DLC,
Door warning, Multipurpose check connector
Audio, Digital clock, Power antenna, A/C switch, Rear fog lamp switch
Idle speed actuator, ECM, Camshaft position sensor, EGR actuator,
Throttle plate actuator
ECM
Head lamp washer motor
Fuel pump relay, Fuel pump motor
ALT
BATTERY
LAMP
ECU
IGN
RAD FAN
BLOWER
ABS
ABS
P/WDW
COND FAN
ECU #1
A/CON COMP
HORN
TAIL LH
TAIL RH
H/LP LH
H/LP RH
FRONT FOG
ROOM LP
AUDIO
ECU #2
ECU#3
H/L WASHER FUSIBLE
LINK
FUSEDESCRIPTION
F/PUMP CHK (E50)
Page 165 of 186
DO-IT-YOURSELF MAINTENANCE 6- 29
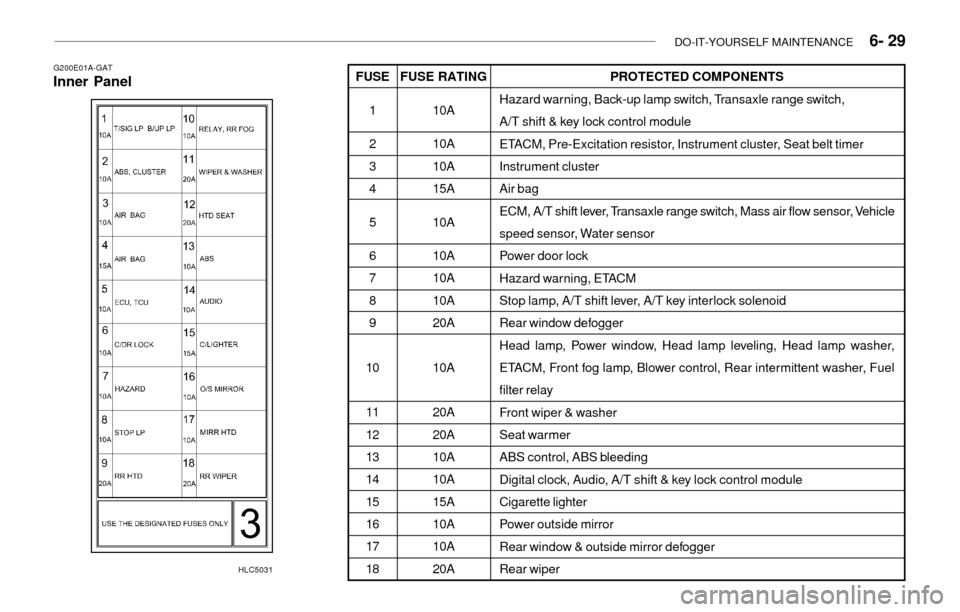
G200E01A-GATInner Panel
HLC5031
PROTECTED COMPONENTS
Hazard warning, Back-up lamp switch, Transaxle range switch,
A/T shift & key lock control module
ETACM, Pre-Excitation resistor, Instrument cluster, Seat belt timer
Instrument cluster
Air bag
ECM, A/T shift lever, Transaxle range switch, Mass air flow sensor, Vehicle
speed sensor, Water sensor
Power door lock
Hazard warning, ETACM
Stop lamp, A/T shift lever, A/T key interlock solenoid
Rear window defogger
Head lamp, Power window, Head lamp leveling, Head lamp washer,
ETACM, Front fog lamp, Blower control, Rear intermittent washer, Fuel
filter relay
Front wiper & washer
Seat warmer
ABS control, ABS bleeding
Digital clock, Audio, A/T shift & key lock control module
Cigarette lighter
Power outside mirror
Rear window & outside mirror defogger
Rear wiperFUSE RATING
10A
10A
10A
15A
10A
10A
10A
10A
20A
10A
20A
20A
10A
10A
15A
10A
10A
20A FUSE
1
2
3
4
5
6
7
8
9
10
11
12
13
14
15
16
17
18
Page 184 of 186
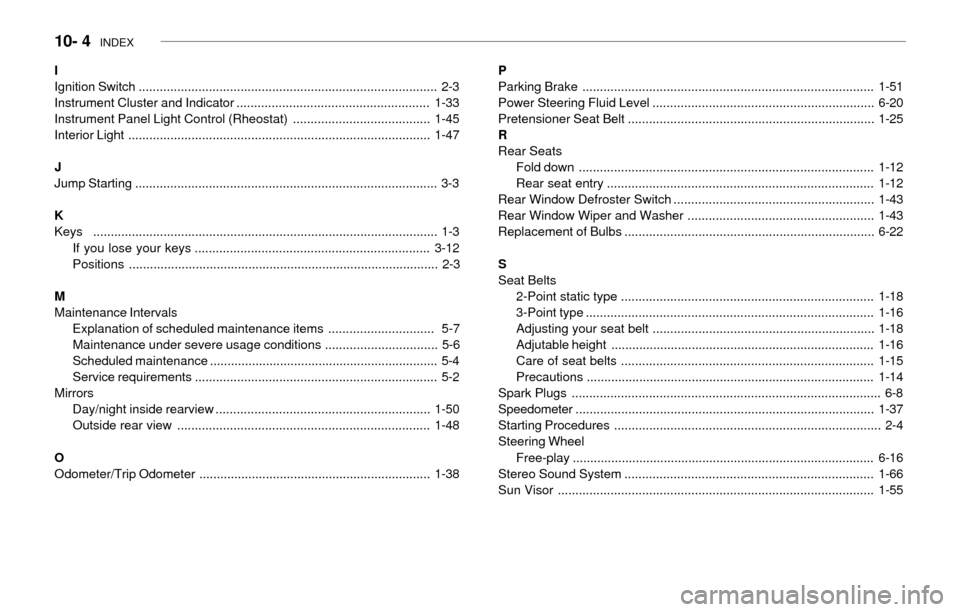
10- 4 INDEX
P
Parking Brake ...................................................................................1-51
Power Steering Fluid Level ...............................................................6-20
Pretensioner Seat Belt ......................................................................1-25
R
Rear Seats
Fold down ....................................................................................1-12
Rear seat entry ............................................................................1-12
Rear Window Defroster Switch .........................................................1-43
Rear Window Wiper and Washer .....................................................1-43
Replacement of Bulbs .......................................................................6-22
S
Seat Belts
2-Point static type ........................................................................1-18
3-Point type ..................................................................................1-16
Adjusting your seat belt ...............................................................1-18
Adjutable height ...........................................................................1-16
Care of seat belts ........................................................................1-15
Precautions ..................................................................................1-14
Spark Plugs ........................................................................................ 6-8
Speedometer.....................................................................................1-37
Starting Procedures ............................................................................ 2-4
Steering Wheel
Free-play ......................................................................................6-16
Stereo Sound System .......................................................................1-66
Sun Visor ..........................................................................................1-55 I
Ignition Switch ..................................................................................... 2-3
Instrument Cluster and Indicator .......................................................1-33
Instrument Panel Light Control (Rheostat) .......................................1-45
Interior Light ......................................................................................1-47
J
Jump Starting ...................................................................................... 3-3
K
Keys .................................................................................................. 1-3
If you lose your keys ...................................................................3-12
Positions ........................................................................................ 2-3
M
Maintenance Intervals
Explanation of scheduled maintenance items .............................. 5-7
Maintenance under severe usage conditions ................................ 5-6
Scheduled maintenance ................................................................. 5-4
Service requirements ..................................................................... 5-2
Mirrors
Day/night inside rearview .............................................................1-50
Outside rear view ........................................................................1-48
O
Odometer/Trip Odometer ..................................................................1-38
Page 185 of 186

INDEX 10- 5
T
Tachometer.......................................................................................1-37
Tailgate..............................................................................................1-54
Theft-Alarm System ............................................................................ 1-6
Tires
Balancing ....................................................................................... 8-4
Chains ............................................................................................ 8-3
Changing a flat tire ........................................................................ 3-6
If you have a flat tire ...................................................................... 3-5
Information..................................................................................... 8-2
Pressure (see glove box) .............................................................. 8-2
Replacement.................................................................................. 8-4
Rotation.......................................................................................... 8-4
Snow tires ...................................................................................... 8-3
Spare tire ....................................................................................... 3-4
Traction .......................................................................................... 8-4
Towing
Emergency ...................................................................................3-12
If your car must be towed ...........................................................3-10
Trailer towing ...............................................................................2-14
Transaxle
Automatic ....................................................................................... 2-7
Automatic transaxle fluid checking ..............................................6-11
Manual........................................................................................... 2-5
Manual transaxle oil checking .....................................................6-10
Trip Computer ...................................................................................1-38
Trunk
Emergency latch release .............................................................1-54
Remote release ............................................................................1-53V
Vehicle Identification Number (VIN) .................................................... 8-2
Vehicle Specifications
Engine............................................................................................ 9-3
Lubrication Chart ............................................................................ 9-4
Measurement................................................................................. 9-2
W
Warning Lights and Indicatior ...........................................................1-34
Windows
Manual........................................................................................... 1-8
Power ............................................................................................. 1-9
Windshield Wiper and Washer .........................................................1-41
Adjustable intermittent wiper operation ........................................1-42
Windshield Wiper Blades .............................................................6-10