engine Hyundai Accent 2003 Workshop Manual
[x] Cancel search | Manufacturer: HYUNDAI, Model Year: 2003, Model line: Accent, Model: Hyundai Accent 2003Pages: 186, PDF Size: 11.36 MB
Page 147 of 186
DO-IT-YOURSELF MAINTENANCE 6- 11
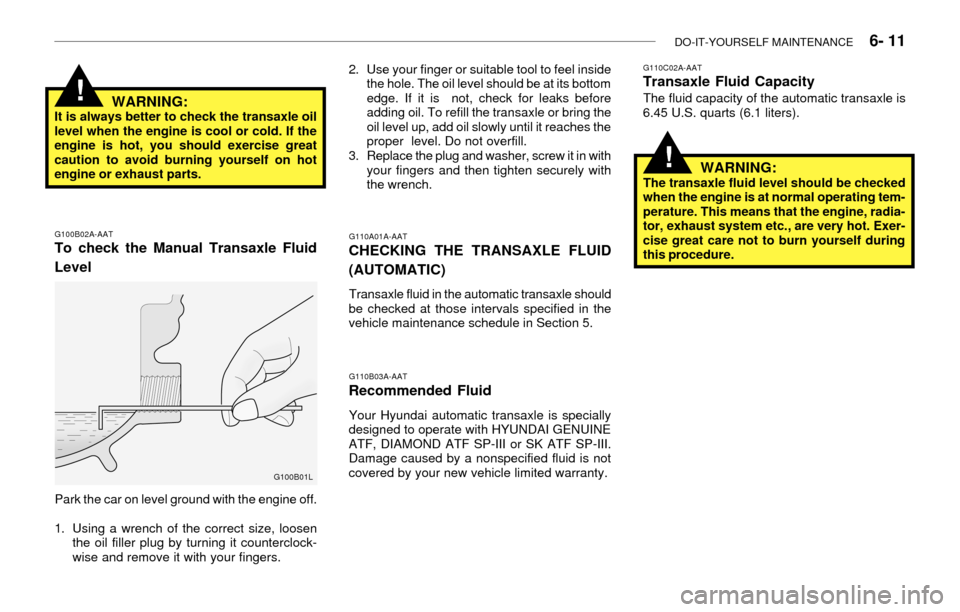
G100B02A-AATTo check the Manual Transaxle Fluid
Level
Park the car on level ground with the engine off.
1. Using a wrench of the correct size, loosen
the oil filler plug by turning it counterclock-
wise and remove it with your fingers.
WARNING:It is always better to check the transaxle oil
level when the engine is cool or cold. If the
engine is hot, you should exercise great
caution to avoid burning yourself on hot
engine or exhaust parts.
!
G100B01L
G110A01A-AAT
CHECKING THE TRANSAXLE FLUID
(AUTOMATIC)
Transaxle fluid in the automatic transaxle should
be checked at those intervals specified in the
vehicle maintenance schedule in Section 5.
G110B03A-AAT
Recommended Fluid
Your Hyundai automatic transaxle is specially
designed to operate with HYUNDAI GENUINE
ATF, DIAMOND ATF SP-III or SK ATF SP-III.
Damage caused by a nonspecified fluid is not
covered by your new vehicle limited warranty.
G110C02A-AATTransaxle Fluid Capacity
The fluid capacity of the automatic transaxle is
6.45 U.S. quarts (6.1 liters). 2. Use your finger or suitable tool to feel inside
the hole. The oil level should be at its bottom
edge. If it is not, check for leaks before
adding oil. To refill the transaxle or bring the
oil level up, add oil slowly until it reaches the
proper level. Do not overfill.
3. Replace the plug and washer, screw it in with
your fingers and then tighten securely with
the wrench.
WARNING:The transaxle fluid level should be checked
when the engine is at normal operating tem-
perature. This means that the engine, radia-
tor, exhaust system etc., are very hot. Exer-
cise great care not to burn yourself during
this procedure.
!
Page 148 of 186
6- 12 DO-IT-YOURSELF MAINTENANCE
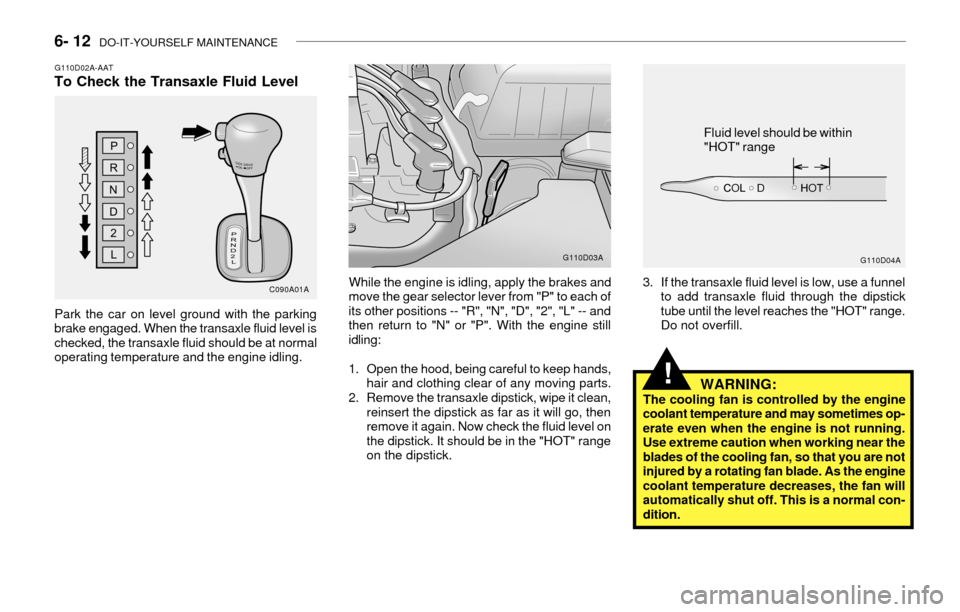
While the engine is idling, apply the brakes and
move the gear selector lever from "P" to each of
its other positions -- "R", "N", "D", "2", "L" -- and
then return to "N" or "P". With the engine still
idling:
1. Open the hood, being careful to keep hands,
hair and clothing clear of any moving parts.
2. Remove the transaxle dipstick, wipe it clean,
reinsert the dipstick as far as it will go, then
remove it again. Now check the fluid level on
the dipstick. It should be in the "HOT" range
on the dipstick.3. If the transaxle fluid level is low, use a funnel
to add transaxle fluid through the dipstick
tube until the level reaches the "HOT" range.
Do not overfill.
G110D03A
G110D04A
Fluid level should be within
"HOT" range
WARNING:The cooling fan is controlled by the engine
coolant temperature and may sometimes op-
erate even when the engine is not running.
Use extreme caution when working near the
blades of the cooling fan, so that you are not
injured by a rotating fan blade. As the engine
coolant temperature decreases, the fan will
automatically shut off. This is a normal con-
dition.
!
G110D02A-AATTo Check the Transaxle Fluid Level
Park the car on level ground with the parking
brake engaged. When the transaxle fluid level is
checked, the transaxle fluid should be at normal
operating temperature and the engine idling.
C090A01A
Page 150 of 186
6- 14 DO-IT-YOURSELF MAINTENANCE
G130B02A-AATTo Replace the Fluid
Recommended brake fluid conforming to DOT 3
or DOT 4 specification should be used. The
reservoir cap must be fully tightened to avoid
contamination from foreign matter or moisture.
NOTE:Do not allow any other liquids to contami-
nate the brake fluid. Seal damage will result.
G140A01A-AAT
AIR CONDITIONER CARE
Keeping the Condenser Clean
The air conditioner condenser (and engine ra-
diator) should be checked periodically for accu-
mulation of dirt, dead insects, leaves, etc. These
can interfere with maximum cooling efficiency.
When removing such accumulations, brush or
hose them away carefully to avoid bending the
cooling fans.
G140C01A-AAT
Lubrication
To lubricate the compressor and the seals in the
system, the air conditioner should be run for at
least 10 minutes each week. This is particularly
important during cool weather when the air con-
ditioning system is not otherwise in use.
G140B01A-AATChecking the Air Conditioner Opera-
tion
1. Start the engine and let it run at fast idle for
several minutes with the air conditioner set
at the maximum cold setting.
2. If the air coming out of the in-dash vents is
not cold, have the air conditioning system
inspected by your Hyundai dealer.
WARNING:Use caution when handling brake fluid. It
can damage your vision if you get it in your
eyes. It will also damage your vehicles paint
if spilled on it and not removed immediately.
!CAUTION:Running the air conditioning system for ex-
tended periods of time with a low refrigerant
level may damage the compressor.
!
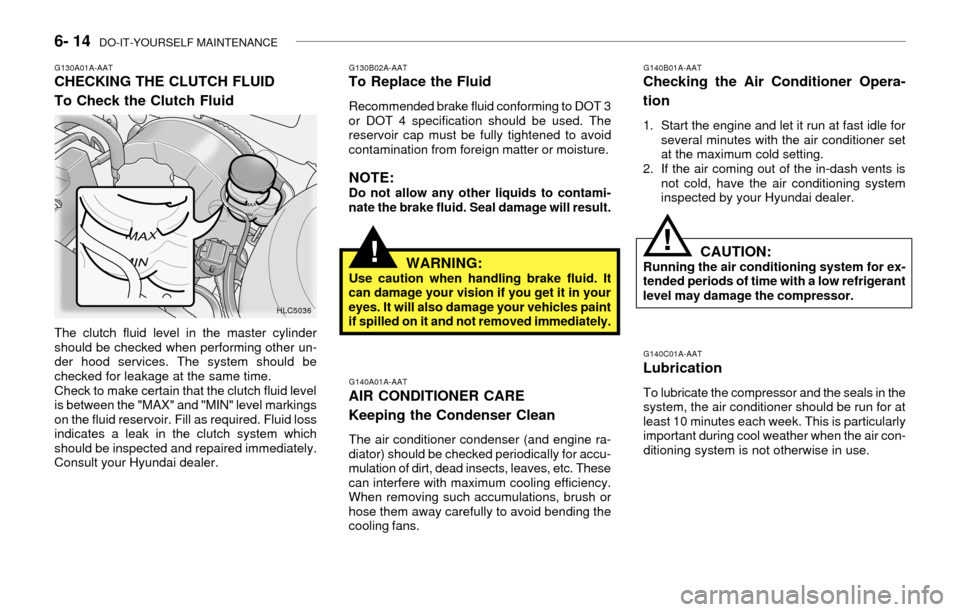
G130A01A-AATCHECKING THE CLUTCH FLUID
To Check the Clutch Fluid
The clutch fluid level in the master cylinder
should be checked when performing other un-
der hood services. The system should be
checked for leakage at the same time.
Check to make certain that the clutch fluid level
is between the "MAX" and "MIN" level markings
on the fluid reservoir. Fill as required. Fluid loss
indicates a leak in the clutch system which
should be inspected and repaired immediately.
Consult your Hyundai dealer.
HLC5036
Page 151 of 186
DO-IT-YOURSELF MAINTENANCE 6- 15
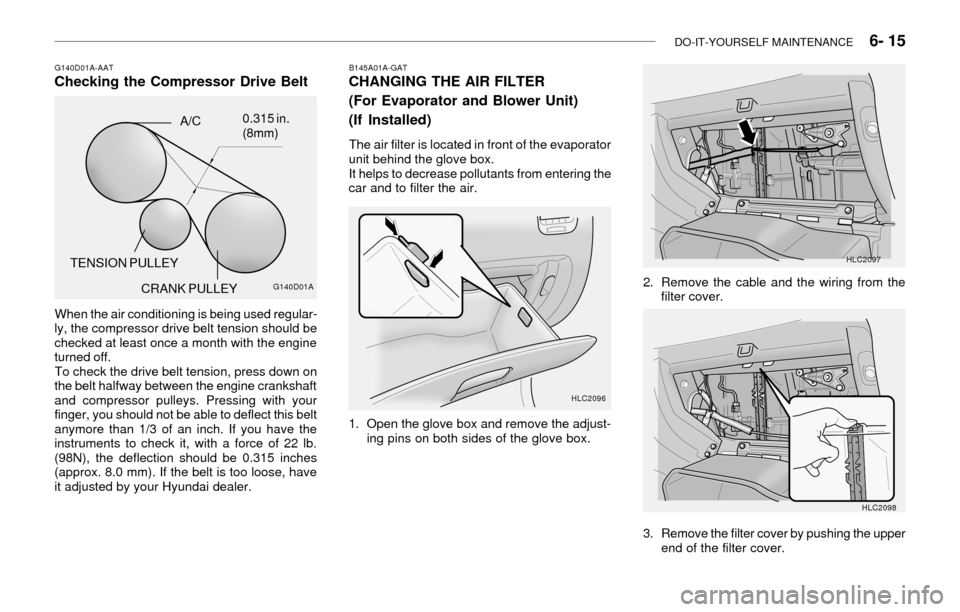
G140D01A-AATChecking the Compressor Drive Belt
When the air conditioning is being used regular-
ly, the compressor drive belt tension should be
checked at least once a month with the engine
turned off.
To check the drive belt tension, press down on
the belt halfway between the engine crankshaft
and compressor pulleys. Pressing with your
finger, you should not be able to deflect this belt
anymore than 1/3 of an inch. If you have the
instruments to check it, with a force of 22 lb.
(98N), the deflection should be 0.315 inches
(approx. 8.0 mm). If the belt is too loose, have
it adjusted by your Hyundai dealer.CRANK PULLEY
G140D01A
A/C
TENSION PULLEY0.315 in.
(8mm)
HLC2096 B145A01A-GAT
CHANGING THE AIR FILTER
(For Evaporator and Blower Unit)
(If Installed)
The air filter is located in front of the evaporator
unit behind the glove box.
It helps to decrease pollutants from entering the
car and to filter the air.
HLC2097
2. Remove the cable and the wiring from the
filter cover.
1. Open the glove box and remove the adjust-
ing pins on both sides of the glove box.
HLC2098
3. Remove the filter cover by pushing the upper
end of the filter cover.
Page 152 of 186
6- 16 DO-IT-YOURSELF MAINTENANCE
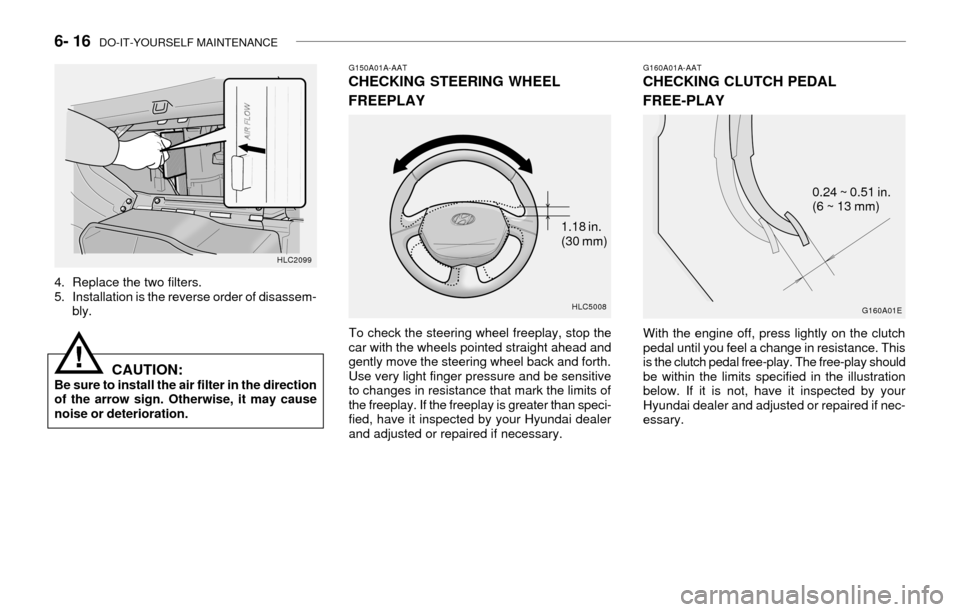
G150A01A-AATCHECKING STEERING WHEEL
FREEPLAY
To check the steering wheel freeplay, stop the
car with the wheels pointed straight ahead and
gently move the steering wheel back and forth.
Use very light finger pressure and be sensitive
to changes in resistance that mark the limits of
the freeplay. If the freeplay is greater than speci-
fied, have it inspected by your Hyundai dealer
and adjusted or repaired if necessary.
G160A01A-AATCHECKING CLUTCH PEDAL
FREE-PLAY
With the engine off, press lightly on the clutch
pedal until you feel a change in resistance. This
is the clutch pedal free-play. The free-play should
be within the limits specified in the illustration
below. If it is not, have it inspected by your
Hyundai dealer and adjusted or repaired if nec-
essary.
HLC5008
1.18 in.
(30 mm)
G160A01E
0.24 ~ 0.51 in.
(6 ~ 13 mm)
HLC2099
4. Replace the two filters.
5. Installation is the reverse order of disassem-
bly.
CAUTION:Be sure to install the air filter in the direction
of the arrow sign. Otherwise, it may cause
noise or deterioration.
!
Page 153 of 186
DO-IT-YOURSELF MAINTENANCE 6- 17
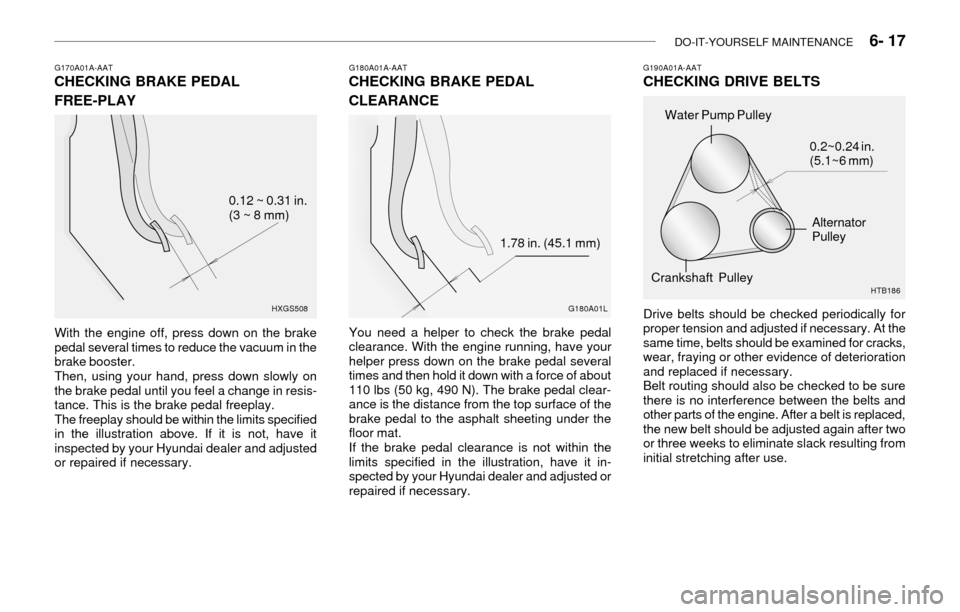
G170A01A-AATCHECKING BRAKE PEDAL
FREE-PLAY
With the engine off, press down on the brake
pedal several times to reduce the vacuum in the
brake booster.
Then, using your hand, press down slowly on
the brake pedal until you feel a change in resis-
tance. This is the brake pedal freeplay.
The freeplay should be within the limits specified
in the illustration above. If it is not, have it
inspected by your Hyundai dealer and adjusted
or repaired if necessary.
HXGS508
0.12 ~ 0.31 in.
(3 ~ 8 mm)
G190A01A-AATCHECKING DRIVE BELTS
Drive belts should be checked periodically for
proper tension and adjusted if necessary. At the
same time, belts should be examined for cracks,
wear, fraying or other evidence of deterioration
and replaced if necessary.
Belt routing should also be checked to be sure
there is no interference between the belts and
other parts of the engine. After a belt is replaced,
the new belt should be adjusted again after two
or three weeks to eliminate slack resulting from
initial stretching after use.
Water Pump Pulley
Alternator
Pulley
Crankshaft Pulley0.2~0.24 in.
(5.1~6 mm)
HTB186 G180A01A-AAT
CHECKING BRAKE PEDAL
CLEARANCE
You need a helper to check the brake pedal
clearance. With the engine running, have your
helper press down on the brake pedal several
times and then hold it down with a force of about
110 lbs (50 kg, 490 N). The brake pedal clear-
ance is the distance from the top surface of the
brake pedal to the asphalt sheeting under the
floor mat.
If the brake pedal clearance is not within the
limits specified in the illustration, have it in-
spected by your Hyundai dealer and adjusted or
repaired if necessary.
G180A01L
1.78 in. (45.1 mm)
Page 156 of 186
6- 20 DO-IT-YOURSELF MAINTENANCE
G220A01A-AATCHECKING ELECTRIC COOLING
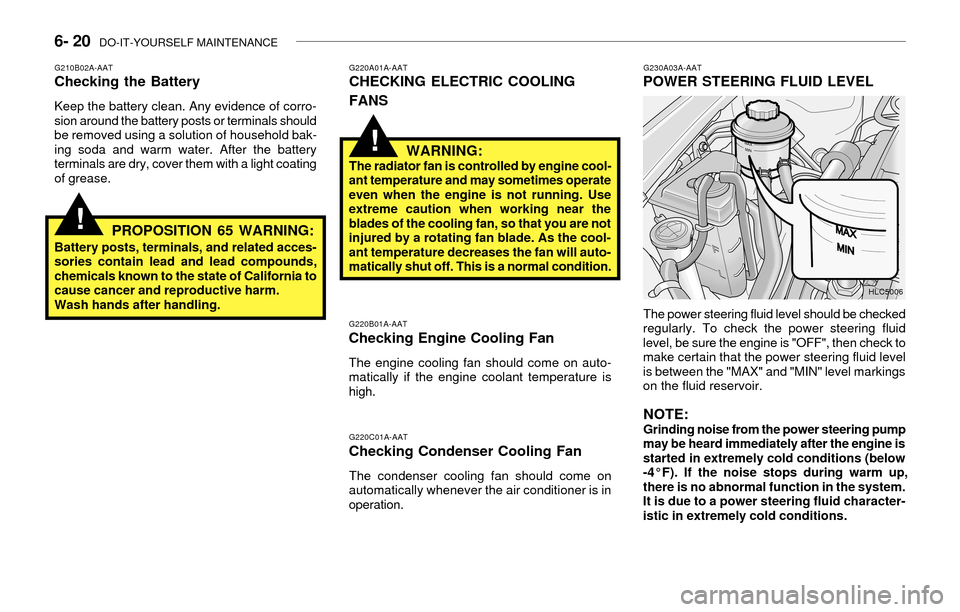
FANSG230A03A-AATPOWER STEERING FLUID LEVEL
G220B01A-AATChecking Engine Cooling Fan
The engine cooling fan should come on auto-
matically if the engine coolant temperature is
high.
WARNING:The radiator fan is controlled by engine cool-
ant temperature and may sometimes operate
even when the engine is not running. Use
extreme caution when working near the
blades of the cooling fan, so that you are not
injured by a rotating fan blade. As the cool-
ant temperature decreases the fan will auto-
matically shut off. This is a normal condition.
!
G220C01A-AATChecking Condenser Cooling Fan
The condenser cooling fan should come on
automatically whenever the air conditioner is in
operation.
HLC5006
The power steering fluid level should be checked
regularly. To check the power steering fluid
level, be sure the engine is "OFF", then check to
make certain that the power steering fluid level
is between the "MAX" and "MIN" level markings
on the fluid reservoir.
NOTE:Grinding noise from the power steering pump
may be heard immediately after the engine is
started in extremely cold conditions (below
-4°F). If the noise stops during warm up,
there is no abnormal function in the system.
It is due to a power steering fluid character-
istic in extremely cold conditions.
G210B02A-AATChecking the Battery
Keep the battery clean. Any evidence of corro-
sion around the battery posts or terminals should
be removed using a solution of household bak-
ing soda and warm water. After the battery
terminals are dry, cover them with a light coating
of grease.
PROPOSITION 65 WARNING:
Battery posts, terminals, and related acces-
sories contain lead and lead compounds,
chemicals known to the state of California to
cause cancer and reproductive harm.
Wash hands after handling.
!
Page 157 of 186
DO-IT-YOURSELF MAINTENANCE 6- 21
G240A01A-AATPOWER STEERING HOSES
It is suggested that you check the power steer-
ing hose connections for fluid leakage at those
intervals specified in the vehicle maintenance
schedule in Section 5.
The power steering hoses should be replaced if
there is severe surface cracking, pulling, scuff-
ing or worn spots. Deterioration of the hose
could cause premature failure.
Recommended Fluid
Use PSF-3 type fluid
NOTE:Do not start the engine when the power
steering oil reservoir is empty.
G250A01A-AAT
FOR MORE INFORMATION ABOUT
YOUR HYUNDAI
If you desire additional information about main-
taining and servicing your Hyundai, you may
purchase a factory Shop Manual at your Hyundai
dealer's parts department. This is the same
manual used by dealership technicians and while
it is highly technical it can be useful in obtaining
a better understanding of your car and how it
works.
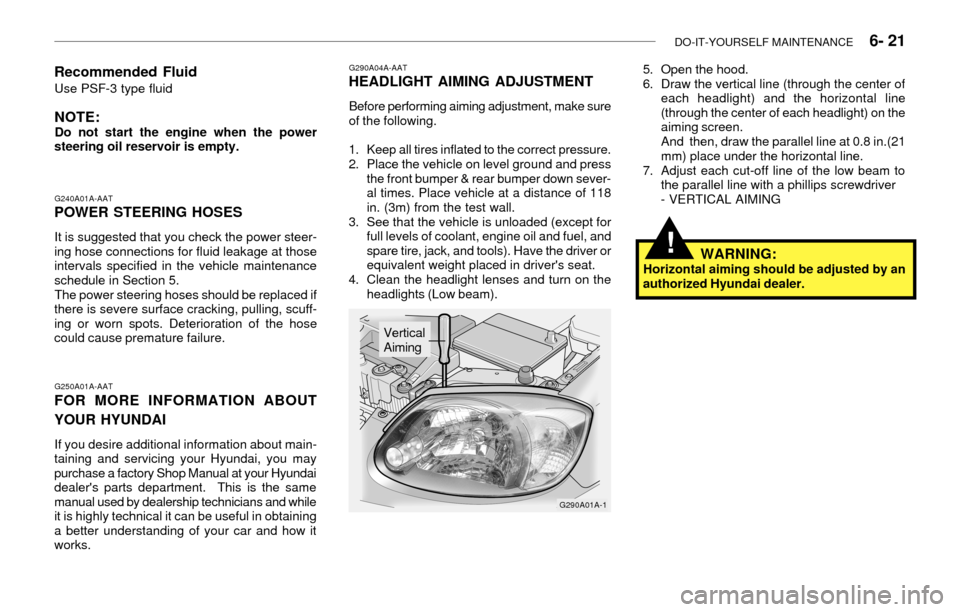
G290A04A-AATHEADLIGHT AIMING ADJUSTMENT
Before performing aiming adjustment, make sure
of the following.
1. Keep all tires inflated to the correct pressure.
2. Place the vehicle on level ground and press
the front bumper & rear bumper down sever-
al times. Place vehicle at a distance of 118
in. (3m) from the test wall.
3. See that the vehicle is unloaded (except for
full levels of coolant, engine oil and fuel, and
spare tire, jack, and tools). Have the driver or
equivalent weight placed in driver's seat.
4. Clean the headlight lenses and turn on the
headlights (Low beam).5. Open the hood.
6. Draw the vertical line (through the center of
each headlight) and the horizontal line
(through the center of each headlight) on the
aiming screen.
And then, draw the parallel line at 0.8 in.(21
mm) place under the horizontal line.
7. Adjust each cut-off line of the low beam to
the parallel line with a phillips screwdriver
- VERTICAL AIMING
G290A01A-1
Vertical
Aiming
WARNING:Horizontal aiming should be adjusted by an
authorized Hyundai dealer.
!
Page 159 of 186
DO-IT-YOURSELF MAINTENANCE 6- 23
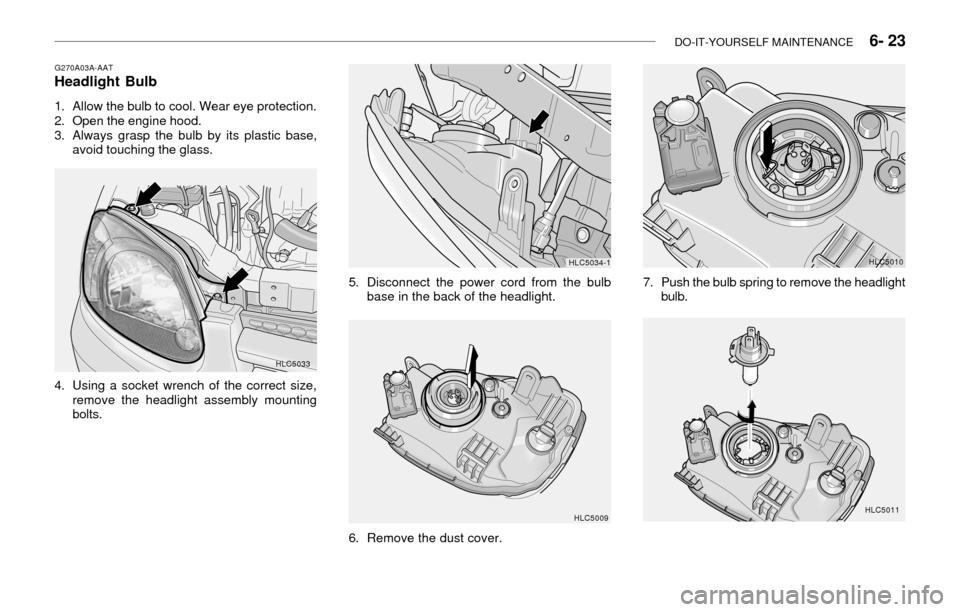
HLC5033 G270A03A-AAT
Headlight Bulb
1. Allow the bulb to cool. Wear eye protection.
2. Open the engine hood.
3. Always grasp the bulb by its plastic base,
avoid touching the glass.
4. Using a socket wrench of the correct size,
remove the headlight assembly mounting
bolts.
6. Remove the dust cover.
HLC5011
HLC5009
5. Disconnect the power cord from the bulb
base in the back of the headlight.7. Push the bulb spring to remove the headlight
bulb.
HLC5010HLC5034-1
Page 164 of 186
6- 28 DO-IT-YOURSELF MAINTENANCE
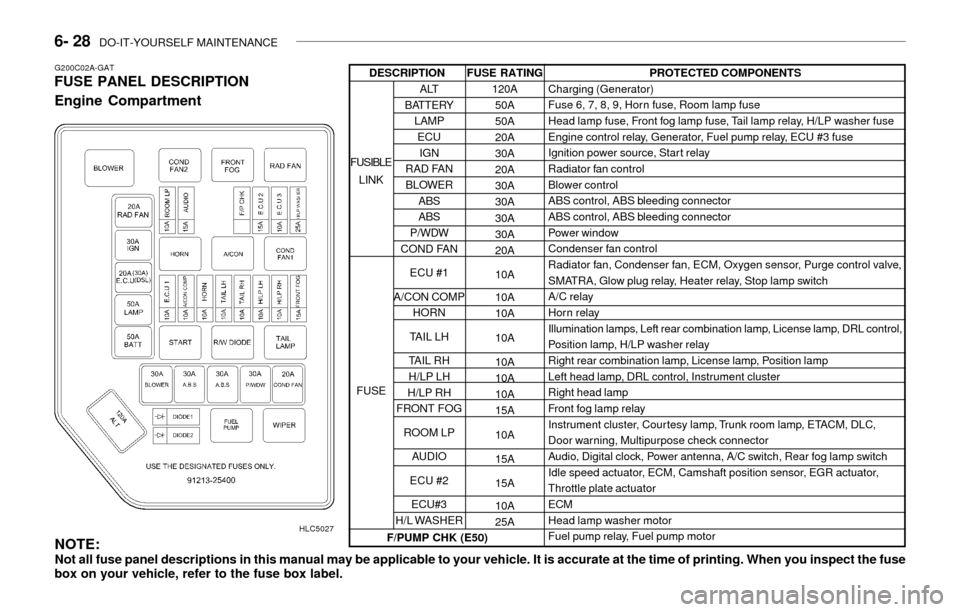
G200C02A-GATFUSE PANEL DESCRIPTION
Engine Compartment
HLC5027
NOTE:Not all fuse panel descriptions in this manual may be applicable to your vehicle. It is accurate at the time of printing. When you inspect the fuse
box on your vehicle, refer to the fuse box label.
FUSE RATING
120A
50A
50A
20A
30A
20A
30A
30A
30A
30A
20A
10A
10A
10A
10A
10A
10A
10A
15A
10A
15A
15A
10A
25APROTECTED COMPONENTS
Charging (Generator)
Fuse 6, 7, 8, 9, Horn fuse, Room lamp fuse
Head lamp fuse, Front fog lamp fuse, Tail lamp relay, H/LP washer fuse
Engine control relay, Generator, Fuel pump relay, ECU #3 fuse
Ignition power source, Star t relay
Radiator fan control
Blower control
ABS control, ABS bleeding connector
ABS control, ABS bleeding connector
Power window
Condenser fan control
Radiator fan, Condenser fan, ECM, Oxygen sensor, Purge control valve,
SMATRA, Glow plug relay, Heater relay, Stop lamp switch
A/C relay
Horn relay
Illumination lamps, Left rear combination lamp, License lamp, DRL control,
Position lamp, H/LP washer relay
Right rear combination lamp, License lamp, Position lamp
Left head lamp, DRL control, Instrument cluster
Right head lamp
Front fog lamp relay
Instrument cluster, Courtesy lamp, Trunk room lamp, ETACM, DLC,
Door warning, Multipurpose check connector
Audio, Digital clock, Power antenna, A/C switch, Rear fog lamp switch
Idle speed actuator, ECM, Camshaft position sensor, EGR actuator,
Throttle plate actuator
ECM
Head lamp washer motor
Fuel pump relay, Fuel pump motor
ALT
BATTERY
LAMP
ECU
IGN
RAD FAN
BLOWER
ABS
ABS
P/WDW
COND FAN
ECU #1
A/CON COMP
HORN
TAIL LH
TAIL RH
H/LP LH
H/LP RH
FRONT FOG
ROOM LP
AUDIO
ECU #2
ECU#3
H/L WASHER FUSIBLE
LINK
FUSEDESCRIPTION
F/PUMP CHK (E50)