turn signal Hyundai Accent 2007 User Guide
[x] Cancel search | Manufacturer: HYUNDAI, Model Year: 2007, Model line: Accent, Model: Hyundai Accent 2007Pages: 282, PDF Size: 10.55 MB
Page 188 of 282
2
DRIVING YOUR HYUNDAI
25
2
DRIVING YOUR HYUNDAI
25
C190F02A-GAT Trailer or Vehicle Towing Tips
1. Before towing, check hitch and safety chain connections as well as proper operation of the trailer running lights, brake lights, and turn signals.
2. Always drive your vehicle at a mod- erate speed (Less than 100 km/h).
3. Trailer towing requires more fuel than normal conditions.
4. To maintain engine braking effi-
ciency, do not tow a trailer withtransaxle in fifth gear (manual transaxle) or an overdrive gear (au- tomatic transaxle).
5. Always secure items in the trailer to prevent load shift while driving.
6. Check the condition and air pres- sure of all tires on the trailer and your car. Low tire pressure can seriously affect the handling. Alsocheck the spare tire.
7. The vehicle/trailer combination is
more affected by crosswind andbuffeting.
GAWR. Improper trailer loading and/or too much luggage in thetrunk can overload the rear axle. Redistribute the load and check the axle weight again.
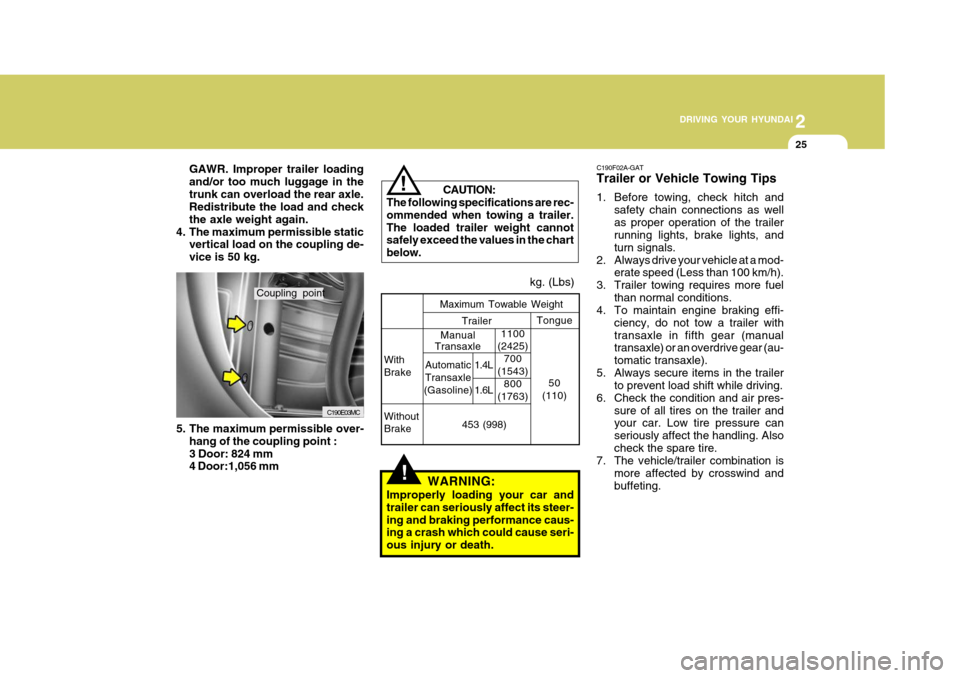
4. The maximum permissible static vertical load on the coupling de-vice is 50 kg.
5. The maximum permissible over- hang of the coupling point :3 Door: 824 mm 4 Door:1,056 mm
Maximum Towable Weight kg. (Lbs)
Coupling point CAUTION:
The following specifications are rec- ommended when towing a trailer.The loaded trailer weight cannot safely exceed the values in the chart below.
!
Manual
Transaxle 1100
(2425)
700
(1543) 800
(1763)
453 (998)
Trailer
Tongue
50
(110)
With Brake Without Brake
Automatic Transaxle
(Gasoline) 1.4L 1.6L
!WARNING:
Improperly loading your car and trailer can seriously affect its steer-ing and braking performance caus- ing a crash which could cause seri- ous injury or death.
C190E03MC
Page 228 of 282
6
DO-IT-YOURSELF MAINTENANCE
5
G020A01A-AAT Engine Compartment The following should be checked regu- larly:
o Engine oil level and condition
o Transaxle fluid level and condition
o Brake fluid level
o Clutch fluid level
o Engine coolant level
o Windshield washer fluid level
o Accessory drive belt condition
o Engine coolant hose condition
o Fluid leaks (on or below compo-
nents)
o Power steering fluid level
o Battery condition
o Air cleaner filter condition G020C01A-AAT Vehicle Interior The following should be checked each time when the vehicle is driven:
o Lights operation
o Windshield wiper operation
o Horn operation
o Defroster, heater system operation
(and air conditioning, if installed)
o Steering operation and condition
o Mirror condition and operation
o Turn signal operation
o Accelerator pedal operation
o Brake operation, including parking
brake
o Manual transaxle operation, includ- ing clutch operation
o Automatic transaxle operation, in- cluding "Park" mechanism opera-tion
o Seat control condition and opera- tion
o Seat belt condition and operation
o Sun visor operation If you notice anything that does not operate correctly or appears to befunctioning incorrectly, inspect it care- fully and seek assistance from your Hyundai dealer if service is needed.
G020B01A-AAT Vehicle Exterior The following should be checked monthly:
o Overall appearance and condition
o Wheel condition and wheel nut torque
o Exhaust system condition
o Light condition and operation
o Windshield glass condition
o Wiper blade condition
o Paint condition and body corrosion
o Fluid leaks
o Door and hood lock condition
o Tire pressure and condition
(including spare tire)
GENERAL CHECKS
Page 250 of 282
6
DO-IT-YOURSELF MAINTENANCE
27REPLACEMENT OF LIGHT BULBS
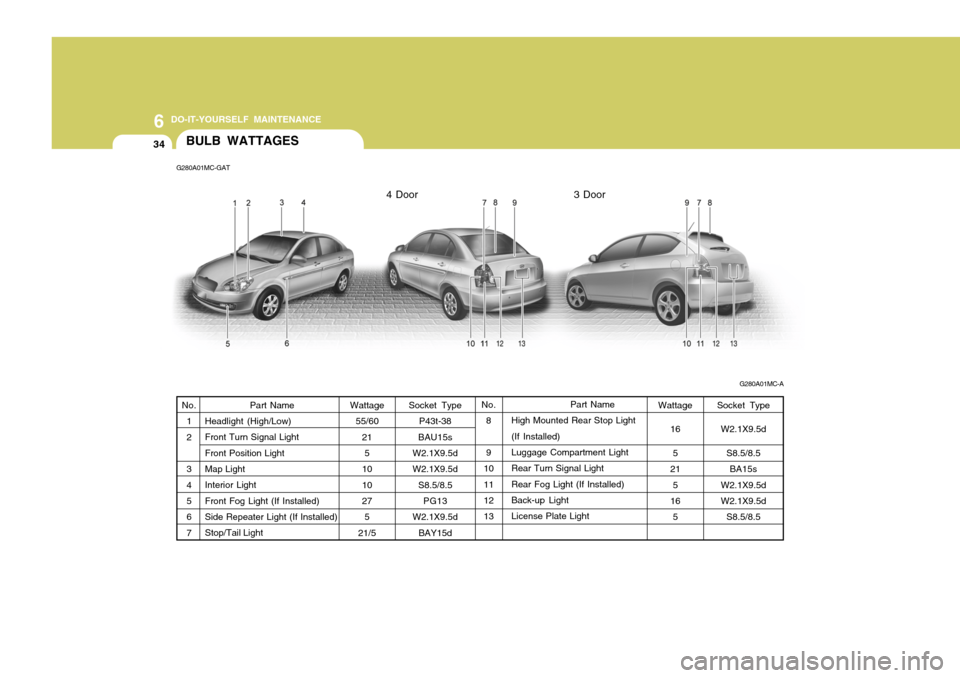
SPECIFICATIONS: "H" Horizontal center line of headlights from ground.: 665 mm (26.18 in.) "W" Distance between each headlight center. : 1,170 mm (46.06 in.) "L" Distance between the headlightsand the wall that the lights are tested against. : 3,000 mm (118.11 in.). G260A01MC-AAT Before attempting to replace a light bulb, be sure the switch is turned to the "OFF" position.The next paragraph shows how to reach the light bulbs so they may be changed. Be sure to replace the burned-out bulbwith one of the same number and watt- age rating. See page 6-34 for the wattage descrip-tions.
CAUTION:
o Keep the lamps out of contact with petroleum products, such as oil,gasoline, etc.
o If you don't have necessary tools,
the correct bulbs and the exper-tise, consult your authorized Hyundai dealer.
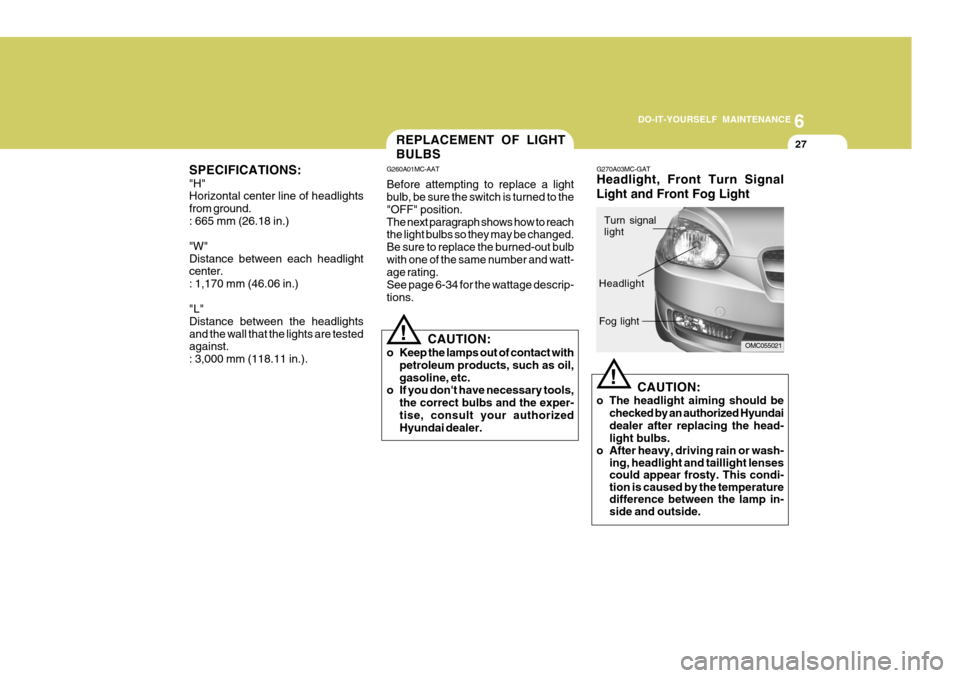
! G270A03MC-GAT Headlight, Front Turn Signal Light and Front Fog Light
CAUTION:
o The headlight aiming should be checked by an authorized Hyundai dealer after replacing the head- light bulbs.
o After heavy, driving rain or wash- ing, headlight and taillight lenses could appear frosty. This condi-tion is caused by the temperaturedifference between the lamp in-side and outside.
!
OMC055021
Turn signal light
Headlight Fog light
Page 253 of 282
6 DO-IT-YOURSELF MAINTENANCE
30
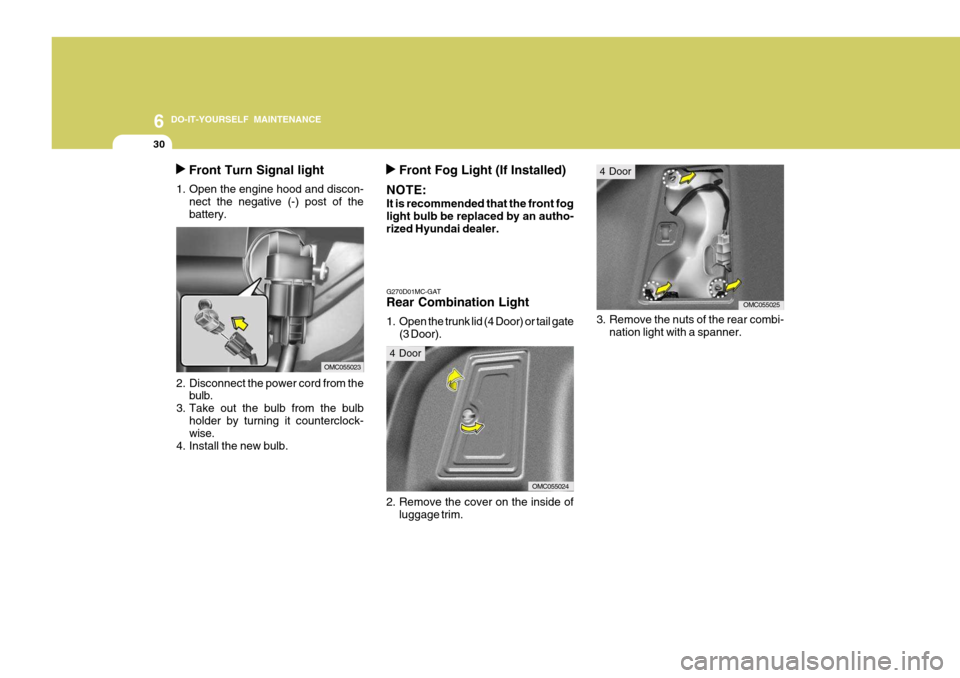
Front Turn Signal light
1. Open the engine hood and discon- nect the negative (-) post of the battery.
2. Disconnect the power cord from the bulb.
3. Take out the bulb from the bulb holder by turning it counterclock- wise.
4. Install the new bulb.
OMC055023
Front Fog Light (If Installed)
NOTE: It is recommended that the front fog light bulb be replaced by an autho- rized Hyundai dealer.
3. Remove the nuts of the rear combi- nation light with a spanner.
G270D01MC-GAT Rear Combination Light
1. Open the trunk lid (4 Door) or tail gate(3 Door).
OMC055024
OMC055025
2. Remove the cover on the inside of luggage trim.
4 Door
4 Door
Page 254 of 282
6
DO-IT-YOURSELF MAINTENANCE
31
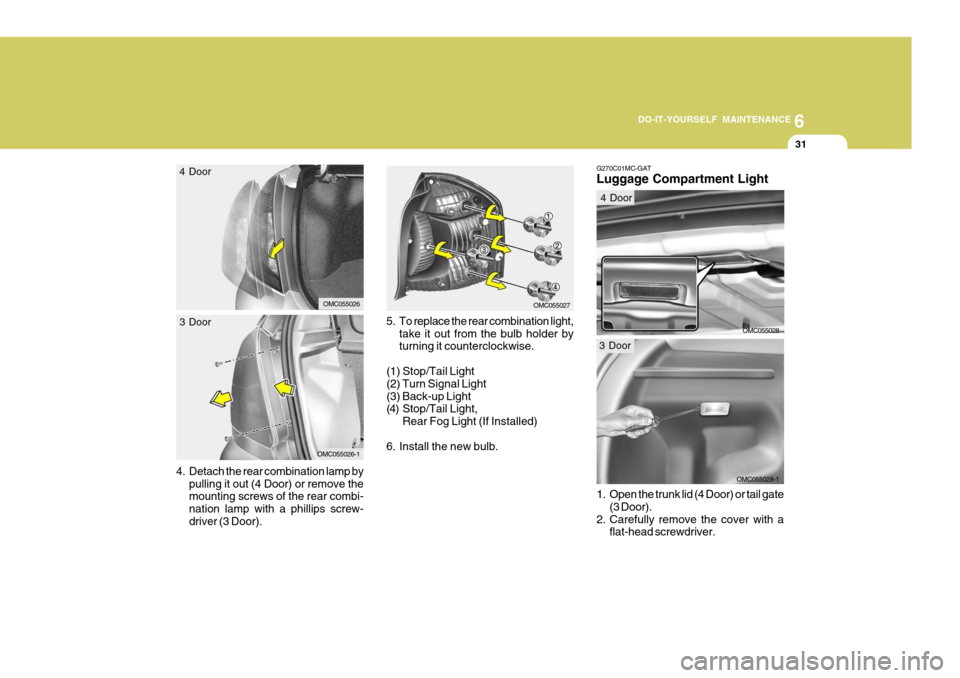
5. To replace the rear combination light, take it out from the bulb holder by turning it counterclockwise.
(1) Stop/Tail Light (2) Turn Signal Light(3) Back-up Light
(4) Stop/Tail Light, Rear Fog Light (If Installed)
6. Install the new bulb.
4.
Detach the rear combination lamp by pulling it out (4 Door) or remove the mounting screws of the rear combi- nation lamp with a phillips screw-driver (3 Door).
OMC055027OMC055026
4 Door
OMC055026-1
3 Door
OMC055028-1
G270C01MC-GAT Luggage Compartment Light
OMC055028
1. Open the trunk lid (4 Door) or tail gate (3 Door).
2. Carefully remove the cover with a flat-head screwdriver.
4 Door
3 Door
Page 257 of 282
6 DO-IT-YOURSELF MAINTENANCE
34BULB WATTAGES
G280A01MC-GAT
G280A01MC-A
Socket Type P43t-38
BAU15s
W2.1X9.5d W2.1X9.5d
S8.5/8.5PG13
W2.1X9.5d
BAY15d Part Name
High Mounted Rear Stop Light(If Installed) Luggage Compartment Light
Rear Turn Signal LightRear Fog Light (If Installed) Back-up Light
License Plate Light
Part Name
Headlight (High/Low)Front Turn Signal LightFront Position Light Map Light Interior LightFront Fog Light (If Installed) Side Repeater Light (If Installed) Stop/Tail Light
No.
12 3 4 5 67 No.
8 9
10 11 12 13
Wattage
55/60
215
1010 27 5
21/5
Wattage
165
21 5
16
5 Socket Type
W2.1X9.5d S8.5/8.5BA15s
W2.1X9.5d W2.1X9.5d S8.5/8.5
4 Door 3 Door
Page 280 of 282

10INDEX
4
Heating and Ventilation ............................................ 1-100
Air flow control ...................................................... 1-101
Air intake control .................................................. 1-100
Bi-level heating ..................................................... 1-104
Defrost/Defogging ................................................. 1-105
Fan speed control ................................................. 1-100
Temperature control .... .......................................... 1-104
High-Mounted Rear Stop Light................................... 1-90
Hood Release ............................................................ 1-90
Horn ........................................................................... 1-98
I Immobilizer System ..................................................... 1-5
Instrument Cluster and Indicator Lights ..................... 1-54
Interior Light
Interior light ............................................................. 1-84
Map light ................................................................. 1-84
J Jump Starting .............................................................. 3-3
K
Key .............................................................................. 1-4 If you lose y our keys ............................................. 3-16
Positions ................................................................... 2-4
Keyless Entry System .............................................. 1-11
L
Lubrication Chart .......................................................... 9-4
Luggage Net .............................................................. 1-95M Maintenance Intervals
Explanation of scheduled maintenance items .......... 5-8Maintenance under severe usage conditions ............ 5-7
Scheduled maintenance ............................................ 5-4
Service requirements ................................................ 5-3
Mirrors
Day/night inside rearview ....... .................................1-89
Outside rearview m irror ........................................... 1-87
Outside rearview mirror heater ................................1-88
Multi Box ................................................................... 1-86
Multi-Function Light Switch ........................................ 1-72
Daytime running lights ............................................ 1-73
Headlight flasher ..................................................... 1-73
Headlight swi tch ..................................................... 1-72
High-beam switch ................................................... 1-73
Lane change si gnal ................................................. 1-72
Parking light auto cut ............................................. 1-73
Turn signal operation .............................................. 1-72
O
Odometer/ Trip Odometer ...... ....................................1-68
P Parking Brake ............................................................ 1-89
Power Outlet .............................................................. 1-79
Power Steering Fluid Level ....... .................................6-24
Power Windows ......................................................... 1-13