stop start Hyundai Accent 2008 User Guide
[x] Cancel search | Manufacturer: HYUNDAI, Model Year: 2008, Model line: Accent, Model: Hyundai Accent 2008Pages: 273, PDF Size: 9.36 MB
Page 162 of 273
DRIVING YOUR HYUNDAI
152
DRIVING FOR ECONOMYC140A02A-AATYou can save fuel and get more miles
from your car if you follow these sugges-
tions:
o Drive smoothly. Accelerate at a mod-
erate rate. Don't make "jack-rabbit"
starts or full-throttle shifts and maintain
a steady cruising speed. Don't race
between stoplights. Try to adjust your
speed to that of the other traffic so you
don't have to change speeds unnec-
essarily. Avoid heavy traffic whenever
possible. Always maintain a safe dis-
tance from other vehicles so you can
avoid unnecessary braking. This also
reduces brake wear.
o Drive at a moderate speed. The faster
you drive, the more fuel your car uses.
Driving at a moderate speed, espe-
cially on the highway, is one of the
most effective ways to reduce fuel con-
sumption.
o Don't "ride" the brake or clutch pedal.
This can increase fuel consumption
and also increase wear on these com-
ponents. In addition, driving with your
foot resting on the brake pedal may
cause the brakes to overheat, which
reduces their effectiveness and may
lead to more serious consequences. o Under some conditions your parking
brake can freeze in the engaged posi-
tion. This is most likely to happen when
there is an accumulation of snow or ice
around or near the rear brakes or if the
brakes are wet. If there is a risk that the
parking brake may freeze, apply it only
temporarily while you put the gear
selector lever in "P" (automatic) or in
first or reverse gear (manual transaxle)
and block the rear wheels so the car
cannot roll. Then release the parking
brake.
o Do not hold the vehicle on the upgrade
with the accelerator pedal. This can
cause the transaxle to overheat. Al-
ways use the brake pedal or parking
brake.o Take care of your tires. Keep them
inflated to the recommended pressure.
Incorrect inflation, either too much or
too little, results in unnecessary tire
wear. Check the tire pressures at least
once a month.
o Be sure that the wheels are aligned
correctly. Improper alignment can re-
sult from hitting curbs or driving too fast
over irregular surfaces. Poor align-
ment causes faster tire wear and may
also result in other problems as well as
greater fuel consumption.
o Keep your car in good condition. For
better fuel economy and reduced main-
tenance costs, maintain your car in
accordance with the maintenance
schedule in Section 5. If you drive your
car in severe conditions, more fre-
quent maintenance is required (see
Section 5 for details).
o Keep your car clean. For maximum
service, your Hyundai should be kept
clean and free of corrosive materials.
It is especially important that mud, dirt,
ice, etc. not be allowed to accumulate
on the underside of the car. This extra
weight can result in increased fuel
consumption and also contribute to
corrosion.
Page 176 of 273
34WHAT TO DO IN AN EMERGENCY
IF THE ENGINE OVERHEATSD030A02A-AATIf your temperature gauge indicates over-
heating, you experience a loss of power,
or hear loud pinging or knocking, the
engine is probably too hot. If this hap-
pens, you should:
1. Pull off the road and stop as soon as
it is safe to do so.
2. Place the gear selector lever in "P"
(automatic), or neutral (manual
transaxle) and set the parking brake. If
the air conditioner is on, turn it off.
3. If coolant is running out under the car
or steam is coming out from the hood,
stop the engine. Do not open the hood
until the coolant has stopped running
or the steaming has stopped. If there is
no visible loss of coolant and no steam,
leave the engine running and check to
be sure the engine cooling fan is op-
erating. If the fan is not running, turn
the engine off. 3. Attach the clamps of the jumper cable
in the exact location shown on the
previous page. First, attach one clamp
of the jumper cable to the positive (+)
post or cable of the discharged battery.
Then attach the other end of the same
cable to the positive (+) post or cable
of the booster battery. Next, using the
other cable, attach one clamp to the
negative (-) post or cable of the booster
battery. Then attach the other end of
that cable to a solid metal part of the
engine away from the battery. Do not
connect the cable to any moving part.
4. Start the engine in the car with the
booster battery and let it run for a few
minutes. This will help to assure that
the booster battery is fully charged.
During the jumping operation, run the
engine in this vehicle at about 2000
rpm.
5. Start the engine in the car with the
discharged battery using the normal
starting procedure. After the engine
starts, leave the jumper cables con-
nected and let the engine run at fast
idle or about 2000 rpm for several
minutes.6. Carefully remove the jumper cables in
the reverse order of attachment.
If you do not know why your battery be-
came discharged (because the lights were
left on, etc.), have the charging system
checked by your Hyundai dealer.
Page 178 of 273
36WHAT TO DO IN AN EMERGENCY
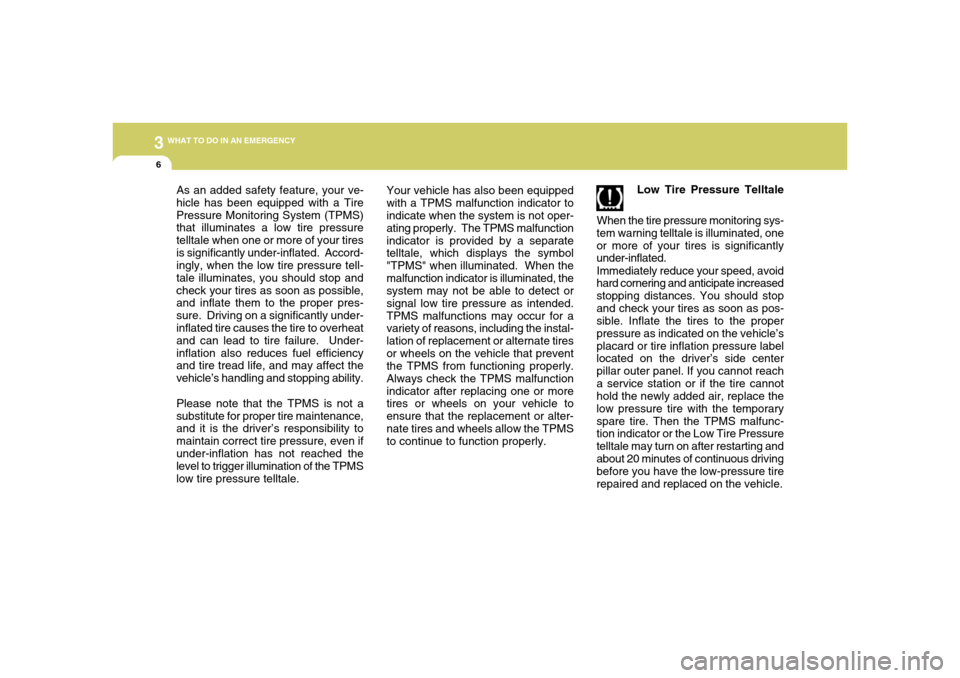
Low Tire Pressure Telltale
When the tire pressure monitoring sys-
tem warning telltale is illuminated, one
or more of your tires is significantly
under-inflated.
Immediately reduce your speed, avoid
hard cornering and anticipate increased
stopping distances. You should stop
and check your tires as soon as pos-
sible. Inflate the tires to the proper
pressure as indicated on the vehicle’s
placard or tire inflation pressure label
located on the driver’s side center
pillar outer panel. If you cannot reach
a service station or if the tire cannot
hold the newly added air, replace the
low pressure tire with the temporary
spare tire. Then the TPMS malfunc-
tion indicator or the Low Tire Pressure
telltale may turn on after restarting and
about 20 minutes of continuous driving
before you have the low-pressure tire
repaired and replaced on the vehicle.
As an added safety feature, your ve-
hicle has been equipped with a Tire
Pressure Monitoring System (TPMS)
that illuminates a low tire pressure
telltale when one or more of your tires
is significantly under-inflated. Accord-
ingly, when the low tire pressure tell-
tale illuminates, you should stop and
check your tires as soon as possible,
and inflate them to the proper pres-
sure. Driving on a significantly under-
inflated tire causes the tire to overheat
and can lead to tire failure. Under-
inflation also reduces fuel efficiency
and tire tread life, and may affect the
vehicle’s handling and stopping ability.
Please note that the TPMS is not a
substitute for proper tire maintenance,
and it is the driver’s responsibility to
maintain correct tire pressure, even if
under-inflation has not reached the
level to trigger illumination of the TPMS
low tire pressure telltale.Your vehicle has also been equipped
with a TPMS malfunction indicator to
indicate when the system is not oper-
ating properly. The TPMS malfunction
indicator is provided by a separate
telltale, which displays the symbol
"TPMS" when illuminated. When the
malfunction indicator is illuminated, the
system may not be able to detect or
signal low tire pressure as intended.
TPMS malfunctions may occur for a
variety of reasons, including the instal-
lation of replacement or alternate tires
or wheels on the vehicle that prevent
the TPMS from functioning properly.
Always check the TPMS malfunction
indicator after replacing one or more
tires or wheels on your vehicle to
ensure that the replacement or alter-
nate tires and wheels allow the TPMS
to continue to function properly.
Page 208 of 273
5
VEHICLE MAINTENANCE REQUIREMENTS
9
F070M01A-AATo Steering Gear Box, Linkage &
Boots/Lower Arm Ball JointWith the vehicle stopped and engine off,
check for excessive free-play in the steer-
ing wheel. Check the linkage for bends or
damage. Check the dust boots and ball
joints for deterioration, cracks, or dam-
age. Replace any damaged parts.
F070L01A-AATo Suspension Mounting BoltsCheck the suspension connections for
looseness or damage. Retighten to the
specified torque.F070K01A-AATo Exhaust Pipe and MufflerVisually inspect the exhaust pipes, muf-
fler and hangers for cracks, deterioration,
or damage. Start the engine and listen
carefully for any exhaust gas leakage.
Tighten connections or replace parts as
necessary.F070J01A-AATo Brake Pads, Calipers and RotorsCheck the pads for excessive wear, discs
for run out and wear, and calipers for fluid
leakage.
F070Q01A-AATo Air Conditioning RefrigerantCheck the air conditioning lines and con-
nections for leakage and damage. Check
air conditioning performance according
to the relevant shop manual if necessary.F070P01A-AATo Driveshafts and BootsCheck the drive shafts, boots and clamps
for cracks, deterioration, or damage. Re-
place any damaged parts and, if neces-
sary, repack the grease.
F070N01A-AATo Power Steering Pump, Belt and
HosesCheck the power steering pump and
hoses for leakage and damage. Replace
any damaged or leaking parts immedi-
ately. Inspect the power steering belt for
evidence of cuts, cracks, excessive wear,
oiliness and proper tension. Replace or
adjust it if necessary.
Page 230 of 273
6
DO-IT-YOURSELF MAINTENANCE
21
G240A01A-AATPOWER STEERING HOSESIt is suggested that you check the power
steering hose connections for fluid leak-
age at those intervals specified in the
vehicle maintenance schedule in Section
5.
The power steering hoses should be re-
placed if there is severe surface cracking,
pulling, scuffing or worn spots. Deteriora-
tion of the hose could cause premature
failure.
POWER STEERING FLUID
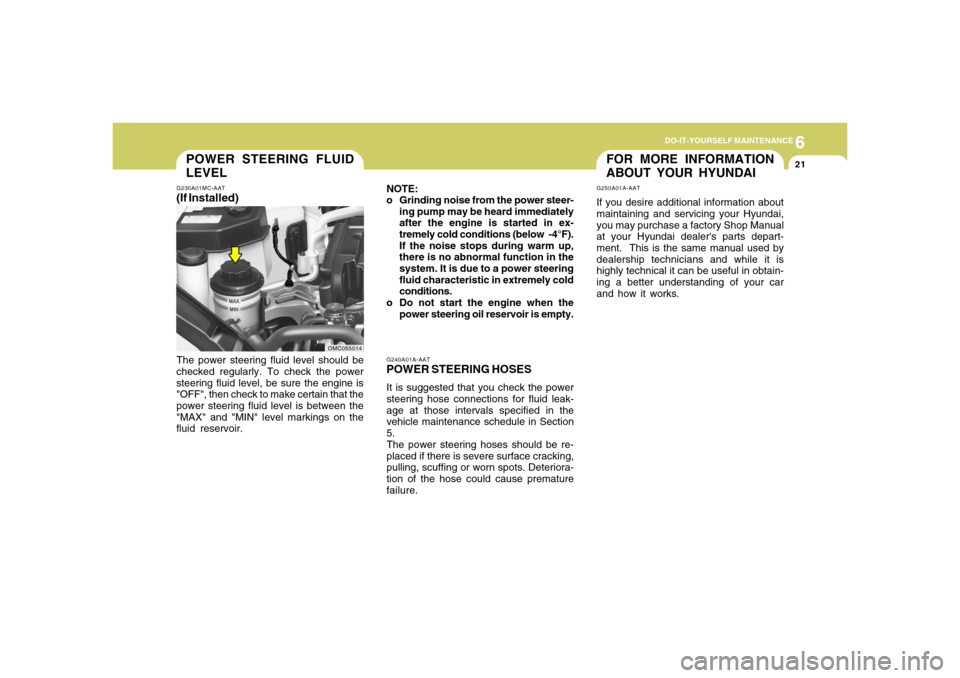
LEVELG230A01MC-AAT(If Installed)The power steering fluid level should be
checked regularly. To check the power
steering fluid level, be sure the engine is
"OFF", then check to make certain that the
power steering fluid level is between the
"MAX" and "MIN" level markings on the
fluid reservoir.NOTE:
o Grinding noise from the power steer-
ing pump may be heard immediately
after the engine is started in ex-
tremely cold conditions (below -4°F).
If the noise stops during warm up,
there is no abnormal function in the
system. It is due to a power steering
fluid characteristic in extremely cold
conditions.
o Do not start the engine when the
power steering oil reservoir is empty.
OMC055014
FOR MORE INFORMATION
ABOUT YOUR HYUNDAIG250A01A-AATIf you desire additional information about
maintaining and servicing your Hyundai,
you may purchase a factory Shop Manual
at your Hyundai dealer's parts depart-
ment. This is the same manual used by
dealership technicians and while it is
highly technical it can be useful in obtain-
ing a better understanding of your car
and how it works.
Page 240 of 273
6
DO-IT-YOURSELF MAINTENANCE
31
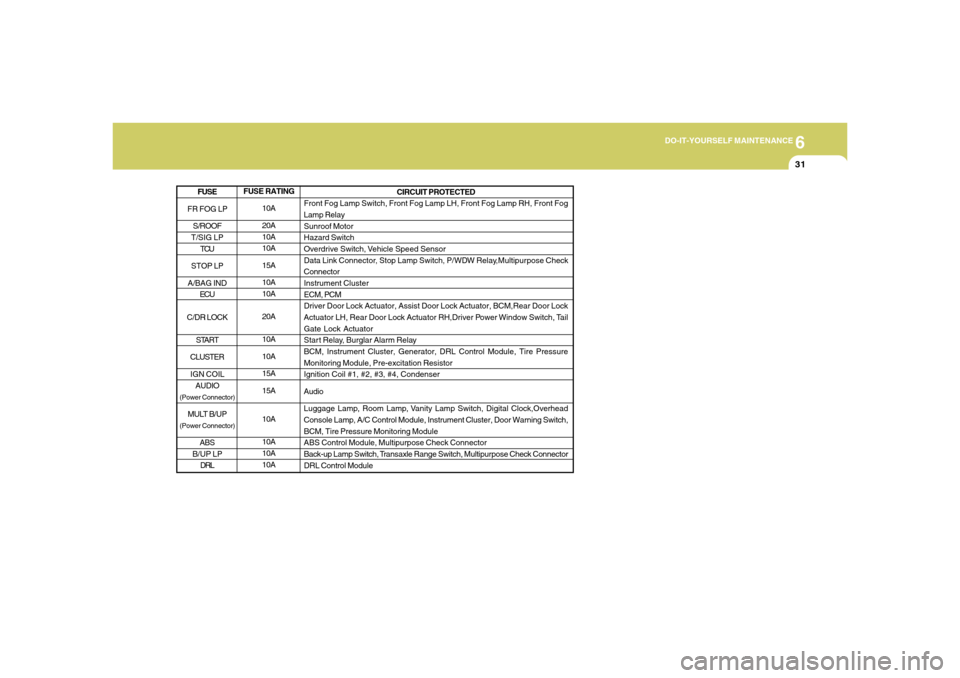
FUSE RATING
10A
20A
10A
10A
15A
10A
10A
20A
10A
10A
15A
15A
10A
10A
10A
10ACIRCUIT PROTECTED
Front Fog Lamp Switch, Front Fog Lamp LH, Front Fog Lamp RH, Front Fog
Lamp Relay
Sunroof Motor
Hazard Switch
Overdrive Switch, Vehicle Speed Sensor
Data Link Connector, Stop Lamp Switch, P/WDW Relay,Multipurpose Check
Connector
Instrument Cluster
ECM, PCM
Driver Door Lock Actuator, Assist Door Lock Actuator, BCM,Rear Door Lock
Actuator LH, Rear Door Lock Actuator RH,Driver Power Window Switch, Tail
Gate Lock Actuator
Star t Relay, Burglar Alarm Relay
BCM, Instrument Cluster, Generator, DRL Control Module, Tire Pressure
Monitoring Module, Pre-excitation Resistor
Ignition Coil #1, #2, #3, #4, Condenser
Audio
Luggage Lamp, Room Lamp, Vanity Lamp Switch, Digital Clock,Overhead
Console Lamp, A/C Control Module, Instrument Cluster, Door Warning Switch,
BCM, Tire Pressure Monitoring Module
ABS Control Module, Multipurpose Check Connector
Back-up Lamp Switch, Transaxle Range Switch, Multipurpose Check Connector
DRL Control Module
FR FOG LP
S/ROOF
T/SIG LP
TCU
STOP LP
A/BAG IND
ECU
C/DR LOCK
START
CLUSTER
IGN COIL
AUDIO(Power Connector)MULT B/UP(Power Connector)
ABS
B/UP LP
DRLFUSE
Page 243 of 273
7
EMISSION CONTROL SYSTEMS
3
CATALYTIC CONVERTER
!
!
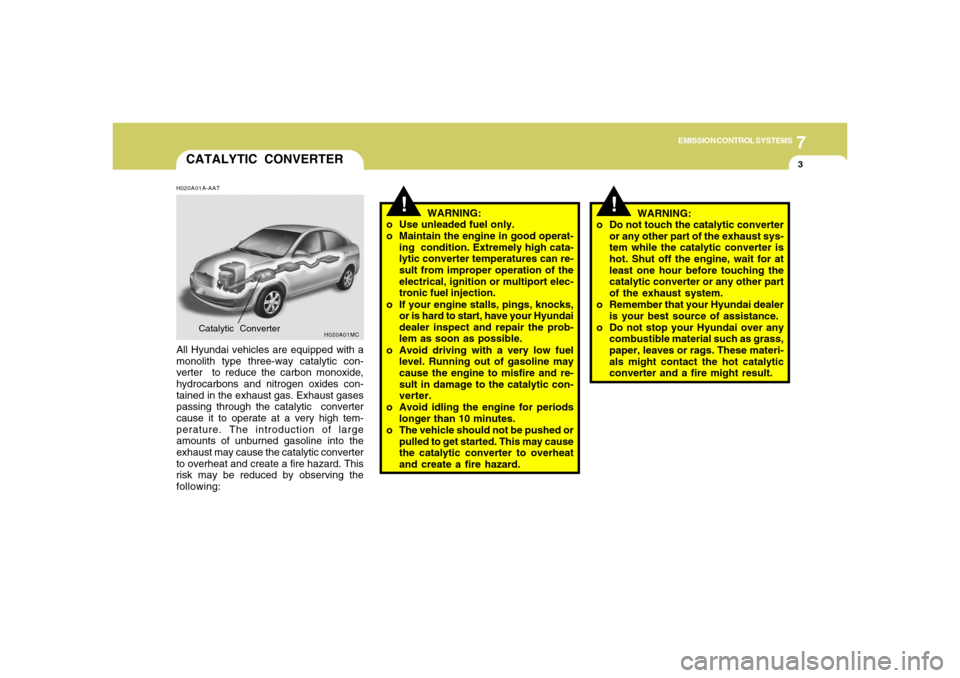
H020A01A-AATAll Hyundai vehicles are equipped with a
monolith type three-way catalytic con-
verter to reduce the carbon monoxide,
hydrocarbons and nitrogen oxides con-
tained in the exhaust gas. Exhaust gases
passing through the catalytic converter
cause it to operate at a very high tem-
perature. The introduction of large
amounts of unburned gasoline into the
exhaust may cause the catalytic converter
to overheat and create a fire hazard. This
risk may be reduced by observing the
following:WARNING:
o Do not touch the catalytic converter
or any other part of the exhaust sys-
tem while the catalytic converter is
hot. Shut off the engine, wait for at
least one hour before touching the
catalytic converter or any other part
of the exhaust system.
o Remember that your Hyundai dealer
is your best source of assistance.
o Do not stop your Hyundai over any
combustible material such as grass,
paper, leaves or rags. These materi-
als might contact the hot catalytic
converter and a fire might result.
H020A01MC
Catalytic Converter
WARNING:
o Use unleaded fuel only.
o Maintain the engine in good operat-
ing condition. Extremely high cata-
lytic converter temperatures can re-
sult from improper operation of the
electrical, ignition or multiport elec-
tronic fuel injection.
o If your engine stalls, pings, knocks,
or is hard to start, have your Hyundai
dealer inspect and repair the prob-
lem as soon as possible.
o Avoid driving with a very low fuel
level. Running out of gasoline may
cause the engine to misfire and re-
sult in damage to the catalytic con-
verter.
o Avoid idling the engine for periods
longer than 10 minutes.
o The vehicle should not be pushed or
pulled to get started. This may cause
the catalytic converter to overheat
and create a fire hazard.
Page 269 of 273

10
INDEX
4
Heating and Cooling Control ..........................................1-105
Air flow control ............................................................. 1-107
Air intake control switch ...............................................1-106
Defrosting/Defogging....................................................1-112
Fan speed control (Blower control) .............................1-106
Temperature control .....................................................1-110
High-Mounted Rear Stop Light .........................................1-95
Hood Release ....................................................................1-96
Horn..................................................................................1-104
I
Ignition Switch ...................................................................... 2-4
Instrument Cluster and Indicator Lights ............................1-60
Instrument Panel Light Control (Rheostat) .......................1-81
Interior Light .......................................................................1-89
J
Jump Starting ....................................................................... 3-3
K
Key ........................................................................................ 1-4
If you lose your keys ......................................................3-20
Positions............................................................................ 2-4L
Light Bulb Wattage .............................................................6-28
Light Bulbs Replacement ..................................................6-22
Lubrication Chart .................................................................. 9-4
Luggage Net ....................................................................1-101
M
Maintenance Intervals .......................................................... 5-2
Explanation of scheduled maintenance items ................ 5-7
Maintenance under severe usage conditions ................. 5-6
Scheduled maintenance .................................................. 5-4
Service requirements ........................................................ 5-2
Maintenance Precautions.................................................... 6-4
Map Light ............................................................................1-89
Mirrors
Day/Night inside rearview mirror ...................................1-94
Outside rearview .............................................................1-92
Multi Box .............................................................................1-91
O
Odometer/Trip Odometer ...................................................1-71
Outside Rearview Mirror ....................................................1-92
P
Parking Brake .....................................................................1-94
Power Outlet .......................................................................1-84
Power Steering Fluid Level ...............................................6-21