hood open Hyundai Accent 2010 Owner's Manual
[x] Cancel search | Manufacturer: HYUNDAI, Model Year: 2010, Model line: Accent, Model: Hyundai Accent 2010Pages: 284, PDF Size: 10.23 MB
Page 23 of 284
1
FEATURES OF YOUR HYUNDAI
11
B070C03MC-GAT Alarm Stage The alarm will be activated if any of the following occurs while the car is parkedand the system is armed.
1) Any door, tail gate (3 Door) included, is opened without using the trans- mitter.
2) The trunk lid (4 Door) is opened without using the key (For Europe).
3) The engine hood is opened. The alarming horn will sound and the turn signal lights will blink continuously for 27 seconds (For Europe, MiddleEast / Except Europe : This happens 3 times). To turn off the system, unlock the door with the transmitter.
NOTE:
1) If any door, trunk lid (4 Door) / tail gate (3 Door) or engine hood re- mains open, the system will notbe armed (For Europe). If any door, tail gate (3 Door) or engine hood remains open, thesystem will not be armed (Except Europe). If this happens, rearm the systemas described above.
2) Once the system is armed, only
the trunk lid (4 Door) may be un-locked using the ignition key with- out disarming the system (For Europe).
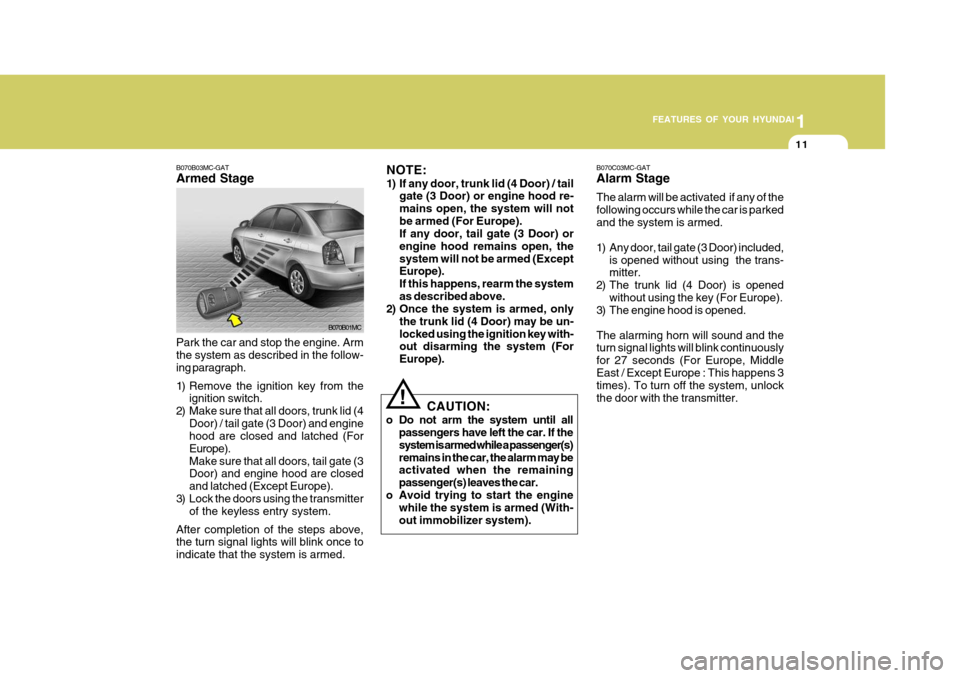
B070B03MC-GAT Armed Stage
B070B01MC
Park the car and stop the engine. Arm the system as described in the follow- ing paragraph.
1) Remove the ignition key from the ignition switch.
2) Make sure that all doors, trunk lid (4 Door) / tail gate (3 Door) and engine hood are closed and latched (For Europe).Make sure that all doors, tail gate (3 Door) and engine hood are closed and latched (Except Europe).
3) Lock the doors using the transmitter of the keyless entry system.
After completion of the steps above, the turn signal lights will blink once to indicate that the system is armed. CAUTION:
o Do not arm the system until all passengers have left the car. If thesystem is armed while a passenger(s)remains in the car, the alarm may be activated when the remaining passenger(s) leaves the car.
o Avoid trying to start the engine while the system is armed (With-out immobilizer system).
!
Page 77 of 284
1
FEATURES OF YOUR HYUNDAI
65
B290A02MC-GAT
Engine Coolant Tempera-
ture Warning Light
WARNING:
Never remove the radiator cap when the engine is hot. The engine coolant is under pressure and could eruptand cause severe burns. Wait until the engine is cool before removing the radiator cap.
!
This warning light shows the tempera- ture of the engine coolant when the ignition switch is ON. The warning lightilluminates if the temperature of the engine coolant is above 123±3°C (253.4±5.4°F).If the warning light illuminates, pull over and stop as soon as possible and turn off the engine. Then open the hood andcheck the coolant level (See "If the engine overheats" on the page 3-4.) and the water pump drive belt. If you sus-pect cooling system trouble, have your cooling system checked by a Hyundai dealer as soon as possible. NOTE: If the engine coolant temperature warning light illuminates, it indicatesoverheating that may damage the engine.
CAUTION:
o Prolonged driving with the Emis- sion Control System MalfunctionIndicator Light illuminated may cause damage to the emissioncontrol systems which could ef- fect drivability or fuel economy. If the Emission Control SystemMalfunction Indicator Light be- gins to flash ON and OFF, poten- tial catalytic converter damage ispossible. This could result in loss of engine power. Have the Engine Control System inspected as soonas possible by an authorized Hyundai dealer (Gasoline Engine).
o In case the injection quantity ad- justment related error occurred,the Emission Control System Mal- function Indicator Light begins toflash ON and OFF. Continuous driving with this status could re- sult in abnormal engine powerloss (or power increase), com- bustion noise and poor emission. If this occurs, have your vehiclechecked by an authorized Hyundai dealer (Diesel Engine).
!
Page 108 of 284
1FEATURES OF YOUR HYUNDAI
96
CAUTION:
Make sure that the support rod has been released prior to closing thehood.
!
Before closing the hood, return the support rod to its clip to prevent it fromrattling. Lower the hood until it is about 1 ft. (30 cm) above the closed position and let it drop. Make sure that it locksinto place.
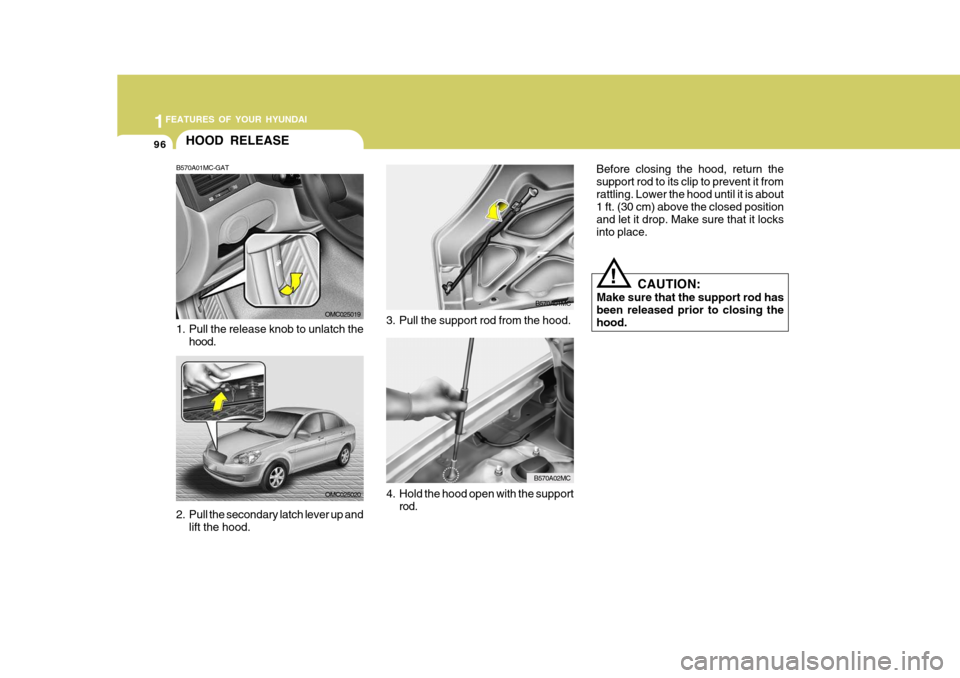
3. Pull the support rod from the hood.
B570A01MC
4. Hold the hood open with the support rod.
B570A02MC
HOOD RELEASE
B570A01MC-GAT
1. Pull the release knob to unlatch the hood.
OMC025019
OMC025020
2. Pull the secondary latch lever up and lift the hood.
Page 109 of 284
1
FEATURES OF YOUR HYUNDAI
97
!WARNING:
o Always double check to be sure that the hood is firmly latched before driving away. If it is not latched, the hood could fly openwhile the vehicle is being driven, causing a total loss of visibility, which might result in an accident.
o The support rod must be inserted completely into the hole providedin the hood whenever you inspectthe engine compartment. This will prevent the hood from falling and possibly injuring you.
o Do not move the vehicle with the hood in the raised position, asvision is obstructed and the hoodcould fall or be damaged.
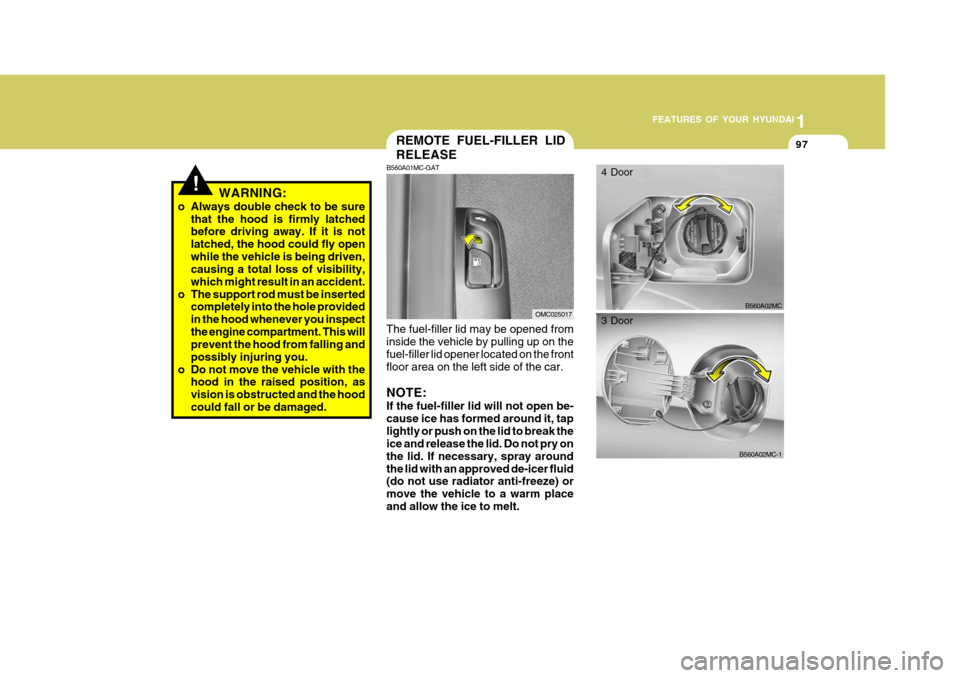
REMOTE FUEL-FILLER LID RELEASE
B560A01MC-GAT
The fuel-filler lid may be opened from inside the vehicle by pulling up on the fuel-filler lid opener located on the front floor area on the left side of the car. NOTE: If the fuel-filler lid will not open be- cause ice has formed around it, taplightly or push on the lid to break the ice and release the lid. Do not pry on the lid. If necessary, spray aroundthe lid with an approved de-icer fluid (do not use radiator anti-freeze) or move the vehicle to a warm placeand allow the ice to melt.
OMC025017B560A02MC
4 Door
B560A02MC-1
3 Door
Page 194 of 284
3 WHAT TO DO IN AN EMERGENCY
4
!
IF THE ENGINE OVERHEATS
D030A02TB-AAT If your temperature gauge indicates overheating, you experience a loss of power, or hear loud pinging or knock- ing, the engine is probably too hot. Ifthis happens to you, you should:
1. Pull off the road and stop as soon as it is safe to do so.
2. Place the gear selector lever in "P"
(automatic), or neutral (manual transaxle) and set the parking brake. If the air conditioning is on, turn it off.
3. If engine coolant is running out un- der the car or steam is coming outfrom underneath the hood, stop theengine. Do not open the hood until the engine coolant has stopped running or the steaming has stopped.If there is no visible loss of engine coolant and no steam, leave the engine running and check to be surethe engine cooling fan is operating. If the fan is not running, turn the engine off.
5. Start the engine in the car with the
discharged battery using the nor-mal starting procedure. After the engine starts, leave the jumper cables connected and let the enginerun at fast idle or about 2,000 rpm for several minutes.
6. Carefully remove the jumper cables in the reverse order of attachment.
If you do not know why your battery became discharged (because the lights were left on, etc.), have the charging system checked by your Hyundaidealer. 4. Check to see if the water pump drive
belt is missing. If it is not missing,check to see that it is tight. If the drive belt seems to be satisfactory, check for coolant leaking from theradiator, hoses or under the car. (If the air conditioning had been in use, it is normal for cold water to bedraining from it when you stop).
WARNING:
While the engine is running, keephair, hands, and clothing away from moving parts such as the fan and drive belts to prevent injury.
Page 252 of 284
6 DO-IT-YOURSELF MAINTENANCE
26HEADLIGHT AIMING ADJUSTMENT
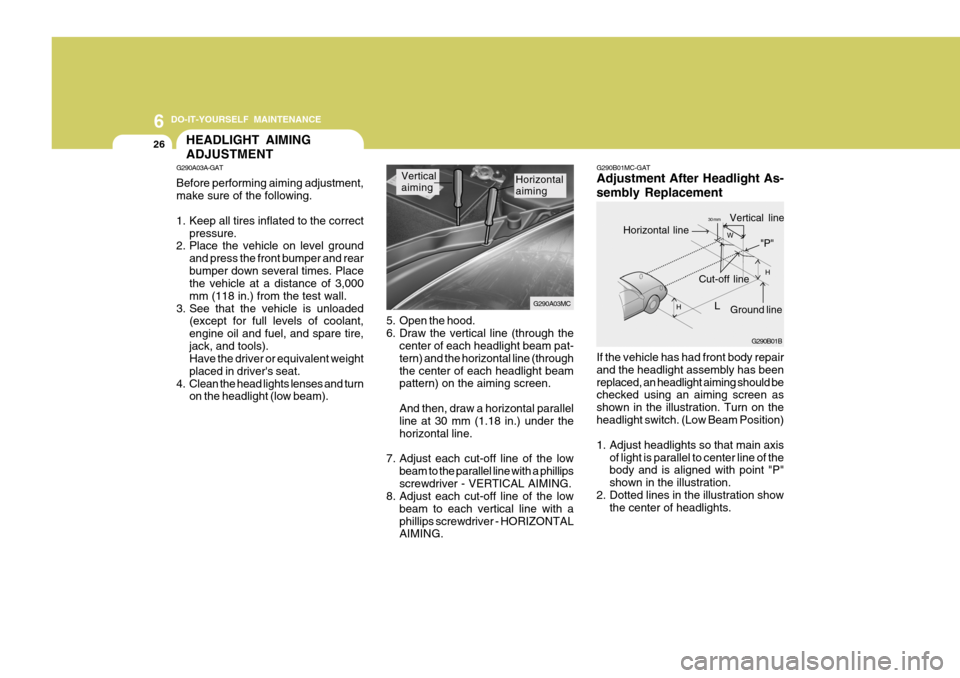
5. Open the hood.
6. Draw the vertical line (through the
center of each headlight beam pat-tern) and the horizontal line (throughthe center of each headlight beam pattern) on the aiming screen. And then, draw a horizontal parallel line at 30 mm (1.18 in.) under the horizontal line.
7. Adjust each cut-off line of the low beam to the parallel line with a phillipsscrewdriver - VERTICAL AIMING.
8. Adjust each cut-off line of the low
beam to each vertical line with aphillips screwdriver - HORIZONTAL AIMING. Horizontal aiming
Vertical aiming
If the vehicle has had front body repair and the headlight assembly has beenreplaced, an headlight aiming should be checked using an aiming screen as shown in the illustration. Turn on theheadlight switch. (Low Beam Position)
1. Adjust headlights so that main axisof light is parallel to center line of the body and is aligned with point "P" shown in the illustration.
2. Dotted lines in the illustration show the center of headlights.
G290B01MC-GAT Adjustment After Headlight As- sembly Replacement
G290A03A-GAT Before performing aiming adjustment, make sure of the following.
1. Keep all tires inflated to the correct
pressure.
2. Place the vehicle on level ground
and press the front bumper and rear bumper down several times. Place the vehicle at a distance of 3,000 mm (118 in.) from the test wall.
3. See that the vehicle is unloaded (except for full levels of coolant,engine oil and fuel, and spare tire,jack, and tools). Have the driver or equivalent weight placed in driver's seat.
4. Clean the head lights lenses and turn on the headlight (low beam). G290B01B
LW
H
H Cut-off line
Ground line
"P"
Horizontal line
Vertical line30 mm
G290A03MC
Page 254 of 284
6 DO-IT-YOURSELF MAINTENANCE
28
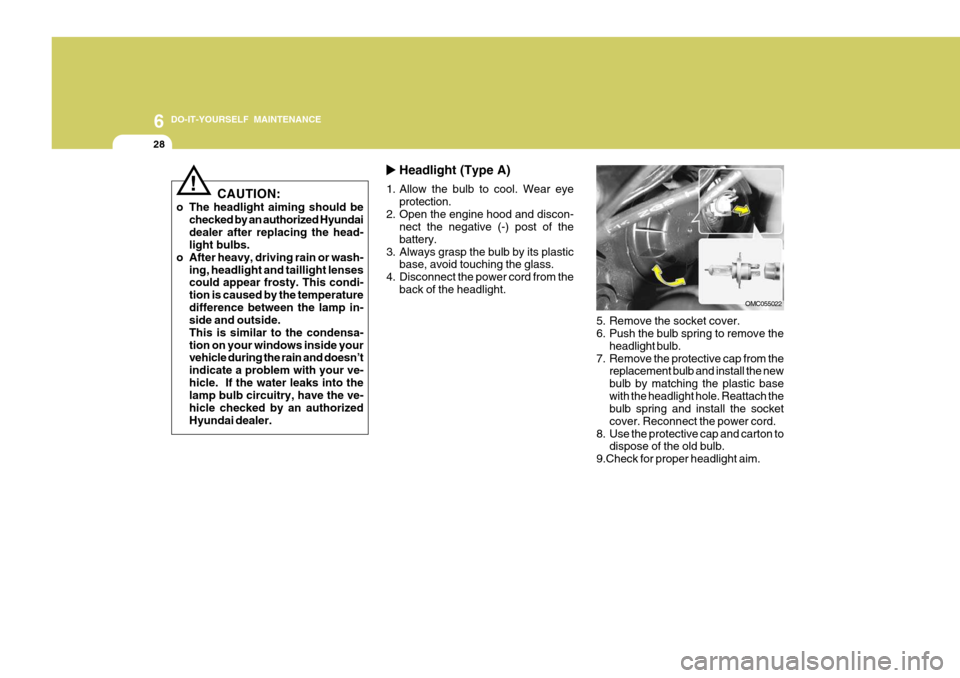
5. Remove the socket cover.
6. Push the bulb spring to remove theheadlight bulb.
7. Remove the protective cap from the replacement bulb and install the new bulb by matching the plastic basewith the headlight hole. Reattach the bulb spring and install the socket cover. Reconnect the power cord.
8. Use the protective cap and carton to dispose of the old bulb.
9.Check for proper headlight aim.
Headlight (Type A)
1. Allow the bulb to cool. Wear eye protection.
2. Open the engine hood and discon- nect the negative (-) post of the battery.
3. Always grasp the bulb by its plastic base, avoid touching the glass.
4. Disconnect the power cord from the back of the headlight.
OMC055022
CAUTION:
o The headlight aiming should be checked by an authorized Hyundai dealer after replacing the head- light bulbs.
o After heavy, driving rain or wash- ing, headlight and taillight lensescould appear frosty. This condi- tion is caused by the temperaturedifference between the lamp in- side and outside. This is similar to the condensa-tion on your windows inside your vehicle during the rain and doesn’t indicate a problem with your ve-hicle. If the water leaks into the lamp bulb circuitry, have the ve- hicle checked by an authorizedHyundai dealer.
!
Page 255 of 284
6
DO-IT-YOURSELF MAINTENANCE
29
Headlight (Type B)
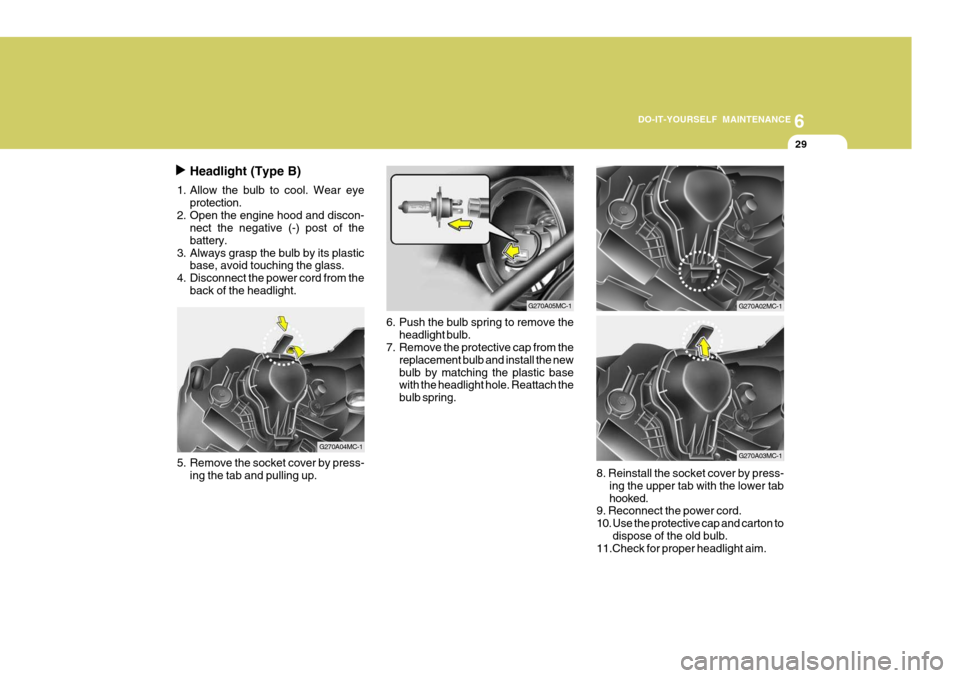
1. Allow the bulb to cool. Wear eye protection.
2. Open the engine hood and discon- nect the negative (-) post of the battery.
3. Always grasp the bulb by its plastic base, avoid touching the glass.
4. Disconnect the power cord from the
back of the headlight.
5. Remove the socket cover by press-ing the tab and pulling up. 6. Push the bulb spring to remove the
headlight bulb.
7. Remove the protective cap from the
replacement bulb and install the new bulb by matching the plastic base with the headlight hole. Reattach the bulb spring.8. Reinstall the socket cover by press-ing the upper tab with the lower tab hooked.
9. Reconnect the power cord.
10. Use the protective cap and carton to
dispose of the old bulb.
11.Check for proper headlight aim.
G270A04MC-1
G270A05MC-1G270A02MC-1
G270A03MC-1
Page 256 of 284
6 DO-IT-YOURSELF MAINTENANCE
30
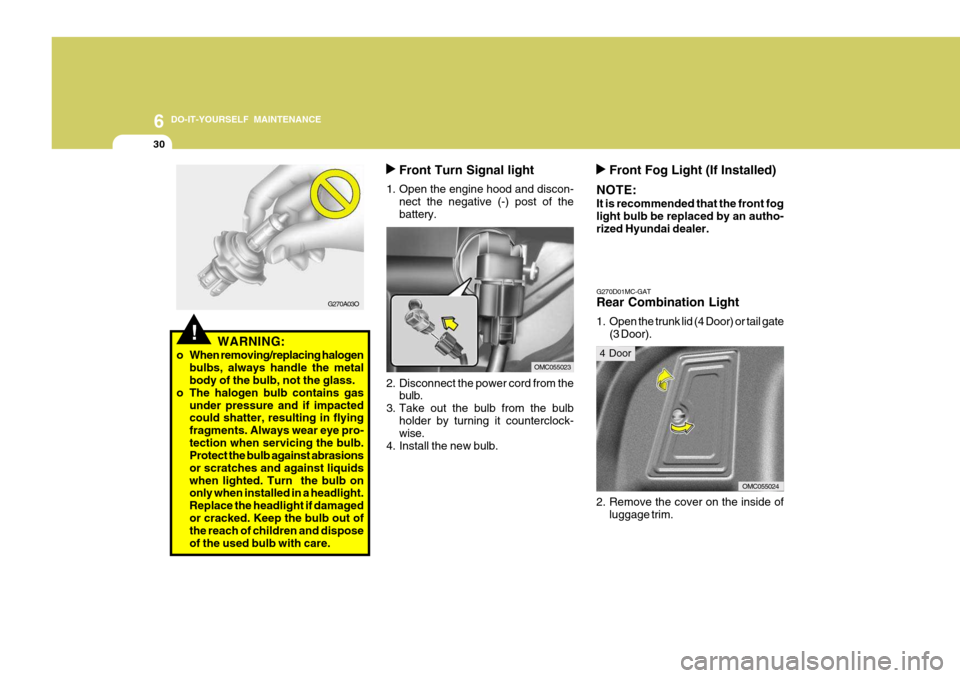
Front Turn Signal light
1. Open the engine hood and discon- nect the negative (-) post of the battery.
2. Disconnect the power cord from the bulb.
3. Take out the bulb from the bulb holder by turning it counterclock- wise.
4. Install the new bulb.
OMC055023
Front Fog Light (If Installed)
NOTE: It is recommended that the front fog light bulb be replaced by an autho- rized Hyundai dealer.
G270D01MC-GAT Rear Combination Light
1. Open the trunk lid (4 Door) or tail gate (3 Door).
OMC055024
2. Remove the cover on the inside of luggage trim.
4 Door
G270A03O
!WARNING:
o When removing/replacing halogen bulbs, always handle the metal body of the bulb, not the glass.
o The halogen bulb contains gas under pressure and if impactedcould shatter, resulting in flying fragments. Always wear eye pro-tection when servicing the bulb. Protect the bulb against abrasions or scratches and against liquidswhen lighted. Turn the bulb on only when installed in a headlight. Replace the headlight if damagedor cracked. Keep the bulb out of the reach of children and dispose of the used bulb with care.