fog light bulb Hyundai Accent 2011 Owner's Manual - RHD (UK. Australia)
[x] Cancel search | Manufacturer: HYUNDAI, Model Year: 2011, Model line: Accent, Model: Hyundai Accent 2011Pages: 232, PDF Size: 8.41 MB
Page 205 of 232
6 DO-IT-YOURSELF MAINTENANCE
24
Headlight
1. Allow the bulb to cool. Wear eye protection.
2. Open the engine bonnet and discon- nect the negative (-) post of the battery.
3. Always grasp the bulb by its plastic base, avoid touching the glass.
4. Disconnect the power cord from the
back of the headlight.
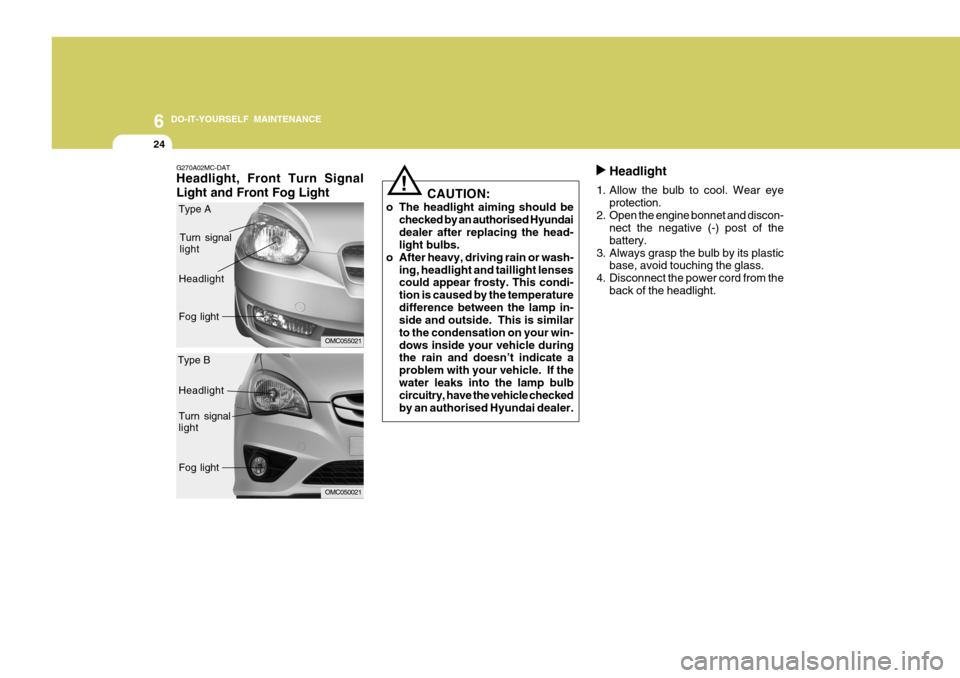
G270A02MC-DAT Headlight, Front Turn Signal Light and Front Fog Light CAUTION:
o The headlight aiming should be checked by an authorised Hyundai dealer after replacing the head- light bulbs.
o After heavy, driving rain or wash- ing, headlight and taillight lensescould appear frosty. This condi- tion is caused by the temperaturedifference between the lamp in- side and outside. This is similar to the condensation on your win-dows inside your vehicle during the rain and doesn’t indicate a problem with your vehicle. If thewater leaks into the lamp bulb circuitry, have the vehicle checked by an authorised Hyundai dealer.
!
OMC055021
Turn signal light
Headlight Fog light
OMC050021
Headlight Turn signal light
Fog light
Type A
Type B
Page 206 of 232
6
DO-IT-YOURSELF MAINTENANCE
25
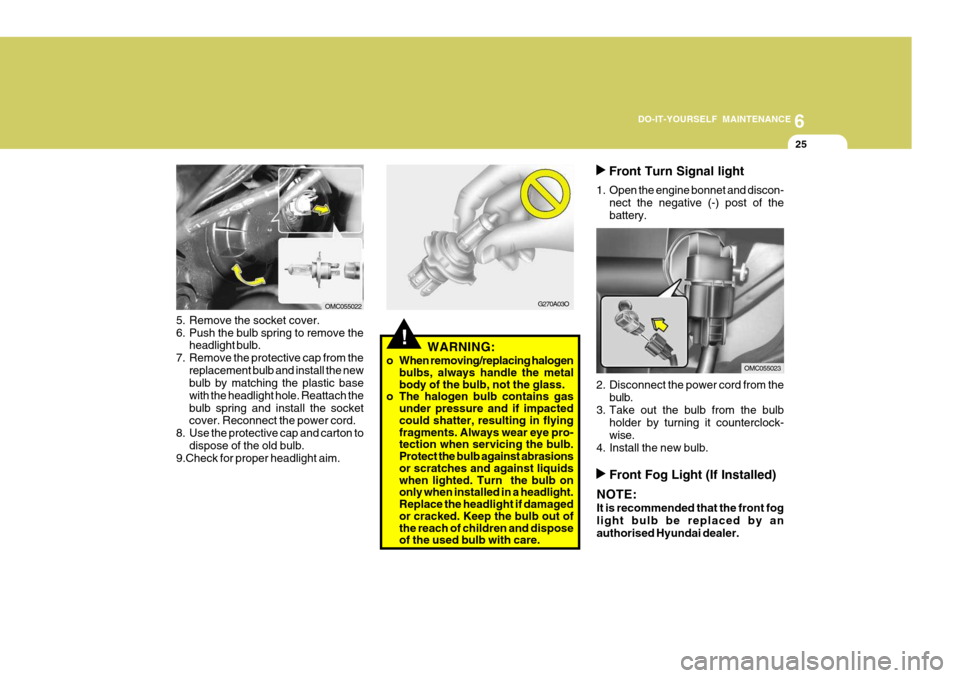
Front Turn Signal light
1. Open the engine bonnet and discon- nect the negative (-) post of the battery.
2. Disconnect the power cord from the bulb.
3. Take out the bulb from the bulb holder by turning it counterclock-wise.
4. Install the new bulb.
G270A03O
!WARNING:
o When removing/replacing halogen bulbs, always handle the metal body of the bulb, not the glass.
o The halogen bulb contains gas
under pressure and if impacted could shatter, resulting in flying fragments. Always wear eye pro- tection when servicing the bulb. Protect the bulb against abrasions or scratches and against liquids when lighted. Turn the bulb on only when installed in a headlight. Replace the headlight if damaged or cracked. Keep the bulb out of the reach of children and dispose of the used bulb with care.
5. Remove the socket cover.
6. Push the bulb spring to remove the
headlight bulb.
7. Remove the protective cap from the replacement bulb and install the new bulb by matching the plastic base with the headlight hole. Reattach thebulb spring and install the socket cover. Reconnect the power cord.
8. Use the protective cap and carton to dispose of the old bulb.
9.Check for proper headlight aim.
OMC055022
OMC055023
Front Fog Light (If Installed)
NOTE: It is recommended that the front fog light bulb be replaced by anauthorised Hyundai dealer.
Page 207 of 232
6 DO-IT-YOURSELF MAINTENANCE
26
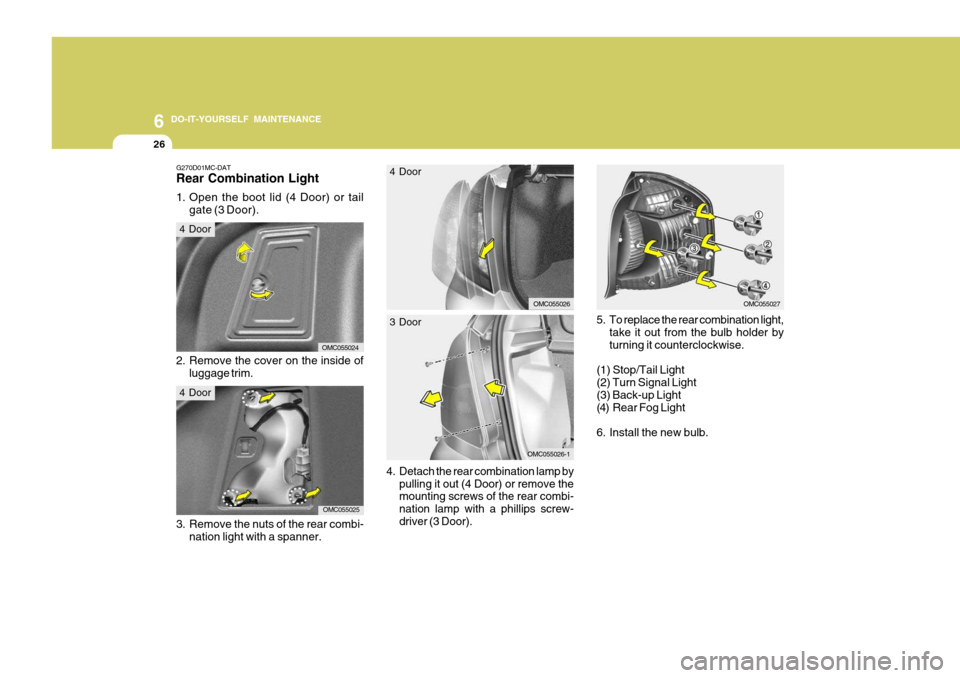
3. Remove the nuts of the rear combi-
nation light with a spanner.
G270D01MC-DAT Rear Combination Light
1. Open the boot lid (4 Door) or tailgate (3 Door).
OMC055024
OMC055025
2. Remove the cover on the inside of
luggage trim.
4 Door
4 Door 5. To replace the rear combination light,
take it out from the bulb holder by turning it counterclockwise.
(1) Stop/Tail Light(2) Turn Signal Light (3) Back-up Light
(4) Rear Fog Light
6. Install the new bulb.
OMC055027OMC055026
4 Door
3 Door
4.
Detach the rear combination lamp by pulling it out (4 Door) or remove the mounting screws of the rear combi- nation lamp with a phillips screw-driver (3 Door).
OMC055026-1
Page 210 of 232
6
DO-IT-YOURSELF MAINTENANCE
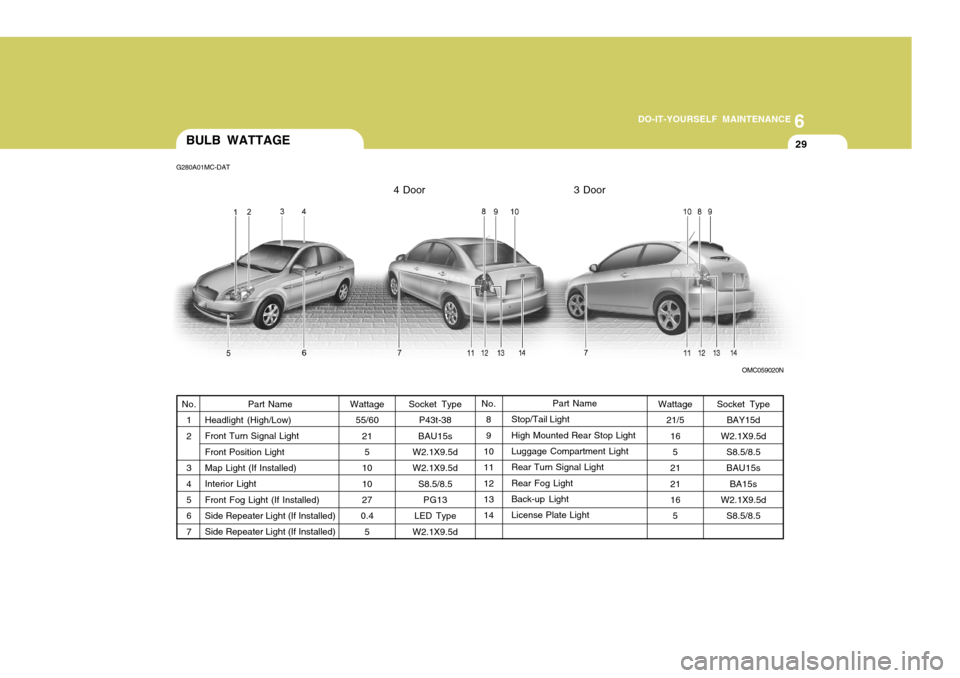
29BULB WATTAGE
G280A01MC-DAT
OMC059020N
Socket Type P43t-38
BAU15s
W2.1X9.5d W2.1X9.5d
S8.5/8.5PG13
LED Type
W2.1X9.5d Part Name
Stop/Tail Light
High Mounted Rear Stop Light Luggage Compartment Light
Rear Turn Signal LightRear Fog Light Back-up Light
License Plate Light
Part Name
Headlight (High/Low) Front Turn Signal Light Front Position LightMap Light (If Installed) Interior Light Front Fog Light (If Installed)Side Repeater Light (If Installed) Side Repeater Light (If Installed)
No.
1 2 3 4 5 67 No.
89
10 11 1213 14
Wattage
55/60 215
10 10 27
0.4
5
Wattage 21/5165
21 21 16 5 Socket Type
BAY15d
W2.1X9.5d S8.5/8.5 BAU15s
BA15s
W2.1X9.5d
S8.5/8.5
4 Door 3 Door