Flasher Hyundai Accent 2013 Owner's Manual
[x] Cancel search | Manufacturer: HYUNDAI, Model Year: 2013, Model line: Accent, Model: Hyundai Accent 2013Pages: 402, PDF Size: 8.49 MB
Page 15 of 402
Your vehicle at a glance
4 2
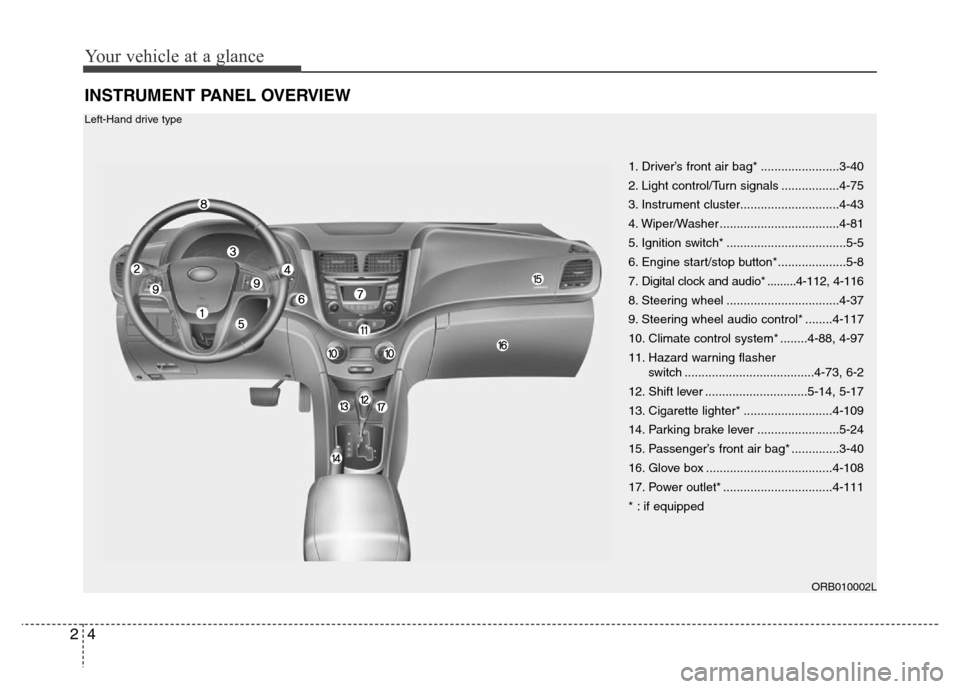
INSTRUMENT PANEL OVERVIEW
1. Driver’s front air bag* .......................3-40
2. Light control/Turn signals .................4-75
3. Instrument cluster.............................4-43
4. Wiper/Washer ...................................4-81
5. Ignition switch* ...................................5-5
6. Engine start/stop button*....................5-8
7. Digital clock and audio* .........4-112, 4-116
8. Steering wheel .................................4-37
9. Steering wheel audio control* ........4-117
10. Climate control system* ........4-88, 4-97
11. Hazard warning flasher
switch ......................................4-73, 6-2
12. Shift lever ..............................5-14, 5-17
13. Cigarette lighter* ..........................4-109
14. Parking brake lever ........................5-24
15. Passenger’s front air bag* ..............3-40
16. Glove box .....................................4-108
17. Power outlet* ................................4-111
* : if equipped
ORB010002L
Left-Hand drive type
Page 16 of 402
25
Your vehicle at a glance
ORB012002R
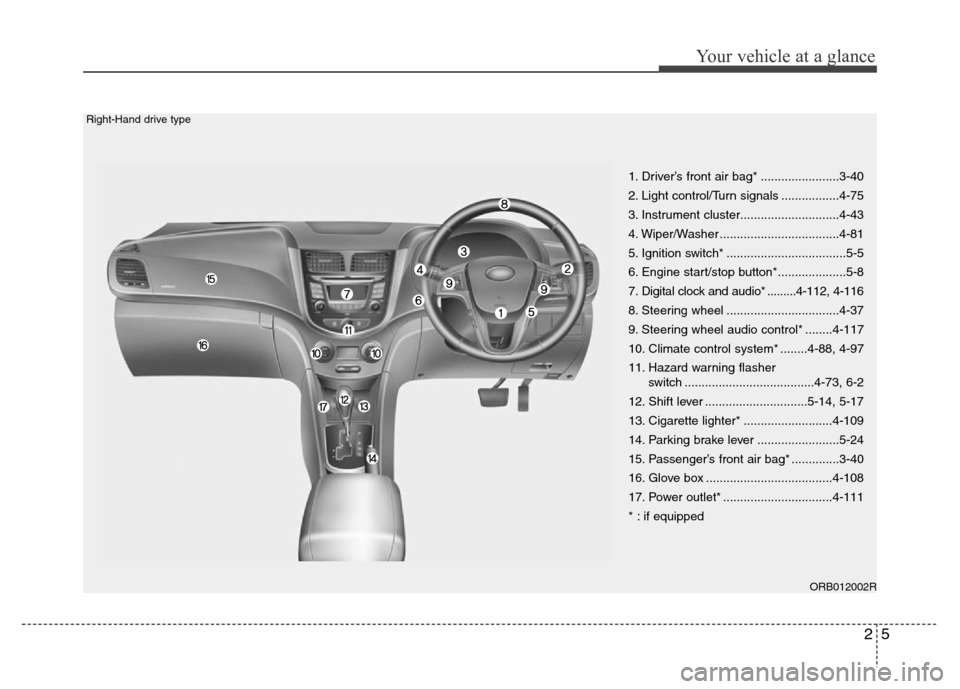
1. Driver’s front air bag* .......................3-40
2. Light control/Turn signals .................4-75
3. Instrument cluster.............................4-43
4. Wiper/Washer ...................................4-81
5. Ignition switch* ...................................5-5
6. Engine start/stop button*....................5-8
7. Digital clock and audio* .........4-112, 4-116
8. Steering wheel .................................4-37
9. Steering wheel audio control* ........4-117
10. Climate control system* ........4-88, 4-97
11. Hazard warning flasher
switch ......................................4-73, 6-2
12. Shift lever ..............................5-14, 5-17
13. Cigarette lighter* ..........................4-109
14. Parking brake lever ........................5-24
15. Passenger’s front air bag* ..............3-40
16. Glove box .....................................4-108
17. Power outlet* ................................4-111
* : if equipped
Right-Hand drive type
Page 71 of 402
4
Keys / 4-3
Smart key / 4-6
Remote keyless entry / 4-10
Door locks / 4-13
Trunk / 4-17
Tailgate / 4-20
Windows / 4-23
Hood / 4-28
Fuel filler lid / 4-30
Sunroof / 4-33
Steering wheel / 4-37
Mirrors / 4-39
Instrument cluster / 4-43
Rear parking assist system / 4-69
Rearview camera / 4-72
Hazard warning flasher / 4-73
Lighting / 4-74
Wipers and washers / 4-81
Interior light / 4-84
Defroster / 4-87
Manual climate control system / 4-88
Automatic climate control system / 4-97
Windshield defrosting and defogging / 4-104
Features of your vehicle
Page 143 of 402
473
Features of your vehicle
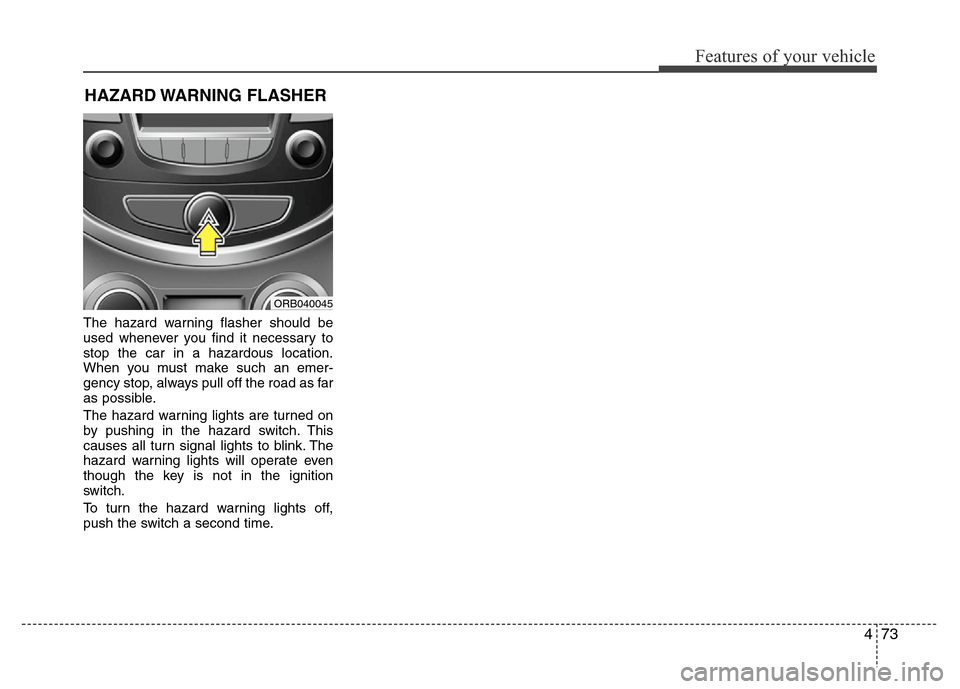
The hazard warning flasher should be
used whenever you find it necessary to
stop the car in a hazardous location.
When you must make such an emer-
gency stop, always pull off the road as far
as possible.
The hazard warning lights are turned on
by pushing in the hazard switch. This
causes all turn signal lights to blink. The
hazard warning lights will operate even
though the key is not in the ignition
switch.
To turn the hazard warning lights off,
push the switch a second time.
HAZARD WARNING FLASHER
ORB040045
Page 261 of 402
541
Driving your vehicle
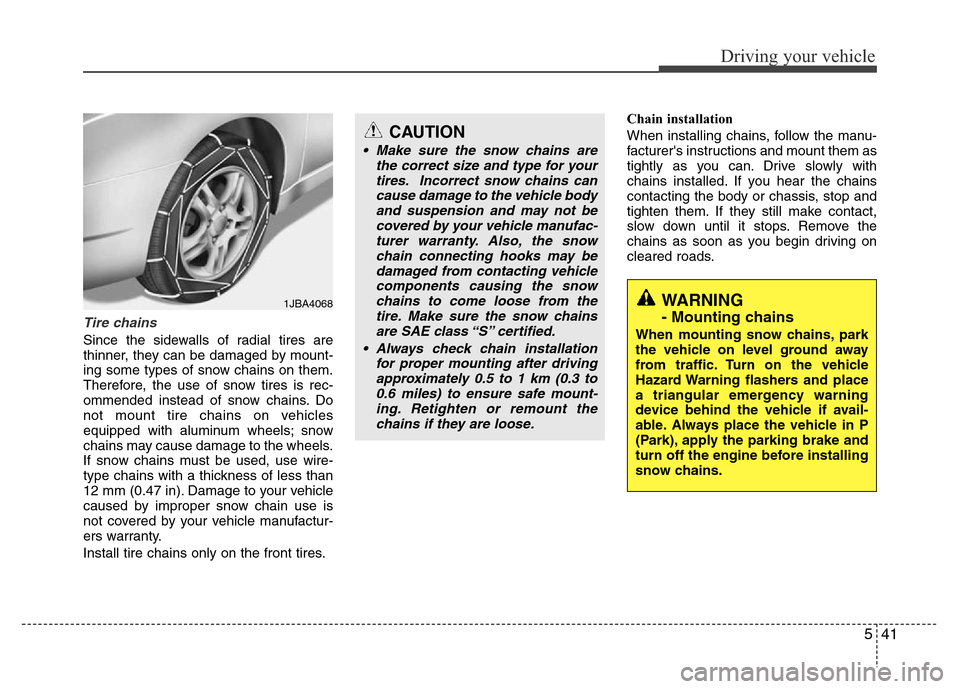
Tire chains
Since the sidewalls of radial tires are
thinner, they can be damaged by mount-
ing some types of snow chains on them.
Therefore, the use of snow tires is rec-
ommended instead of snow chains. Do
not mount tire chains on vehicles
equipped with aluminum wheels; snow
chains may cause damage to the wheels.
If snow chains must be used, use wire-
type chains with a thickness of less than
12 mm (0.47 in). Damage to your vehicle
caused by improper snow chain use is
not covered by your vehicle manufactur-
ers warranty.
Install tire chains only on the front tires.Chain installation
When installing chains, follow the manu-
facturer's instructions and mount them as
tightly as you can. Drive slowly with
chains installed. If you hear the chains
contacting the body or chassis, stop and
tighten them. If they still make contact,
slow down until it stops. Remove the
chains as soon as you begin driving on
cleared roads.
CAUTION
• Make sure the snow chains are
the correct size and type for your
tires. Incorrect snow chains can
cause damage to the vehicle body
and suspension and may not be
covered by your vehicle manufac-
turer warranty. Also, the snow
chain connecting hooks may be
damaged from contacting vehicle
components causing the snow
chains to come loose from the
tire. Make sure the snow chains
are SAE class “S” certified.
• Always check chain installation
for proper mounting after driving
approximately 0.5 to 1 km (0.3 to
0.6 miles) to ensure safe mount-
ing. Retighten or remount the
chains if they are loose.
WARNING
- Mounting chains
When mounting snow chains, park
the vehicle on level ground away
from traffic. Turn on the vehicle
Hazard Warning flashers and place
a triangular emergency warning
device behind the vehicle if avail-
able. Always place the vehicle in P
(Park), apply the parking brake and
turn off the engine before installing
snow chains.
1JBA4068
Page 267 of 402
547
Driving your vehicle
Following distance
Stay at least twice as far behind the vehi-
cle ahead as you would when driving
your vehicle without a trailer. This can
help you avoid situations that require
heavy braking and sudden turns.
Passing
You’ll need more passing distance up
ahead when you’re towing a trailer. And,
because of the increased vehicle length,
you’ll need to go much farther beyond the
passed vehicle before you can return to
your lane.
Backing up
Hold the bottom of the steering wheel
with one hand. Then, to move the trailer
to the left, just move your hand to the left.
To move the trailer to the right, move your
hand to the right. Always back up slowly
and, if possible, have someone guide
you.
Making turns
When you’re turning with a trailer, make
wider turns than normal. Do this so your
trailer won’t strike soft shoulders, curbs,
road signs, trees, or other objects. Avoid
jerky or sudden maneuvers. Signal well
in advance.
Turn signals when towing a trailer
When you tow a trailer, your vehicle has
to have a different turn signal flasher and
extra wiring. The green arrows on your
instrument panel will flash whenever you
signal a turn or lane change. Properly
connected, the trailer lights will also flash
to alert other drivers you’re about to turn,
change lanes, or stop.
When towing a trailer, the green arrows
on your instrument panel will flash for
turns even if the bulbs on the trailer are
burned out. Thus, you may think drivers
behind you are seeing your signals
when, in fact, they are not. It’s important
to check occasionally to be sure the trail-
er bulbs are still working. You must also
check the lights every time you discon-
nect and then reconnect the wires.
Do not connect a trailer lighting system
directly to your vehicle’s lighting system.
Use only an approved trailer wiring har-
ness.
An authorized HYUNDAI dealer can
assist you in installing the wiring har-
ness.
Page 275 of 402
What to do in an emergency
2 6
ROAD WARNING
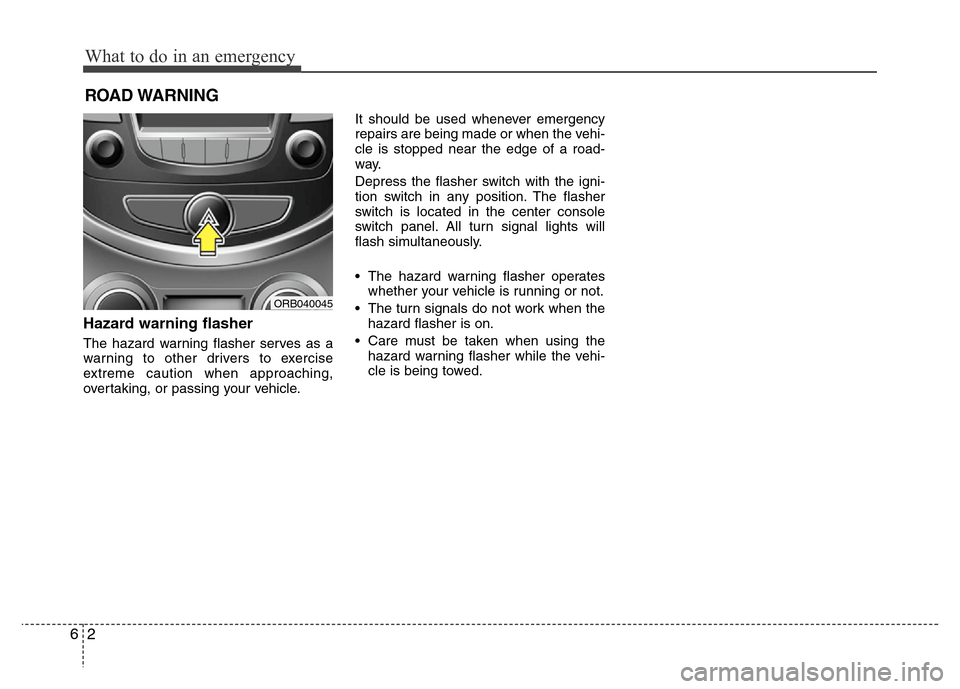
Hazard warning flasher
The hazard warning flasher serves as a
warning to other drivers to exercise
extreme caution when approaching,
overtaking, or passing your vehicle.It should be used whenever emergency
repairs are being made or when the vehi-
cle is stopped near the edge of a road-
way.
Depress the flasher switch with the igni-
tion switch in any position. The flasher
switch is located in the center console
switch panel. All turn signal lights will
flash simultaneously.
• The hazard warning flasher operates
whether your vehicle is running or not.
• The turn signals do not work when the
hazard flasher is on.
• Care must be taken when using the
hazard warning flasher while the vehi-
cle is being towed.
ORB040045
Page 276 of 402
63
What to do in an emergency
IN CASE OF AN EMERGENCY WHILE DRIVING
If the engine stalls at a crossroad
or crossing
• If the engine stalls at a crossroad or
crossing, set the shift lever in the N
(Neutral) position and then push the
vehicle to a safe place.
• If your vehicle has a manual transaxle
not equipped with a ignition lock
switch, the vehicle can move forward
by shifting to the 2(second) or 3(third)
gear and then turning the starter with-
out depressing the clutch pedal.
If you have a flat tire while driving
If a tire goes flat while you are driving:
1. Take your foot off the accelerator pedal
and let the car slow down while driving
straight ahead. Do not apply the brakes
immediately or attempt to pull off the
road as this may cause a loss of con-
trol. When the car has slowed to such
a speed that it is safe to do so, brake
carefully and pull off the road. Drive off
the road as far as possible and park on
firm, level ground. If you are on a divid-
ed highway, do not park in the median
area between the two traffic lanes.
2. When the vehicle is stopped, turn on
your emergency hazard flashers, set
the parking brake and put the transaxle
in P (automatic transaxle) or reverse
(manual transaxle).
3. Have all passengers get out of the car.
Be sure they all get out on the side of
the car that is away from traffic.
4. When changing a flat tire, follow the
instruction provided later in this sec-
tion.
If engine stalls while driving
1. Reduce your speed gradually, keeping
a straight line. Move cautiously off the
road to a safe place.
2. Turn on your emergency flashers.
3. Try to start the engine again. If your
vehicle will not start, contact an
authorized HYUNDAI dealer or seek
other qualified assistance.
Page 298 of 402
77
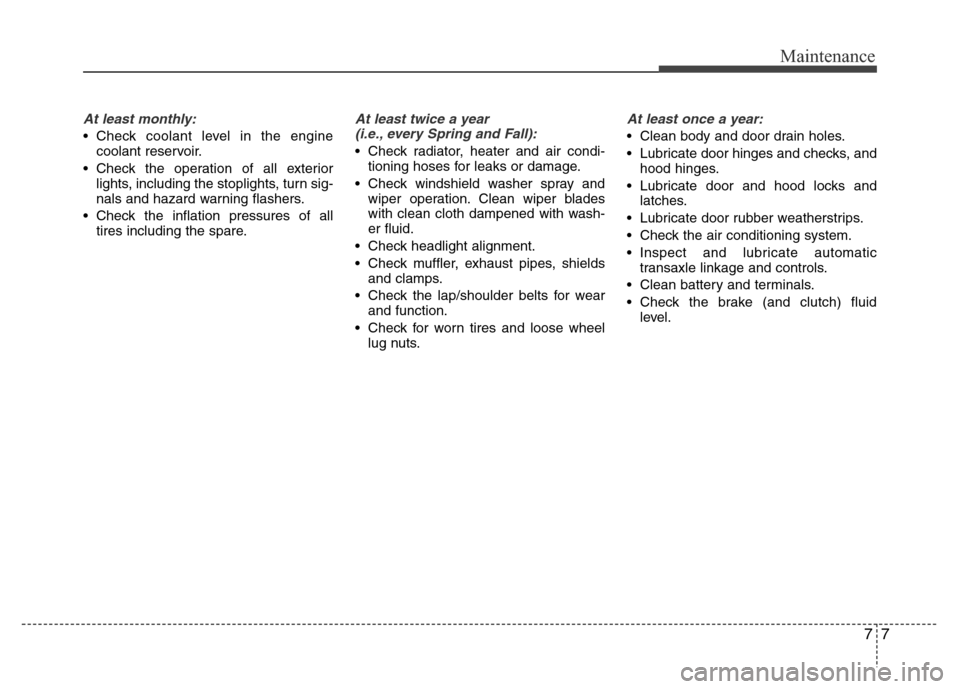
Maintenance
At least monthly:
• Check coolant level in the engine
coolant reservoir.
• Check the operation of all exterior
lights, including the stoplights, turn sig-
nals and hazard warning flashers.
• Check the inflation pressures of all
tires including the spare.
At least twice a year
(i.e., every Spring and Fall):
• Check radiator, heater and air condi-
tioning hoses for leaks or damage.
• Check windshield washer spray and
wiper operation. Clean wiper blades
with clean cloth dampened with wash-
er fluid.
• Check headlight alignment.
• Check muffler, exhaust pipes, shields
and clamps.
• Check the lap/shoulder belts for wear
and function.
• Check for worn tires and loose wheel
lug nuts.
At least once a year:
• Clean body and door drain holes.
• Lubricate door hinges and checks, and
hood hinges.
• Lubricate door and hood locks and
latches.
• Lubricate door rubber weatherstrips.
• Check the air conditioning system.
• Inspect and lubricate automatic
transaxle linkage and controls.
• Clean battery and terminals.
• Check the brake (and clutch) fluid
level.