light Hyundai Accent 2013 Owner's Manual
[x] Cancel search | Manufacturer: HYUNDAI, Model Year: 2013, Model line: Accent, Model: Hyundai Accent 2013Pages: 402, PDF Size: 8.49 MB
Page 7 of 402
Introduction
2 1
We want to help you get the greatest
possible driving pleasure from your vehi-
cle. Your Owner’s Manual can assist you
in many ways. We strongly recommend
that you read the entire manual. In order
to minimize the chance of death or injury,
you must read the WARNING and CAU-
TION sections in the manual.
Illustrations complement the words in this
manual to best explain how to enjoy your
vehicle. By reading your manual, you
learn about features, important safety
information, and driving tips under vari-
ous road conditions.
The general layout of the manual is pro-
vided in the Table of Contents. A good
place to start is the index; it has an alpha-
betical listing of all information in your
manual.
Sections: This manual has eight sections
plus an index. Each section begins with a
brief list of contents so you can tell at a
glance if that section has the information
you want.You will find various WARNINGs,
CAUTIONs, and NOTICEs in this manu-
al. These WARNINGs were prepared to
enhance your personal safety. You should
carefully read and follow ALL procedures
and recommendations provided in these
WARNINGs, CAUTIONs and NOTICEs.
✽ NOTICE
A NOTICE indicates interesting or help-
ful information is being provided.
Gasoline engine
Unleaded
For Europe
For the optimal vehicle performance, we
recommend you to use unleaded gaso-
line with an octane rating of RON
(Research Octane Number) 95/AKI (Anti
Knock Index) 91 or higher.
You may use unleaded gasoline with an
octane rating of RON 91~94/AKI 87~90
but it may result in slight performance
reduction of the vehicle.
Except Europe
Your new vehicle is designed to use only
unleaded fuel having an Octane Rating
of RON (Research Octane Number) 91/
AKI (Anti-Knock Index) 87 or higher.
Your new vehicle is designed to obtain
maximum performance with UNLEADED
FUEL, as well as minimize exhaust emis-
sions and spark plug fouling.
HOW TO USE THIS MANUAL
WARNING
A WARNING indicates a situation in
which harm, serious bodily injury or
death could result if the warning is
ignored.
CAUTION
A CAUTION indicates a situation in
which damage to your vehicle could
result if the caution is ignored.
FUEL REQUIREMENTS
Page 13 of 402
Your vehicle at a glance
2 2
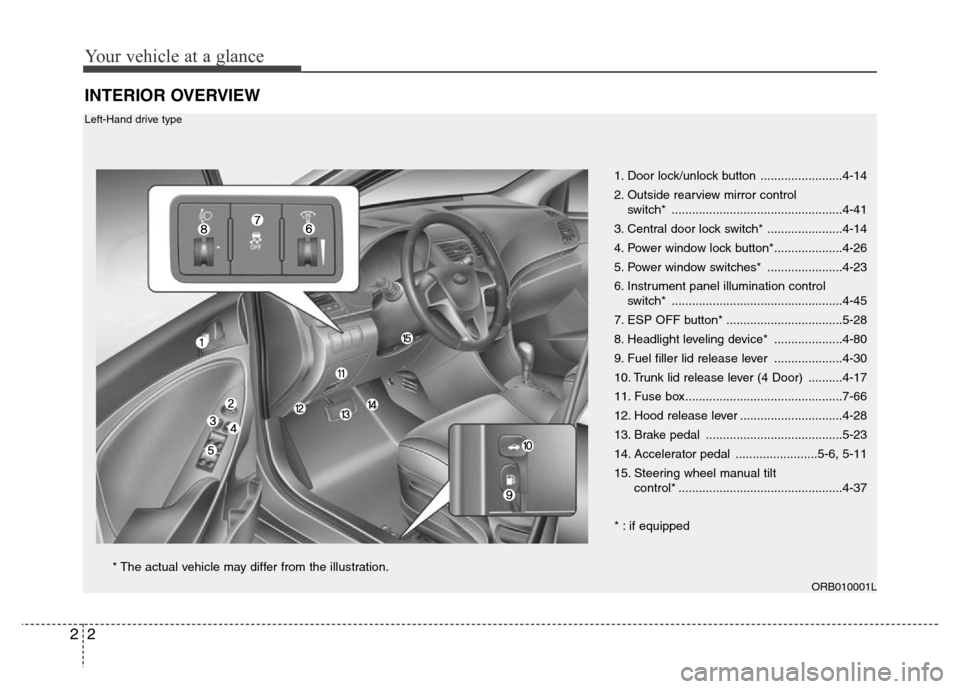
INTERIOR OVERVIEW
1. Door lock/unlock button ........................4-14
2. Outside rearview mirror control
switch* ..................................................4-41
3. Central door lock switch* ......................4-14
4. Power window lock button*....................4-26
5. Power window switches* ......................4-23
6. Instrument panel illumination control
switch* ..................................................4-45
7. ESP OFF button* ..................................5-28
8. Headlight leveling device* ....................4-80
9. Fuel filler lid release lever ....................4-30
10. Trunk lid release lever (4 Door) ..........4-17
11. Fuse box..............................................7-66
12. Hood release lever ..............................4-28
13. Brake pedal ........................................5-23
14. Accelerator pedal ........................5-6, 5-11
15. Steering wheel manual tilt
control* ................................................4-37
* : if equipped
ORB010001L
* The actual vehicle may differ from the illustration.
Left-Hand drive type
Page 14 of 402
23
Your vehicle at a glance
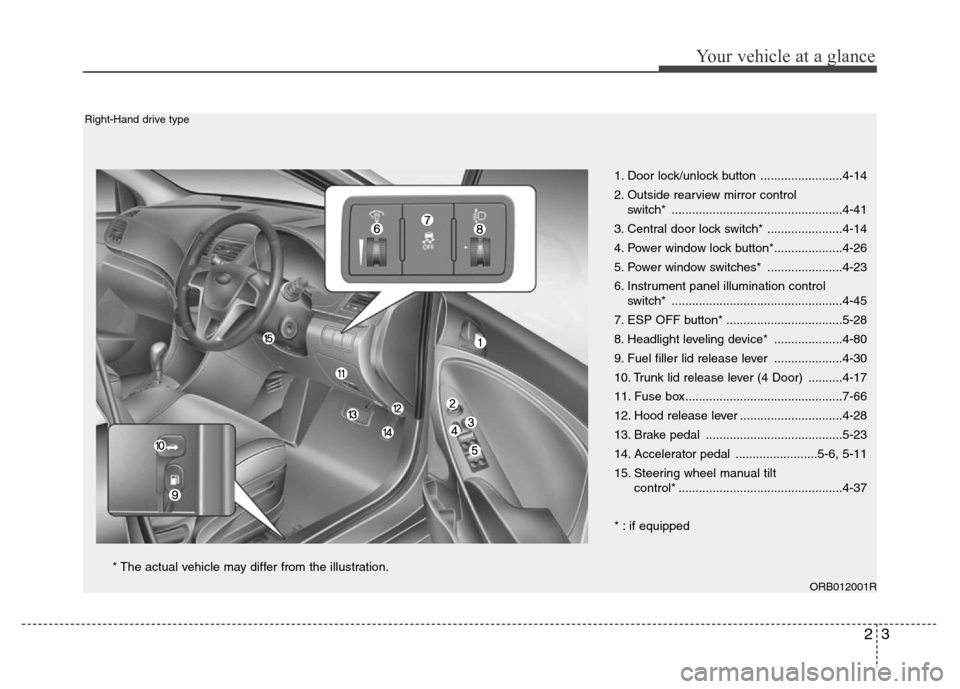
1. Door lock/unlock button ........................4-14
2. Outside rearview mirror control
switch* ..................................................4-41
3. Central door lock switch* ......................4-14
4. Power window lock button*....................4-26
5. Power window switches* ......................4-23
6. Instrument panel illumination control
switch* ..................................................4-45
7. ESP OFF button* ..................................5-28
8. Headlight leveling device* ....................4-80
9. Fuel filler lid release lever ....................4-30
10. Trunk lid release lever (4 Door) ..........4-17
11. Fuse box..............................................7-66
12. Hood release lever ..............................4-28
13. Brake pedal ........................................5-23
14. Accelerator pedal ........................5-6, 5-11
15. Steering wheel manual tilt
control* ................................................4-37
* : if equipped
ORB012001R
* The actual vehicle may differ from the illustration.
Right-Hand drive type
Page 15 of 402
Your vehicle at a glance
4 2
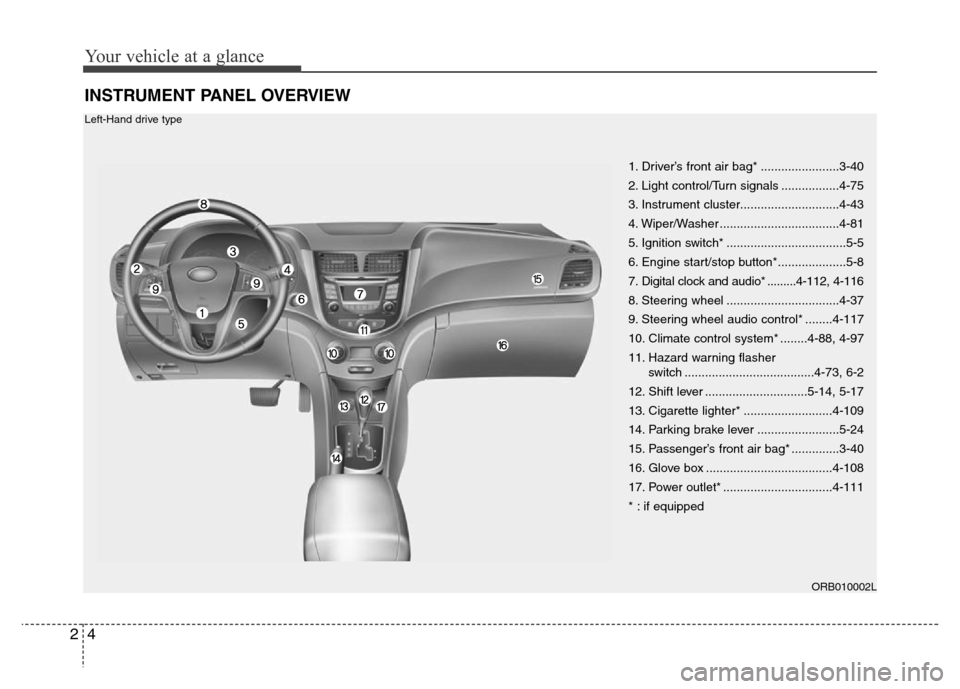
INSTRUMENT PANEL OVERVIEW
1. Driver’s front air bag* .......................3-40
2. Light control/Turn signals .................4-75
3. Instrument cluster.............................4-43
4. Wiper/Washer ...................................4-81
5. Ignition switch* ...................................5-5
6. Engine start/stop button*....................5-8
7. Digital clock and audio* .........4-112, 4-116
8. Steering wheel .................................4-37
9. Steering wheel audio control* ........4-117
10. Climate control system* ........4-88, 4-97
11. Hazard warning flasher
switch ......................................4-73, 6-2
12. Shift lever ..............................5-14, 5-17
13. Cigarette lighter* ..........................4-109
14. Parking brake lever ........................5-24
15. Passenger’s front air bag* ..............3-40
16. Glove box .....................................4-108
17. Power outlet* ................................4-111
* : if equipped
ORB010002L
Left-Hand drive type
Page 16 of 402
25
Your vehicle at a glance
ORB012002R
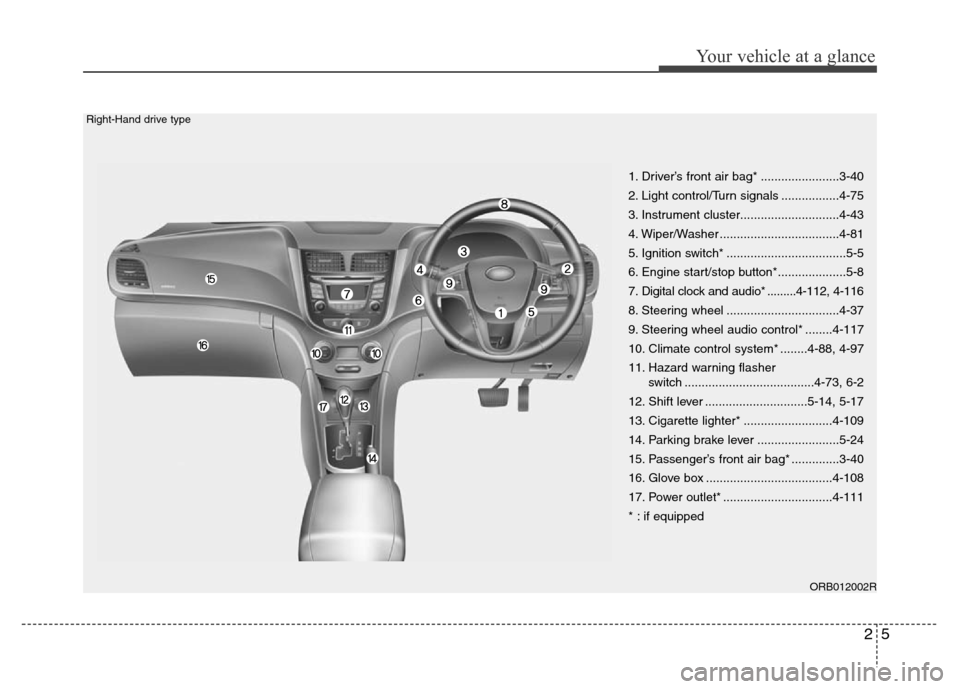
1. Driver’s front air bag* .......................3-40
2. Light control/Turn signals .................4-75
3. Instrument cluster.............................4-43
4. Wiper/Washer ...................................4-81
5. Ignition switch* ...................................5-5
6. Engine start/stop button*....................5-8
7. Digital clock and audio* .........4-112, 4-116
8. Steering wheel .................................4-37
9. Steering wheel audio control* ........4-117
10. Climate control system* ........4-88, 4-97
11. Hazard warning flasher
switch ......................................4-73, 6-2
12. Shift lever ..............................5-14, 5-17
13. Cigarette lighter* ..........................4-109
14. Parking brake lever ........................5-24
15. Passenger’s front air bag* ..............3-40
16. Glove box .....................................4-108
17. Power outlet* ................................4-111
* : if equipped
Right-Hand drive type
Page 22 of 402
Safety features of your vehicle
4 3
Front seat
Manual adjustment
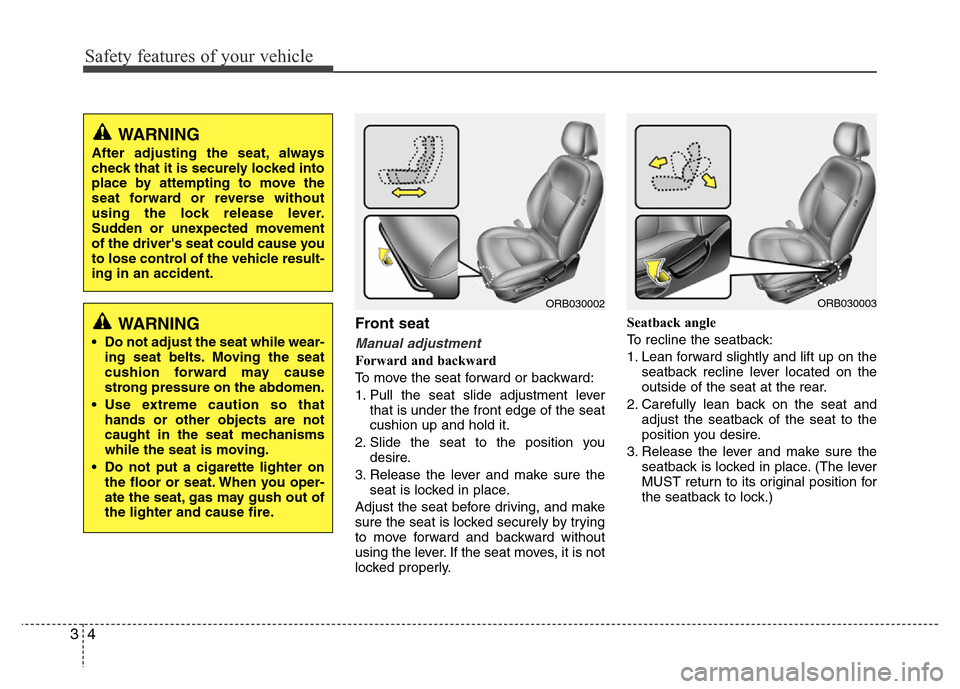
Forward and backward
To move the seat forward or backward:
1. Pull the seat slide adjustment lever
that is under the front edge of the seat
cushion up and hold it.
2. Slide the seat to the position you
desire.
3. Release the lever and make sure the
seat is locked in place.
Adjust the seat before driving, and make
sure the seat is locked securely by trying
to move forward and backward without
using the lever. If the seat moves, it is not
locked properly.Seatback angle
To recline the seatback:
1. Lean forward slightly and lift up on the
seatback recline lever located on the
outside of the seat at the rear.
2. Carefully lean back on the seat and
adjust the seatback of the seat to the
position you desire.
3. Release the lever and make sure the
seatback is locked in place. (The lever
MUST return to its original position for
the seatback to lock.)
ORB030003ORB030002
WARNING
After adjusting the seat, always
check that it is securely locked into
place by attempting to move the
seat forward or reverse without
using the lock release lever.
Sudden or unexpected movement
of the driver's seat could cause you
to lose control of the vehicle result-
ing in an accident.
WARNING
• Do not adjust the seat while wear-
ing seat belts. Moving the seat
cushion forward may cause
strong pressure on the abdomen.
• Use extreme caution so that
hands or other objects are not
caught in the seat mechanisms
while the seat is moving.
• Do not put a cigarette lighter on
the floor or seat. When you oper-
ate the seat, gas may gush out of
the lighter and cause fire.
Page 30 of 402
Safety features of your vehicle
12 3
Seat belt warning (if equipped)
■Ty p e A
As a reminder to the driver, the seat belt
warning light will blink for approximately
6 seconds each time you turn the ignition
switch ON regardless of belt fastening.
If the driver’s seat belt is unfastened after
the ignition switch is ON, the seat belt
warning light blinks again for approxi-
mately 6 seconds.
If the driver's seat belt is not fastened
when the ignition switch is turned ON or
if it is unfastened after the ignition switch
is ON, the seat belt warning chime will
sound for approximately 6 seconds. At
this time, if the seat belt is fastened, the
chime will stop at once. (if equipped)
■ Ty p e B
As a reminder to the driver, the driver’s
seat belt warning lights will illuminate for
approximately 6 seconds each time you
turn the ignition switch ON regardless of
belt fastening.
If the driver’s seat belt is not fastened
when the ignition switch is turned ON or
if it is disconnected after the ignition
switch is turned ON, the seat belt warn-
ing light will illuminate until the belt is fas-
tened.
If you continue not to fasten the seat belt
and you drive over 9 km/h, the illuminat-
ed warning light will start to blink until you
drive under 6 km/h.
If you continue not to fasten the seat belt
and you drive over 20 km/h (12 mph) the
seat belt warning chime will sound for
approximately 100 seconds and the cor-
responding warning light will blink.
1GQA2083
WARNING
• No modifications or additions
should be made by the user
which will either prevent the seat
belt adjusting devices from oper-
ating to remove slack, or prevent
the seat belt assembly from being
adjusted to remove slack.
• When you fasten the seat belt, be
careful not to latch the seat belt in
buckles of other seat. It's very dan-
gerous and you may not be pro-
tected by the seat belt properly.
• Do not unfasten the seat belt and
do not fasten and unfasten the
seat belt repeatedly while driving.
This could result in loss of con-
trol, and an accident causing
death, serious injury, or property
damage.
• When fastening the seat belt,
make sure that the seat belt does
not pass over objects that are
hard or can break easily.
• Make sure there is nothing in the
buckle. The seat belt may not be
fastened securely.
Page 36 of 402
Safety features of your vehicle
18 3
Pre-tensioner seat belt
(if equipped)
Your vehicle is equipped with driver's and
front passenger's pre-tensioner seat
belts. The purpose of the pre-tensioner is
to make sure that the seat belts fit tightly
against the occupant's body in certain
frontal collisions. The pre-tensioner seat
belts may be activated in crashes where
the frontal collision is severe enough.When the vehicle stops suddenly, or if
the occupant tries to lean forward too
quickly, the seat belt retractor will lock
into position. In certain frontal collisions,
the pre-tensioner will activate and pull
the seat belt into tighter contact against
the occupant's body.
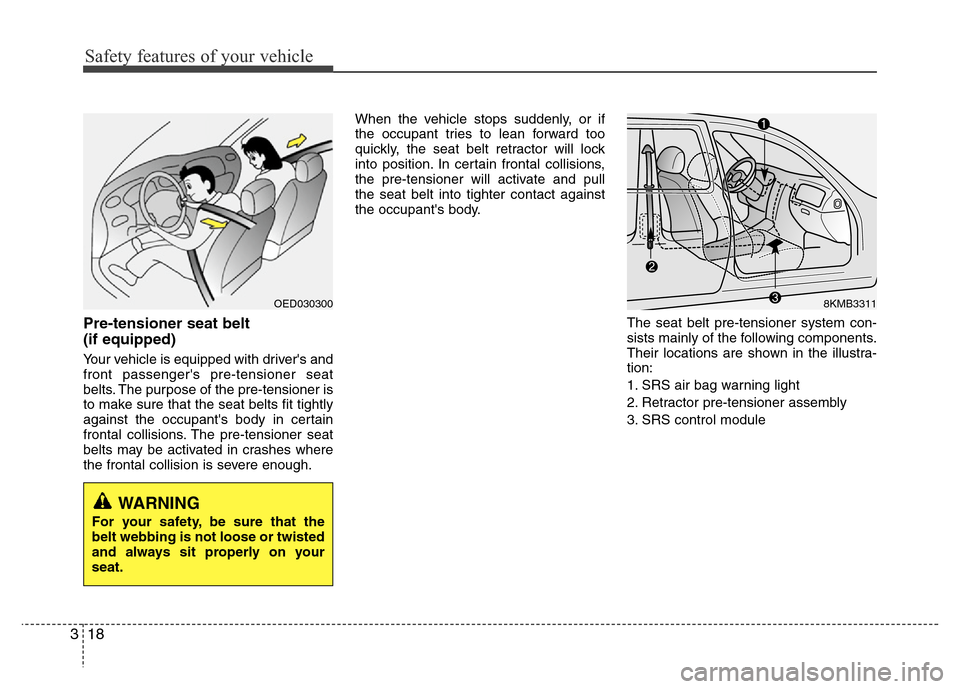
The seat belt pre-tensioner system con-
sists mainly of the following components.
Their locations are shown in the illustra-
tion:
1. SRS air bag warning light
2. Retractor pre-tensioner assembly
3. SRS control module
OED030300
WARNING
For your safety, be sure that the
belt webbing is not loose or twisted
and always sit properly on your
seat.
8KMB3311
Page 37 of 402
319
Safety features of your vehicle
✽NOTICE
• When the pre-tensioner seat belts are
activated, a loud noise may be heard
and fine dust, which may appear to be
smoke, may be visible in the passenger
compartment. These are normal oper-
ating conditions and are not haz-
ardous.
• Although it is harmless, the fine dust
may cause skin irritation and should
not be breathed for prolonged peri-
ods. Wash all exposed skin areas thor-
oughly after an accident in which the
pre-tensioner seat belts were activat-
ed.
• Because the sensor that activates the
SRS air bag is connected with the pre-
tensioner seat belt, the SRS air bag
warning light on the instrument
panel will illuminate for approximate-
ly 6 seconds after the ignition switch
has been turned to the ON position,
and then it should turn off.WARNING
To obtain maximum benefit from a
pre-tensioner seat belt:
1. The seat belt must be worn cor-
rectly and adjusted to the proper
position. Please read and follow
all of the important information
and precautions about your vehi-
cle’s occupant safety features –
including seat belts and air bags
– that are provided in this manu-
al.
2. Be sure you and your passen-
gers always wear seat belts prop-
erly.
CAUTION
If the pre-tensioner seat belt is not
working properly, this warning light
will illuminate even if there is no
malfunction of the SRS air bag. If
the SRS air bag warning light does
not illuminate when the ignition
switch is turned to ON, or if it
remains illuminated after illuminat-
ing for approximately 6 seconds, or
if it illuminates while the vehicle is
being driven, have an authorized
HYUNDAI dealer inspect the pre-
tensioner seat belt and SRS air bag
system as soon as possible.
Page 39 of 402
321
Safety features of your vehicle
Infant or small child
You should be aware of the specific
requirements in your country. Child
and/or infant seats must be properly
placed and installed in the rear seat. For
more information about the use of these
restraints, refer to “Child restraint sys-
tem” in this section.✽NOTICE
Small children are best protected from
injury in an accident when properly
restrained in the rear seat by a child
restraint system that meets the require-
ments of the Safety Standards of your
country. Before buying any child
restraint system, make sure that it has a
label certifying that it meets Safety
Standards of your country. The restraint
must be appropriate for your child's
height and weight. Check the label on
the child restraint for this information.
Refer to “Child restraint system” in this
section.
Larger children
Children who are too large for child
restraint systems should always occupy
the rear seat and use the available
lap/shoulder belts. The lap portion should
be fastened snug on the hips and as low
as possible. Check belt fit periodically. A
child's squirming could put the belt out of
position. Children are afforded the most
safety in the event of an accident when
they are restrained by a proper restraint
system in the rear seat. If a larger child
(over age 12) must be seated in the front
seat, the child should be securely
restrained by the available lap/shoulder
belt and the seat should be placed in the
rearmost position. Children age 12 and
under should be restrained securely in
the rear seat. NEVER place a child age
12 and under in the front seat. NEVER
place a rear facing child seat in the front
seat of a vehicle.
If the shoulder belt portion slightly touch-
es the child’s neck or face, try placing the
child closer to the center of the vehicle. If
the shoulder belt still touches their face
or neck they need to be returned to a
child restraint system.
WARNING
Every person in your vehicle needs
to be properly restrained at all
times, including infants and chil-
dren. Never hold a child in your
arms or lap when riding in a vehi-
cle. The violent forces created dur-
ing a crash will tear the child from
your arms and throw the child
against the interior. Always use a
child restraint appropriate for your
child's height and weight.