lock Hyundai Accent 2014 Owner's Manual
[x] Cancel search | Manufacturer: HYUNDAI, Model Year: 2014, Model line: Accent, Model: Hyundai Accent 2014Pages: 406, PDF Size: 33.11 MB
Page 10 of 406
13
Introduction
Your new vehicle is designed to use only
unleaded fuel having a pump octane
number ((R+M)/2) of 87 (Research
Octane Number 91) or higher.
Your new vehicle is designed to obtain
maximum performance with UNLEADED
FUEL, as well as minimize exhaust emis-
sions and spark plug fouling.Gasoline containing alcohol and
methanol
Gasohol, a mixture of gasoline and
ethanol (also known as grain alcohol),
and gasoline or gasohol containing
methanol (also known as wood alcohol)
are being marketed along with or instead
of leaded or unleaded gasoline.
Do not use gasohol containing more than
10% ethanol, and do not use gasoline or
gasohol containing any methanol. Either
of these fuels may cause drivability prob-
lems and damage to the fuel system.
Discontinue using gasohol of any kind if
drivability problems occur.
Vehicle damage or drivability problems
may not be covered by the manufacturer’s
warranty if they result from the use of:
1. Gasohol containing more than 10%
ethanol.
2. Gasoline or gasohol containing
methanol.
3. Leaded fuel or leaded gasohol."E85" fuel is an alternative fuel com-
prised of 85 percent ethanol and 15 per-
cent gasoline, and is manufactured
exclusively for use in Flexible Fuel
Vehicles. “E85” is not compatible with
your vehicle. Use of “E85” may result in
poor engine performance and damage to
your vehicle's engine and fuel system.
HYUNDAI recommends that customers
do not use fuel with an ethanol content
exceeding 10 percent.
FUEL REQUIREMENTS
CAUTION
Never add any fuel system cleaning
agents to the fuel tank other than
what has been specified. (Consult
an authorized HYUNDAI dealer for
details.)
WARNING
• Do not "top off" after the nozzle
automatically shuts off when
refueling.
Tighten the cap fully clockwise
until it clicks one time and stops
turning, otherwise the fuel cap
open warning light " " will illu-
minate.
Always check that the fuel cap is
installed securely to prevent fuel
spillage in the event of an acci-
dent.CAUTION
Never use gasohol which contains
methanol. Discontinue use of any
gasohol product which impairs dri-
vability.
CAUTION
Your New Vehicle Limited Warranty
does not cover damage to the fuel
system or any performance prob-
lems caused by the use of “E85” fuel.
Page 15 of 406
Your vehicle at a glance
2 2
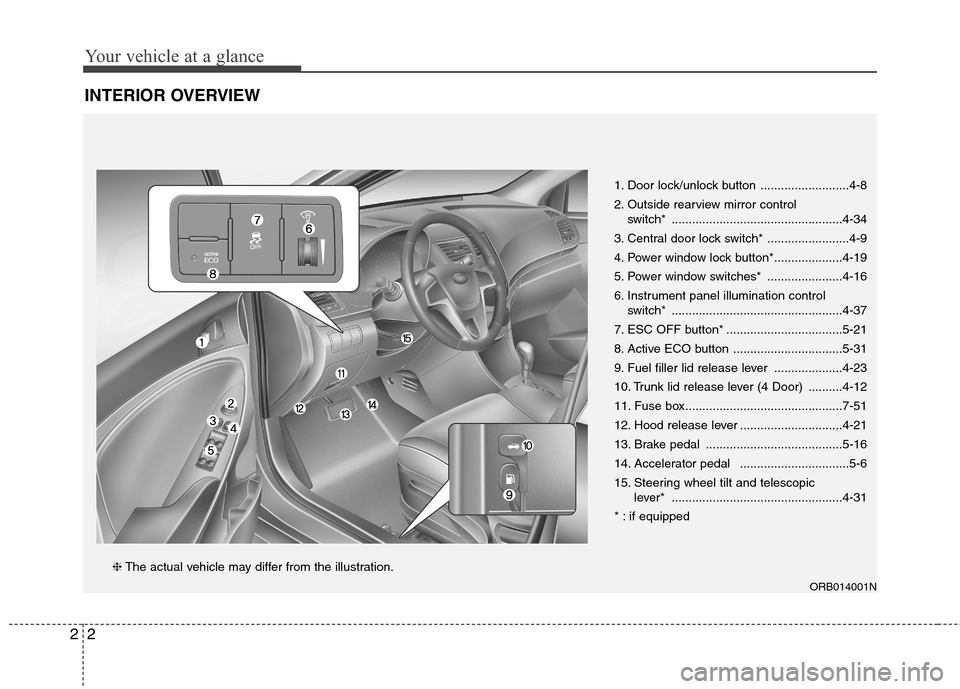
INTERIOR OVERVIEW
1. Door lock/unlock button ..........................4-8
2. Outside rearview mirror control
switch* ..................................................4-34
3. Central door lock switch* ........................4-9
4. Power window lock button*....................4-19
5. Power window switches* ......................4-16
6. Instrument panel illumination control
switch* ..................................................4-37
7. ESC OFF button* ..................................5-21
8. Active ECO button ................................5-31
9. Fuel filler lid release lever ....................4-23
10. Trunk lid release lever (4 Door) ..........4-12
11. Fuse box..............................................7-51
12. Hood release lever ..............................4-21
13. Brake pedal ........................................5-16
14. Accelerator pedal ................................5-6
15. Steering wheel tilt and telescopic
lever* ..................................................4-31
* : if equipped
❈The actual vehicle may differ from the illustration.
ORB014001N
Page 16 of 406
23
Your vehicle at a glance
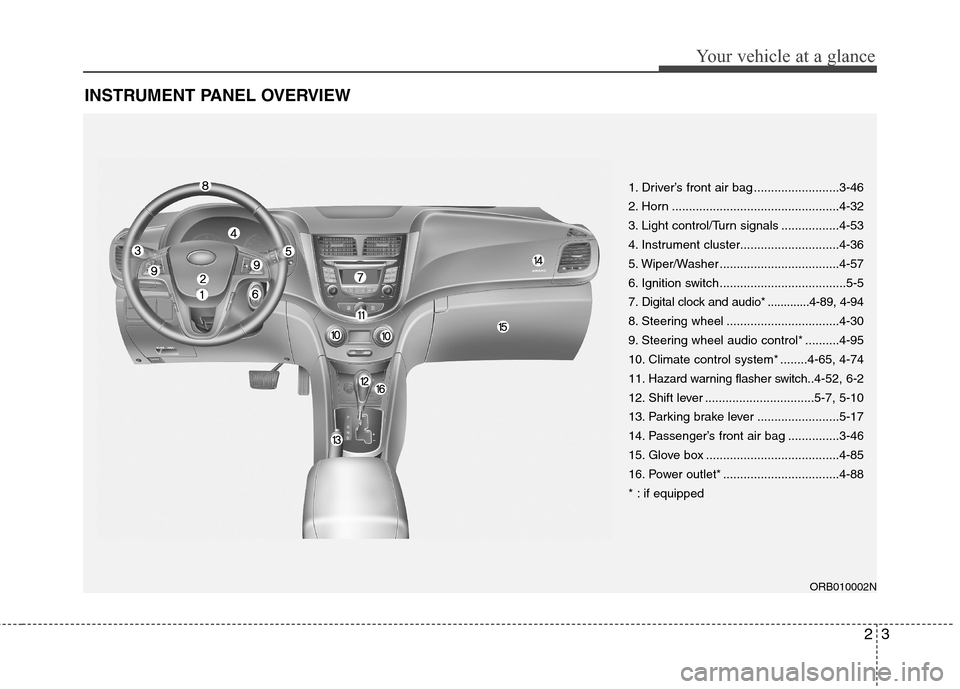
INSTRUMENT PANEL OVERVIEW
1. Driver’s front air bag .........................3-46
2. Horn .................................................4-32
3. Light control/Turn signals .................4-53
4. Instrument cluster.............................4-36
5. Wiper/Washer ...................................4-57
6. Ignition switch .....................................5-5
7. Digital clock and audio* .............4-89, 4-94
8. Steering wheel .................................4-30
9. Steering wheel audio control* ..........4-95
10. Climate control system* ........4-65, 4-74
11. Hazard warning flasher switch..4-52, 6-2
12. Shift lever ................................5-7, 5-10
13. Parking brake lever ........................5-17
14. Passenger’s front air bag ...............3-46
15. Glove box .......................................4-85
16. Power outlet* ..................................4-88
* : if equipped
ORB010002N
Page 20 of 406
33
Safety features of your vehicle
WARNING- Driver’s seat
Never attempt to adjust the seat
while the vehicle is moving. This
could result in loss of control,
and an accident causing death,
serious injury, or property dam-
age.
Do not allow anything to interfere
with the normal position of the
seatback. Storing items against a
seatback or in any other way
interfering with proper locking of
a seatback could result in serious
or fatal injury in a sudden stop or
collision.
seatback upright and the lap por-
tion of the seat belt snug and low
across the hips. This is the best
position to protect you in case of
an accident.
In order to avoid unnecessary
and perhaps severe air bag
injuries, always sit as far back as
possible from the steering wheel
while maintaining comfortable
control of the vehicle. We recom-
mend that your chest be at least
10 inches (250 mm) away from
the steering wheel.
WARNING- Loose objects
Loose objects in the driver’s foot
area could interfere with the opera-
tion of the foot pedals, possibly
causing an accident. Do not place
anything under the front seats.
WARNING- Driver respon-
sibility for passengers
Riding in a vehicle with the seat-
back reclined could lead to serious
or fatal injury in an accident. If a
seat is reclined during an accident,
the occupant’s hips may slide
under the lap portion of the seat
belt, applying great force to the
unprotected abdomen. Serious or
fatal internal injuries could result.
The driver must advise the passen-
ger to keep the seatback in an
upright position whenever the vehi-
cle is in motion.
WARNING - Uprighting
seat
When you return the seatback to its
upright position, hold the seatback
and return it slowly and be sure
there are no other occupants
around the seat. If the seatback is
returned without being held and
controlled, the back of the seat
could spring forward resulting in
accidental injury to a person struck
by the seatback.
WARNING
Do not use a sitting cushion that
reduces friction between the seat
and passenger. The passenger's
hips may slide under the lap por-
tion of the seat belt during an acci-
dent or a sudden stop. Serious or
fatal internal injuries could result
because the seat belt can't operate
normally.
Page 21 of 406
Safety features of your vehicle
4 3
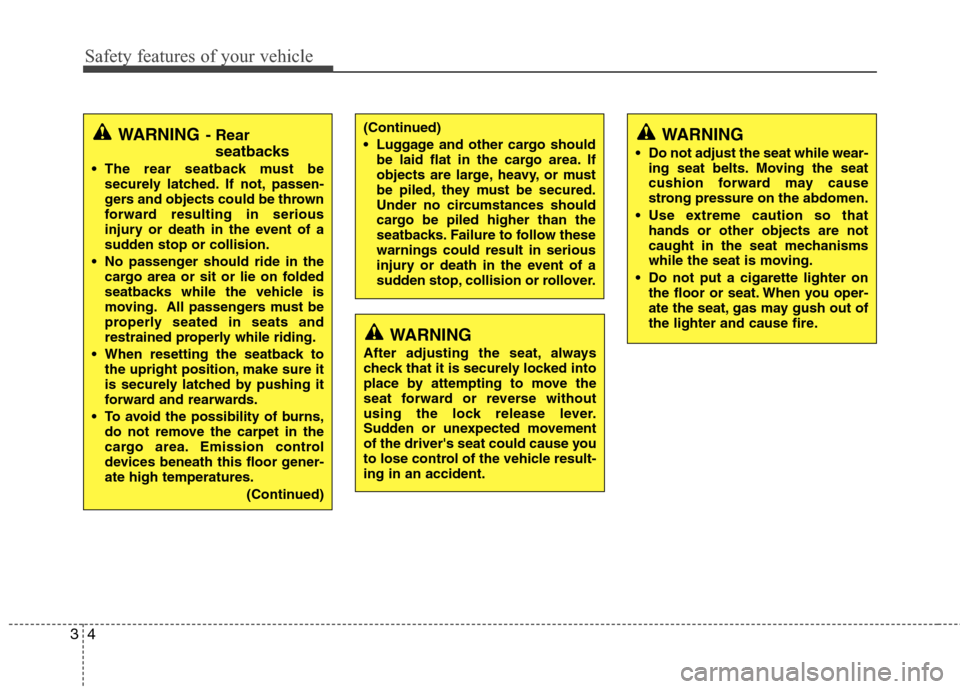
(Continued)
Luggage and other cargo should
be laid flat in the cargo area. If
objects are large, heavy, or must
be piled, they must be secured.
Under no circumstances should
cargo be piled higher than the
seatbacks. Failure to follow these
warnings could result in serious
injury or death in the event of a
sudden stop, collision or rollover.WARNING- Rear
seatbacks
The rear seatback must be
securely latched. If not, passen-
gers and objects could be thrown
forward resulting in serious
injury or death in the event of a
sudden stop or collision.
No passenger should ride in the
cargo area or sit or lie on folded
seatbacks while the vehicle is
moving. All passengers must be
properly seated in seats and
restrained properly while riding.
When resetting the seatback to
the upright position, make sure it
is securely latched by pushing it
forward and rearwards.
To avoid the possibility of burns,
do not remove the carpet in the
cargo area. Emission control
devices beneath this floor gener-
ate high temperatures.
(Continued)
WARNING
After adjusting the seat, always
check that it is securely locked into
place by attempting to move the
seat forward or reverse without
using the lock release lever.
Sudden or unexpected movement
of the driver's seat could cause you
to lose control of the vehicle result-
ing in an accident.
WARNING
Do not adjust the seat while wear-
ing seat belts. Moving the seat
cushion forward may cause
strong pressure on the abdomen.
Use extreme caution so that
hands or other objects are not
caught in the seat mechanisms
while the seat is moving.
Do not put a cigarette lighter on
the floor or seat. When you oper-
ate the seat, gas may gush out of
the lighter and cause fire.
Page 22 of 406
35
Safety features of your vehicle
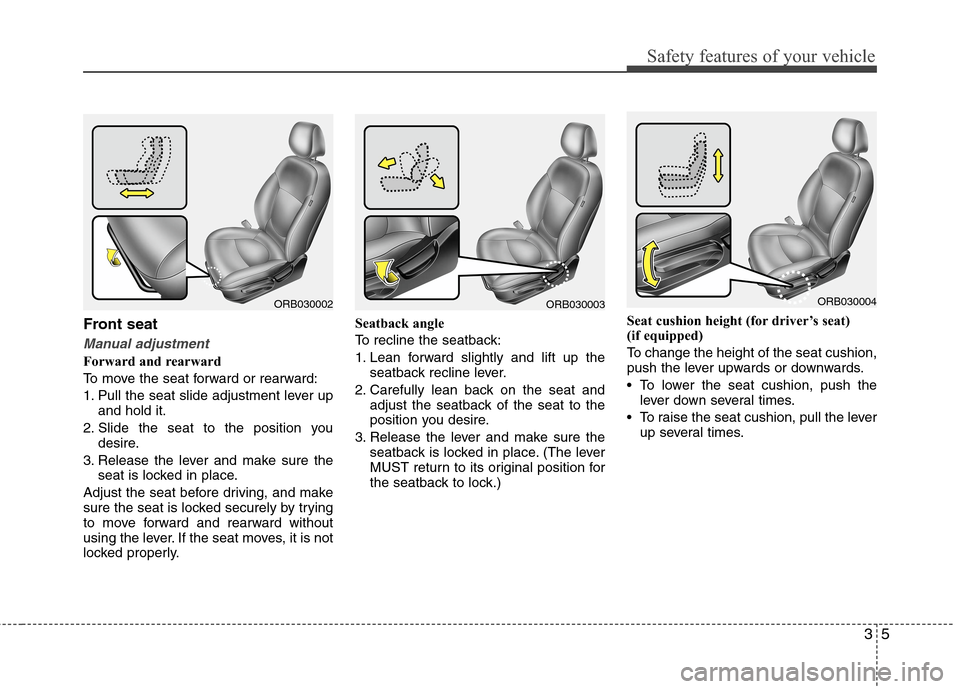
Front seat
Manual adjustment
Forward and rearward
To move the seat forward or rearward:
1. Pull the seat slide adjustment lever up
and hold it.
2. Slide the seat to the position you
desire.
3. Release the lever and make sure the
seat is locked in place.
Adjust the seat before driving, and make
sure the seat is locked securely by trying
to move forward and rearward without
using the lever. If the seat moves, it is not
locked properly.Seatback angle
To recline the seatback:
1. Lean forward slightly and lift up the
seatback recline lever.
2. Carefully lean back on the seat and
adjust the seatback of the seat to the
position you desire.
3. Release the lever and make sure the
seatback is locked in place. (The lever
MUST return to its original position for
the seatback to lock.)Seat cushion height (for driver’s seat)
(if equipped)
To change the height of the seat cushion,
push the lever upwards or downwards.
• To lower the seat cushion, push the
lever down several times.
To raise the seat cushion, pull the lever
up several times.
ORB030002ORB030003ORB030004
Page 24 of 406
37
Safety features of your vehicle
Adjusting the height up and down
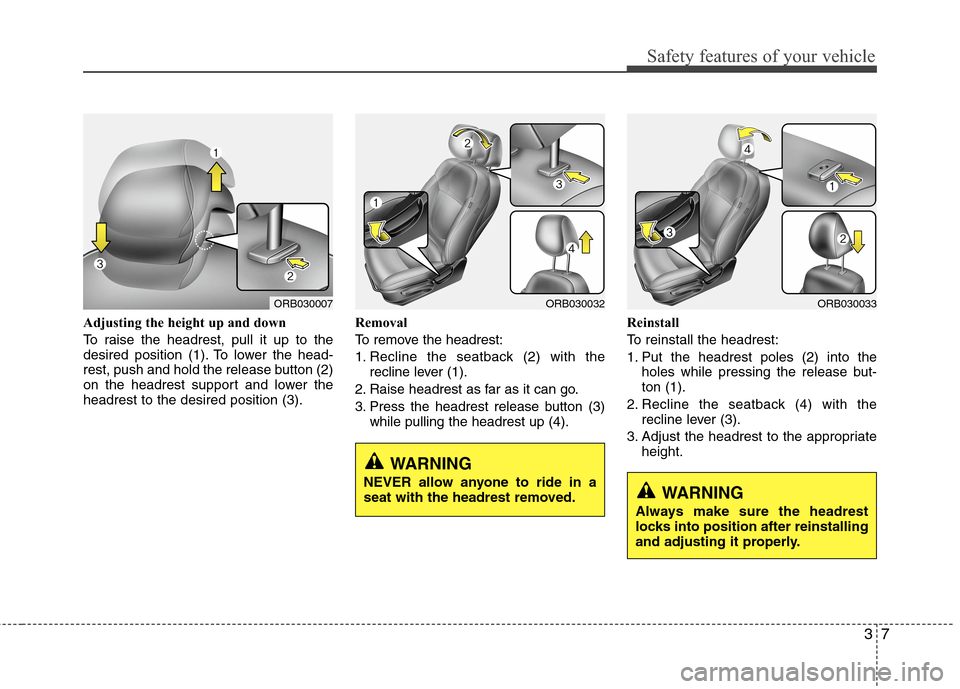
To raise the headrest, pull it up to the
desired position (1). To lower the head-
rest, push and hold the release button (2)
on the headrest support and lower the
headrest to the desired position (3).Removal
To remove the headrest:
1. Recline the seatback (2) with the
recline lever (1).
2. Raise headrest as far as it can go.
3. Press the headrest release button (3)
while pulling the headrest up (4).Reinstall
To reinstall the headrest:
1. Put the headrest poles (2) into the
holes while pressing the release but-
ton (1).
2. Recline the seatback (4) with the
recline lever (3).
3. Adjust the headrest to the appropriate
height.
WARNING
NEVER allow anyone to ride in a
seat with the headrest removed.WARNING
Always make sure the headrest
locks into position after reinstalling
and adjusting it properly.
ORB030007ORB030032ORB030033
Page 27 of 406
Safety features of your vehicle
10 3
Adjusting the height up and down
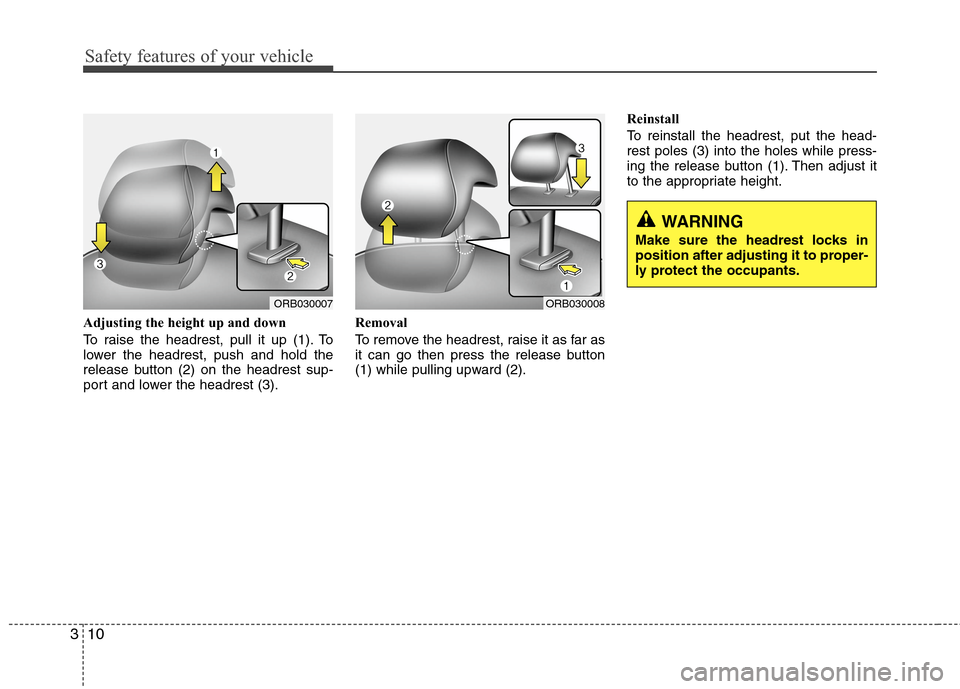
To raise the headrest, pull it up (1). To
lower the headrest, push and hold the
release button (2) on the headrest sup-
port and lower the headrest (3).Removal
To remove the headrest, raise it as far as
it can go then press the release button
(1) while pulling upward (2).Reinstall
To reinstall the headrest, put the head-
rest poles (3) into the holes while press-
ing the release button (1). Then adjust it
to the appropriate height.
ORB030007
WARNING
Make sure the headrest locks in
position after adjusting it to proper-
ly protect the occupants.
ORB030008
Page 29 of 406
Safety features of your vehicle
12 3
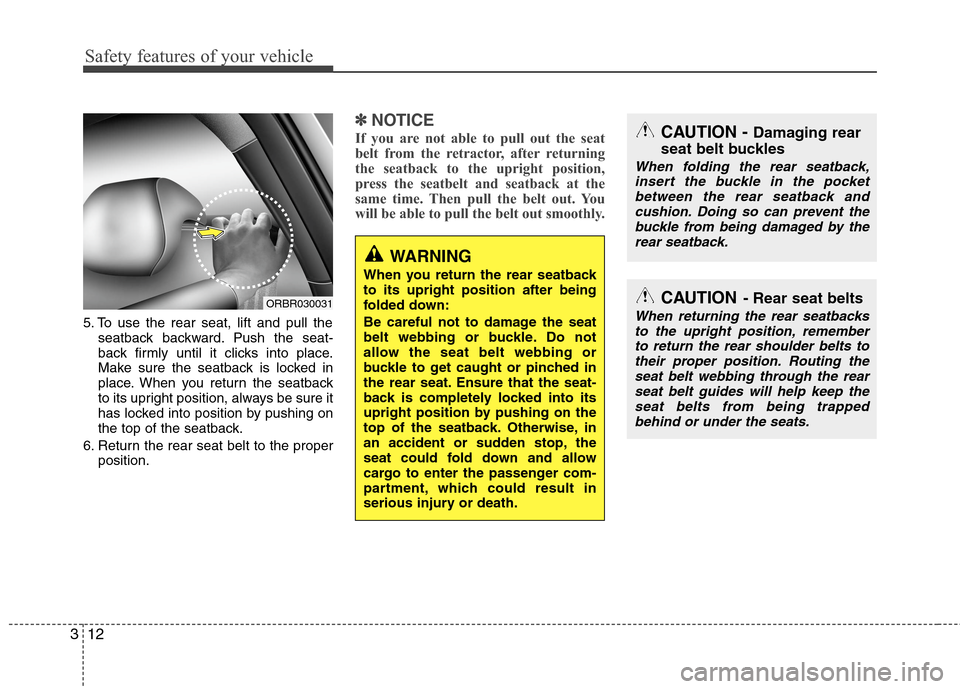
5. To use the rear seat, lift and pull the
seatback backward. Push the seat-
back firmly until it clicks into place.
Make sure the seatback is locked in
place. When you return the seatback
to its upright position, always be sure it
has locked into position by pushing on
the top of the seatback.
6. Return the rear seat belt to the proper
position.
✽ ✽
NOTICE
If you are not able to pull out the seat
belt from the retractor, after returning
the seatback to the upright position,
press the seatbelt and seatback at the
same time. Then pull the belt out. You
will be able to pull the belt out smoothly.
CAUTION- Rear seat belts
When returning the rear seatbacks
to the upright position, remember
to return the rear shoulder belts to
their proper position. Routing the
seat belt webbing through the rear
seat belt guides will help keep the
seat belts from being trapped
behind or under the seats.
CAUTION - Damaging rear
seat belt buckles
When folding the rear seatback,
insert the buckle in the pocket
between the rear seatback and
cushion. Doing so can prevent the
buckle from being damaged by the
rear seatback.
WARNING
When you return the rear seatback
to its upright position after being
folded down:
Be careful not to damage the seat
belt webbing or buckle. Do not
allow the seat belt webbing or
buckle to get caught or pinched in
the rear seat. Ensure that the seat-
back is completely locked into its
upright position by pushing on the
top of the seatback. Otherwise, in
an accident or sudden stop, the
seat could fold down and allow
cargo to enter the passenger com-
partment, which could result in
serious injury or death.
ORBR030031
Page 33 of 406
Safety features of your vehicle
16 3
Seat belt - Driver's 3-point system
with emergency locking retractor
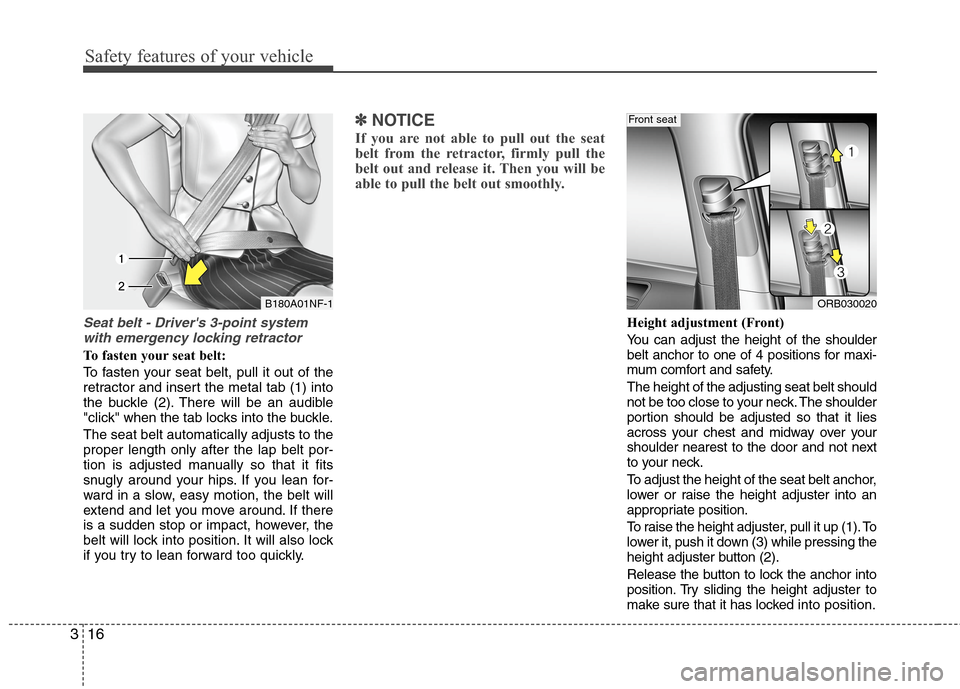
To fasten your seat belt:
To fasten your seat belt, pull it out of the
retractor and insert the metal tab (1) into
the buckle (2). There will be an audible
"click" when the tab locks into the buckle.
The seat belt automatically adjusts to the
proper length only after the lap belt por-
tion is adjusted manually so that it fits
snugly around your hips. If you lean for-
ward in a slow, easy motion, the belt will
extend and let you move around. If there
is a sudden stop or impact, however, the
belt will lock into position. It will also lock
if you try to lean forward too quickly.
✽ ✽
NOTICE
If you are not able to pull out the seat
belt from the retractor, firmly pull the
belt out and release it. Then you will be
able to pull the belt out smoothly.
Height adjustment (Front)
You can adjust the height of the shoulder
belt anchor to one of 4 positions for maxi-
mum comfort and safety.
The height of the adjusting seat belt should
not be too close to your neck. The shoulder
portion should be adjusted so that it lies
across your chest and midway over your
shoulder nearest to the door and not next
to your neck.
To adjust the height of the seat belt anchor,
lower or raise the height adjuster into an
appropriate position.
To raise the height adjuster, pull it up (1). To
lower it, push it down (3) while pressing the
height adjuster button (2).
Release the button to lock the anchor into
position. Try sliding the height adjuster to
make sure that it has locked into position.
B180A01NF-1ORB030020
Front seat