turn signal bulb Hyundai Accent 2015 Owner's Manual - RHD (UK. Australia)
[x] Cancel search | Manufacturer: HYUNDAI, Model Year: 2015, Model line: Accent, Model: Hyundai Accent 2015Pages: 425, PDF Size: 8.62 MB
Page 148 of 425
Features of your vehicle
78 4
If an indicator stays on and does not
flash or if it flashes abnormally, one of the
turn signal bulbs may be burned out and
will require replacement.
One-touch lane change function
To activate an one-touch lane change
function, move the turn signal lever
slightly and then release it. The lane
change signals will blink 3 times.
✽NOTICE
If an indicator flash is abnormally quick
or slow, a bulb may be burned out or
have a poor electrical connection in the
circuit.Front fog light (if equipped)
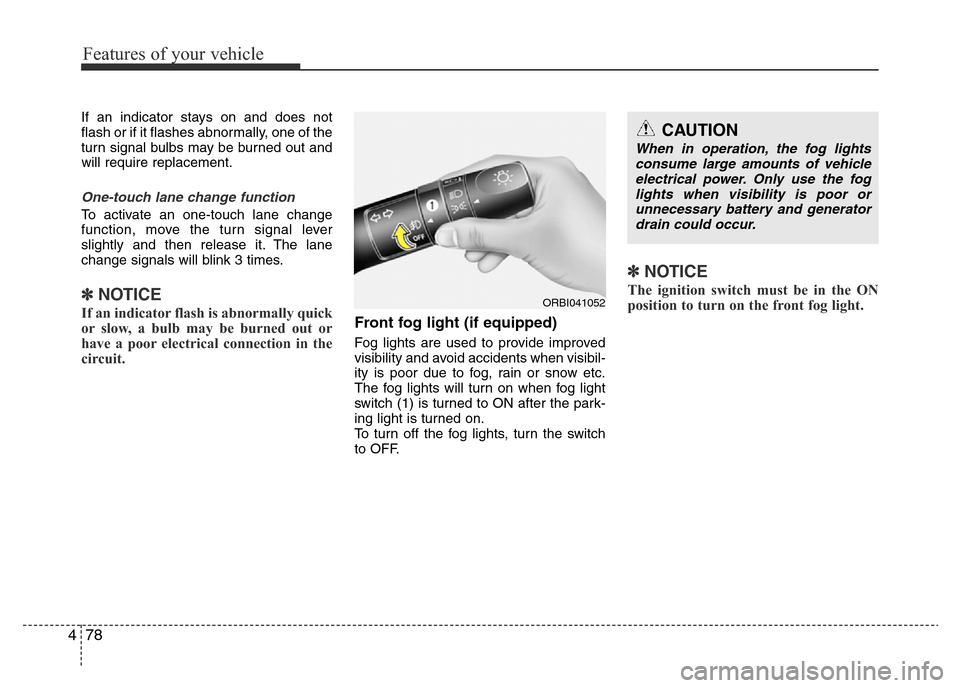
Fog lights are used to provide improved
visibility and avoid accidents when visibil-
ity is poor due to fog, rain or snow etc.
The fog lights will turn on when fog light
switch (1) is turned to ON after the park-
ing light is turned on.
To turn off the fog lights, turn the switch
to OFF.
✽NOTICE
The ignition switch must be in the ON
position to turn on the front fog light.ORBI041052
CAUTION
When in operation, the fog lights
consume large amounts of vehicle
electrical power. Only use the fog
lights when visibility is poor or
unnecessary battery and generator
drain could occur.
Page 304 of 425
567
Driving your vehicle
Turn signals when towing a trailer
When you tow a trailer, your vehicle has
to have a different turn signal flasher and
extra wiring. The green arrows on your
instrument panel will flash whenever you
signal a turn or lane change. Properly
connected, the trailer lights will also flash
to alert other drivers you’re about to turn,
change lanes, or stop.
When towing a trailer, the green arrows
on your instrument panel will flash for
turns even if the bulbs on the trailer are
burned out. Thus, you may think drivers
behind you are seeing your signals
when, in fact, they are not. It’s important
to check occasionally to be sure the trail-
er bulbs are still working. You must also
check the lights every time you discon-
nect and then reconnect the wires.
Do not connect a trailer lighting system
directly to your vehicle’s lighting system.
Use only an approved trailer wiring har-
ness.
An authorised HYUNDAI dealer can
assist you in installing the genuine wiring
harness.
Driving on grades
Reduce speed and shift to a lower gear
before you start down a long or steep
downgrade. If you do not down shift, you
may have to use extended braking, cre-
ating heat and potentially reducing brak-
ing efficiency.
On a long uphill grade, shift to a lower
gear and reduce your speed to around
70 km/h (45 mph) to reduce the possibil-
ity of to engine and transaxle overheat-
ing.WARNING
Failure to use an approved trailer
wiring harness could result in dam-
age to the vehicle electrical system
and/or personal injury.
CAUTION
• When towing a trailer on steep
grades (in excess of 6%) pay
close attention to the engine
coolant temperature gauge to
ensure the engine does not over-
heat. If the needle of the coolant
temperature gauge moves across
the dial towards “H” (HOT), pull
over and stop as soon as it is safe
to do so, and allow the engine to
idle until it cools down. You may
proceed once the engine has
cooled sufficiently.
• You must decide driving speed
depending on trailer weight and
uphill grade to reduce the possi-
bility of engine and transaxle
overheating.
Page 395 of 425
767
Maintenance
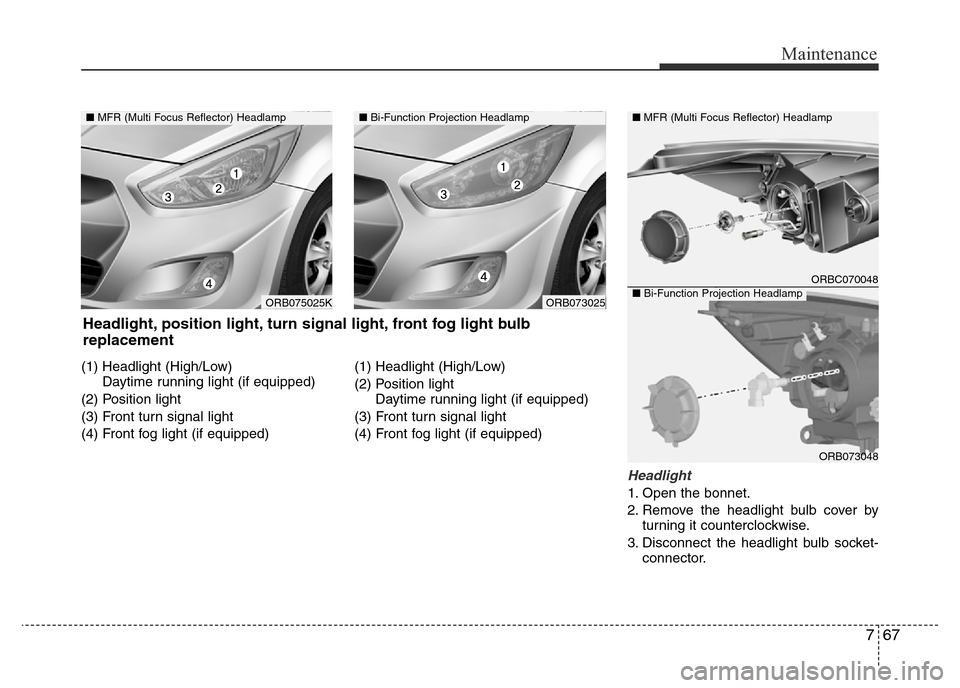
(1) Headlight (High/Low)
Daytime running light (if equipped)
(2) Position light
(3) Front turn signal light
(4) Front fog light (if equipped)(1) Headlight (High/Low)
(2) Position light
Daytime running light (if equipped)
(3) Front turn signal light
(4) Front fog light (if equipped)
Headlight
1. Open the bonnet.
2. Remove the headlight bulb cover by
turning it counterclockwise.
3. Disconnect the headlight bulb socket-
connector.
ORBC070048
ORB073048 ■MFR (Multi Focus Reflector) Headlamp
■Bi-Function Projection HeadlampORB075025K
■MFR (Multi Focus Reflector) Headlamp■Bi-Function Projection Headlamp
Headlight, position light, turn signal light, front fog light bulb
replacement
ORB073025
Page 398 of 425
Maintenance
70 7
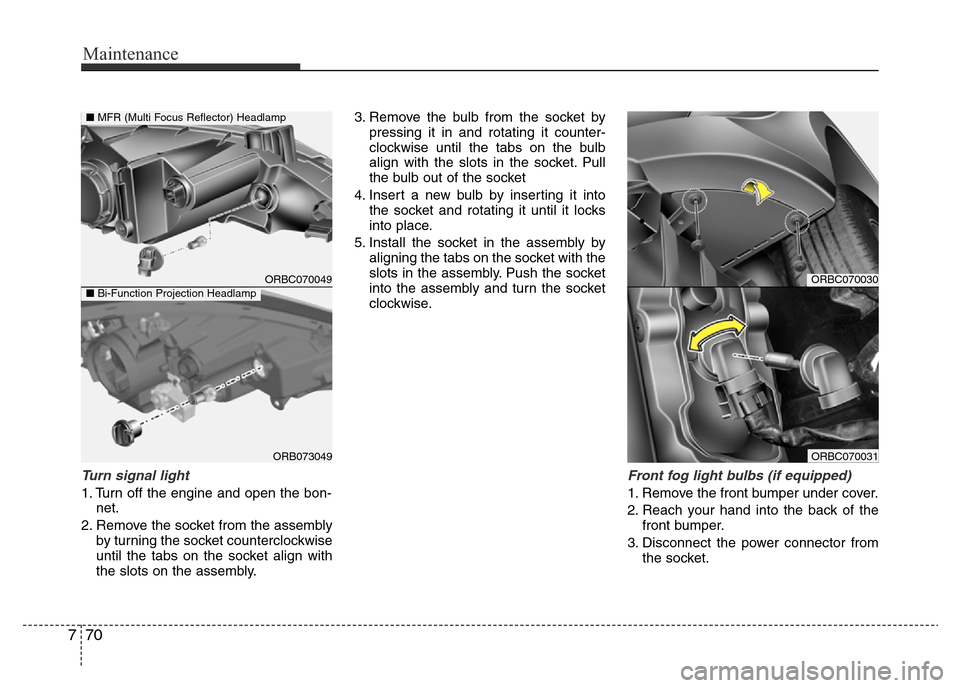
Turn signal light
1. Turn off the engine and open the bon-
net.
2. Remove the socket from the assembly
by turning the socket counterclockwise
until the tabs on the socket align with
the slots on the assembly.3. Remove the bulb from the socket by
pressing it in and rotating it counter-
clockwise until the tabs on the bulb
align with the slots in the socket. Pull
the bulb out of the socket
4. Insert a new bulb by inserting it into
the socket and rotating it until it locks
into place.
5. Install the socket in the assembly by
aligning the tabs on the socket with the
slots in the assembly. Push the socket
into the assembly and turn the socket
clockwise.
Front fog light bulbs (if equipped)
1. Remove the front bumper under cover.
2. Reach your hand into the back of the
front bumper.
3. Disconnect the power connector from
the socket.
ORBC070030
ORBC070031
ORBC070049
ORB073049
■MFR (Multi Focus Reflector) Headlamp
■Bi-Function Projection Headlamp
Page 403 of 425
775
Maintenance
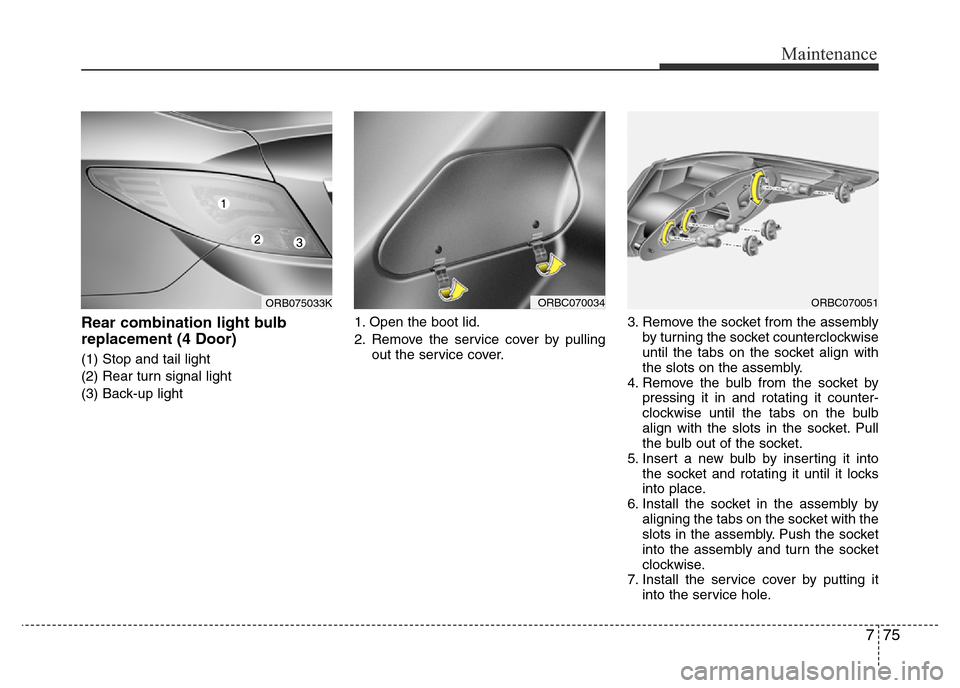
Rear combination light bulb
replacement (4 Door)
(1) Stop and tail light
(2) Rear turn signal light
(3) Back-up light1. Open the boot lid.
2. Remove the service cover by pulling
out the service cover.3. Remove the socket from the assembly
by turning the socket counterclockwise
until the tabs on the socket align with
the slots on the assembly.
4. Remove the bulb from the socket by
pressing it in and rotating it counter-
clockwise until the tabs on the bulb
align with the slots in the socket. Pull
the bulb out of the socket.
5. Insert a new bulb by inserting it into
the socket and rotating it until it locks
into place.
6. Install the socket in the assembly by
aligning the tabs on the socket with the
slots in the assembly. Push the socket
into the assembly and turn the socket
clockwise.
7. Install the service cover by putting it
into the service hole.
ORBC070034ORB075033KORBC070051
Page 404 of 425
Maintenance
76 7
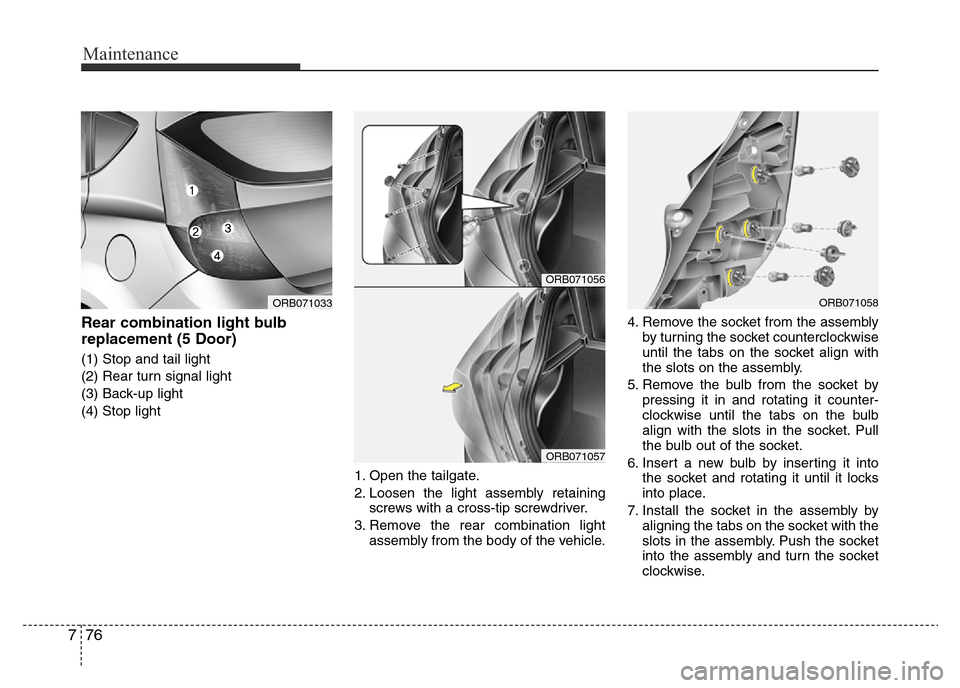
Rear combination light bulb
replacement (5 Door)
(1) Stop and tail light
(2) Rear turn signal light
(3) Back-up light
(4) Stop light
1. Open the tailgate.
2. Loosen the light assembly retaining
screws with a cross-tip screwdriver.
3. Remove the rear combination light
assembly from the body of the vehicle.4. Remove the socket from the assembly
by turning the socket counterclockwise
until the tabs on the socket align with
the slots on the assembly.
5. Remove the bulb from the socket by
pressing it in and rotating it counter-
clockwise until the tabs on the bulb
align with the slots in the socket. Pull
the bulb out of the socket.
6. Insert a new bulb by inserting it into
the socket and rotating it until it locks
into place.
7. Install the socket in the assembly by
aligning the tabs on the socket with the
slots in the assembly. Push the socket
into the assembly and turn the socket
clockwise.
ORB071056
ORB071057
ORB071033ORB071058
Page 419 of 425
83
Specifications & Consumer information
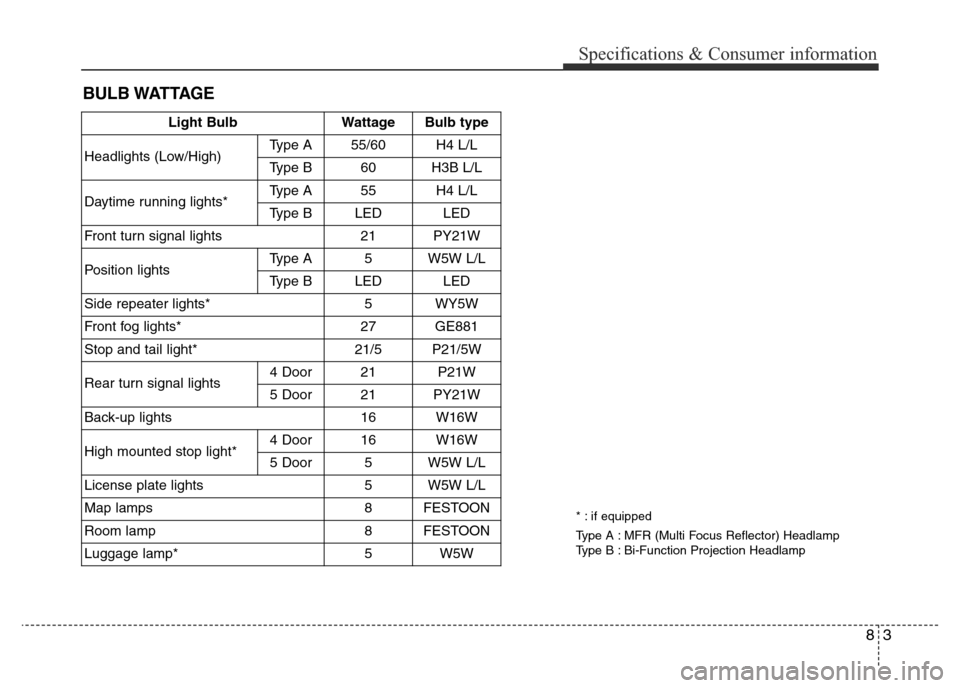
BULB WATTAGE
Light BulbWattageBulb type
Headlights (Low/High)Type A55/60H4 L/L
Type B60H3B L/L
Daytime running lights*Type A55H4 L/L
Type BLEDLED
Front turn signal lights21PY21W
Position lightsType A5W5W L/L
Type BLEDLED
Side repeater lights* 5WY5W
Front fog lights*27GE881
Stop and tail light* 21/5P21/5W
Rear turn signal lights 4 Door21P21W
5 Door21PY21W
Back-up lights16W16W
High mounted stop light*4 Door16W16W
5 Door5W5W L/L
License plate lights5W5W L/L
Map lamps8FESTOON
Room lamp8FESTOON
Luggage lamp*5W5W
* : if equipped
Type A : MFR (Multi Focus Reflector) Headlamp
Type B : Bi-Function Projection Headlamp