clutch Hyundai Accent 2017 Owner's Manual
[x] Cancel search | Manufacturer: HYUNDAI, Model Year: 2017, Model line: Accent, Model: Hyundai Accent 2017Pages: 380, PDF Size: 12.45 MB
Page 16 of 380
Your vehicle at a glance
2-4
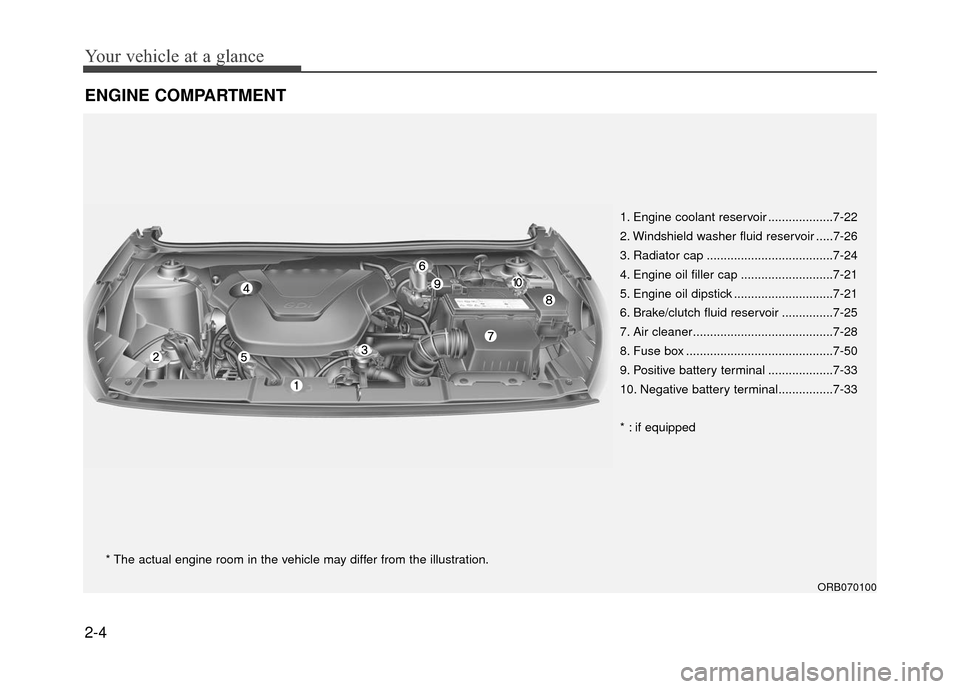
ENGINE COMPARTMENT
ORB070100
* The actual engine room in the vehicle may differ from the illustration.1. Engine coolant reservoir ...................7-22
2. Windshield washer fluid reservoir .....7-26
3. Radiator cap .....................................7-24
4. Engine oil filler cap ...........................7-21
5. Engine oil dipstick .............................7-21
6. Brake/clutch fluid reservoir ...............7-25
7. Air cleaner.........................................7-28
8. Fuse box ...........................................7-50
9. Positive battery terminal ...................7-33
10. Negative battery terminal................7-33
* : if equipped
Page 209 of 380
Driving your vehicle
5-6
Starting the engine
1. Make sure the parking brake isapplied.
2. Manual Transaxle - Depress the
clutch pedal fully and shift the
transaxle into Neutral. Keep the clutch
pedal and brake pedal depressed
while turning the ignition switch to the
start position. The star ter will not oper-
ate if the clutch pedal is not fully
depressed.
Automatic Transaxle - Place the
transaxle shift lever in P (Park).
Depress the brake pedal fully.
You can also start the engine when the shift lever is in the N (Neutral)position.
3. Turn the ignition switch to START and
hold it there until the engine starts (a
maximum of 10 seconds), then
release the key.
It should be started without depressingthe accelerator.
4. Do not wait for the engine to warm up while the vehicle remains stationary.
Start driving at moderate engine
speeds. (Steep accelerating and
decelerating should be avoided.)
WARNING
Always wear appropriate shoes
when operating your vehicle.
Unsuitable shoes (high heels, slip-
pers, ski boots, etc.) may interfere
with your ability to use the brake,
accelerator pedal, and clutch (if
equipped).
CAUTION
Do not engage the starter for morethan 10 seconds. If the engine stallsor fails to start, wait 5 to 10 seconds before re-engaging the starter.Improper use of the starter maydamage it.
CAUTION
If the engine stalls while the vehicle is in motion, do not attempt to movethe shift lever to the P (Park) posi- tion. If traffic and road conditionspermit, you may put the shift leverin the N (Neutral) position while the vehicle is still moving and turn theignition switch to the START posi- tion in an attempt to restart theengine.
Page 210 of 380
5-7
Driving your vehicle
Manual transaxle operation
The manual transaxle has 6 forward
gears.
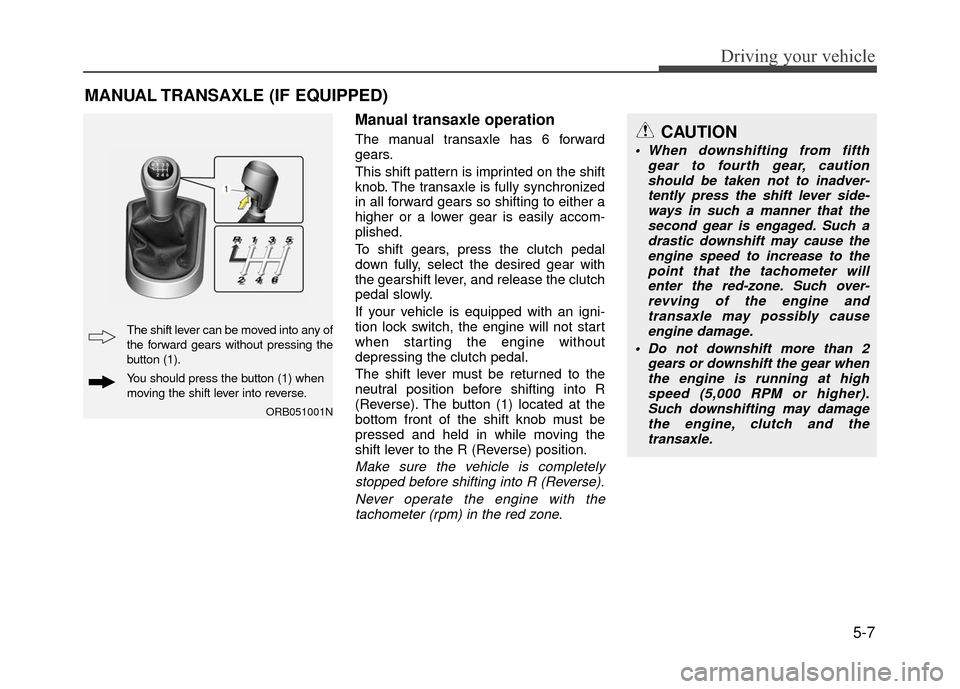
This shift pattern is imprinted on the shift
knob. The transaxle is fully synchronized
in all forward gears so shifting to either a
higher or a lower gear is easily accom-
plished.
To shift gears, press the clutch pedal
down fully, select the desired gear with
the gearshift lever, and release the clutch
pedal slowly.
If your vehicle is equipped with an igni-
tion lock switch, the engine will not start
when starting the engine without
depressing the clutch pedal.
The shift lever must be returned to the
neutral position before shifting into R
(Reverse). The button (1) located at the
bottom front of the shift knob must be
pressed and held in while moving the
shift lever to the R (Reverse) position.
Make sure the vehicle is completelystopped before shifting into R (Reverse).
Never operate the engine with thetachometer (rpm) in the red zone.
MANUAL TRANSAXLE (IF EQUIPPED)
ORB051001N
The shift lever can be moved into any of
the forward gears without pressing the
button (1).
You should press the button (1) when
moving the shift lever into reverse.
CAUTION
When downshifting from fifth gear to fourth gear, cautionshould be taken not to inadver- tently press the shift lever side-ways in such a manner that thesecond gear is engaged. Such a drastic downshift may cause theengine speed to increase to the point that the tachometer willenter the red-zone. Such over- revving of the engine andtransaxle may possibly causeengine damage.
Do not downshift more than 2 gears or downshift the gear whenthe engine is running at high speed (5,000 RPM or higher).Such downshifting may damage the engine, clutch and thetransaxle.
Page 211 of 380
Driving your vehicle
5-8
During cold weather, shifting may bedifficult until the transaxle lubricant is
warmed up. This is normal and not
harmful to the transaxle.
If you've come to a complete stop and it's hard to shift into 1st or R (Reverse),
leave the shift lever in the neutral posi-
tion and release the clutch. Depress the
clutch pedal back down, and then shift
into 1st or R (Reverse) gear position.Using the clutch
The clutch should be depressed all the
way to the floor before shifting, then
released slowly. The clutch pedal should
always be fully released while driving. Do
not rest your foot on the clutch pedal
while driving. This can cause unneces-
sary wear. Do not partially engage the
clutch to hold the vehicle on an incline.
This causes unnecessary wear. Use the
foot brake or parking brake to hold the
vehicle on an incline. Do not operate the
clutch pedal rapidly and repeatedly.
Downshifting
It is important to downshift when you
must slow down in heavy traffic or while
driving up or down steep hills.
Downshifting reduces the chance of
stalling and gives better acceleration.
When the vehicle is traveling down steep
hills, downshifting helps maintain safe
speed and prolongs brake life.
WARNING
Before leaving the driver's seat,
always set the parking brake fully
and shut the engine off. Then make
sure the transaxle is shifted into 1st
gear when the vehicle is parked on
a level or uphill grade, and shifted
into R (Reverse) on a downhill
grade. Unexpected and sudden
vehicle movement can occur if
these precautions are not followed
in the order identified.
CAUTION
To avoid premature clutch wear and damage, do not drive withyour foot resting on the clutchpedal. Also, do not use the clutchto hold the vehicle stopped on anuphill grade, while waiting for atraffic light, etc.
Do not use the shift lever as a handrest during driving, as thiscan result in premature wear of the transaxle shift forks.
When operating the clutch pedal, press the clutch pedal down fully.
If you don't press the clutch pedalfully, the clutch may be damagedor noise may occur.
Page 229 of 380
Driving your vehicle
5-26
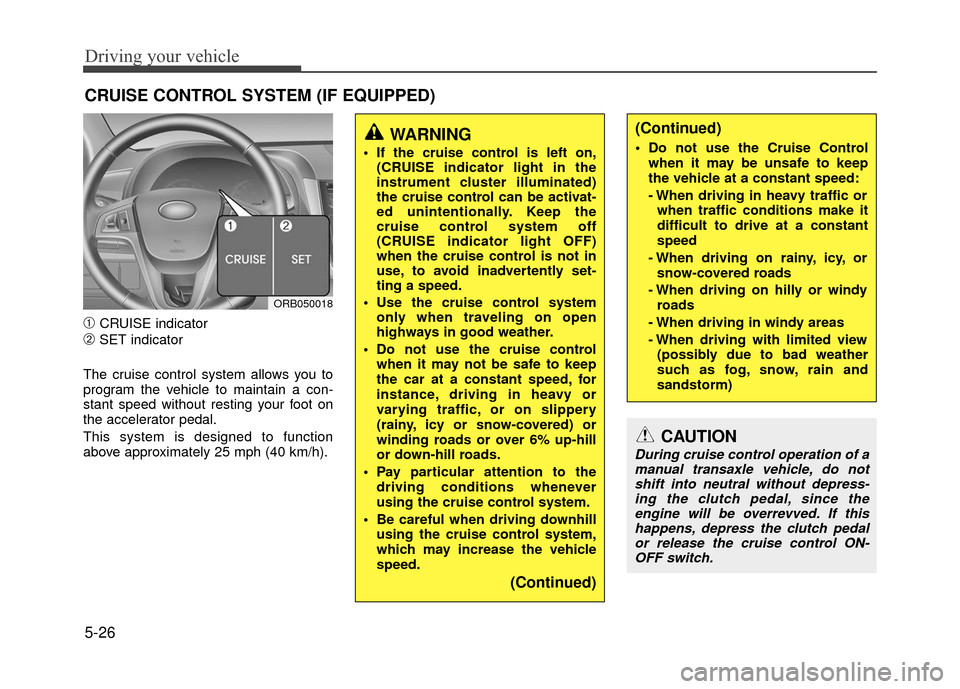
➀CRUISE indicator
➁SET indicator
The cruise control system allows you to
program the vehicle to maintain a con-
stant speed without resting your foot on
the accelerator pedal.
This system is designed to function
above approximately 25 mph (40 km/h).
CRUISE CONTROL SYSTEM (IF EQUIPPED)
WARNING
If the cruise control is left on, (CRUISE indicator light in the
instrument cluster illuminated)
the cruise control can be activat-
ed unintentionally. Keep the
cruise control system off
(CRUISE indicator light OFF)
when the cruise control is not in
use, to avoid inadvertently set-
ting a speed.
Use the cruise control system only when traveling on open
highways in good weather.
Do not use the cruise control when it may not be safe to keep
the car at a constant speed, for
instance, driving in heavy or
varying traffic, or on slippery
(rainy, icy or snow-covered) or
winding roads or over 6% up-hill
or down-hill roads.
Pay particular attention to the driving conditions whenever
using the cruise control system.
Be careful when driving downhill using the cruise control system,
which may increase the vehicle
speed.
(Continued)
(Continued)
Do not use the Cruise Controlwhen it may be unsafe to keep
the vehicle at a constant speed:
- When driving in heavy traffic orwhen traffic conditions make it
difficult to drive at a constant
speed
- When driving on rainy, icy, or snow-covered roads
- When driving on hilly or windy roads
- When driving in windy areas
- When driving with limited view (possibly due to bad weather
such as fog, snow, rain and
sandstorm)
ORB050018
CAUTION
During cruise control operation of amanual transaxle vehicle, do notshift into neutral without depress-ing the clutch pedal, since theengine will be overrevved. If thishappens, depress the clutch pedalor release the cruise control ON-OFF switch.
Page 232 of 380
5-29
Driving your vehicle
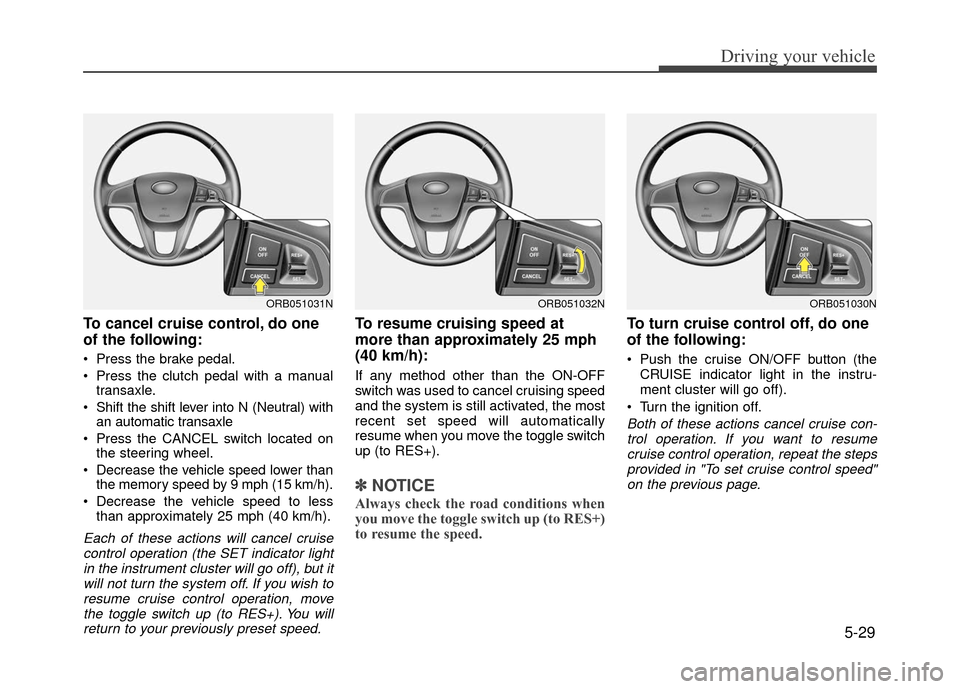
To cancel cruise control, do one
of the following:
Press the brake pedal.
Press the clutch pedal with a manualtransaxle.
Shift the shift lever into N (Neutral) with an automatic transaxle
Press the CANCEL switch located on the steering wheel.
Decrease the vehicle speed lower than the memory speed by 9 mph (15 km/h).
Decrease the vehicle speed to less than approximately 25 mph (40 km/h).
Each of these actions will cancel cruise
control operation (the SET indicator lightin the instrument cluster will go off), but it will not turn the system off. If you wish toresume cruise control operation, movethe toggle switch up (to RES+). You willreturn to your previously preset speed.
To resume cruising speed at
more than approximately 25 mph
(40 km/h):
If any method other than the ON-OFF
switch was used to cancel cruising speed
and the system is still activated, the most
recent set speed will automatically
resume when you move the toggle switch
up (to RES+).
✽ ✽ NOTICE
Always check the road conditions when
you move the toggle switch up (to RES+)
to resume the speed.
To turn cruise control off, do one
of the following:
Push the cruise ON/OFF button (the
CRUISE indicator light in the instru-
ment cluster will go off).
Turn the ignition off.
Both of these actions cancel cruise con- trol operation. If you want to resume cruise control operation, repeat the stepsprovided in "To set cruise control speed" on the previous page.
ORB051032NORB051030NORB051031N
Page 284 of 380
7
Engine compartment / 7-2
Maintenance services / 7-3
Owner maintenance / 7-4
Scheduled maintenance service / 7-6
Explanation of scheduled maintenance items / 7-19
Engine oil / 7-21
Engine coolant / 7-22
Brake/clutch fluid / 7-25
Washer fluid / 7-26
Parking brake / 7-26
Air cleaner / 7-27
Climate control air filter / 7-28
Wiper blades / 7-30
Battery / 7-33
Tires and wheels / 7-36
Fuses / 7-50
Light bulbs / 7-60
Appearance care / 7-70
Emission control system / 7-76
California perchlorate notice / 7-78
Maintenance
Page 285 of 380
Maintenance
7-2
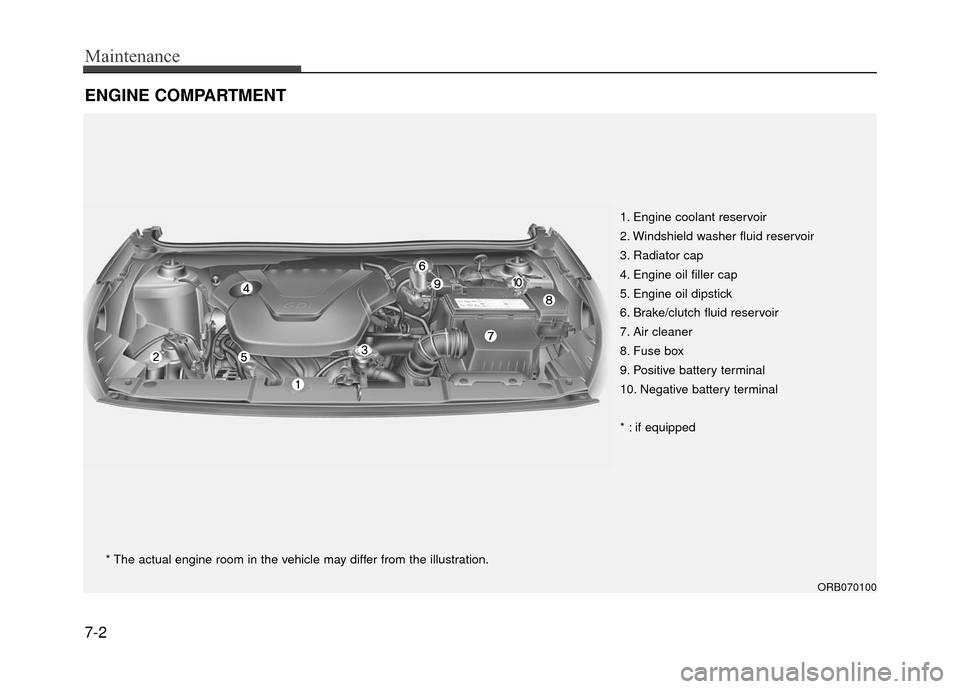
ENGINE COMPARTMENT
ORB070100
* The actual engine room in the vehicle may differ from the illustration.1. Engine coolant reservoir
2. Windshield washer fluid reservoir
3. Radiator cap
4. Engine oil filler cap
5. Engine oil dipstick
6. Brake/clutch fluid reservoir
7. Air cleaner
8. Fuse box
9. Positive battery terminal
10. Negative battery terminal
* : if equipped
Page 291 of 380
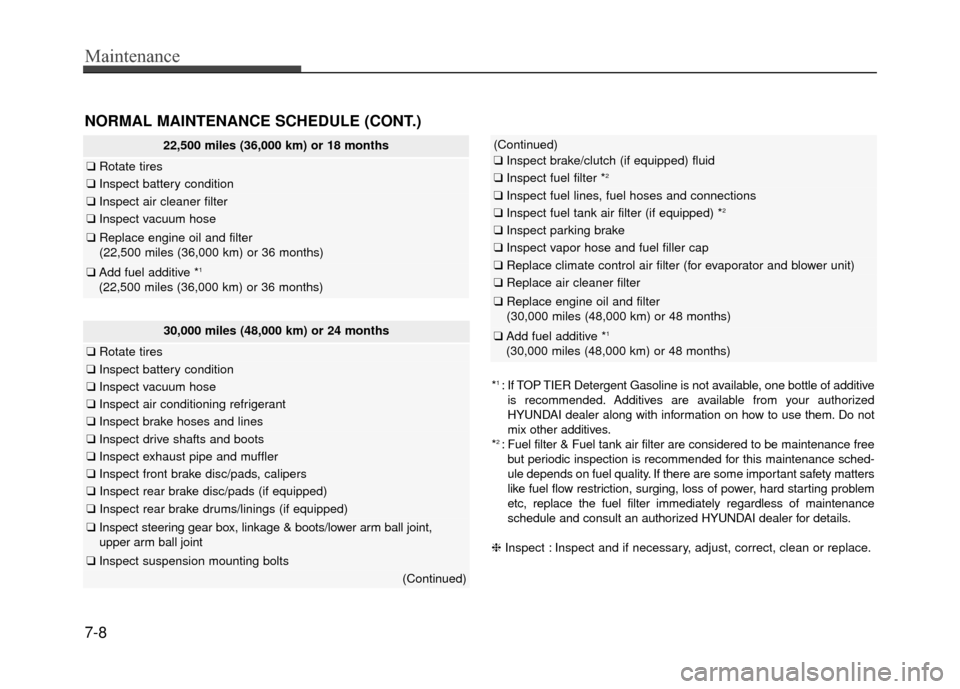
Maintenance
7-8
30,000 miles (48,000 km) or 24 months
❑Rotate tires
❑Inspect battery condition
❑Inspect vacuum hose
❑Inspect air conditioning refrigerant
❑Inspect brake hoses and lines
❑Inspect drive shafts and boots
❑Inspect exhaust pipe and muffler
❑Inspect front brake disc/pads, calipers
❑Inspect rear brake disc/pads (if equipped)
❑Inspect rear brake drums/linings (if equipped)
❑Inspect steering gear box, linkage & boots/lower arm ball joint,
upper arm ball joint
❑Inspect suspension mounting bolts
(Continued)
22,500 miles (36,000 km) or 18 months
❑ Rotate tires
❑ Inspect battery condition
❑Inspect air cleaner filter
❑Inspect vacuum hose
❑Replace engine oil and filter
(22,500 miles (36,000 km) or 36 months)
❑Add fuel additive *1
(22,500 miles (36,000 km) or 36 months)
*1 : If TOP TIER Detergent Gasoline is not available, one bottle of additive
is recommended. Additives are available from your authorized
HYUNDAI dealer along with information on how to use them. Do not
mix other additives.
*
2 : Fuel filter & Fuel tank air filter are considered to be maintenance free\
but periodic inspection is recommended for this maintenance sched-
ule depends on fuel quality. If there are some important safety matters
like fuel flow restriction, surging, loss of power, hard starting problem
etc, replace the fuel filter immediately regardless of maintenance
schedule and consult an authorized HYUNDAI dealer for details.
❈ Inspect : Inspect and if necessary, adjust, correct, clean or replace.
NORMAL MAINTENANCE SCHEDULE (CONT.)
(Continued)
❑Inspect brake/clutch (if equipped) fluid
❑Inspect fuel filter *2
❑Inspect fuel lines, fuel hoses and connections
❑Inspect fuel tank air filter (if equipped) *2
❑Inspect parking brake
❑Inspect vapor hose and fuel filler cap
❑ Replace climate control air filter (for evaporator and blower unit)
❑Replace air cleaner filter
❑Replace engine oil and filter
(30,000 miles (48,000 km) or 48 months)
❑Add fuel additive *1
(30,000 miles (48,000 km) or 48 months)
Page 293 of 380
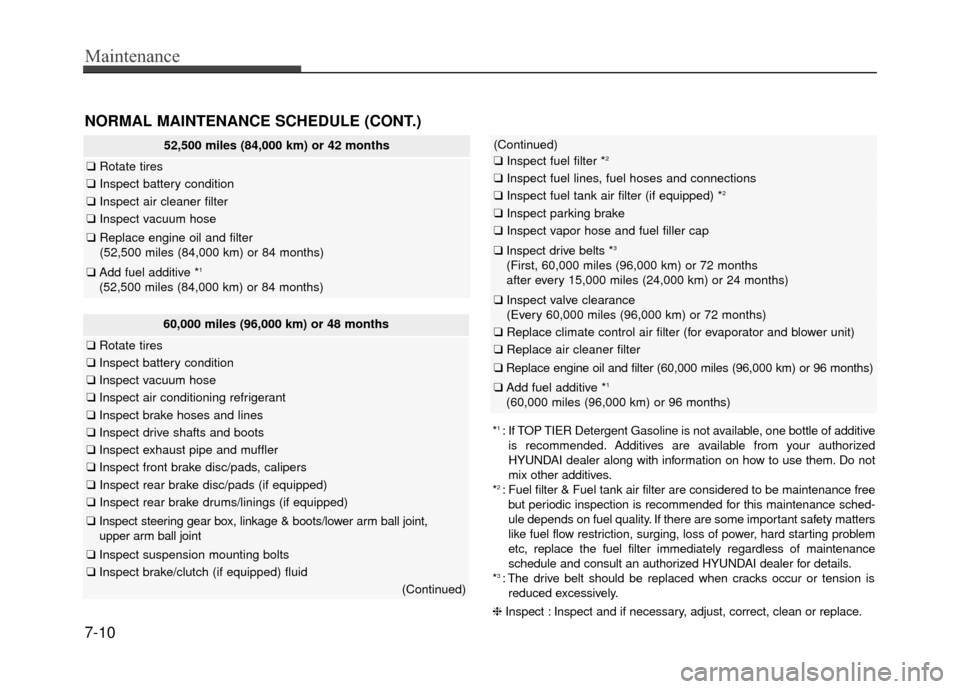
Maintenance
7-10
60,000 miles (96,000 km) or 48 months
❑Rotate tires
❑Inspect battery condition
❑Inspect vacuum hose
❑Inspect air conditioning refrigerant
❑Inspect brake hoses and lines
❑Inspect drive shafts and boots
❑Inspect exhaust pipe and muffler
❑Inspect front brake disc/pads, calipers
❑Inspect rear brake disc/pads (if equipped)
❑Inspect rear brake drums/linings (if equipped)
❑Inspect steering gear box, linkage & boots/lower arm ball joint,
upper arm ball joint
❑ Inspect suspension mounting bolts
❑Inspect brake/clutch (if equipped) fluid
(Continued)
(Continued)
❑Inspect fuel filter *2
❑Inspect fuel lines, fuel hoses and connections
❑Inspect fuel tank air filter (if equipped) *2
❑Inspect parking brake
❑Inspect vapor hose and fuel filler cap
❑Inspect drive belts *3
(First, 60,000 miles (96,000 km) or 72 months
after every 15,000 miles (24,000 km) or 24 months)
❑ Inspect valve clearance
(Every 60,000 miles (96,000 km) or 72 months)
❑ Replace climate control air filter (for evaporator and blower unit)
❑Replace air cleaner filter
❑Replace engine oil and filter (60,000 miles (96,000 km) or 96 months)\
❑ Add fuel additive *1
(60,000 miles (96,000 km) or 96 months)
NORMAL MAINTENANCE SCHEDULE (CONT.)
52,500 miles (84,000 km) or 42 months
❑ Rotate tires
❑Inspect battery condition
❑ Inspect air cleaner filter
❑Inspect vacuum hose
❑Replace engine oil and filter
(52,500 miles (84,000 km) or 84 months)
❑Add fuel additive *1
(52,500 miles (84,000 km) or 84 months)
*1 : If TOP TIER Detergent Gasoline is not available, one bottle of additive
is recommended. Additives are available from your authorized
HYUNDAI dealer along with information on how to use them. Do not
mix other additives.
*
2 : Fuel filter & Fuel tank air filter are considered to be maintenance free\
but periodic inspection is recommended for this maintenance sched-
ule depends on fuel quality. If there are some important safety matters
like fuel flow restriction, surging, loss of power, hard starting problem
etc, replace the fuel filter immediately regardless of maintenance
schedule and consult an authorized HYUNDAI dealer for details.
*
3 : The drive belt should be replaced when cracks occur or tension is reduced excessively.
❈ Inspect : Inspect and if necessary, adjust, correct, clean or replace.