torque Hyundai Accent 2017 Owner's Manual
[x] Cancel search | Manufacturer: HYUNDAI, Model Year: 2017, Model line: Accent, Model: Hyundai Accent 2017Pages: 380, PDF Size: 12.45 MB
Page 98 of 380
Features of your vehicle
4-24
TILT DOWN →SLIDE OPEN →
SLIDE CLOSE
Then, release the control lever.
When this is complete, the sunroof sys-
tem is reset.
❈ For more detailed information, contact
an authorized HYUNDAI dealer.Electric power steering (EPS)
The power steering uses a motor to
assist you in steering the vehicle. If the
engine is off or if the power steering sys-
tem becomes inoperative, the vehicle
may still be steered, but it will require
increased steering effort.
The motor driven power steering is con-
trolled by a power steering control unit
which senses the steering wheel torque
and vehicle speed to command the
motor.
The steering assist increases as the
vehicle’s speed increases and as the
vehicle’s speed decreases for optimum
steering assist decreases.
Should you notice any change in the
effort required to steer during normal
vehicle operation, have the power steer-
ing checked by an authorized HYUNDAI
dealer.
CAUTION
If the sunroof is not reset when the
vehicle battery is disconnected ordischarged, or related fuse isblown, the sunroof may operateimproperly.
STEERING WHEEL
CAUTION
If the Electric Power Steering System does not operate normal-ly, the warning light will illuminate on the instrument cluster. Thesteering wheel may become diffi-cult to control or operate abnor- mally. Take your vehicle to anauthorized HYUNDAI dealer and have the vehicle checked as soonas possible.
When you operate the steering wheel in low temperature, abnor-mal noise could occur. If tempera- ture rises, the noise will disap-pear. This is a normal condition.
When the vehicle is stationary, if you turn the steering wheel all theway to the left or right continu-ously, the steering wheel becomes heavier from the end.This is normal and not system malfunction. As time passes, thesteering wheel will return to its normal condition.
Page 233 of 380
Driving your vehicle
5-30
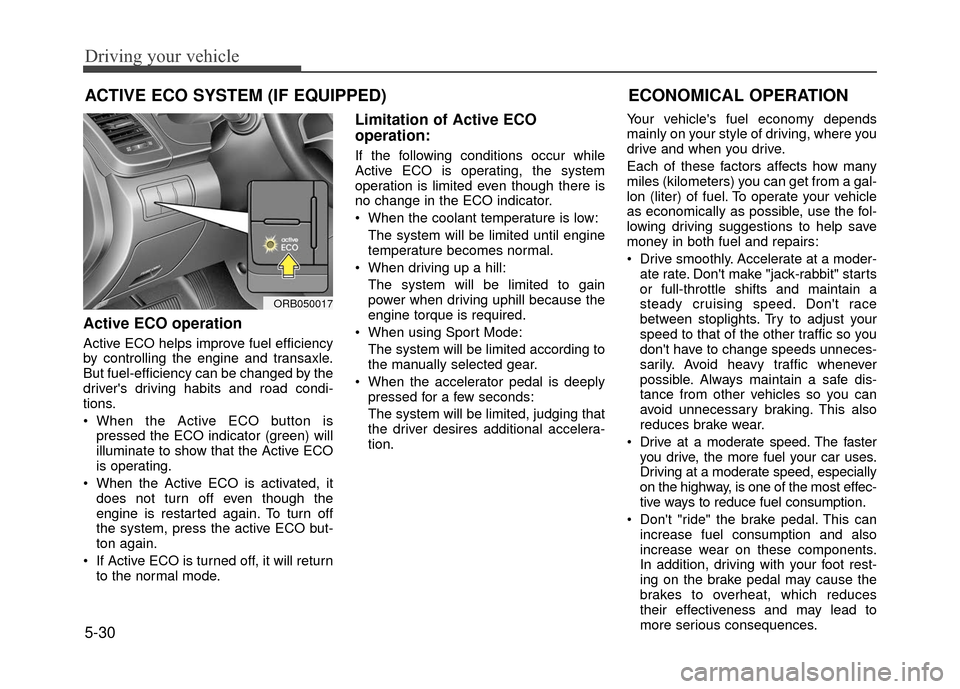
Active ECO operation
Active ECO helps improve fuel efficiency
by controlling the engine and transaxle.
But fuel-efficiency can be changed by the
driver's driving habits and road condi-
tions.
When the Active ECO button ispressed the ECO indicator (green) will
illuminate to show that the Active ECO
is operating.
When the Active ECO is activated, it does not turn off even though the
engine is restarted again. To turn off
the system, press the active ECO but-
ton again.
If Active ECO is turned off, it will return to the normal mode.
Limitation of Active ECO
operation:
If the following conditions occur while
Active ECO is operating, the system
operation is limited even though there is
no change in the ECO indicator.
When the coolant temperature is low:
The system will be limited until engine
temperature becomes normal.
When driving up a hill: The system will be limited to gain
power when driving uphill because the
engine torque is required.
When using Sport Mode: The system will be limited according to
the manually selected gear.
When the accelerator pedal is deeply pressed for a few seconds:
The system will be limited, judging that
the driver desires additional accelera-
tion. Your vehicle's fuel economy depends
mainly on your style of driving, where you
drive and when you drive.
Each of these factors affects how many
miles (kilometers) you can get from a gal-
lon (liter) of fuel. To operate your vehicle
as economically as possible, use the fol-
lowing driving suggestions to help save
money in both fuel and repairs:
Drive smoothly. Accelerate at a moder-
ate rate. Don't make "jack-rabbit" starts
or full-throttle shifts and maintain a
steady cruising speed. Don't race
between stoplights. Try to adjust your
speed to that of the other traffic so you
don't have to change speeds unneces-
sarily. Avoid heavy traffic whenever
possible. Always maintain a safe dis-
tance from other vehicles so you can
avoid unnecessary braking. This also
reduces brake wear.
Drive at a moderate speed. The faster you drive, the more fuel your car uses.
Driving at a moderate speed, especially
on the highway, is one of the most effec-
tive ways to reduce fuel consumption.
Don't "ride" the brake pedal. This can increase fuel consumption and also
increase wear on these components.
In addition, driving with your foot rest-
ing on the brake pedal may cause the
brakes to overheat, which reduces
their effectiveness and may lead to
more serious consequences.
ACTIVE ECO SYSTEM (IF EQUIPPED)
ORB050017
ECONOMICAL OPERATION
Page 269 of 380
6-21
What to do in an emergency
10. To reinstall the wheel, hold it onthe studs, put the wheel nuts on
the studs and tighten them finger
tight. The nuts should be installed
with their tapered small diameter
ends directed inward. Jiggle the
tire to be sure it is completely
seated, then tighten the nuts as
much as possible with your fin-
gers again.
11. Lower the car to the ground by turning the wheel nut wrench
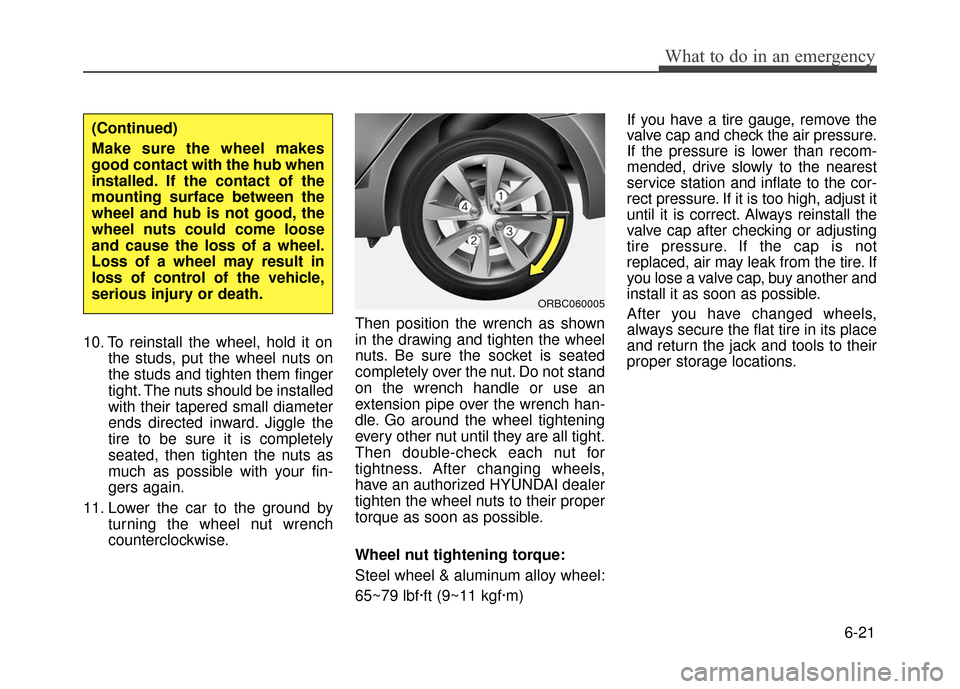
counterclockwise. Then position the wrench as shown
in the drawing and tighten the wheel
nuts. Be sure the socket is seated
completely over the nut. Do not stand
on the wrench handle or use an
extension pipe over the wrench han-
dle. Go around the wheel tightening
every other nut until they are all tight.
Then double-check each nut for
tightness. After changing wheels,
have an authorized HYUNDAI dealer
tighten the wheel nuts to their proper
torque as soon as possible.
Wheel nut tightening torque:
Steel wheel & aluminum alloy wheel:
65~79 lbf·ft (9~11 kgf·m) If you have a tire gauge, remove the
valve cap and check the air pressure.
If the pressure is lower than recom-
mended, drive slowly to the nearest
service station and inflate to the cor-
rect pressure. If it is too high, adjust it
until it is correct. Always reinstall the
valve cap after checking or adjusting
tire pressure. If the cap is not
replaced, air may leak from the tire. If
you lose a valve cap, buy another and
install it as soon as possible.
After you have changed wheels,
always secure the flat tire in its place
and return the jack and tools to their
proper storage locations.
(Continued)
Make sure the wheel makes
good contact with the hub when
installed. If the contact of the
mounting surface between the
wheel and hub is not good, the
wheel nuts could come loose
and cause the loss of a wheel.
Loss of a wheel may result in
loss of control of the vehicle,
serious injury or death.
ORBC060005
Page 303 of 380
Maintenance
7-20
Automatic transaxle fluid
(if equipped)
Automatic transaxle fluid should not be
checked under normal usage conditions.
But in severe conditions, the fluid should
be changed at an authorized HYUNDAI
dealer in accordance to the scheduled
maintenance at the beginning of this
chapter.
✽ ✽NOTICE
Automatic transaxle fluid color is basi-
cally red.
As the vehicle is driven, the automatic
transaxle fluid will begin to look darker.
It is normal condition and you should
not judge the need to replace the fluid
based upon the changed color.
Manual transaxle fluid
(if equipped)
Inspect the manual transaxle fluid
according to the maintenance schedule.
Brake hoses and lines
Visually check for proper installation,
chafing, cracks, deterioration and any
leakage. Replace any deteriorated or
damaged parts immediately.
Brake/clutch fluid
Check brake fluid level in the brake fluid
reservoir. The level should be between
"MIN" and "MAX" marks on the side of
the reservoir. Use only hydraulic brake
fluid conforming to DOT 3 or DOT 4
specification.
Valve clearance
Inspect excessive valve noise and/or
engine vibration and adjust if necessary.
An authorized HYUNDAI dealer should
perform the operation.
Parking brake
Inspect the parking brake system includ-
ing the parking brake pedal and cables.
Brake discs, pads, calipers and
rotors
Check the pads for excessive wear, discs
for run out and wear, and calipers for fluid
leakage.
Exhaust pipe and muffler
Visually inspect the exhaust pipes, muf-
fler and hangers for cracks, deterioration,
or damage. Start the engine and listen
carefully for any exhaust gas leakage.
Tighten connections or replace parts as
necessary.
Suspension mounting bolts
Check the suspension connections for
looseness or damage. Retighten to the
specified torque.
Steering gear box, linkage &
boots/lower arm ball joint
With the vehicle stopped and engine off,
check for excessive free-play in the
steering wheel. Check the linkage for
bends or damage. Check the dust boots
and ball joints for deterioration, cracks, or
damage. Replace any damaged parts.
Drive shafts and boots
Check the drive shafts, boots and clamps
for cracks, deterioration, or damage.
Replace any damaged parts and, if nec-
essary, repack the grease.
Air conditioning refrigerant
Check the air conditioning lines and con-
nections for leakage and damage.
CAUTION
The use of a non-specified fluid
could result in transaxle malfunc-tion and failure. Use only specifiedautomatic transaxle fluid. (Refer to"Recommended lubricants andcapacities" in section 8.)
Page 364 of 380
8-3
Specifications, Consumer information, Reporting safety defeccts
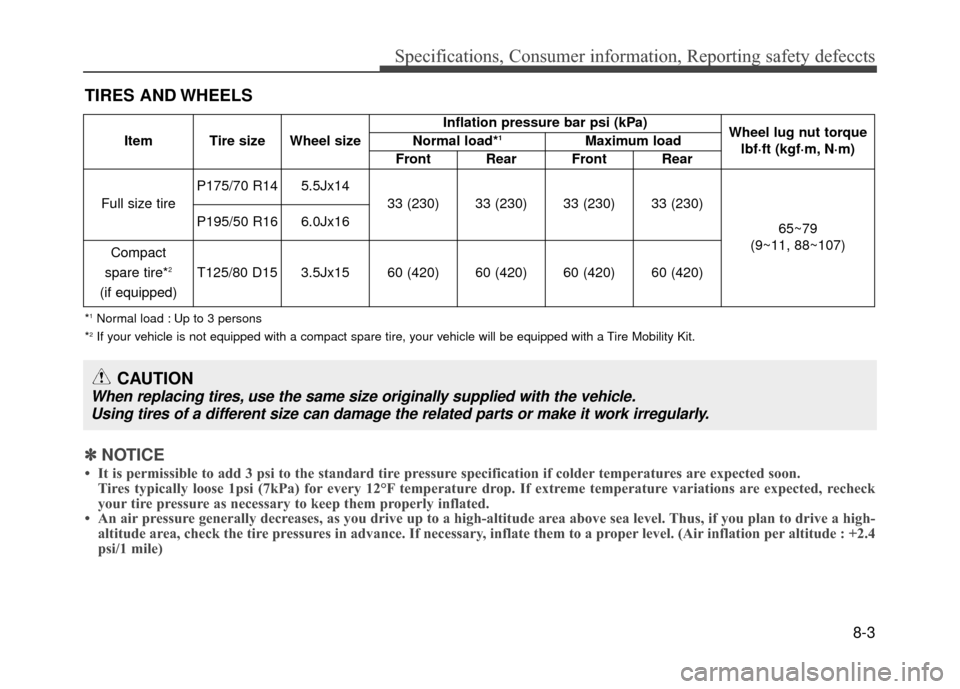
TIRES AND WHEELS
Item Tire size Wheel sizeInflation pressure bar psi (kPa)
Wheel lug nut torque
lbf·ft (kgf·m, N·m)
Normal load*1Maximum load
Front Rear Front Rear
Full size tire P175/70 R14 5.5Jx14
33 (230) 33 (230) 33 (230) 33 (230)
65~79
(9~11, 88~107)
P195/50 R16 6.0Jx16
Compact
spare tire*
2
(if equipped) T125/80 D15 3.5Jx15 60 (420) 60 (420) 60 (420) 60 (420)
*1Normal load : Up to 3 persons
*2If your vehicle is not equipped with a compact spare tire, your vehicle will be equipped with a Tire Mobility Kit.
✽
✽ NOTICE
• It is permissible to add 3 psi to the standard tire pressure specification if colder temperatures are expected soon.
Tires typically loose 1psi (7kPa) for every 12°F temperature drop. If extreme temperature variations are expected, recheck
your tire pressure as necessary to keep them properly inflated.
• An air pressure generally decreases, as you drive up to a high-altitude area above sea level. Thus, if you plan to drive a high- altitude area, check the tire pressures in advance. If necessary, inflate them to a proper level. (Air inflation per altitude : +2 .4
psi/1 mile)
CAUTION
When replacing tires, use the same size originally supplied with the vehicle.
Using tires of a different size can damage the related parts or make it work irregularly.