tow Hyundai Accent 2017 Owner's Manual
[x] Cancel search | Manufacturer: HYUNDAI, Model Year: 2017, Model line: Accent, Model: Hyundai Accent 2017Pages: 380, PDF Size: 12.45 MB
Page 23 of 380
3-7
Safety features of your vehicle
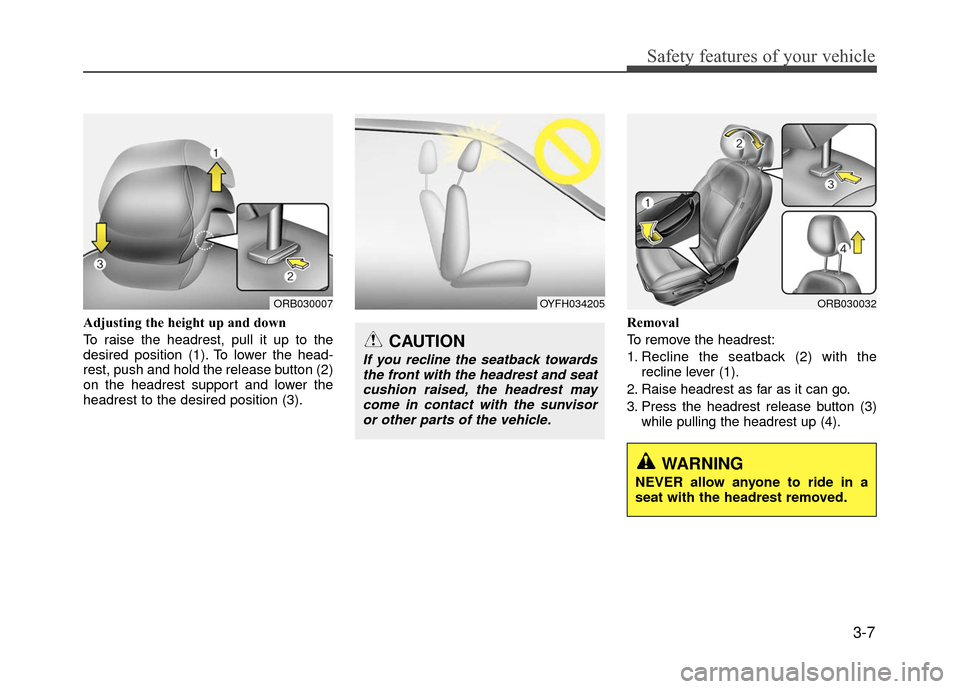
Adjusting the height up and down
To raise the headrest, pull it up to the
desired position (1). To lower the head-
rest, push and hold the release button (2)
on the headrest support and lower the
headrest to the desired position (3).Removal
To remove the headrest:
1. Recline the seatback (2) with the
recline lever (1).
2. Raise headrest as far as it can go.
3. Press the headrest release button (3) while pulling the headrest up (4).
WARNING
NEVER allow anyone to ride in a
seat with the headrest removed.
ORB030007OYFH034205ORB030032
CAUTION
If you recline the seatback towardsthe front with the headrest and seatcushion raised, the headrest maycome in contact with the sunvisoror other parts of the vehicle.
Page 27 of 380
3-11
Safety features of your vehicle
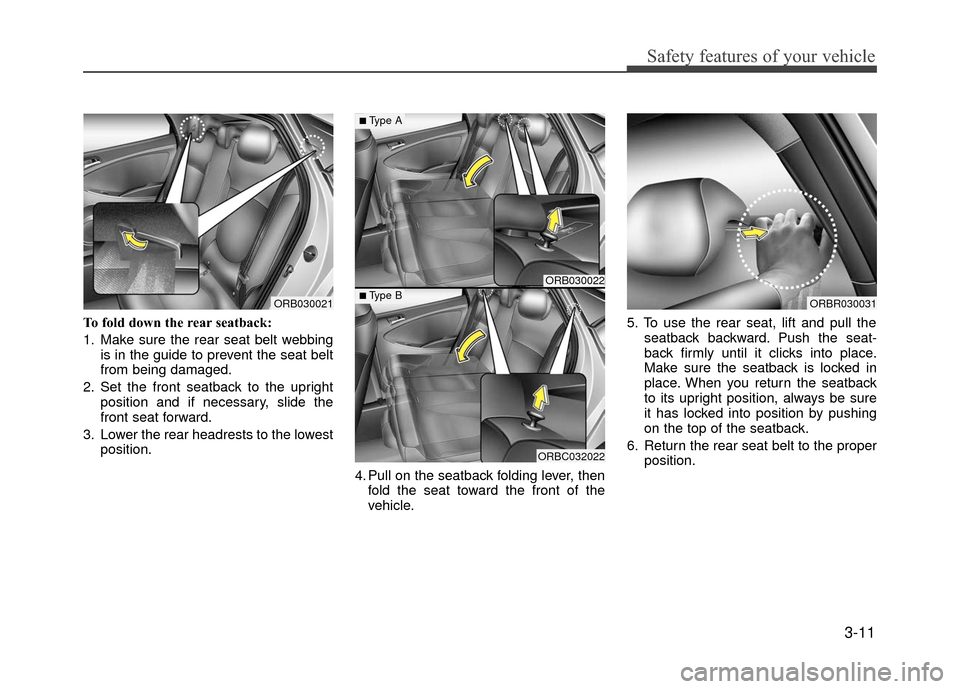
To fold down the rear seatback:
1. Make sure the rear seat belt webbingis in the guide to prevent the seat belt
from being damaged.
2. Set the front seatback to the upright position and if necessary, slide the
front seat forward.
3. Lower the rear headrests to the lowest position.
4. Pull on the seatback folding lever, thenfold the seat toward the front of the
vehicle. 5. To use the rear seat, lift and pull the
seatback backward. Push the seat-
back firmly until it clicks into place.
Make sure the seatback is locked in
place. When you return the seatback
to its upright position, always be sure
it has locked into position by pushing
on the top of the seatback.
6. Return the rear seat belt to the proper position.
ORB030022
ORBC032022
■Type A
■Type BORB030021ORBR030031
Page 45 of 380
3-29
Safety features of your vehicle
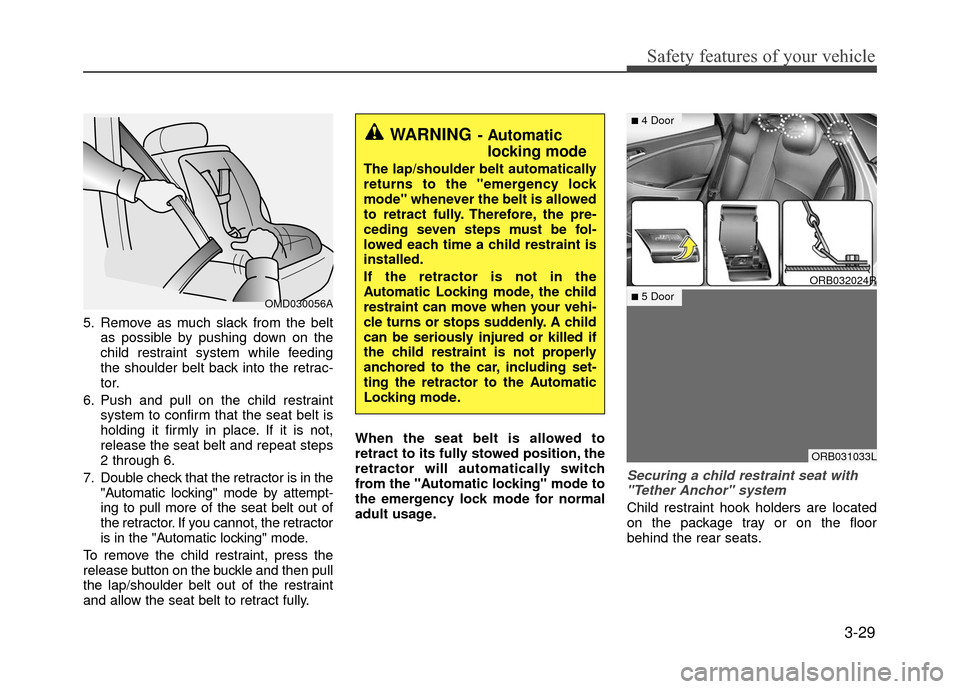
5. Remove as much slack from the beltas possible by pushing down on the
child restraint system while feeding
the shoulder belt back into the retrac-
tor.
6. Push and pull on the child restraint system to confirm that the seat belt is
holding it firmly in place. If it is not,
release the seat belt and repeat steps
2 through 6.
7. Double check that the retractor is in the "Automatic locking" mode by attempt-
ing to pull more of the seat belt out of
the retractor. If you cannot, the retractor
is in the "Automatic locking" mode.
To remove the child restraint, press the
release button on the buckle and then pull
the lap/shoulder belt out of the restraint
and allow the seat belt to retract fully. When the seat belt is allowed to
retract to its fully stowed position, the
retractor will automatically switch
from the "Automatic locking" mode to
the emergency lock mode for normal
adult usage.
Securing a child restraint seat with
"Tether Anchor" system
Child restraint hook holders are located
on the package tray or on the floor
behind the rear seats.
OMD030056A
WARNING- Automatic locking mode
The lap/shoulder belt automatically
returns to the "emergency lock
mode" whenever the belt is allowed
to retract fully. Therefore, the pre-
ceding seven steps must be fol-
lowed each time a child restraint is
installed.
If the retractor is not in the
Automatic Locking mode, the child
restraint can move when your vehi-
cle turns or stops suddenly. A child
can be seriously injured or killed if
the child restraint is not properly
anchored to the car, including set-
ting the retractor to the Automatic
Locking mode.
ORB032024R
ORB031033L
■4 Door
■5 Door
Page 56 of 380
Safety features of your vehicle
3-40
Main components of occupant
detection system
A detection device located within thefront passenger seat.
Electronic system to determine whether the front passenger air bag
system should be activated or deacti-
vated.
A warning light located on the instru- ment panel which illuminates the
words PASSENGER AIR BAG "OFF"
indicating the front passenger air bag
system is deactivated.
The instrument panel air bag warning light is interconnected with the occu-
pant detection system.
The ODS is designed to detect the pres-
ence of a properly-seated front passen-
ger and determine if the passenger's
front air bag should be enabled (may
inflate) or not. The purpose is to help reduce the risk of
injury or death from an inflating air bag to
certain front passenger seat occupants,
such as children, by requiring the air bag
to be automatically turned OFF.
For example, if a child restraint of the
type specified in the regulations is on the
seat, the occupant detection sensor can
detect it and cause the air bag to turn
OFF.
Front passenger seat adult occupants
who are properly seated and wearing the
seat belt properly, should not cause the
passenger air bag to be automatically
turned OFF. For small adults it may be
turned OFF, however, if the occupant
does not sit in the seat properly (for
example, by not sitting upright, by sitting
on the edge of the seat, or by otherwise
being out of position), this could cause
the sensor to turn the air bag OFF.
Always be sure that you and all vehicle
occupants are seated and restrained
properly (sitting upright with the seat in
an upright position, centered on the seat
cushion, with the person's legs comfort-
ably extended, feet on the floor, and
wearing the safety belt properly) for the
most effective protection by the air bag
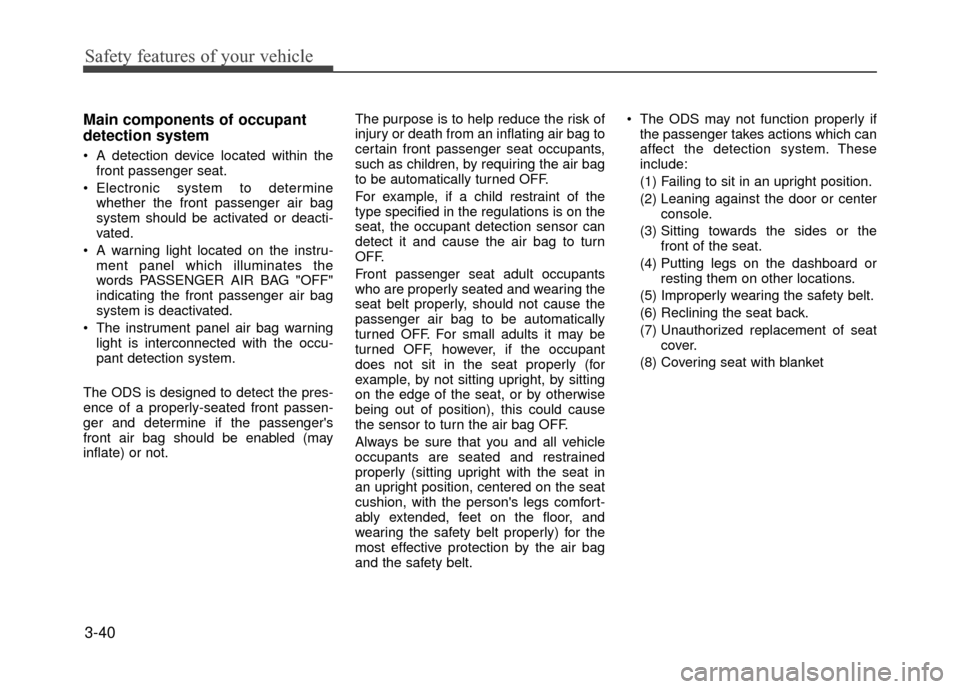
and the safety belt. The ODS may not function properly if
the passenger takes actions which can
affect the detection system. These
include:
(1) Failing to sit in an upright position.
(2) Leaning against the door or center console.
(3) Sitting towards the sides or the front of the seat.
(4) Putting legs on the dashboard or resting them on other locations.
(5) Improperly wearing the safety belt.
(6) Reclining the seat back.
(7) Unauthorized replacement of seat cover.
(8) Covering seat with blanket
Page 58 of 380
Safety features of your vehicle
3-42
1KMN3663
1KMN3664
1KMN3665
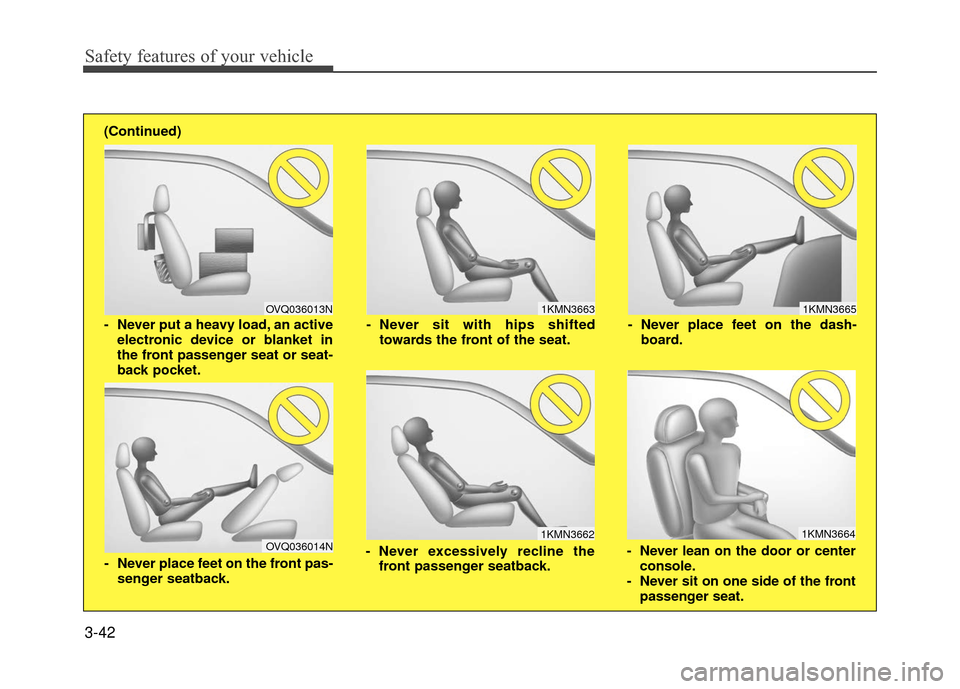
- Never sit with hips shiftedtowards the front of the seat.
- Never lean on the door or centerconsole.
- Never sit on one side of the front passenger seat.
- Never place feet on the dash-
board.
OVQ036013N
1KMN3662
- Never put a heavy load, an activeelectronic device or blanket in
the front passenger seat or seat-
back pocket.
- Never excessively recline thefront passenger seatback.
OVQ036014N
- Never place feet on the front pas-senger seatback.
(Continued)
Page 73 of 380
3-57
Safety features of your vehicle
Additional safety precautions
Never let passengers ride in the
cargo area or on top of a folded-
down back seat. All occupants should
sit upright, fully back in their seats with
their seat belts on and their feet on the
floor.
Passengers should not move out of
or change seats while the vehicle is
moving. A passenger who is not wear-
ing a seat belt during a crash or emer-
gency stop can be thrown against the
inside of the vehicle, against other
occupants, or out of the vehicle.
Each seat belt is designed to
restrain one occupant. If more than
one person uses the same seat belt,
they could be seriously injured or killed
in a collision.
Do not use any accessories on seat
belts. Devices claiming to improve
occupant comfort or reposition the seat
belt can reduce the protection provided
by the seat belt and increase the
chance of serious injury in a crash.
Passengers should not place hard
or sharp objects between them-
selves and the air bags. Carrying
hard or sharp objects on your lap or in
your mouth can result in injuries if an
air bag inflates.WARNING
Modification to SRS components or wiring, including the addition
of any kind of badges to the pad
covers or modifications to the
body structure, can adversely
affect SRS performance and lead
to possible injury.
Not only the modification of the parts where the SRS sensors are
but also the modification of other
parts of the vehicle may affect the
SRS performance and lead to
possible injury.
For cleaning the air bag pad cov- ers, use only a soft, dry cloth or
one which has been moistened
with plain water. Solvents or
cleaners could adversely affect
the air bag covers and proper
deployment of the system.
No objects should be placed over or near the air bag modules on
the steering wheel, instrument
panel, and the front passenger's
panel above the glove box,
because any such object could
cause harm if the vehicle is in a
crash severe enough to cause
the air bags to inflate.
(Continued)
(Continued)
If the air bags inflate, they mustbe replaced by an authorized
HYUNDAI dealer.
Do not tamper with or disconnect SRS wiring, or other components
of the SRS system. Doing so
could result in injury, due to acci-
dental inflation of the air bags or
by rendering the SRS inopera-
tive.
If components of the air bag sys- tem must be discarded, or if the
vehicle must be scrapped, certain
safety precautions must be
observed. An authorized
HYUNDAI dealer knows these
precautions and can give you the
necessary information. Failure to
follow these precautions and pro-
cedures could increase the risk
of personal injury.
If your car was flooded and has soaked carpeting or water on the
flooring, you shouldn't try to start
the engine; have the car towed to
an authorized HYUNDAI dealer.
Page 80 of 380
Features of your vehicle
4-6
Operating door locks from out-
side the vehicle
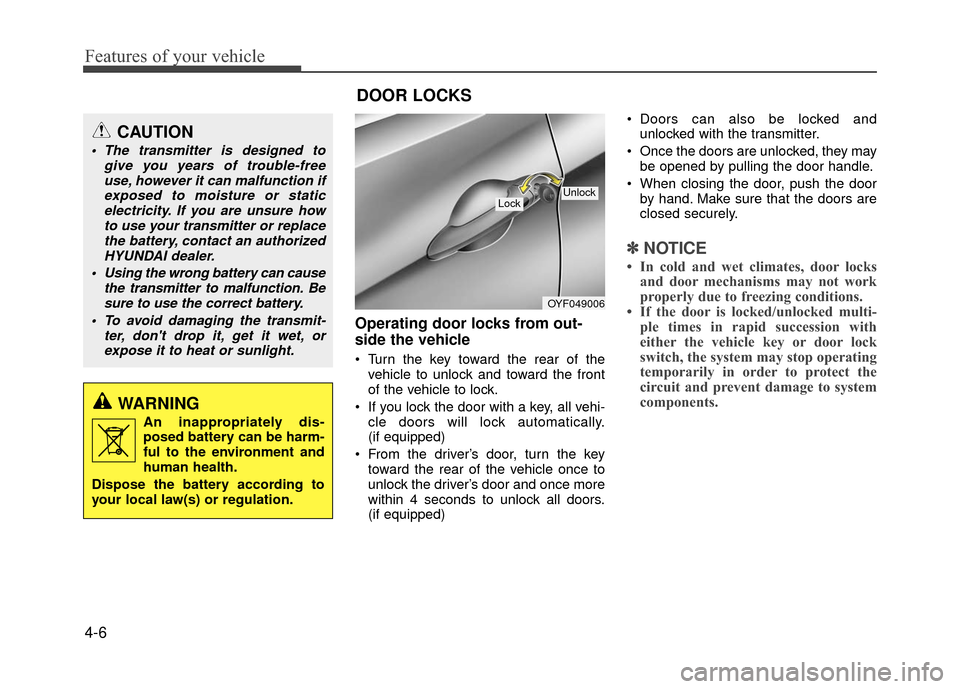
• Turn the key toward the rear of thevehicle to unlock and toward the front
of the vehicle to lock.
If you lock the door with a key, all vehi- cle doors will lock automatically.
(if equipped)
From the driver’s door, turn the key toward the rear of the vehicle once to
unlock the driver’s door and once more
within 4 seconds to unlock all doors.
(if equipped) Doors can also be locked and
unlocked with the transmitter.
Once the doors are unlocked, they may be opened by pulling the door handle.
When closing the door, push the door by hand. Make sure that the doors are
closed securely.
✽ ✽ NOTICE
• In cold and wet climates, door locks
and door mechanisms may not work
properly due to freezing conditions.
• If the door is locked/unlocked multi- ple times in rapid succession with
either the vehicle key or door lock
switch, the system may stop operating
temporarily in order to protect the
circuit and prevent damage to system
components.
CAUTION
The transmitter is designed to
give you years of trouble-freeuse, however it can malfunction ifexposed to moisture or staticelectricity. If you are unsure how to use your transmitter or replacethe battery, contact an authorizedHYUNDAI dealer.
Using the wrong battery can cause the transmitter to malfunction. Besure to use the correct battery.
To avoid damaging the transmit- ter, don't drop it, get it wet, orexpose it to heat or sunlight.
WARNING
An inappropriately dis-
posed battery can be harm-
ful to the environment and
human health.
Dispose the battery according to
your local law(s) or regulation.
DOOR LOCKS
OYF049006
LockUnlock
Page 95 of 380
4-21
Features of your vehicle
If your vehicle is equipped with a sunroof,
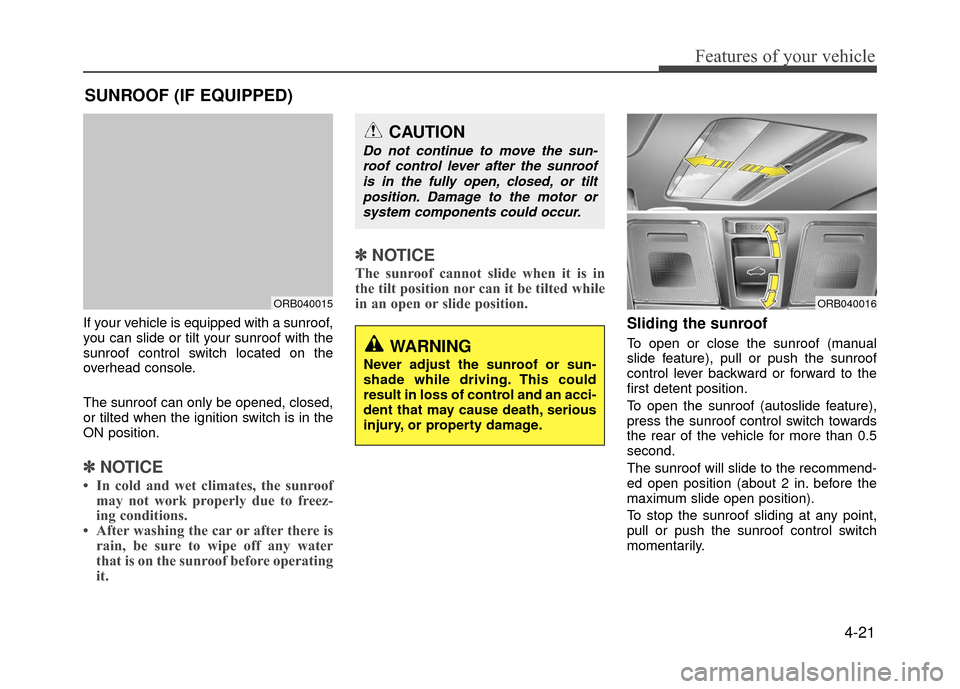
you can slide or tilt your sunroof with the
sunroof control switch located on the
overhead console.
The sunroof can only be opened, closed,
or tilted when the ignition switch is in the
ON position.
✽ ✽NOTICE
• In cold and wet climates, the sunroof
may not work properly due to freez-
ing conditions.
• After washing the car or after there is rain, be sure to wipe off any water
that is on the sunroof before operating
it.
✽ ✽ NOTICE
The sunroof cannot slide when it is in
the tilt position nor can it be tilted while
in an open or slide position.
Sliding the sunroof
To open or close the sunroof (manual
slide feature), pull or push the sunroof
control lever backward or forward to the
first detent position.
To open the sunroof (autoslide feature),
press the sunroof control switch towards
the rear of the vehicle for more than 0.5
second.
The sunroof will slide to the recommend-
ed open position (about 2 in. before the
maximum slide open position).
To stop the sunroof sliding at any point,
pull or push the sunroof control switch
momentarily.
SUNROOF (IF EQUIPPED)
ORB040015
CAUTION
Do not continue to move the sun-
roof control lever after the sunroofis in the fully open, closed, or tiltposition. Damage to the motor orsystem components could occur.
WARNING
Never adjust the sunroof or sun-
shade while driving. This could
result in loss of control and an acci-
dent that may cause death, serious
injury, or property damage.
ORB040016
Page 96 of 380
Features of your vehicle
4-22
To open the sunroof to the maximum
slide open position, press the the switch
towards the rear of the vehicle once
again and hold it until the sunroof slides
all the way open.
✽ ✽NOTICE
To reduce wind noise while driving, we
recommend you to drive at the recom-
mended postion (about 2 in. before the
maximum slide open positon).
To prevent damage to the sunroof and
the motor, do not continue to press the
sunroof control lever after the sunroof is
in the fully open, closed or tilt position(s).
To close the sunroof (autoslide feature),
move the sunroof control switch towards
the front of the vehicle for more than 0.5
second.
The sunroof will close all the way. To stop
the sunroof sliding at any point, pull or
push the sunroof control switch momen-
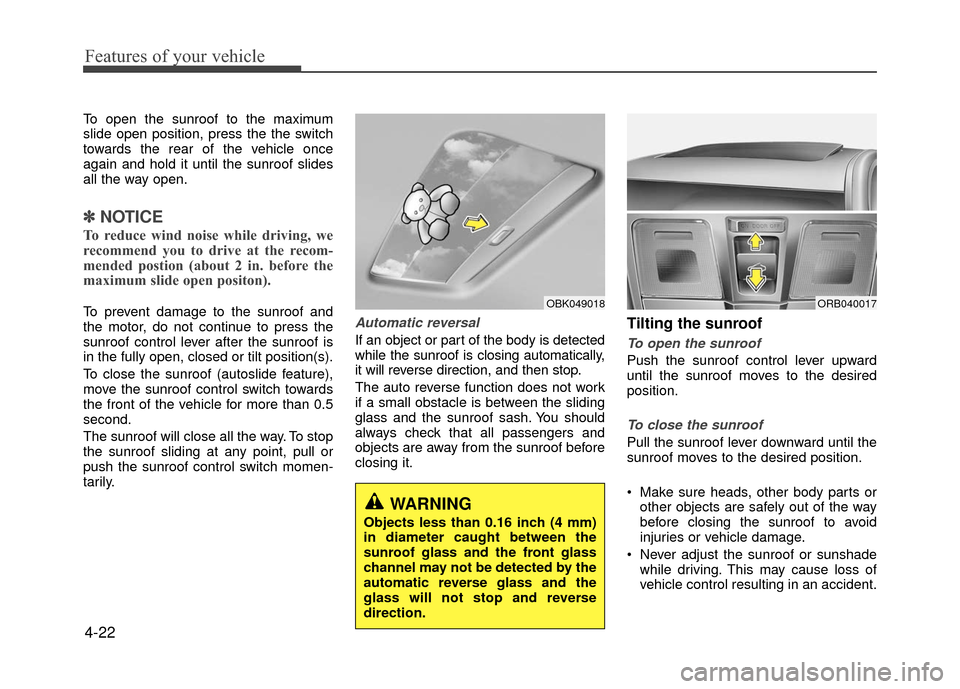
tarily.Automatic reversal
If an object or part of the body is detected
while the sunroof is closing automatically,
it will reverse direction, and then stop.
The auto reverse function does not work
if a small obstacle is between the sliding
glass and the sunroof sash. You should
always check that all passengers and
objects are away from the sunroof before
closing it.
Tilting the sunroof
To open the sunroof
Push the sunroof control lever upward
until the sunroof moves to the desired
position.
To close the sunroof
Pull the sunroof lever downward until the
sunroof moves to the desired position.
Make sure heads, other body parts or
other objects are safely out of the way
before closing the sunroof to avoid
injuries or vehicle damage.
Never adjust the sunroof or sunshade while driving. This may cause loss of
vehicle control resulting in an accident.
ORB040017OBK049018
WARNING
Objects less than 0.16 inch (4 mm)
in diameter caught between the
sunroof glass and the front glass
channel may not be detected by the
automatic reverse glass and the
glass will not stop and reverse
direction.
Page 100 of 380
Features of your vehicle
4-26
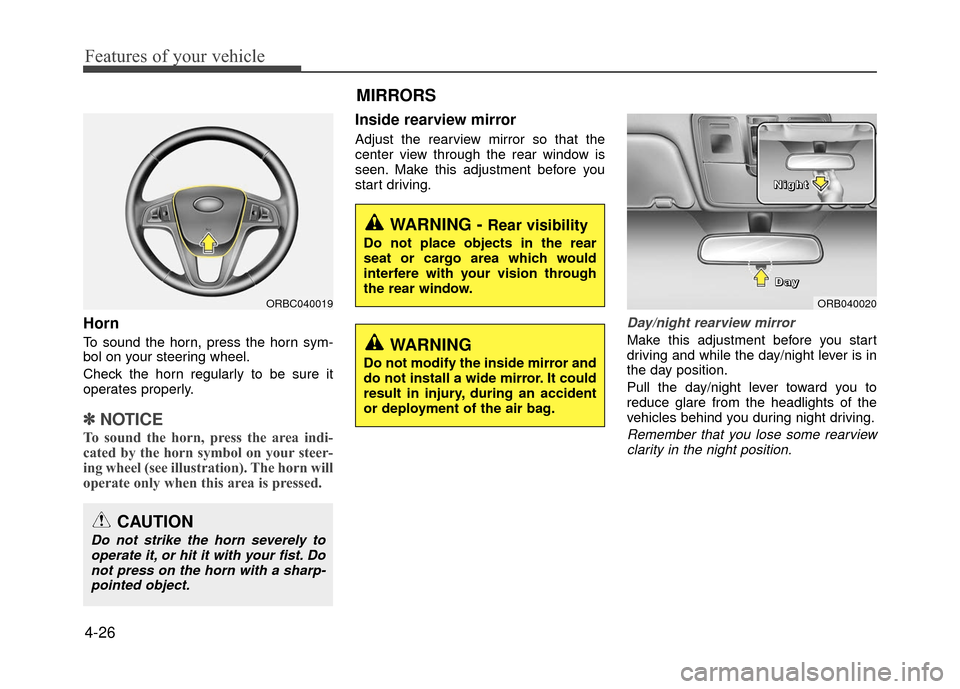
Horn
To sound the horn, press the horn sym-
bol on your steering wheel.
Check the horn regularly to be sure it
operates properly.
✽ ✽NOTICE
To sound the horn, press the area indi-
cated by the horn symbol on your steer-
ing wheel (see illustration). The horn will
operate only when this area is pressed.
Inside rearview mirror
Adjust the rearview mirror so that the
center view through the rear window is
seen. Make this adjustment before you
start driving.
Day/night rearview mirror
Make this adjustment before you start
driving and while the day/night lever is in
the day position.
Pull the day/night lever toward you to
reduce glare from the headlights of the
vehicles behind you during night driving.
Remember that you lose some rearview
clarity in the night position.
ORBC040019
CAUTION
Do not strike the horn severely to operate it, or hit it with your fist. Donot press on the horn with a sharp-pointed object.
MIRRORS
WARNING - Rear visibility
Do not place objects in the rear
seat or cargo area which would
interfere with your vision through
the rear window.
ORB040020
D
D
D
D
a
a
a
a
y
y
y
y
N
N
N
N
i
i
i
i
g
g
g
g
h
h
h
h
t
t
t
t
WARNING
Do not modify the inside mirror and
do not install a wide mirror. It could
result in injury, during an accident
or deployment of the air bag.