window Hyundai Atos 2002 User Guide
[x] Cancel search | Manufacturer: HYUNDAI, Model Year: 2002, Model line: Atos, Model: Hyundai Atos 2002Pages: 249, PDF Size: 3.11 MB
Page 64 of 249
DRIVING YOUR HYUNDAI
DRIVING YOUR HYUNDAI DRIVING YOUR HYUNDAI
DRIVING YOUR HYUNDAI
DRIVING YOUR HYUNDAI
2- 1
2. DRIVING YOUR HYUNDAI
C010A01A-AAT
WARNING: ENGINE EXHAUST CAN BE DANGEROUS!
WARNING: ENGINE EXHAUST CAN BE DANGEROUS! WARNING: ENGINE EXHAUST CAN BE DANGEROUS!
WARNING: ENGINE EXHAUST CAN BE DANGEROUS!
WARNING: ENGINE EXHAUST CAN BE DANGEROUS!
Engine exhaust fumes can be extremely dangerous. If, at any time, you smell exhaust fumes inside the vehicle, open the windows immediately. o Do not inhale exhaust fumes.
o Do not inhale exhaust fumes. o Do not inhale exhaust fumes.
o Do not inhale exhaust fumes.
o Do not inhale exhaust fumes. Exhaust fumes contain carbon monoxide, a colorless, odorless gas that can cause unconsciousness and death by asphyxiation.
o Be sure the exhaust system does not leak.
o Be sure the exhaust system does not leak. o Be sure the exhaust system does not leak.
o Be sure the exhaust system does not leak.
o Be sure the exhaust system does not leak. The exhaust system should be checked whenever the vehicle is raised to change the oil or for any other purpose. If you hear a change in the sound of the exhaust or if you drive over something that strikes the underneath side of the car, have theexhaust system checked as soon as possible by your Hyundai dealer.
o Do not run the engine in an enclosed area.
o Do not run the engine in an enclosed area. o Do not run the engine in an enclosed area.
o Do not run the engine in an enclosed area.
o Do not run the engine in an enclosed area. Letting the engine idle in your garage, even with the garage door open, is a hazardous practice. Never run the engine in your garage any longer than it takes to start the engine and back the car out.
o Avoid idling the engine for prolonged periods with people inside the car.
o Avoid idling the engine for prolonged periods with people inside the car. o Avoid idling the engine for prolonged periods with people inside the car.
o Avoid idling the engine for prolonged periods with people inside the car.
o Avoid idling the engine for prolonged periods with people inside the car. If it is necessary to idle the engine for a prolonged period with people inside the car, be sure to do so only in an open area with the air intake set at "Fresh" and the fan operating at one of the higher speeds so fresh air is drawn into the interior.If you must drive with the tail gate open because you are carrying objects that make this necessary: 1. Close all windows. 2. Open side vents.3. Set the air intake control at "Fresh", the air flow control at "Floor" or "Face" and the fan at one of the higher speeds.
To assure proper operation of the ventilation system, be sure the ventilation air intakes located just in front of the windshield are kept clear of snow, ice, leaves or other obstructions.
22
22
2
Page 65 of 249
DRIVING YOUR HYUNDAI
DRIVING YOUR HYUNDAI DRIVING YOUR HYUNDAI
DRIVING YOUR HYUNDAI
DRIVING YOUR HYUNDAI
2- 2 C020A01A-AAT
BEFORE STARTING THE ENGINE
BEFORE STARTING THE ENGINE BEFORE STARTING THE ENGINE
BEFORE STARTING THE ENGINE
BEFORE STARTING THE ENGINE
Before you start the engine, you should always:
1. Look around the vehicle to be sure there are no flat tires, puddles of oil, water or other indications of possible trouble.
2. After entering the car, check to be sure the parking brake is engaged.
3. Check that all windows, and lights are clean.
4. Check that the interior and exterior mirrors are clean and in position.
5. Check your seat, seatback and headrest to be sure they are in their proper positions.
6. Lock all the doors.
7. Fasten your seat belt and be sure that all other occupants have fastened theirs.
8. Turn off all lights and accessories that are not needed.
9. When you turn the ignition switch to "ON", check that all appropriate warning lights are operating and that you have sufficient fuel.
10. Check the operation of warning lights and all bulbs when key is in the "ON" position. o To start the engine, insert the ignition key
and turn it to the "START" position. Releaseit as soon as the engine starts. Do not hold
the key in the "START" position for morethan 15 seconds.
NOTE:
NOTE: NOTE:
NOTE:
NOTE:
For safety, the engine will not start if the
For safety, the engine will not start if the For safety, the engine will not start if the
For safety, the engine will not start if the
For safety, the engine will not start if the
shift lever is not
shift lever is not shift lever is not
shift lever is not
shift lever is not in "P" or "N" Position
in "P" or "N" Position in "P" or "N" Position
in "P" or "N" Position
in "P" or "N" Position
(Automatic Transaxle).
(Automatic Transaxle). (Automatic Transaxle).
(Automatic Transaxle).
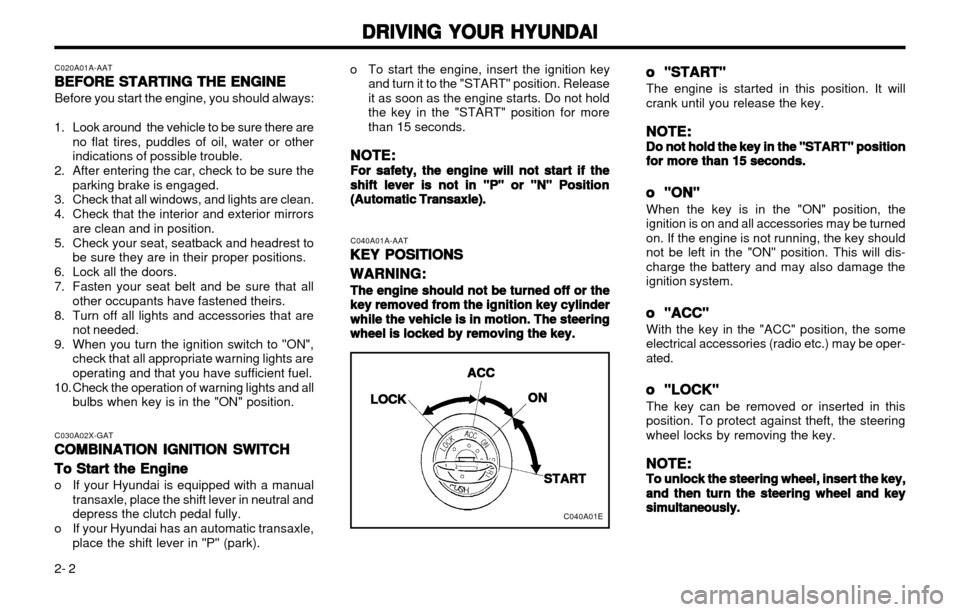
(Automatic Transaxle). C040A01A-AAT
KEY POSITIONS
KEY POSITIONS KEY POSITIONS
KEY POSITIONS
KEY POSITIONS
WARNING:
WARNING: WARNING:
WARNING:
WARNING:
The engine should not be turned off or the
The engine should not be turned off or the The engine should not be turned off or the
The engine should not be turned off or the
The engine should not be turned off or the
key removed from
key removed from key removed from
key removed from
key removed from the ignition key cylinder
the ignition key cylinder the ignition key cylinder
the ignition key cylinder
the ignition key cylinder
while the vehicle is in motion. The steering
while the vehicle is in motion. The steering while the vehicle is in motion. The steering
while the vehicle is in motion. The steering
while the vehicle is in motion. The steering
wheel
wheel wheel
wheel
wheel is locked by removing the key.
is locked by removing the key. is locked by removing the key.
is locked by removing the key.
is locked by removing the key. oo
oo
o "START"
"START" "START"
"START"
"START"
The engine is started in this position. It will crank until you release the key.
NOTE:
NOTE: NOTE:
NOTE:
NOTE:
Do not hold the key in the "START" position
Do not hold the key in the "START" position Do not hold the key in the "START" position
Do not hold the key in the "START" position
Do not hold the key in the "START" position
for more than 15 seconds.
for more than 15 seconds. for more than 15 seconds.
for more than 15 seconds.
for more than 15 seconds.
oo
oo
o
"ON"
"ON" "ON"
"ON"
"ON"
When the key is in the "ON" position, the
ignition is on and all accessories may be turnedon. If the engine is not running, the key shouldnot be left in the "ON" position. This will dis-
charge the battery and may also damage theignition system.
oo
oo
o "ACC"
"ACC" "ACC"
"ACC"
"ACC"
With the key in the "ACC" position, the some
electrical accessories (radio etc.) may be oper-ated.
oo
oo
o "LOCK"
"LOCK" "LOCK"
"LOCK"
"LOCK"
The key can be removed or inserted in thisposition. To protect against theft, the steeringwheel locks by removing the key.
NOTE:
NOTE: NOTE:
NOTE:
NOTE:
To unlock the steering wheel, insert the key,
To unlock the steering wheel, insert the key, To unlock the steering wheel, insert the key,
To unlock the steering wheel, insert the key,
To unlock the steering wheel, insert the key,
and then turn the
and then turn the and then turn the
and then turn the
and then turn the
steering wheel and key
steering wheel and key steering wheel and key
steering wheel and key
steering wheel and key
simultaneously.
simultaneously. simultaneously.
simultaneously.
simultaneously.
C030A02X-GAT
COMBINATION IGNITION SWITCH
COMBINATION IGNITION SWITCH COMBINATION IGNITION SWITCH
COMBINATION IGNITION SWITCH
COMBINATION IGNITION SWITCH
To Start the Engine
To Start the Engine To Start the Engine
To Start the Engine
To Start the Engine
o If your Hyundai is equipped with a manual
transaxle, place the shift lever in neutral and depress the clutch pedal fully.
o If your Hyundai has an automatic transaxle, place the shift lever in "P" (park).
C040A01E
LOCK
LOCK LOCK
LOCK
LOCK ACC
ACC ACC
ACC
ACC
ONON
ONON
ON
START
START START
START
START
Page 73 of 249
DRIVING YOUR HYUNDAI
DRIVING YOUR HYUNDAI DRIVING YOUR HYUNDAI
DRIVING YOUR HYUNDAI
DRIVING YOUR HYUNDAI
2- 10 ice. If the lock is frozen internally, you may be able to thaw it out by using a heated key.Handle the heated key with care to avoid burn-ing your fingers.
NOTE:
NOTE: NOTE:
NOTE:
NOTE:
The proper temperature for using the immo-
The proper temperature for using the immo- The proper temperature for using the immo-
The proper temperature for using the immo-
The proper temperature for using the immo-
bilizer key is from -40°C to 80°C. If you heat
bilizer key is from -40°C to 80°C. If you heat bilizer key is from -40°C to 80°C. If you heat
bilizer key is from -40°C to 80°C. If you heat
bilizer key is from -40°C to 80°C. If you heat
the immobilizer key over 80°C to open the
the immobilizer key over 80°C to open the the immobilizer key over 80°C to open the
the immobilizer key over 80°C to open the
the immobilizer key over 80°C to open the
frozen lock,
frozen lock, frozen lock,
frozen lock,
frozen lock, it may cause damage to the
it may cause damage to the it may cause damage to the
it may cause damage to the
it may cause damage to the
transponder in its head.
transponder in its head. transponder in its head.
transponder in its head.
transponder in its head. C160H01A-AAT
Use Approved Anti-Freeze in Window
Use Approved Anti-Freeze in Window Use Approved Anti-Freeze in Window
Use Approved Anti-Freeze in Window
Use Approved Anti-Freeze in Window
Washer System
Washer System Washer System
Washer System
Washer System
To keep the water in the window washer sys- tem from freezing, add an approved anti-freezesolution in accordance with instructions on thecontainer. Window washer anti-freeze is avail-able from Hyundai dealers and most auto partsoutlets. Do not use engine coolant or othertypes of anti-freeze as these may damage thefinish. C160I01X-GAT
Don't Let Your Parking Brake Freeze
Don't Let Your Parking Brake Freeze Don't Let Your Parking Brake Freeze
Don't Let Your Parking Brake Freeze
Don't Let Your Parking Brake Freeze
Under some conditions your parking brake can freeze in the engaged position. This is mostlikely to happen when there is an accumulationof snow or ice around or near the rear brakes orif the brakes are wet. If there is a risk theparking brake may freeze, apply it only tempo-
C160F01A-AAT
Check Spark Plugs and Ignition
Check Spark Plugs and Ignition Check Spark Plugs and Ignition
Check Spark Plugs and Ignition
Check Spark Plugs and Ignition
System
System System
System
System
Inspect your spark plugs as described in Sec-tion 6 and replace them if necessary. Alsocheck all ignition wiring and components to besure they are not cracked, worn or damaged inany way.
C160D01A-AAT
Check Battery and Cables
Check Battery and Cables Check Battery and Cables
Check Battery and Cables
Check Battery and Cables
Winter puts additional burdens on the batterysystem. Visually inspect the battery and cablesas described in Section 6. The level of chargein your battery can be checked by your Hyundaidealer or a service station. C160E01A-AATChange to "Winter Weight" Oil if
Change to "Winter Weight" Oil if Change to "Winter Weight" Oil if
Change to "Winter Weight" Oil if
Change to "Winter Weight" Oil if
Necessary
Necessary Necessary
Necessary
Necessary
In some climates it is recommended that a lower viscosity "winter weight" oil be used dur-ing cold weather. See Section 9 for recommen-dations. If you aren't sure what weight oil youshould use, consult your Hyundai dealer. C160G01A-GAT
To Keep Locks from Freezing
To Keep Locks from Freezing To Keep Locks from Freezing
To Keep Locks from Freezing
To Keep Locks from Freezing
To keep the locks from freezing, squirt an approved de-icer fluid or glycerine into the keyopening. If a lock is covered with ice, squirt itwith an approved de-icing fluid to remove the
Failure to do so may adversely affect the safety
and handling of your car. Speeding, rapid accel-eration, sudden brake applications, and sharpturns are potentially very hazardous practices.During deceleration, use engine braking to thefullest extent. Sudden brake applications onsnowy or icy roads may cause skids to occur.
You need to keep sufficient distance betweenthe vehicle in front and your vehicle. Also, applythe brake gently.
It should be noted that installing tire chains on
the tire will provide a greater driving force, butwill not prevent side skids.
NOTE:
NOTE: NOTE:
NOTE:
NOTE:
Tire chains are not legal in all provinces.
Tire chains are not legal in all provinces. Tire chains are not legal in all provinces.
Tire chains are not legal in all provinces.
Tire chains are not legal in all provinces. Check
Check Check
Check
Check province laws before fitting tire
province laws before fitting tire province laws before fitting tire
province laws before fitting tire
province laws before fitting tire
chains.
chains. chains.
chains.
chains.
C160C01A-AATUse High Quality Ethylene Glycol
Use High Quality Ethylene Glycol Use High Quality Ethylene Glycol
Use High Quality Ethylene Glycol
Use High Quality Ethylene Glycol
Coolant
Coolant Coolant
Coolant
Coolant
Your Hyundai is delivered with high quality
ethylene glycol coolant in the cooling system. It is the only type of coolant that should be usedbecause it helps prevent corrosion in the cool-ing system, lubricates the water pump andprevents freezing. Be sure to replace or replen-ish your coolant in accordance with the main-tenance schedule in Section 5. Before winter,have your coolant tested to assure that itsfreezing point is sufficient for the temperaturesanticipated during the winter.
Page 74 of 249
DRIVING YOUR HYUNDAI
DRIVING YOUR HYUNDAI DRIVING YOUR HYUNDAI
DRIVING YOUR HYUNDAI
DRIVING YOUR HYUNDAI
2- 11
C190A01A-GAT
TRAILER OR VEHICLE TOWING
TRAILER OR VEHICLE TOWING TRAILER OR VEHICLE TOWING
TRAILER OR VEHICLE TOWING
TRAILER OR VEHICLE TOWING
If you are considering towing with your car, you
should first check with your Province Depart- ment of Motor Vehicles to determine their legal
requirements. Since laws vary from province to province the
requirements for towing trailers, cars, or other types of vehicles or apparatus may differ. Askyour Hyundai dealer for further details beforetowing.
CAUTION:
CAUTION: CAUTION:
CAUTION:
CAUTION:
Do not do any towing with your car during
Do not do any towing with your car during Do not do any towing with your car during
Do not do any towing with your car during
Do not do any towing with your car during its first 2,000 km (1,200 miles) in order to
its first 2,000 km (1,200 miles) in order to its first 2,000 km (1,200 miles) in order to
its first 2,000 km (1,200 miles) in order to
its first 2,000 km (1,200 miles) in order to
allow the engine to properly break in. Fail-
allow the engine to properly break in. Fail- allow the engine to properly break in. Fail-
allow the engine to properly break in. Fail-
allow the engine to properly break in. Fail-
ure to heed this caution may result in seri-
ure to heed this caution may result in seri- ure to heed this caution may result in seri-
ure to heed this caution may result in seri-
ure to heed this caution may result in seri-
ous engine or transaxle damage.
ous engine or transaxle damage. ous engine or transaxle damage.
ous engine or transaxle damage.
ous engine or transaxle damage.
C190B01S-AATTrailer Hitches
Trailer Hitches Trailer Hitches
Trailer Hitches
Trailer Hitches
Select the proper hitch and ball combination,
making sure that it's location is compatible with that of the trailer or vehicle being towed.
Use a quality non-equalizing hitch which distrib-
utes the tongue load uniformly throughout thechassis.
The hitch should be bolted securely to the car
and installed by a qualified technician. DO NOTUSE A HITCH DESIGNED FOR TEMPORARYINSTALLATION AND NEVER USE ONE THATATTACHES ONLY TO THE BUMPER.
C170A01A-AAT
HIGHER SPEED MOTORING
HIGHER SPEED MOTORING HIGHER SPEED MOTORING
HIGHER SPEED MOTORING
HIGHER SPEED MOTORING
Pre-Trip Inspections
Pre-Trip Inspections Pre-Trip Inspections
Pre-Trip Inspections
Pre-Trip Inspections 1. Tires:
Adjust the tire inflation pressures to specifica-
tion driving. Low tire inflation pressures will result in overheating and possible failure of thetires.
Avoid using worn or damaged tires which may
result in reduced traction or tire failure.
NOTE:
NOTE: NOTE:
NOTE:
NOTE:
Never exceed the maximum tire inflation
Never exceed the maximum tire inflation Never exceed the maximum tire inflation
Never exceed the maximum tire inflation
Never exceed the maximum tire inflation pressure shown on the tires.
pressure shown on the tires. pressure shown on the tires.
pressure shown on the tires.
pressure shown on the tires.
2. Fuel, engine coolant and engine oil:High speed travel consumes 1.5 times more
fuel than urban motoring. Do not forget to check both engine coolant and engine oil. 3. Drive belt:
A loose or damaged drive belt may result in
overheating of the engine.
C180A01A-AATUSE OF LIGHTS
USE OF LIGHTS USE OF LIGHTS
USE OF LIGHTS
USE OF LIGHTS
Check your lights regularly for correct operation
and always keep them clean. When driving during the day in conditions of poor visibility, itis helpful to drive with headlights on low beam.This enables you to be seen as well as to see.
rarily while you put the gear selector lever in"P" (automatic transaxle) or in first or reversegear (manual transaxle) and block the rearwheels so the car cannot roll. Then release theparking brake.
C160J01A-AATDon't Let Ice and Snow Accumulate
Don't Let Ice and Snow Accumulate Don't Let Ice and Snow Accumulate
Don't Let Ice and Snow Accumulate
Don't Let Ice and Snow Accumulate
Underneath
Underneath Underneath
Underneath
Underneath
Under some conditions, snow and ice can build
up under the fenders and interfere with thesteering. When driving in severe winter condi-tions where this may happen, you should peri-odically check underneath the car to be surethe movement of the front wheels and thesteering components are not obstructed.
C160K01A-AATCarry Emergency Equipment
Carry Emergency Equipment Carry Emergency Equipment
Carry Emergency Equipment
Carry Emergency Equipment
Depending on the severity of the weather where
you drive your car, you should carry appropri-ate emergency equipment. Some of the itemsyou may want to carry include tire chains, towstraps or chains, flashlight, emergency flares,sand, a shovel, jumper cables, a windowscraper, gloves, ground cloth, coveralls, a blan-ket, etc.
Page 89 of 249
CORROSION PREVENTION AND APPEARANCE CARE
CORROSION PREVENTION AND APPEARANCE CARE CORROSION PREVENTION AND APPEARANCE CARE
CORROSION PREVENTION AND APPEARANCE CARE
CORROSION PREVENTION AND APPEARANCE CARE
4-4 Take a piece of cheese cloth and using any mild soap and lukewarm water, work up a goodlather. Thoroughly wash the leather. Wipe cleanwith a slightly damp cloth and dry with softcloth. Do this as often as the leather becomessoiled. During tanning operations, sufficient oils are incorporated through processing that none needbe applied during the life of the leather. Oil
applied to the finished surface will in no wayhelp the leather and may do more harm thangood. Varnishes and furniture polishes shouldnever be used under any conditions. E040C01A-AAT
Cleaning the Carpets
Cleaning the Carpets Cleaning the Carpets
Cleaning the Carpets
Cleaning the Carpets
Use a foam-type carpet cleaner. Cleaners of this type are available in aerosol cans in liquidform or powder. Read the instructions and fol-low them exactly. Using a vacuum cleaner withthe appropriate attachment, remove as muchdirt from the carpets as possible. Apply thefoam following the manufacturer's directions,then rub in overlapping circles. Do not addwater. These cleaners work best when thecarpet is kept as dry as possible. E050A01A-AAT
ANY QUESTIONS?
ANY QUESTIONS? ANY QUESTIONS?
ANY QUESTIONS?
ANY QUESTIONS?
If you have any questions about the care of
your car, consult your Hyundai dealer. E040D01A-AAT
Cleaning the Seat Belts
Cleaning the Seat Belts Cleaning the Seat Belts
Cleaning the Seat Belts
Cleaning the Seat Belts
To clean the seat belts, use a cloth or sponge
with mild soap or detergent and warm water. Donot use strong detergents, dye, bleach or abra-sive materials on the seat belts as this mayweaken the fabric.
While cleaning the belts, inspect them for ex-
cessive wear, cuts, fraying or other signs ofdamage and replace them if necessary.
E040E01A-AATCleaning the Windows
Cleaning the Windows Cleaning the Windows
Cleaning the Windows
Cleaning the Windows
You may use any household window cleaner onthe windows. However, when cleaning the in-side of the rear window be careful not to dam-age the rear window defroster wiring.
Page 127 of 249
INDEX
INDEX INDEX
INDEX
INDEX
10-3
Adjustable height ........................................................................... 1-9
Adjusting your seat belt ...............................................................
1-10
Care of seat belts .......................................................................... 1-8
Precautions .................................................................................... 1-7
Spark Plugs ............................................................................... 6-7 ~ 6-8 Speedometer ..................................................................................... 1-22
Starting Procedure .............................................................................. 2-3
Steering Wheel Free play ................................................................. 6-13
Stereo Radio Operation (H922M) .......................................... 1-47 ~ 1-48
Stereo Radio Operation (HMR90) ......................................... 1-42 ~ 1-43
Stereo Sound System ............................................................ 1-40 ~ 1-41
Sun Visor .......................................................................................... 1-32
TT
TT
T Tail Gate
Open ............................................................................................ 1-30
Remote release ............................................................................ 1-30
Tires
Balancing ....................................................................................... 8-3
Chains ............................................................................................ 8-2
Changing a flat tire ........................................................................ 3-4
If you have a flat tire ...................................................................... 3-3Information ..................................................................................... 8-1
Pressure ........................................................................................ 8-1 Replacement .................................................................................. 8-3
Rotation .......................................................................................... 8-2
Snow tires ...................................................................................... 8-2
Spare tire ....................................................................................... 3-3
Traction .......................................................................................... 8-3
MM
MM
MMaintenance Intervals
Explanation of scheduled maintenance items ...................... 5-5 ~ 5-7
Maintenance under severe usage conditions ................................ 5-4
Scheduled maintenance ................................................................. 5-2
Service requirements ..................................................................... 5-1
Mirrors Day-night inside rearview ............................................................ 1-28
Outside rear view ........................................................................ 1-27
OO
OO
OOdometer .......................................................................................... 1-23
PP
PP
P
Parking Brake ................................................................................... 1-28
Power Steering Fluid Level .................................................... 6-16 ~ 6-17
Pretensioner Seat Belt ...................................................................... 1-13
RR
RR
RRear Seat
Fold down .................................................................................... 1-29
Rear Window Defroster Switch ......................................................... 1-26
Rear Window Wiper and Washer ..................................................... 1-25
Roof Rack ......................................................................................... 1-33
SS
SS
SSeat Belts
2-Point static type ............................................................. 1-10 ~ 1-11
3-Point type ......................................................................... 1-9 ~ 1-10
Page 128 of 249
INDEX
INDEX INDEX
INDEX
INDEX
10-4
Towing
Emergency ..................................................................................... 3-8
If your car must be towed ............................................................. 3-7
Trailer or vehicle towing .............................................................. 2-11
Transaxle
Automatic ....................................................................................... 2-5
Automatic transaxle fluid checking ................................... 6-10 ~ 6-11
Manual transaxle oil checking ....................................................... 6-9
VV
VV
V
Vehicle Identification Number (VIN) .................................................... 8-1 Ventilation
Center ventilator ........................................................................... 1-37
Side ventilator .............................................................................. 1-37
WW
WW
W
Warning Lights ....................................................................... 1-20 ~ 1-22Windows
Manual ........................................................................................... 1-6
Power ............................................................................................. 1-7
Windshield Wiper and Washer ......................................................... 1-24
Windshield Wiper Blades .................................................................... 6-9
Page 141 of 249
FEATURES OF YOUR HYUNDAI
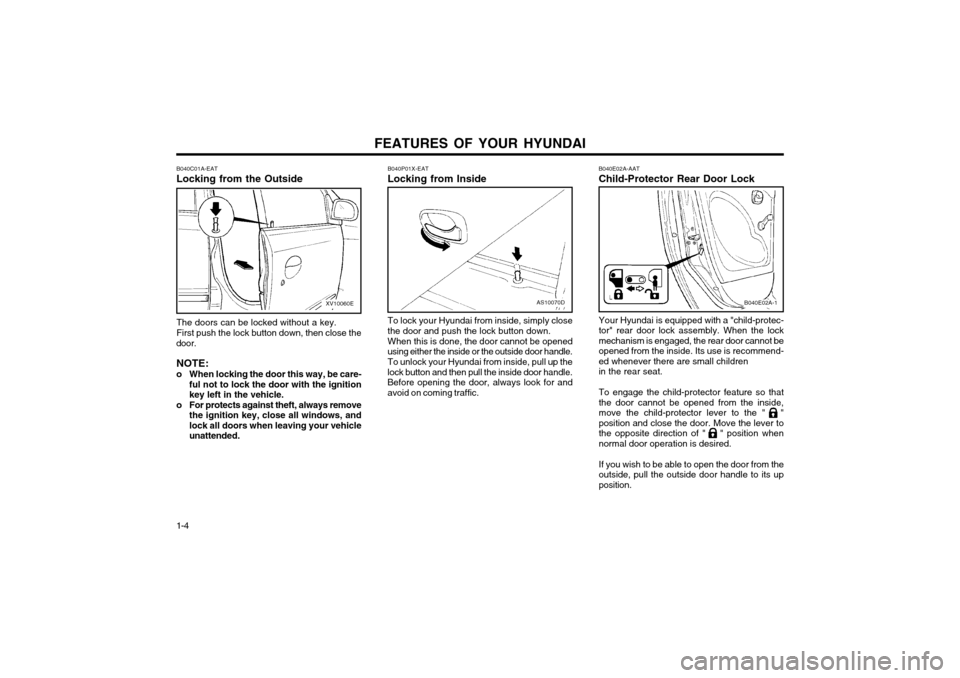
1-4 B040E02A-AAT Child-Protector Rear Door Lock Your Hyundai is equipped with a "child-protec-
tor" rear door lock assembly. When the lockmechanism is engaged, the rear door cannot be
opened from the inside. Its use is recommend-ed whenever there are small childrenin the rear seat. To engage the child-protector feature so that
the door cannot be opened from the inside,move the child-protector lever to the " "
position and close the door. Move the lever to
the opposite direction of " " position whennormal door operation is desired. If you wish to be able to open the door from the outside, pull the outside door handle to its upposition.
B040E02A-1
To lock your Hyundai from inside, simply close the door and push the lock button down. When this is done, the door cannot be opened using either the inside or the outside door handle. To unlock your Hyundai from inside, pull up the lock button and then pull the inside door handle.
Before opening the door, always look for andavoid on coming traffic. B040P01X-EAT Locking from Inside
AS10070D
B040C01A-EAT Locking from the OutsideXV10060E
The doors can be locked without a key. First push the lock button down, then close the
door.
NOTE:
o When locking the door this way, be care- ful not to lock the door with the ignition key left in the vehicle.
o For protects against theft, always remove the ignition key, close all windows, andlock all doors when leaving your vehicleunattended.
Page 143 of 249
FEATURES OF YOUR HYUNDAI
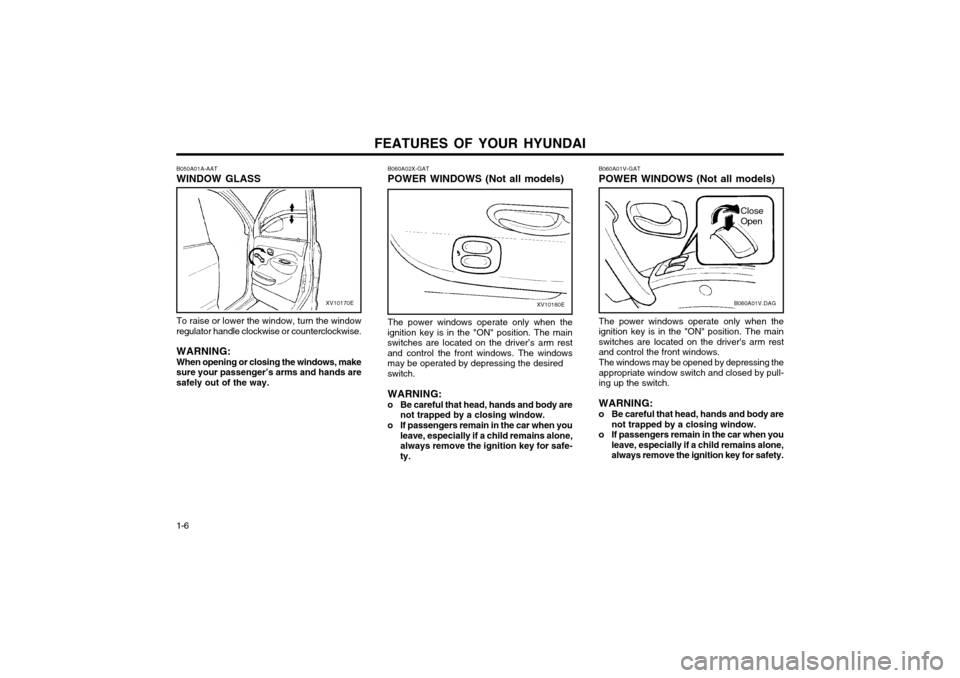
1-6 B060A01V-GAT POWER WINDOWS (Not all models)
B060A01V.DAG
The power windows operate only when the
ignition key is in the "ON" position. The mainswitches are located on the driver's arm restand control the front windows. The windows may be opened by depressing the appropriate window switch and closed by pull-ing up the switch. WARNING:
o Be careful that head, hands and body are not trapped by a closing window.
o If passengers remain in the car when you leave, especially if a child remains alone, always remove the ignition key for safety.
Close Open
The power windows operate only when the
ignition key is in the "ON" position. The main switches are located on the driver’s arm restand control the front windows. The windowsmay be operated by depressing the desired switch. WARNING:
o Be careful that head, hands and body are not trapped by a closing window.
o If passengers remain in the car when you leave, especially if a child remains alone, always remove the ignition key for safe-ty.
B060A02X-GAT POWER WINDOWS (Not all models)
XV10180E
B050A01A-AAT WINDOW GLASS
XV10170E
To raise or lower the window, turn the window
regulator handle clockwise or counterclockwise.
WARNING: When opening or closing the windows, make
sure your passenger’s arms and hands are safely out of the way.
Page 160 of 249
FEATURES OF YOUR HYUNDAI 1-23
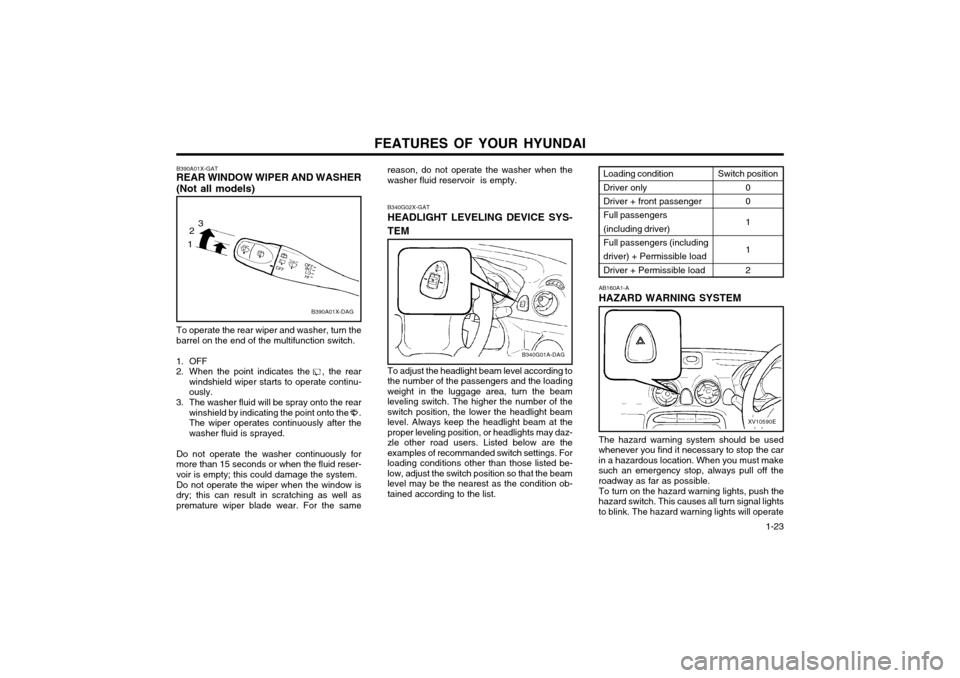
reason, do not operate the washer when the washer fluid reservoir is empty. B340G02X-GAT HEADLIGHT LEVELING DEVICE SYS- TEM To adjust the headlight beam level according to the number of the passengers and the loadingweight in the luggage area, turn the beamleveling switch. The higher the number of theswitch position, the lower the headlight beamlevel. Always keep the headlight beam at the
proper leveling position, or headlights may daz-zle other road users. Listed below are theexamples of recommanded switch settings. Forloading conditions other than those listed be-
low, adjust the switch position so that the beamlevel may be the nearest as the condition ob-tained according to the list.
B340G01A-DAG
B390A01X-GAT REAR WINDOW WIPER AND WASHER (Not all models)
B390A01X-DAG
To operate the rear wiper and washer, turn the barrel on the end of the multifunction switch.
1. OFF
2. When the point indicates the , the rear windshield wiper starts to operate continu-ously.
3. The washer fluid will be spray onto the rear winshield by indicating the point onto the .The wiper operates continuously after thewasher fluid is sprayed.
Do not operate the washer continuously formore than 15 seconds or when the fluid reser-voir is empty; this could damage the system. Do not operate the wiper when the window is dry; this can result in scratching as well aspremature wiper blade wear. For the same
1 2
3
The hazard warning system should be used
whenever you find it necessary to stop the car in a hazardous location. When you must makesuch an emergency stop, always pull off theroadway as far as possible.
To turn on the hazard warning lights, push the
hazard switch. This causes all turn signal lightsto blink. The hazard warning lights will operate AB160A1-A HAZARD WARNING SYSTEM
XV10590E
Loading condition Driver only Driver + front passenger Full passengers(including driver)Full passengers (including driver) + Permissible load Driver + Permissible load
Switch position
0 0 1 1 2