headlight aiming Hyundai Atos 2002 Owner's Manual
[x] Cancel search | Manufacturer: HYUNDAI, Model Year: 2002, Model line: Atos, Model: Hyundai Atos 2002Pages: 249, PDF Size: 3.11 MB
Page 113 of 249

DO-IT-YOURSELF MAINTENANCE
DO-IT-YOURSELF MAINTENANCE DO-IT-YOURSELF MAINTENANCE
DO-IT-YOURSELF MAINTENANCE
DO-IT-YOURSELF MAINTENANCE
6-17
G270A02X-GAT
HEADLIGHT BULB
HEADLIGHT BULB HEADLIGHT BULB
HEADLIGHT BULB
HEADLIGHT BULB
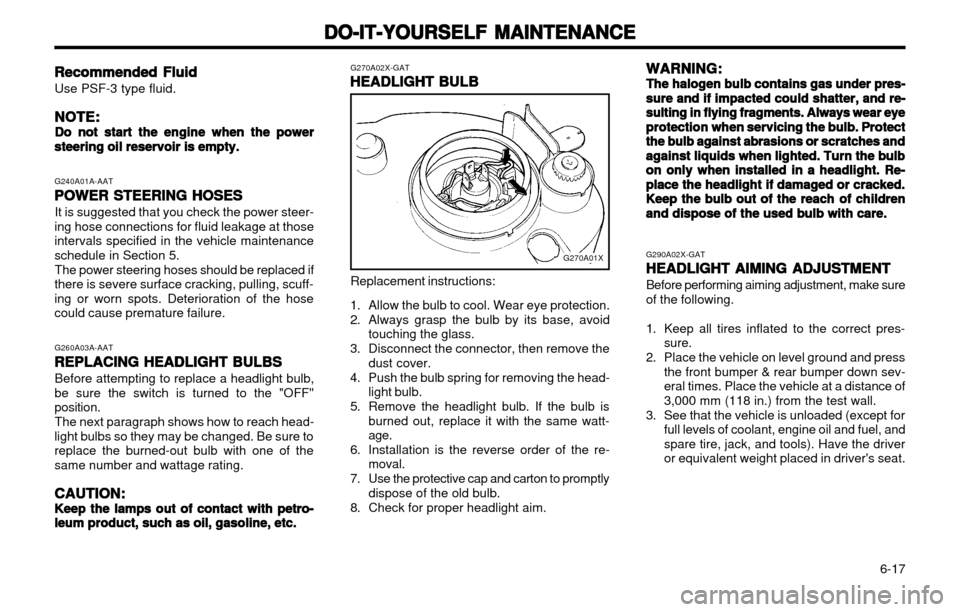
Replacement instructions:
1. Allow the bulb to cool. Wear eye protection.
2. Always grasp the bulb by its base, avoid touching the glass.
3. Disconnect the connector, then remove the dust cover.
4. Push the bulb spring for removing the head- light bulb.
5. Remove the headlight bulb. If the bulb is burned out, replace it with the same watt- age.
6. Installation is the reverse order of the re- moval.
7. Use the protective cap and carton to promptly dispose of the old bulb.
8. Check for proper headlight aim. WARNING:
WARNING: WARNING:
WARNING:
WARNING:
The halogen bulb contains gas under pres-
The halogen bulb contains gas under pres- The halogen bulb contains gas under pres-
The halogen bulb contains gas under pres-
The halogen bulb contains gas under pres- sure and if impacted
sure and if impacted sure and if impacted
sure and if impacted
sure and if impacted
could shatter, and re-
could shatter, and re- could shatter, and re-
could shatter, and re-
could shatter, and re-
sulting in flying fragments. Always wear eye
sulting in flying fragments. Always wear eye sulting in flying fragments. Always wear eye
sulting in flying fragments. Always wear eye
sulting in flying fragments. Always wear eye
protection
protection protection
protection
protection
when servicing the bulb. Protect
when servicing the bulb. Protect when servicing the bulb. Protect
when servicing the bulb. Protect
when servicing the bulb. Protect
the bulb against abrasions or scratches and
the bulb against abrasions or scratches and the bulb against abrasions or scratches and
the bulb against abrasions or scratches and
the bulb against abrasions or scratches and
against liquids when lighted. Turn the bulb
against liquids when lighted. Turn the bulb against liquids when lighted. Turn the bulb
against liquids when lighted. Turn the bulb
against liquids when lighted. Turn the bulb
on only when installed in a headlight. Re-
on only when installed in a headlight. Re- on only when installed in a headlight. Re-
on only when installed in a headlight. Re-
on only when installed in a headlight. Re-
place the headlight if damaged or cracked.
place the headlight if damaged or cracked. place the headlight if damaged or cracked.
place the headlight if damaged or cracked.
place the headlight if damaged or cracked.
Keep the bulb out of the reach
Keep the bulb out of the reach Keep the bulb out of the reach
Keep the bulb out of the reach
Keep the bulb out of the reach
of children
of children of children
of children
of children
and dispose of the used bulb with care.
and dispose of the used bulb with care. and dispose of the used bulb with care.
and dispose of the used bulb with care.
and dispose of the used bulb with care. G290A02X-GAT
HEADLIGHT AIMING ADJUSTMENT
HEADLIGHT AIMING ADJUSTMENT HEADLIGHT AIMING ADJUSTMENT
HEADLIGHT AIMING ADJUSTMENT
HEADLIGHT AIMING ADJUSTMENT Before performing aiming adjustment, make sure of the following.
1. Keep all tires inflated to the correct pres-
sure.
2. Place the vehicle on level ground and press the front bumper & rear bumper down sev- eral times. Place the vehicle at a distance of3,000 mm (118 in.) from the test wall.
3. See that the vehicle is unloaded (except for full levels of coolant, engine oil and fuel, andspare tire, jack, and tools). Have the driveror equivalent weight placed in driver's seat.
Recommended Fluid
Recommended Fluid Recommended Fluid
Recommended Fluid
Recommended Fluid
Use PSF-3 type fluid.
NOTE:
NOTE: NOTE:
NOTE:
NOTE:
Do not start the engine when the power
Do not start the engine when the power Do not start the engine when the power
Do not start the engine when the power
Do not start the engine when the power steering oil reservoir is empty.
steering oil reservoir is empty. steering oil reservoir is empty.
steering oil reservoir is empty.
steering oil reservoir is empty.
G240A01A-AATPOWER STEERING HOSES
POWER STEERING HOSES POWER STEERING HOSES
POWER STEERING HOSES
POWER STEERING HOSES
It is suggested that you check the power steer-
ing hose connections for fluid leakage at those intervals specified in the vehicle maintenanceschedule in Section 5.
The power steering hoses should be replaced if
there is severe surface cracking, pulling, scuff-ing or worn spots. Deterioration of the hosecould cause premature failure.
G260A03A-AATREPLACING HEADLIGHT BULBS
REPLACING HEADLIGHT BULBS REPLACING HEADLIGHT BULBS
REPLACING HEADLIGHT BULBS
REPLACING HEADLIGHT BULBS
Before attempting to replace a headlight bulb,
be sure the switch is turned to the "OFF"position.
The next paragraph shows how to reach head-
light bulbs so they may be changed. Be sure toreplace the burned-out bulb with one of thesame number and wattage rating.
CAUTION:
CAUTION: CAUTION:
CAUTION:
CAUTION:
Keep the lamps out of contact with petro-
Keep the lamps out of contact with petro- Keep the lamps out of contact with petro-
Keep the lamps out of contact with petro-
Keep the lamps out of contact with petro- leum product, such as oil, gasoline, etc.
leum product, such as oil, gasoline, etc. leum product, such as oil, gasoline, etc.
leum product, such as oil, gasoline, etc.
leum product, such as oil, gasoline, etc.
G270A01X
Page 114 of 249

DO-IT-YOURSELF MAINTENANCE
DO-IT-YOURSELF MAINTENANCE DO-IT-YOURSELF MAINTENANCE
DO-IT-YOURSELF MAINTENANCE
DO-IT-YOURSELF MAINTENANCE
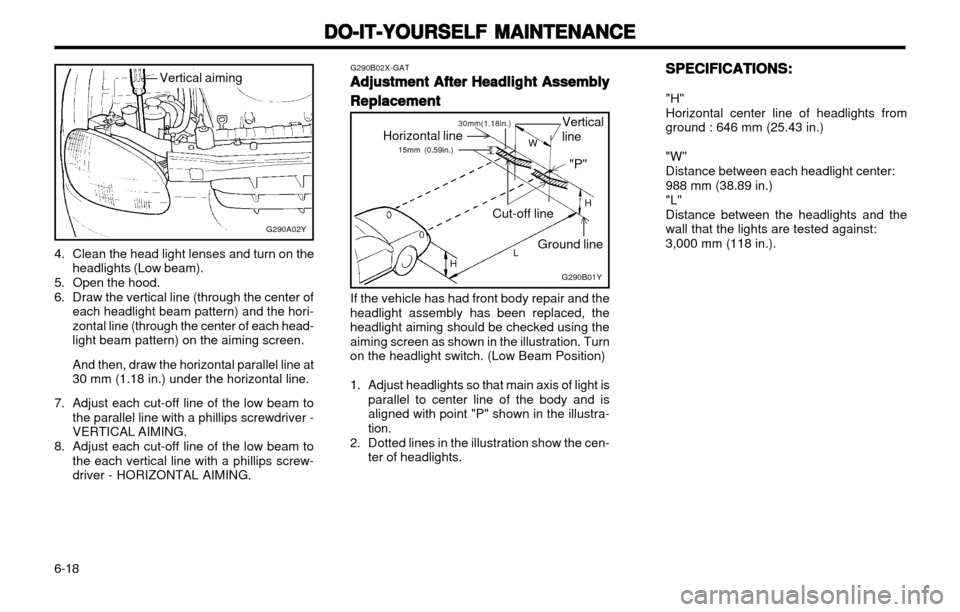
6-18 SPECIFICATIONS:
SPECIFICATIONS: SPECIFICATIONS:
SPECIFICATIONS:
SPECIFICATIONS: "H" Horizontal center line of headlights from ground : 646 mm (25.43 in.) "W" Distance between each headlight center:988 mm (38.89 in.)"L"Distance between the headlights and the wall that the lights are tested against:3,000 mm (118 in.).
4. Clean the head light lenses and turn on the
headlights (Low beam).
5. Open the hood.
6. Draw the vertical line (through the center of each headlight beam pattern) and the hori- zontal line (through the center of each head-light beam pattern) on the aiming screen. And then, draw the horizontal parallel line at 30 mm (1.18 in.) under the horizontal line.
7. Adjust each cut-off line of the low beam to the parallel line with a phillips screwdriver -VERTICAL AIMING.
8. Adjust each cut-off line of the low beam to the each vertical line with a phillips screw-driver - HORIZONTAL AIMING.
G290A02Y
Vertical aiming G290B02X-GAT
Adjustment After Headlight Assembly
Adjustment After Headlight Assembly Adjustment After Headlight Assembly
Adjustment After Headlight Assembly
Adjustment After Headlight Assembly
Replacement
Replacement Replacement
Replacement
Replacement
G290B01Y
Vertical line
Cut-off line Ground line
Horizontal line
LW
H
H "P"
15mm (0.59in.)30mm(1.18in.)
If the vehicle has had front body repair and the
headlight assembly has been replaced, the headlight aiming should be checked using the
aiming screen as shown in the illustration. Turnon the headlight switch. (Low Beam Position)
1. Adjust headlights so that main axis of light is parallel to center line of the body and is aligned with point "P" shown in the illustra-tion.
2. Dotted lines in the illustration show the cen- ter of headlights.
Page 235 of 249

DO-IT-YOURSELF MAINTENANCE 6-17
WARNING: The halogen bulb contains gas under pres-
sure and if impacted could shatter, and re- sulting in flying fragments. Always wear eye
protection when servicing the bulb. Protectthe bulb against abrasions or scratches andagainst liquids when lighted. Turn on thebulb only when installing in a headlight.Replace the headlight if damaged or cracked.Keep the bulb out of the reach of childrenand dispose of the used bulb with care.
G290A01X-EAT
HEADLIGHT AIMING ADJUSTMENT
G290A01V
Before performing aiming adjustment, make sure
of the following.
Vertical aiming
1. Keep all tires inflated to the correct pres- sure.
2. Place the vehicle on level ground and press the front bumper & rear bumper down sev- eral times.
3. See that the vehicle is unloaded (except for full levels of coolant, engine oil and fuel, andspare tire, jack, and tools). Have the driveror equivalent weight placed in driver's seat.
4. Clean the head lights lens and turn on the headlight (Low beam).
5. Open the bonnet.
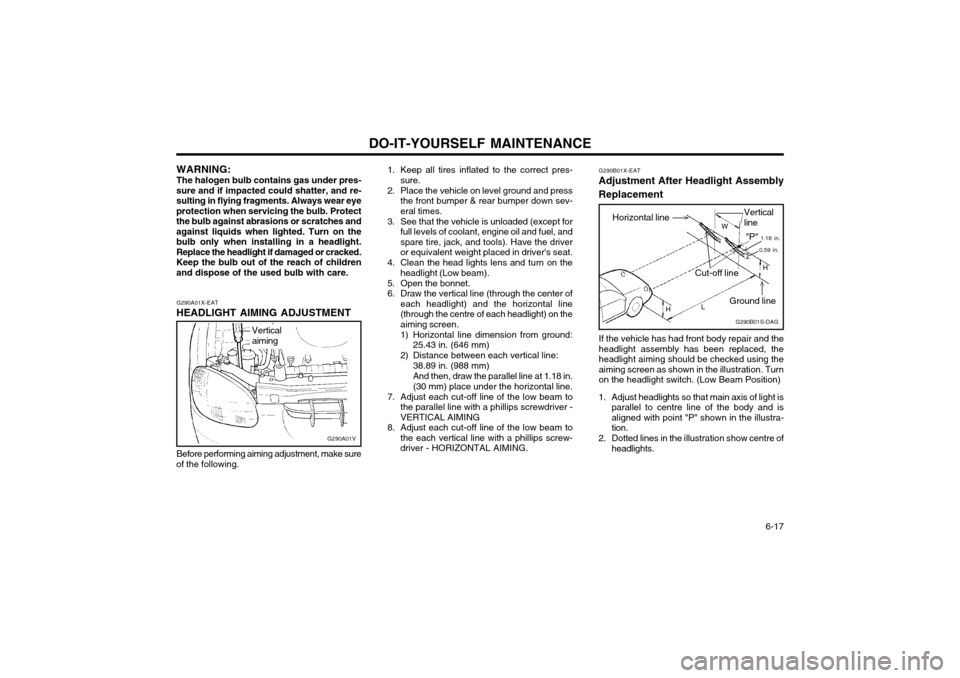
6. Draw the vertical line (through the center of each headlight) and the horizontal line(through the centre of each headlight) on theaiming screen.
1) Horizontal line dimension from ground:25.43 in. (646 mm)
2) Distance between each vertical line: 38.89 in. (988 mm)And then, draw the parallel line at 1.18 in. (30 mm) place under the horizontal line.
7. Adjust each cut-off line of the low beam to the parallel line with a phillips screwdriver -VERTICAL AIMING
8. Adjust each cut-off line of the low beam to the each vertical line with a phillips screw-driver - HORIZONTAL AIMING. G290B01X-EAT
Adjustment After Headlight Assembly Replacement
If the vehicle has had front body repair and the headlight assembly has been replaced, theheadlight aiming should be checked using theaiming screen as shown in the illustration. Turnon the headlight switch. (Low Beam Position)
1. Adjust headlights so that main axis of light is parallel to centre line of the body and isaligned with point "P" shown in the illustra-tion.
2. Dotted lines in the illustration show centre of headlights. G290B01S-DAG
Horizontal lineVertical line
W
0.59 in.
"P" 1.18 in.
Cut-off line
Ground line H
H L