oil type Hyundai Atos 2002 Owner's Manual
[x] Cancel search | Manufacturer: HYUNDAI, Model Year: 2002, Model line: Atos, Model: Hyundai Atos 2002Pages: 249, PDF Size: 3.11 MB
Page 73 of 249
DRIVING YOUR HYUNDAI
DRIVING YOUR HYUNDAI DRIVING YOUR HYUNDAI
DRIVING YOUR HYUNDAI
DRIVING YOUR HYUNDAI
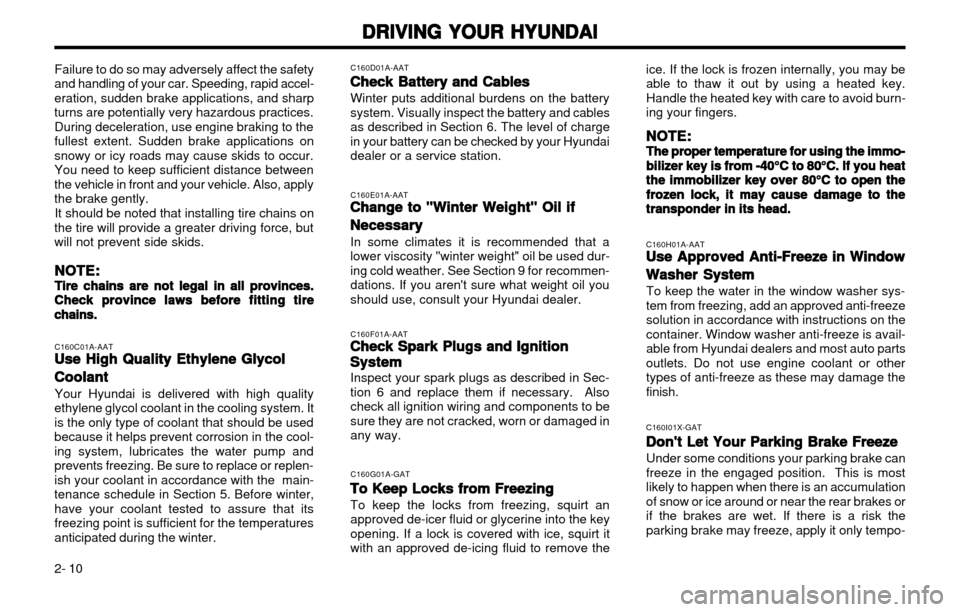
2- 10 ice. If the lock is frozen internally, you may be able to thaw it out by using a heated key.Handle the heated key with care to avoid burn-ing your fingers.
NOTE:
NOTE: NOTE:
NOTE:
NOTE:
The proper temperature for using the immo-
The proper temperature for using the immo- The proper temperature for using the immo-
The proper temperature for using the immo-
The proper temperature for using the immo-
bilizer key is from -40°C to 80°C. If you heat
bilizer key is from -40°C to 80°C. If you heat bilizer key is from -40°C to 80°C. If you heat
bilizer key is from -40°C to 80°C. If you heat
bilizer key is from -40°C to 80°C. If you heat
the immobilizer key over 80°C to open the
the immobilizer key over 80°C to open the the immobilizer key over 80°C to open the
the immobilizer key over 80°C to open the
the immobilizer key over 80°C to open the
frozen lock,
frozen lock, frozen lock,
frozen lock,
frozen lock, it may cause damage to the
it may cause damage to the it may cause damage to the
it may cause damage to the
it may cause damage to the
transponder in its head.
transponder in its head. transponder in its head.
transponder in its head.
transponder in its head. C160H01A-AAT
Use Approved Anti-Freeze in Window
Use Approved Anti-Freeze in Window Use Approved Anti-Freeze in Window
Use Approved Anti-Freeze in Window
Use Approved Anti-Freeze in Window
Washer System
Washer System Washer System
Washer System
Washer System
To keep the water in the window washer sys- tem from freezing, add an approved anti-freezesolution in accordance with instructions on thecontainer. Window washer anti-freeze is avail-able from Hyundai dealers and most auto partsoutlets. Do not use engine coolant or othertypes of anti-freeze as these may damage thefinish. C160I01X-GAT
Don't Let Your Parking Brake Freeze
Don't Let Your Parking Brake Freeze Don't Let Your Parking Brake Freeze
Don't Let Your Parking Brake Freeze
Don't Let Your Parking Brake Freeze
Under some conditions your parking brake can freeze in the engaged position. This is mostlikely to happen when there is an accumulationof snow or ice around or near the rear brakes orif the brakes are wet. If there is a risk theparking brake may freeze, apply it only tempo-
C160F01A-AAT
Check Spark Plugs and Ignition
Check Spark Plugs and Ignition Check Spark Plugs and Ignition
Check Spark Plugs and Ignition
Check Spark Plugs and Ignition
System
System System
System
System
Inspect your spark plugs as described in Sec-tion 6 and replace them if necessary. Alsocheck all ignition wiring and components to besure they are not cracked, worn or damaged inany way.
C160D01A-AAT
Check Battery and Cables
Check Battery and Cables Check Battery and Cables
Check Battery and Cables
Check Battery and Cables
Winter puts additional burdens on the batterysystem. Visually inspect the battery and cablesas described in Section 6. The level of chargein your battery can be checked by your Hyundaidealer or a service station. C160E01A-AATChange to "Winter Weight" Oil if
Change to "Winter Weight" Oil if Change to "Winter Weight" Oil if
Change to "Winter Weight" Oil if
Change to "Winter Weight" Oil if
Necessary
Necessary Necessary
Necessary
Necessary
In some climates it is recommended that a lower viscosity "winter weight" oil be used dur-ing cold weather. See Section 9 for recommen-dations. If you aren't sure what weight oil youshould use, consult your Hyundai dealer. C160G01A-GAT
To Keep Locks from Freezing
To Keep Locks from Freezing To Keep Locks from Freezing
To Keep Locks from Freezing
To Keep Locks from Freezing
To keep the locks from freezing, squirt an approved de-icer fluid or glycerine into the keyopening. If a lock is covered with ice, squirt itwith an approved de-icing fluid to remove the
Failure to do so may adversely affect the safety
and handling of your car. Speeding, rapid accel-eration, sudden brake applications, and sharpturns are potentially very hazardous practices.During deceleration, use engine braking to thefullest extent. Sudden brake applications onsnowy or icy roads may cause skids to occur.
You need to keep sufficient distance betweenthe vehicle in front and your vehicle. Also, applythe brake gently.
It should be noted that installing tire chains on
the tire will provide a greater driving force, butwill not prevent side skids.
NOTE:
NOTE: NOTE:
NOTE:
NOTE:
Tire chains are not legal in all provinces.
Tire chains are not legal in all provinces. Tire chains are not legal in all provinces.
Tire chains are not legal in all provinces.
Tire chains are not legal in all provinces. Check
Check Check
Check
Check province laws before fitting tire
province laws before fitting tire province laws before fitting tire
province laws before fitting tire
province laws before fitting tire
chains.
chains. chains.
chains.
chains.
C160C01A-AATUse High Quality Ethylene Glycol
Use High Quality Ethylene Glycol Use High Quality Ethylene Glycol
Use High Quality Ethylene Glycol
Use High Quality Ethylene Glycol
Coolant
Coolant Coolant
Coolant
Coolant
Your Hyundai is delivered with high quality
ethylene glycol coolant in the cooling system. It is the only type of coolant that should be usedbecause it helps prevent corrosion in the cool-ing system, lubricates the water pump andprevents freezing. Be sure to replace or replen-ish your coolant in accordance with the main-tenance schedule in Section 5. Before winter,have your coolant tested to assure that itsfreezing point is sufficient for the temperaturesanticipated during the winter.
Page 74 of 249
DRIVING YOUR HYUNDAI
DRIVING YOUR HYUNDAI DRIVING YOUR HYUNDAI
DRIVING YOUR HYUNDAI
DRIVING YOUR HYUNDAI
2- 11
C190A01A-GAT
TRAILER OR VEHICLE TOWING
TRAILER OR VEHICLE TOWING TRAILER OR VEHICLE TOWING
TRAILER OR VEHICLE TOWING
TRAILER OR VEHICLE TOWING
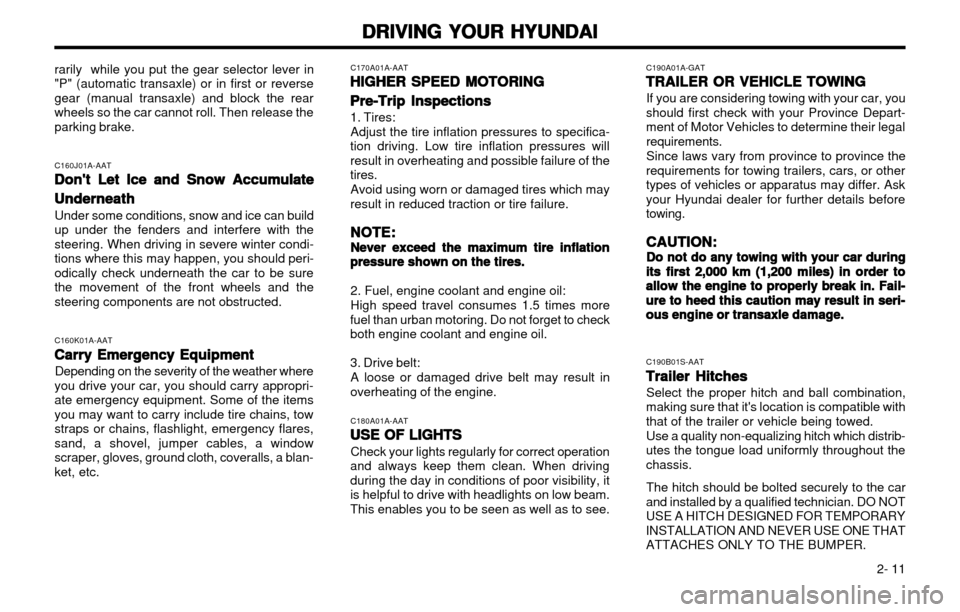
If you are considering towing with your car, you
should first check with your Province Depart- ment of Motor Vehicles to determine their legal
requirements. Since laws vary from province to province the
requirements for towing trailers, cars, or other types of vehicles or apparatus may differ. Askyour Hyundai dealer for further details beforetowing.
CAUTION:
CAUTION: CAUTION:
CAUTION:
CAUTION:
Do not do any towing with your car during
Do not do any towing with your car during Do not do any towing with your car during
Do not do any towing with your car during
Do not do any towing with your car during its first 2,000 km (1,200 miles) in order to
its first 2,000 km (1,200 miles) in order to its first 2,000 km (1,200 miles) in order to
its first 2,000 km (1,200 miles) in order to
its first 2,000 km (1,200 miles) in order to
allow the engine to properly break in. Fail-
allow the engine to properly break in. Fail- allow the engine to properly break in. Fail-
allow the engine to properly break in. Fail-
allow the engine to properly break in. Fail-
ure to heed this caution may result in seri-
ure to heed this caution may result in seri- ure to heed this caution may result in seri-
ure to heed this caution may result in seri-
ure to heed this caution may result in seri-
ous engine or transaxle damage.
ous engine or transaxle damage. ous engine or transaxle damage.
ous engine or transaxle damage.
ous engine or transaxle damage.
C190B01S-AATTrailer Hitches
Trailer Hitches Trailer Hitches
Trailer Hitches
Trailer Hitches
Select the proper hitch and ball combination,
making sure that it's location is compatible with that of the trailer or vehicle being towed.
Use a quality non-equalizing hitch which distrib-
utes the tongue load uniformly throughout thechassis.
The hitch should be bolted securely to the car
and installed by a qualified technician. DO NOTUSE A HITCH DESIGNED FOR TEMPORARYINSTALLATION AND NEVER USE ONE THATATTACHES ONLY TO THE BUMPER.
C170A01A-AAT
HIGHER SPEED MOTORING
HIGHER SPEED MOTORING HIGHER SPEED MOTORING
HIGHER SPEED MOTORING
HIGHER SPEED MOTORING
Pre-Trip Inspections
Pre-Trip Inspections Pre-Trip Inspections
Pre-Trip Inspections
Pre-Trip Inspections 1. Tires:
Adjust the tire inflation pressures to specifica-
tion driving. Low tire inflation pressures will result in overheating and possible failure of thetires.
Avoid using worn or damaged tires which may
result in reduced traction or tire failure.
NOTE:
NOTE: NOTE:
NOTE:
NOTE:
Never exceed the maximum tire inflation
Never exceed the maximum tire inflation Never exceed the maximum tire inflation
Never exceed the maximum tire inflation
Never exceed the maximum tire inflation pressure shown on the tires.
pressure shown on the tires. pressure shown on the tires.
pressure shown on the tires.
pressure shown on the tires.
2. Fuel, engine coolant and engine oil:High speed travel consumes 1.5 times more
fuel than urban motoring. Do not forget to check both engine coolant and engine oil. 3. Drive belt:
A loose or damaged drive belt may result in
overheating of the engine.
C180A01A-AATUSE OF LIGHTS
USE OF LIGHTS USE OF LIGHTS
USE OF LIGHTS
USE OF LIGHTS
Check your lights regularly for correct operation
and always keep them clean. When driving during the day in conditions of poor visibility, itis helpful to drive with headlights on low beam.This enables you to be seen as well as to see.
rarily while you put the gear selector lever in"P" (automatic transaxle) or in first or reversegear (manual transaxle) and block the rearwheels so the car cannot roll. Then release theparking brake.
C160J01A-AATDon't Let Ice and Snow Accumulate
Don't Let Ice and Snow Accumulate Don't Let Ice and Snow Accumulate
Don't Let Ice and Snow Accumulate
Don't Let Ice and Snow Accumulate
Underneath
Underneath Underneath
Underneath
Underneath
Under some conditions, snow and ice can build
up under the fenders and interfere with thesteering. When driving in severe winter condi-tions where this may happen, you should peri-odically check underneath the car to be surethe movement of the front wheels and thesteering components are not obstructed.
C160K01A-AATCarry Emergency Equipment
Carry Emergency Equipment Carry Emergency Equipment
Carry Emergency Equipment
Carry Emergency Equipment
Depending on the severity of the weather where
you drive your car, you should carry appropri-ate emergency equipment. Some of the itemsyou may want to carry include tire chains, towstraps or chains, flashlight, emergency flares,sand, a shovel, jumper cables, a windowscraper, gloves, ground cloth, coveralls, a blan-ket, etc.
Page 89 of 249
CORROSION PREVENTION AND APPEARANCE CARE
CORROSION PREVENTION AND APPEARANCE CARE CORROSION PREVENTION AND APPEARANCE CARE
CORROSION PREVENTION AND APPEARANCE CARE
CORROSION PREVENTION AND APPEARANCE CARE
4-4 Take a piece of cheese cloth and using any mild soap and lukewarm water, work up a goodlather. Thoroughly wash the leather. Wipe cleanwith a slightly damp cloth and dry with softcloth. Do this as often as the leather becomessoiled. During tanning operations, sufficient oils are incorporated through processing that none needbe applied during the life of the leather. Oil
applied to the finished surface will in no wayhelp the leather and may do more harm thangood. Varnishes and furniture polishes shouldnever be used under any conditions. E040C01A-AAT
Cleaning the Carpets
Cleaning the Carpets Cleaning the Carpets
Cleaning the Carpets
Cleaning the Carpets
Use a foam-type carpet cleaner. Cleaners of this type are available in aerosol cans in liquidform or powder. Read the instructions and fol-low them exactly. Using a vacuum cleaner withthe appropriate attachment, remove as muchdirt from the carpets as possible. Apply thefoam following the manufacturer's directions,then rub in overlapping circles. Do not addwater. These cleaners work best when thecarpet is kept as dry as possible. E050A01A-AAT
ANY QUESTIONS?
ANY QUESTIONS? ANY QUESTIONS?
ANY QUESTIONS?
ANY QUESTIONS?
If you have any questions about the care of
your car, consult your Hyundai dealer. E040D01A-AAT
Cleaning the Seat Belts
Cleaning the Seat Belts Cleaning the Seat Belts
Cleaning the Seat Belts
Cleaning the Seat Belts
To clean the seat belts, use a cloth or sponge
with mild soap or detergent and warm water. Donot use strong detergents, dye, bleach or abra-sive materials on the seat belts as this mayweaken the fabric.
While cleaning the belts, inspect them for ex-
cessive wear, cuts, fraying or other signs ofdamage and replace them if necessary.
E040E01A-AATCleaning the Windows
Cleaning the Windows Cleaning the Windows
Cleaning the Windows
Cleaning the Windows
You may use any household window cleaner onthe windows. However, when cleaning the in-side of the rear window be careful not to dam-age the rear window defroster wiring.
Page 113 of 249
DO-IT-YOURSELF MAINTENANCE
DO-IT-YOURSELF MAINTENANCE DO-IT-YOURSELF MAINTENANCE
DO-IT-YOURSELF MAINTENANCE
DO-IT-YOURSELF MAINTENANCE
6-17
G270A02X-GAT
HEADLIGHT BULB
HEADLIGHT BULB HEADLIGHT BULB
HEADLIGHT BULB
HEADLIGHT BULB
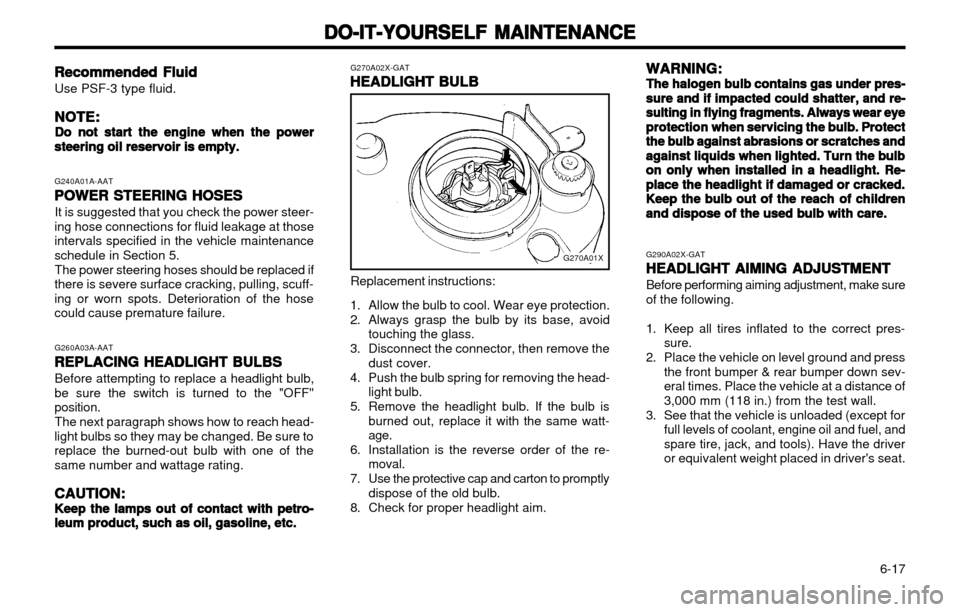
Replacement instructions:
1. Allow the bulb to cool. Wear eye protection.
2. Always grasp the bulb by its base, avoid touching the glass.
3. Disconnect the connector, then remove the dust cover.
4. Push the bulb spring for removing the head- light bulb.
5. Remove the headlight bulb. If the bulb is burned out, replace it with the same watt- age.
6. Installation is the reverse order of the re- moval.
7. Use the protective cap and carton to promptly dispose of the old bulb.
8. Check for proper headlight aim. WARNING:
WARNING: WARNING:
WARNING:
WARNING:
The halogen bulb contains gas under pres-
The halogen bulb contains gas under pres- The halogen bulb contains gas under pres-
The halogen bulb contains gas under pres-
The halogen bulb contains gas under pres- sure and if impacted
sure and if impacted sure and if impacted
sure and if impacted
sure and if impacted
could shatter, and re-
could shatter, and re- could shatter, and re-
could shatter, and re-
could shatter, and re-
sulting in flying fragments. Always wear eye
sulting in flying fragments. Always wear eye sulting in flying fragments. Always wear eye
sulting in flying fragments. Always wear eye
sulting in flying fragments. Always wear eye
protection
protection protection
protection
protection
when servicing the bulb. Protect
when servicing the bulb. Protect when servicing the bulb. Protect
when servicing the bulb. Protect
when servicing the bulb. Protect
the bulb against abrasions or scratches and
the bulb against abrasions or scratches and the bulb against abrasions or scratches and
the bulb against abrasions or scratches and
the bulb against abrasions or scratches and
against liquids when lighted. Turn the bulb
against liquids when lighted. Turn the bulb against liquids when lighted. Turn the bulb
against liquids when lighted. Turn the bulb
against liquids when lighted. Turn the bulb
on only when installed in a headlight. Re-
on only when installed in a headlight. Re- on only when installed in a headlight. Re-
on only when installed in a headlight. Re-
on only when installed in a headlight. Re-
place the headlight if damaged or cracked.
place the headlight if damaged or cracked. place the headlight if damaged or cracked.
place the headlight if damaged or cracked.
place the headlight if damaged or cracked.
Keep the bulb out of the reach
Keep the bulb out of the reach Keep the bulb out of the reach
Keep the bulb out of the reach
Keep the bulb out of the reach
of children
of children of children
of children
of children
and dispose of the used bulb with care.
and dispose of the used bulb with care. and dispose of the used bulb with care.
and dispose of the used bulb with care.
and dispose of the used bulb with care. G290A02X-GAT
HEADLIGHT AIMING ADJUSTMENT
HEADLIGHT AIMING ADJUSTMENT HEADLIGHT AIMING ADJUSTMENT
HEADLIGHT AIMING ADJUSTMENT
HEADLIGHT AIMING ADJUSTMENT Before performing aiming adjustment, make sure of the following.
1. Keep all tires inflated to the correct pres-
sure.
2. Place the vehicle on level ground and press the front bumper & rear bumper down sev- eral times. Place the vehicle at a distance of3,000 mm (118 in.) from the test wall.
3. See that the vehicle is unloaded (except for full levels of coolant, engine oil and fuel, andspare tire, jack, and tools). Have the driveror equivalent weight placed in driver's seat.
Recommended Fluid
Recommended Fluid Recommended Fluid
Recommended Fluid
Recommended Fluid
Use PSF-3 type fluid.
NOTE:
NOTE: NOTE:
NOTE:
NOTE:
Do not start the engine when the power
Do not start the engine when the power Do not start the engine when the power
Do not start the engine when the power
Do not start the engine when the power steering oil reservoir is empty.
steering oil reservoir is empty. steering oil reservoir is empty.
steering oil reservoir is empty.
steering oil reservoir is empty.
G240A01A-AATPOWER STEERING HOSES
POWER STEERING HOSES POWER STEERING HOSES
POWER STEERING HOSES
POWER STEERING HOSES
It is suggested that you check the power steer-
ing hose connections for fluid leakage at those intervals specified in the vehicle maintenanceschedule in Section 5.
The power steering hoses should be replaced if
there is severe surface cracking, pulling, scuff-ing or worn spots. Deterioration of the hosecould cause premature failure.
G260A03A-AATREPLACING HEADLIGHT BULBS
REPLACING HEADLIGHT BULBS REPLACING HEADLIGHT BULBS
REPLACING HEADLIGHT BULBS
REPLACING HEADLIGHT BULBS
Before attempting to replace a headlight bulb,
be sure the switch is turned to the "OFF"position.
The next paragraph shows how to reach head-
light bulbs so they may be changed. Be sure toreplace the burned-out bulb with one of thesame number and wattage rating.
CAUTION:
CAUTION: CAUTION:
CAUTION:
CAUTION:
Keep the lamps out of contact with petro-
Keep the lamps out of contact with petro- Keep the lamps out of contact with petro-
Keep the lamps out of contact with petro-
Keep the lamps out of contact with petro- leum product, such as oil, gasoline, etc.
leum product, such as oil, gasoline, etc. leum product, such as oil, gasoline, etc.
leum product, such as oil, gasoline, etc.
leum product, such as oil, gasoline, etc.
G270A01X
Page 122 of 249
VEHICLE SPECIFICATIONS
VEHICLE SPECIFICATIONS VEHICLE SPECIFICATIONS
VEHICLE SPECIFICATIONS
VEHICLE SPECIFICATIONS
9-1
9.9.
9.9.
9.
VEHICLE SPECIFICA
VEHICLE SPECIFICA VEHICLE SPECIFICA
VEHICLE SPECIFICA
VEHICLE SPECIFICA
TIONS
TIONS TIONS
TIONS
TIONS
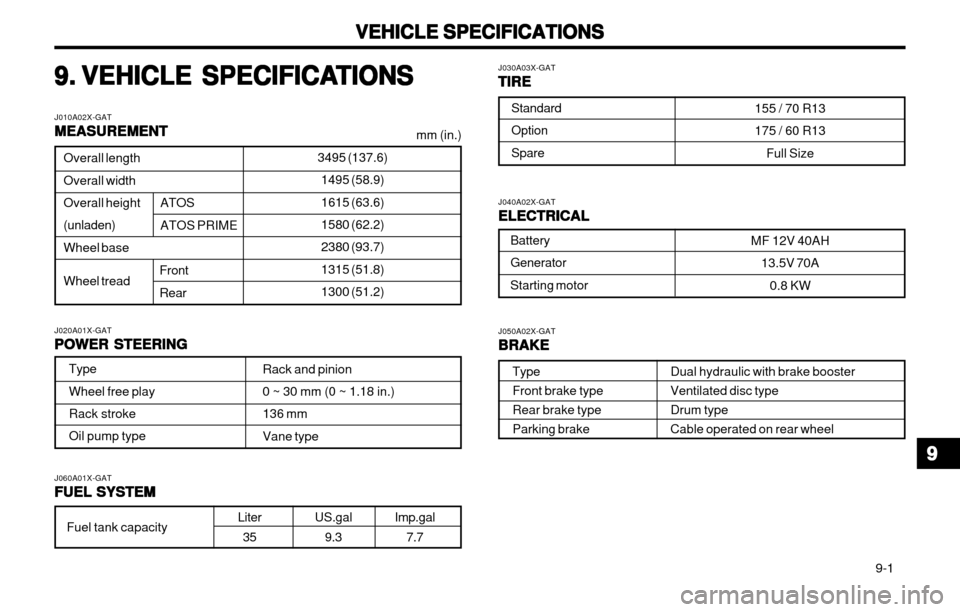
J010A02X-GAT MEASUREMENT
MEASUREMENT MEASUREMENT
MEASUREMENT
MEASUREMENT
mm (in.)
J020A01X-GAT POWER STEERING
POWER STEERING POWER STEERING
POWER STEERING
POWER STEERING
Imp.gal
7.7Liter35 US.gal
9.3
J060A01X-GAT
FUEL SYSTEM
FUEL SYSTEM FUEL SYSTEM
FUEL SYSTEM
FUEL SYSTEM J040A02X-GAT
ELECTRICAL
ELECTRICAL ELECTRICAL
ELECTRICAL
ELECTRICAL J050A02X-GAT
BRAKE
BRAKE BRAKE
BRAKE
BRAKE
Dual hydraulic with brake booster Ventilated disc typeDrum typeCable operated on rear wheel
J030A03X-GAT
TIRE
TIRE TIRE
TIRE
TIRE
3495 (137.6)
1495 (58.9) 1615 (63.6) 1580 (62.2) 2380 (93.7)1315 (51.8) 1300 (51.2)Overall length Overall widthOverall height (unladen) Wheel base Wheel tread
Front Rear
ATOS ATOS PRIME
Type Wheel free play Rack stroke Oil pump type Rack and pinion 0 ~ 30 mm (0 ~ 1.18 in.) 136 mmVane type
Standard Option Spare
155 / 70 R13175 / 60 R13
Full Size
Battery Generator Starting motor MF 12V 40AH
13.5V 70A
0.8 KW
Fuel tank capacity Type Front brake typeRear brake typeParking brake
99
99
9
Page 203 of 249
WHAT TO DO IN AN EMERGENCY
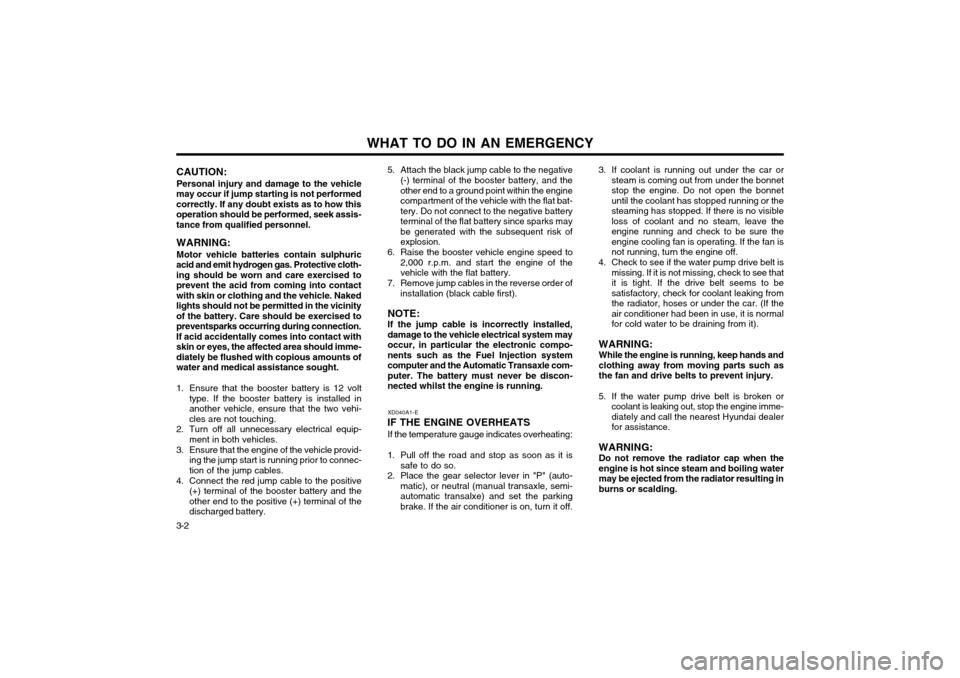
3-2 3. If coolant is running out under the car or
steam is coming out from under the bonnet stop the engine. Do not open the bonnetuntil the coolant has stopped running or thesteaming has stopped. If there is no visibleloss of coolant and no steam, leave theengine running and check to be sure theengine cooling fan is operating. If the fan isnot running, turn the engine off.
4. Check to see if the water pump drive belt is missing. If it is not missing, check to see thatit is tight. If the drive belt seems to besatisfactory, check for coolant leaking fromthe radiator, hoses or under the car. (If theair conditioner had been in use, it is normalfor cold water to be draining from it).
WARNING: While the engine is running, keep hands andclothing away from moving parts such asthe fan and drive belts to prevent injury.
5. If the water pump drive belt is broken or coolant is leaking out, stop the engine imme-diately and call the nearest Hyundai dealerfor assistance.
WARNING: Do not remove the radiator cap when theengine is hot since steam and boiling watermay be ejected from the radiator resulting inburns or scalding.
CAUTION:
Personal injury and damage to the vehicle
may occur if jump starting is not performedcorrectly. If any doubt exists as to how thisoperation should be performed, seek assis-tance from qualified personnel. WARNING:
Motor vehicle batteries contain sulphuric
acid and emit hydrogen gas. Protective cloth- ing should be worn and care exercised toprevent the acid from coming into contactwith skin or clothing and the vehicle. Nakedlights should not be permitted in the vicinityof the battery. Care should be exercised topreventsparks occurring during connection.If acid accidentally comes into contact withskin or eyes, the affected area should imme-diately be flushed with copious amounts ofwater and medical assistance sought.
1. Ensure that the booster battery is 12 volt type. If the booster battery is installed in another vehicle, ensure that the two vehi-cles are not touching.
2. Turn off all unnecessary electrical equip- ment in both vehicles.
3. Ensure that the engine of the vehicle provid- ing the jump start is running prior to connec-tion of the jump cables.
4. Connect the red jump cable to the positive (+) terminal of the booster battery and theother end to the positive (+) terminal of thedischarged battery. 5. Attach the black jump cable to the negative
(-) terminal of the booster battery, and theother end to a ground point within the enginecompartment of the vehicle with the flat bat-tery. Do not connect to the negative batteryterminal of the flat battery since sparks maybe generated with the subsequent risk ofexplosion.
6. Raise the booster vehicle engine speed to 2,000 r.p.m. and start the engine of thevehicle with the flat battery.
7. Remove jump cables in the reverse order of installation (black cable first).
NOTE: If the jump cable is incorrectly installed, damage to the vehicle electrical system mayoccur, in particular the electronic compo-nents such as the Fuel Injection systemcomputer and the Automatic Transaxle com-puter. The battery must never be discon-nected whilst the engine is running. XD040A1-E
IF THE ENGINE OVERHEATS If the temperature gauge indicates overheating:
1. Pull off the road and stop as soon as it is safe to do so.
2. Place the gear selector lever in "P" (auto- matic), or neutral (manual transaxle, semi- automatic transalxe) and set the parkingbrake. If the air conditioner is on, turn it off.
Page 234 of 249
DO-IT-YOURSELF MAINTENANCE
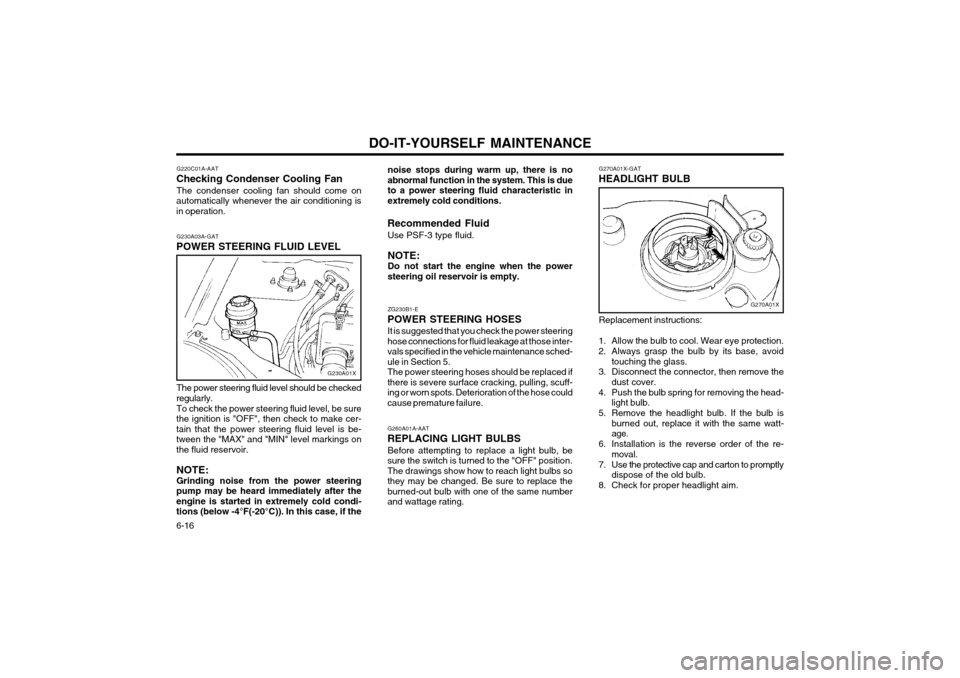
6-16 G270A01X-GAT
HEADLIGHT BULB
G270A01X
Replacement instructions:
1. Allow the bulb to cool. Wear eye protection.
2. Always grasp the bulb by its base, avoid touching the glass.
3. Disconnect the connector, then remove the dust cover.
4. Push the bulb spring for removing the head- light bulb.
5. Remove the headlight bulb. If the bulb is burned out, replace it with the same watt- age.
6. Installation is the reverse order of the re- moval.
7. Use the protective cap and carton to promptly dispose of the old bulb.
8. Check for proper headlight aim.
noise stops during warm up, there is no
abnormal function in the system. This is dueto a power steering fluid characteristic inextremely cold conditions.
Recommended Fluid Use PSF-3 type fluid. NOTE: Do not start the engine when the power
steering oil reservoir is empty. ZG230B1-E
POWER STEERING HOSES It is suggested that you check the power steering hose connections for fluid leakage at those inter-vals specified in the vehicle maintenance sched-ule in Section 5.The power steering hoses should be replaced ifthere is severe surface cracking, pulling, scuff-ing or worn spots. Deterioration of the hose couldcause premature failure.
G260A01A-AAT
REPLACING LIGHT BULBS Before attempting to replace a light bulb, be
sure the switch is turned to the "OFF" position.
The drawings show how to reach light bulbs sothey may be changed. Be sure to replace the
burned-out bulb with one of the same numberand wattage rating.
G220C01A-AAT
Checking Condenser Cooling Fan
The condenser cooling fan should come on
automatically whenever the air conditioning is in operation.
G230A03A-GAT
POWER STEERING FLUID LEVEL
G230A01X
The power steering fluid level should be checked
regularly.
To check the power steering fluid level, be sure
the ignition is "OFF", then check to make cer- tain that the power steering fluid level is be-
tween the "MAX" and "MIN" level markings onthe fluid reservoir.
NOTE: Grinding noise from the power steering
pump may be heard immediately after the engine is started in extremely cold condi-tions (below -4°F(-20°C)). In this case, if the
Page 244 of 249
VEHICLE SPECIFICATIONS 9-1
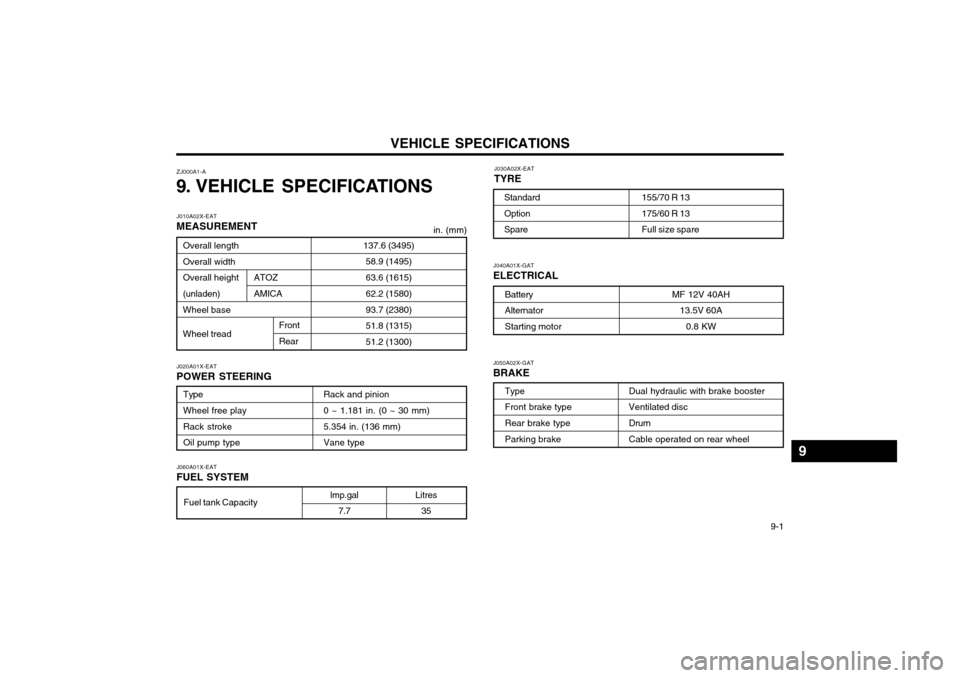
Litres
35 J040A01X-GAT ELECTRICAL
Battery Alternator Starting motor
MF 12V 40AH
13.5V 60A
0.8 KW
J050A02X-GAT BRAKE
Dual hydraulic with brake booster Ventilated disc Drum Cable operated on rear wheel
J060A01X-EAT FUEL SYSTEM
lmp.gal 7.7
J020A01X-EAT POWER STEERING
Type Wheel free play Rack stroke Oil pump type Rack and pinion0 ~ 1.181 in. (0 ~ 30 mm) 5.354 in. (136 mm) Vane type
ZJ000A1-A
9. VEHICLE SPECIFICATIONS J030A02X-EAT TYRE
155/70 R 13 175/60 R 13 Full size spare
Standard Option Spare
J010A02X-EAT MEASUREMENT
137.6 (3495)58.9 (1495) 63.6 (1615) 62.2 (1580) 93.7 (2380) 51.8 (1315) 51.2 (1300)Overall length Overall width Overall height (unladen) Wheel base Wheel tread
in. (mm)
ATOZ AMICA
Front Rear
Fuel tank Capacity Type Front brake type Rear brake type Parking brake
9