radiator cap Hyundai Atos 2002 Owner's Manual
[x] Cancel search | Manufacturer: HYUNDAI, Model Year: 2002, Model line: Atos, Model: Hyundai Atos 2002Pages: 249, PDF Size: 3.11 MB
Page 31 of 249
FEATURES OF YOUR HYUNDAI
FEATURES OF YOUR HYUNDAI FEATURES OF YOUR HYUNDAI
FEATURES OF YOUR HYUNDAI
FEATURES OF YOUR HYUNDAI
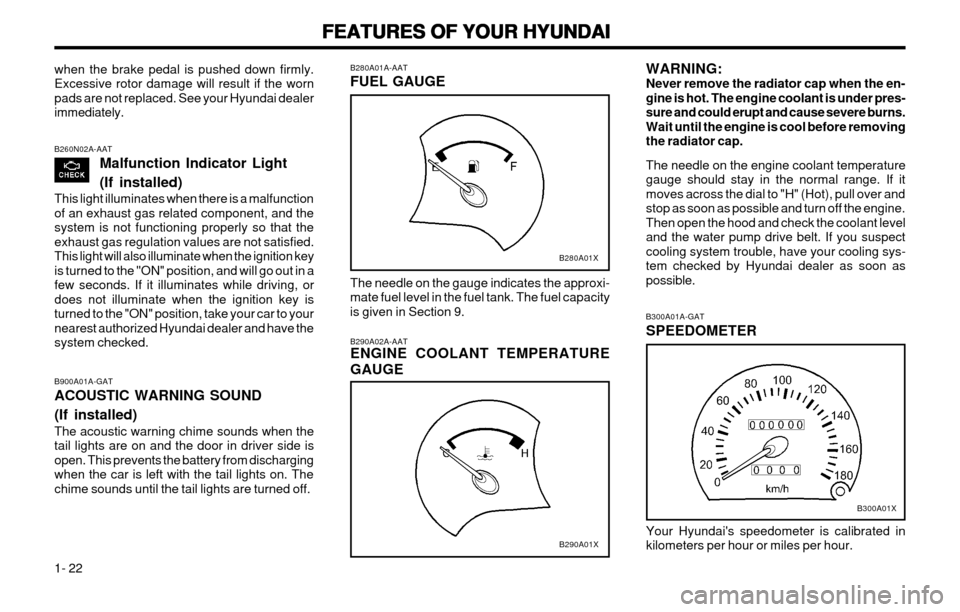
1- 22 B300A01A-GAT SPEEDOMETER Your Hyundai's speedometer is calibrated in kilometers per hour or miles per hour.
B280A01A-AAT FUEL GAUGE The needle on the gauge indicates the approxi- mate fuel level in the fuel tank. The fuel capacityis given in Section 9.
B900A01A-GAT ACOUSTIC WARNING SOUND (If installed) The acoustic warning chime sounds when the tail lights are on and the door in driver side isopen. This prevents the battery from dischargingwhen the car is left with the tail lights on. Thechime sounds until the tail lights are turned off.
B260N02A-AAT
Malfunction Indicator Light (If installed)
This light illuminates when there is a malfunction of an exhaust gas related component, and thesystem is not functioning properly so that theexhaust gas regulation values are not satisfied.This light will also illuminate when the ignition keyis turned to the "ON" position, and will go out in afew seconds. If it illuminates while driving, ordoes not illuminate when the ignition key isturned to the "ON" position, take your car to yournearest authorized Hyundai dealer and have thesystem checked.
when the brake pedal is pushed down firmly. Excessive rotor damage will result if the wornpads are not replaced. See your Hyundai dealerimmediately.
B280A01X
B290A02A-AAT ENGINE COOLANT TEMPERATURE GAUGE WARNING: Never remove the radiator cap when the en-gine is hot. The engine coolant is under pres-sure and could erupt and cause severe burns.Wait until the engine is cool before removingthe radiator cap. The needle on the engine coolant temperature gauge should stay in the normal range. If itmoves across the dial to "H" (Hot), pull over andstop as soon as possible and turn off the engine.Then open the hood and check the coolant leveland the water pump drive belt. If you suspectcooling system trouble, have your cooling sys-tem checked by Hyundai dealer as soon aspossible.
B290A01X
B300A01X
Page 40 of 249
FEATURES OF YOUR HYUNDAI
FEATURES OF YOUR HYUNDAI FEATURES OF YOUR HYUNDAI
FEATURES OF YOUR HYUNDAI
FEATURES OF YOUR HYUNDAI
1- 31
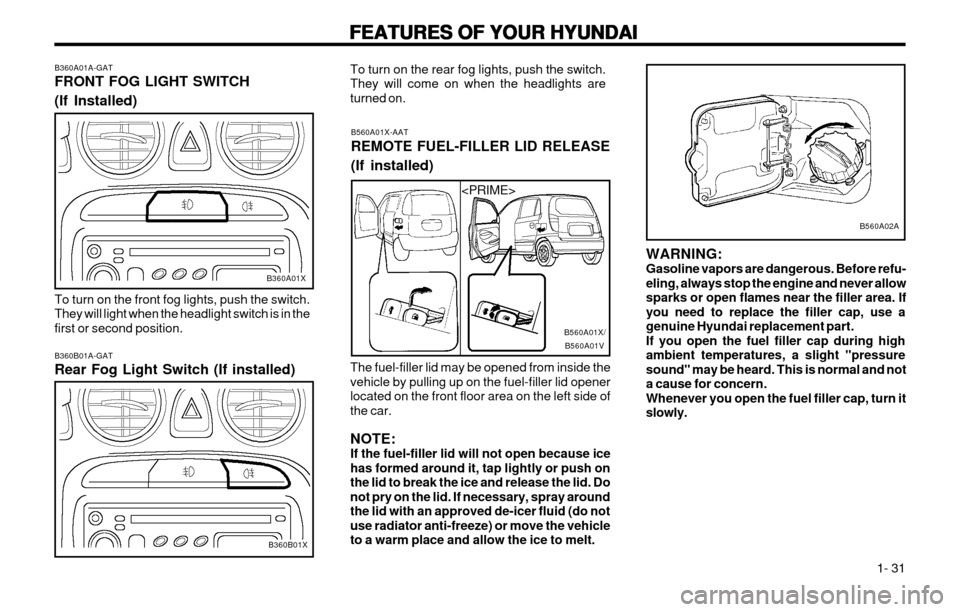
B560A01X-AAT REMOTE FUEL-FILLER LID RELEASE (If installed)
The fuel-filler lid may be opened from inside the vehicle by pulling up on the fuel-filler lid openerlocated on the front floor area on the left side ofthe car. NOTE: If the fuel-filler lid will not open because icehas formed around it, tap lightly or push onthe lid to break the ice and release the lid. Donot pry on the lid. If necessary, spray around
the lid with an approved de-icer fluid (do notuse radiator anti-freeze) or move the vehicleto a warm place and allow the ice to melt.
To turn on the rear fog lights, push the switch.They will come on when the headlights areturned on.
B560A01V
B560A01X/
B360A01A-GAT FRONT FOG LIGHT SWITCH (If Installed) To turn on the front fog lights, push the switch. They will light when the headlight switch is in thefirst or second position. B360B01A-GAT Rear Fog Light Switch (If installed)
B360A01X
B360B01X WARNING: Gasoline vapors are dangerous. Before refu-
eling, always stop the engine and never allowsparks or open flames near the filler area. Ifyou need to replace the filler cap, use agenuine Hyundai replacement part.If you open the fuel filler cap during highambient temperatures, a slight "pressuresound" may be heard. This is normal and nota cause for concern.Whenever you open the fuel filler cap, turn itslowly.
B560A02A
Page 80 of 249
WHAT TO DO IN AN EMERGENCY
WHAT TO DO IN AN EMERGENCY WHAT TO DO IN AN EMERGENCY
WHAT TO DO IN AN EMERGENCY
WHAT TO DO IN AN EMERGENCY
3-3
WARNING:
WARNING: WARNING:
WARNING:
WARNING:
While the engine is running, keep hands,
While the engine is running, keep hands, While the engine is running, keep hands,
While the engine is running, keep hands,
While the engine is running, keep hands, long hair
long hair long hair
long hair
long hair
and clothing away from moving
and clothing away from moving and clothing away from moving
and clothing away from moving
and clothing away from moving
parts such as the fan and drive belts to
parts such as the fan and drive belts to parts such as the fan and drive belts to
parts such as the fan and drive belts to
parts such as the fan and drive belts to
prevent
prevent prevent
prevent
prevent
injury.
injury. injury.
injury.
injury.
5. If the water pump drive belt is broken or engine coolant is leaking out, stop the en- gine immediately and call the nearestHyundai dealer for assistance.
WARNING:
WARNING: WARNING:
WARNING:
WARNING:
Do not remove the radiator cap when the
Do not remove the radiator cap when the Do not remove the radiator cap when the
Do not remove the radiator cap when the
Do not remove the radiator cap when the engine is hot. This may allow
engine is hot. This may allow engine is hot. This may allow
engine is hot. This may allow
engine is hot. This may allow coolant to be
coolant to be coolant to be
coolant to be
coolant to be
blown out of the opening and cause serious
blown out of the opening and cause serious blown out of the opening and cause serious
blown out of the opening and cause serious
blown out of the opening and cause serious
burns.
burns. burns.
burns.
burns.
6. If you cannot find the cause of the overheat-
ing, wait until the engine temperature has returned to normal. Then, if engine coolanthas been lost, carefully remove the radiator
cap and add engine coolant to bring the fluidlevel in the reservoir up to the halfway mark.
7. Proceed with caution, keeping alert for fur- ther signs of overheating. If overheating hap-pens again, call a Hyundai dealer for assis-tance.
CAUTION:
CAUTION: CAUTION:
CAUTION:
CAUTION:
Serious loss of engine coolant indicates
Serious loss of engine coolant indicates Serious loss of engine coolant indicates
Serious loss of engine coolant indicates
Serious loss of engine coolant indicates there is a leak in
there is a leak in there is a leak in
there is a leak in
there is a leak in the cooling system and this
the cooling system and this the cooling system and this
the cooling system and this
the cooling system and this
should be checked as soon as possible by a
should be checked as soon as possible by a should be checked as soon as possible by a
should be checked as soon as possible by a
should be checked as soon as possible by a
Hyundai
Hyundai Hyundai
Hyundai
Hyundai dealer.
dealer. dealer.
dealer.
dealer. D040A01A-GAT
SPARE TIRE
SPARE TIRE SPARE TIRE
SPARE TIRE
SPARE TIRE
The following instructions for the FULL SIZE
spare tire should be observed:
Check inflation pressure as soon as practical
after installing the spare tire, and adjust to the specified pressure. The tire pressure should beperiodically checked and maintained at thespecified pressure while the tire is stored.
Tire Size Inflation Pressure Full Size 210 kPa (30 psi)
Spare Tire Pressure
D040B01A-AAT
Handling the Spare Tire
Handling the Spare Tire Handling the Spare Tire
Handling the Spare Tire
Handling the Spare Tire
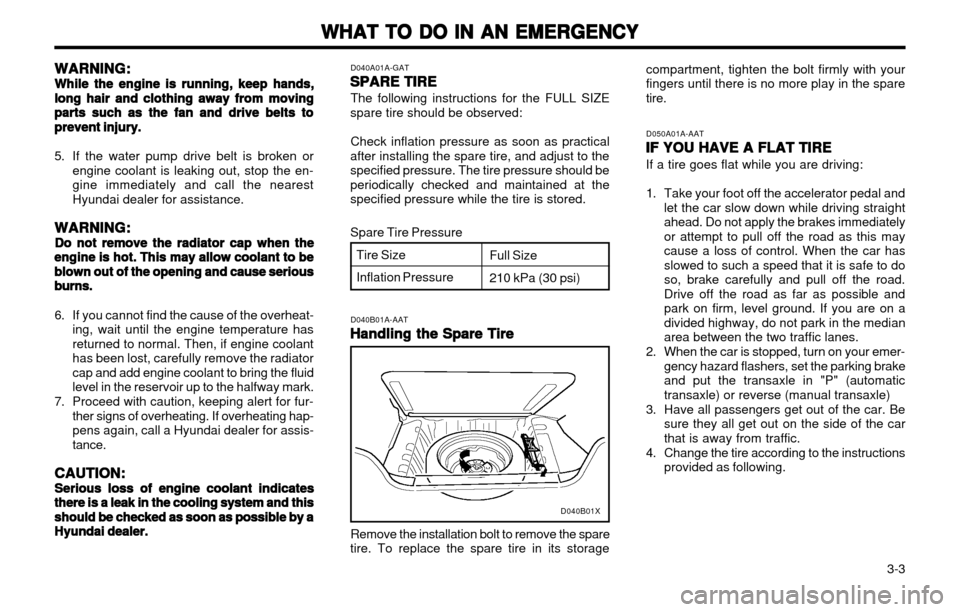
Remove the installation bolt to remove the spare
tire. To replace the spare tire in its storage D050A01A-AAT
IF YOU HAVE A FLAT TIRE
IF YOU HAVE A FLAT TIRE IF YOU HAVE A FLAT TIRE
IF YOU HAVE A FLAT TIRE
IF YOU HAVE A FLAT TIRE If a tire goes flat while you are driving:
1. Take your foot off the accelerator pedal and
let the car slow down while driving straight ahead. Do not apply the brakes immediatelyor attempt to pull off the road as this may
cause a loss of control. When the car hasslowed to such a speed that it is safe to doso, brake carefully and pull off the road.Drive off the road as far as possible and
park on firm, level ground. If you are on adivided highway, do not park in the medianarea between the two traffic lanes.
2. When the car is stopped, turn on your emer- gency hazard flashers, set the parking brakeand put the transaxle in "P" (automatic
transaxle) or reverse (manual transaxle)
3. Have all passengers get out of the car. Be sure they all get out on the side of the carthat is away from traffic.
4. Change the tire according to the instructions provided as following.
compartment, tighten the bolt firmly with yourfingers until there is no more play in the sparetire.
D040B01X
Page 97 of 249
DO-IT-YOURSELF MAINTENANCE
DO-IT-YOURSELF MAINTENANCE DO-IT-YOURSELF MAINTENANCE
DO-IT-YOURSELF MAINTENANCE
DO-IT-YOURSELF MAINTENANCE
6-1
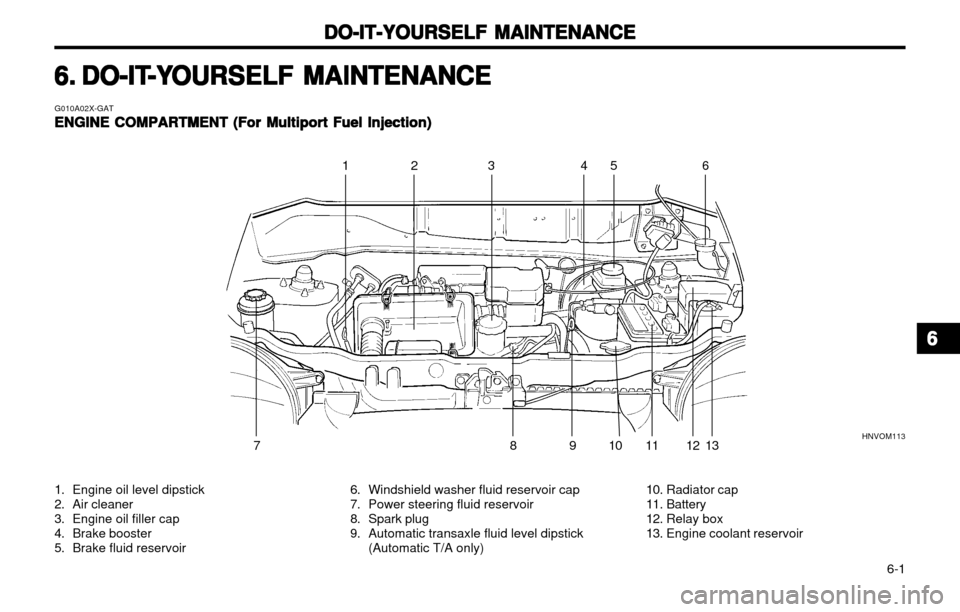
G010A02X-GATENGINE COMPARTMENT (For Multiport Fuel Injection)
ENGINE COMPARTMENT (For Multiport Fuel Injection) ENGINE COMPARTMENT (For Multiport Fuel Injection)
ENGINE COMPARTMENT (For Multiport Fuel Injection)
ENGINE COMPARTMENT (For Multiport Fuel Injection)
1. Engine oil level dipstick
2. Air cleaner
3. Engine oil filler cap
4. Brake booster
5. Brake fluid reservoir 6. Windshield washer fluid reservoir cap
7. Power steering fluid reservoir
8. Spark plug
9. Automatic transaxle fluid level dipstick
(Automatic T/A only) 10. Radiator cap
11. Battery
12. Relay box
13. Engine coolant reservoir
6.6.
6.6.
6.
DO-IT
DO-IT DO-IT
DO-IT
DO-IT
-Y
-Y -Y
-Y
-Y
OURSELF MAINTENANCE
OURSELF MAINTENANCE OURSELF MAINTENANCE
OURSELF MAINTENANCE
OURSELF MAINTENANCE
12 4 5 6
HNVOM113
81 011 13
12
79 3
66
66
6
Page 101 of 249
DO-IT-YOURSELF MAINTENANCE
DO-IT-YOURSELF MAINTENANCE DO-IT-YOURSELF MAINTENANCE
DO-IT-YOURSELF MAINTENANCE
DO-IT-YOURSELF MAINTENANCE
6-5
G050A01A-AAT
CHECKING AND CHANGING THE EN-
CHECKING AND CHANGING THE EN- CHECKING AND CHANGING THE EN-
CHECKING AND CHANGING THE EN-
CHECKING AND CHANGING THE EN-
GINE COOLANT
GINE COOLANT GINE COOLANT
GINE COOLANT
GINE COOLANT
WARNING:
WARNING: WARNING:
WARNING:
WARNING:
Do not remove the radiator cap when the
Do not remove the radiator cap when the Do not remove the radiator cap when the
Do not remove the radiator cap when the
Do not remove the radiator cap when the engine is hot. When the engine is hot, the
engine is hot. When the engine is hot, the engine is hot. When the engine is hot, the
engine is hot. When the engine is hot, the
engine is hot. When the engine is hot, the
engine coolant is under pressure and may
engine coolant is under pressure and may engine coolant is under pressure and may
engine coolant is under pressure and may
engine coolant is under pressure and may
erupt through the opening if the cap is
erupt through the opening if the cap is erupt through the opening if the cap is
erupt through the opening if the cap is
erupt through the opening if the cap is
removed. You could be seriously burned if
removed. You could be seriously burned if removed. You could be seriously burned if
removed. You could be seriously burned if
removed. You could be seriously burned if
you do not observe this precaution. Do not
you do not observe this precaution. Do not you do not observe this precaution. Do not
you do not observe this precaution. Do not
you do not observe this precaution. Do not
remove the radiator cap until the radiator is
remove the radiator cap until the radiator is remove the radiator cap until the radiator is
remove the radiator cap until the radiator is
remove the radiator cap until the radiator is
cool to the touch.
cool to the touch. cool to the touch.
cool to the touch.
cool to the touch.
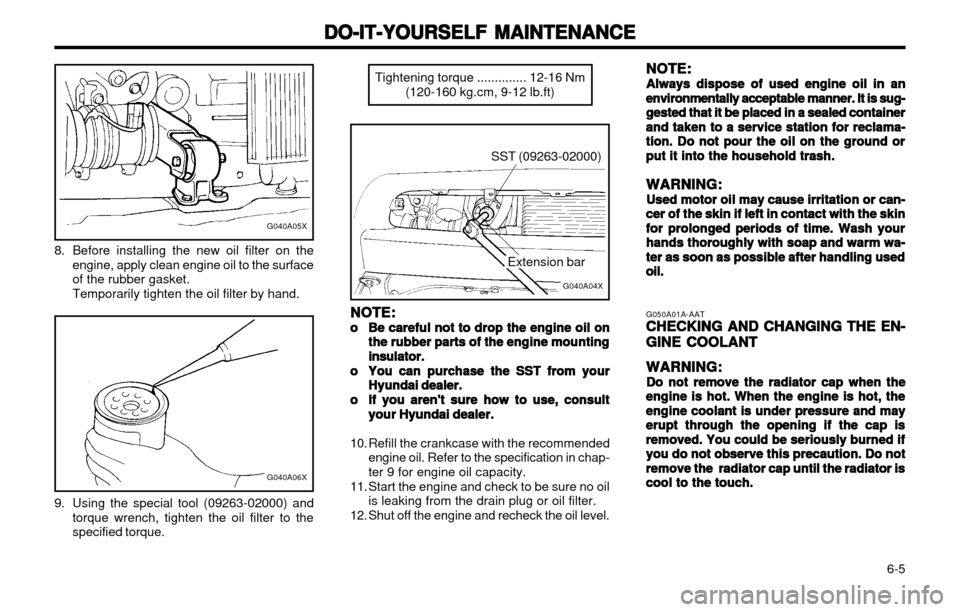
8. Before installing the new oil filter on the
engine, apply clean engine oil to the surface of the rubber gasket. Temporarily tighten the oil filter by hand.
G040A05X
G040A06X
9. Using the special tool (09263-02000) andtorque wrench, tighten the oil filter to the specified torque. Tightening torque .............. 12-16 Nm
(120-160 kg.cm, 9-12 lb.ft)
SST (09263-02000)
G040A04X
Extension bar
NOTE:
NOTE: NOTE:
NOTE:
NOTE:
oo
oo
o Be careful not to drop the engine oil on
Be careful not to drop the engine oil on Be careful not to drop the engine oil on
Be careful not to drop the engine oil on
Be careful not to drop the engine oil on
the rubber
the rubber the rubber
the rubber
the rubber
parts of the engine mounting
parts of the engine mounting parts of the engine mounting
parts of the engine mounting
parts of the engine mounting
insulator.
insulator. insulator.
insulator.
insulator.
oo
oo
o You can purchase the SST from your
You can purchase the SST from your You can purchase the SST from your
You can purchase the SST from your
You can purchase the SST from your
Hyundai dealer.
Hyundai dealer. Hyundai dealer.
Hyundai dealer.
Hyundai dealer.
oo
oo
o If you aren't sure how to use, consult
If you aren't sure how to use, consult If you aren't sure how to use, consult
If you aren't sure how to use, consult
If you aren't sure how to use, consult
your Hyundai dealer.
your Hyundai dealer. your Hyundai dealer.
your Hyundai dealer.
your Hyundai dealer.
10. Refill the crankcase with the recommended engine oil. Refer to the specification in chap- ter 9 for engine oil capacity.
11. Start the engine and check to be sure no oil is leaking from the drain plug or oil filter.
12. Shut off the engine and recheck the oil level. NOTE:
NOTE: NOTE:
NOTE:
NOTE:
Always dispose of used engine oil in an
Always dispose of used engine oil in an Always dispose of used engine oil in an
Always dispose of used engine oil in an
Always dispose of used engine oil in an environmentally acceptable
environmentally acceptable environmentally acceptable
environmentally acceptable
environmentally acceptable
manner. It is sug-
manner. It is sug- manner. It is sug-
manner. It is sug-
manner. It is sug-
gested that it be placed in a sealed container
gested that it be placed in a sealed container gested that it be placed in a sealed container
gested that it be placed in a sealed container
gested that it be placed in a sealed container
and taken
and taken and taken
and taken
and taken
to a service station for reclama-
to a service station for reclama- to a service station for reclama-
to a service station for reclama-
to a service station for reclama-
tion. Do not pour the oil on the ground or
tion. Do not pour the oil on the ground or tion. Do not pour the oil on the ground or
tion. Do not pour the oil on the ground or
tion. Do not pour the oil on the ground or
put it into the household trash.
put it into the household trash. put it into the household trash.
put it into the household trash.
put it into the household trash.
WARNING:
WARNING: WARNING:
WARNING:
WARNING:
Used motor oil may cause irritation or can-
Used motor oil may cause irritation or can- Used motor oil may cause irritation or can-
Used motor oil may cause irritation or can-
Used motor oil may cause irritation or can-cer of the skin if
cer of the skin if cer of the skin if
cer of the skin if
cer of the skin if left in contact with the skin
left in contact with the skin left in contact with the skin
left in contact with the skin
left in contact with the skin
for prolonged periods of time. Wash your
for prolonged periods of time. Wash your for prolonged periods of time. Wash your
for prolonged periods of time. Wash your
for prolonged periods of time. Wash your
hands
hands hands
hands
hands thoroughly with soap and warm wa-
thoroughly with soap and warm wa- thoroughly with soap and warm wa-
thoroughly with soap and warm wa-
thoroughly with soap and warm wa-
ter as soon as possible after handling used
ter as soon as possible after handling used ter as soon as possible after handling used
ter as soon as possible after handling used
ter as soon as possible after handling used
oil.oil.
oil.oil.
oil.
Page 102 of 249
DO-IT-YOURSELF MAINTENANCE
DO-IT-YOURSELF MAINTENANCE DO-IT-YOURSELF MAINTENANCE
DO-IT-YOURSELF MAINTENANCE
DO-IT-YOURSELF MAINTENANCE
6-6 -15 (5)
-25 (-13) -35 (-31)-45 (-49)
G050B01A-AAT
Recommended Engine Coolant
Recommended Engine Coolant Recommended Engine Coolant
Recommended Engine Coolant
Recommended Engine Coolant
Use a high quality ethylene-glycol coolant in a
50/50 mix with water. The engine coolant should be compatible with aluminum engine parts. Ad-ditional corrosion inhibitors or additives shouldnot be used. The cooling system must be main-tained with the correct concentration and typeof engine coolant to prevent freezing and corro-sion. Never allow the concentration of antifreeze to exceed the 60% level or go below the 35% levelor damage to the coolant system may result. Forproper concentration when adding or replacingthe coolant, refer to the following table.
35% 40%50%60% G050C01A-AAT
To Check the Coolant Level
To Check the Coolant Level To Check the Coolant Level
To Check the Coolant Level
To Check the Coolant Level
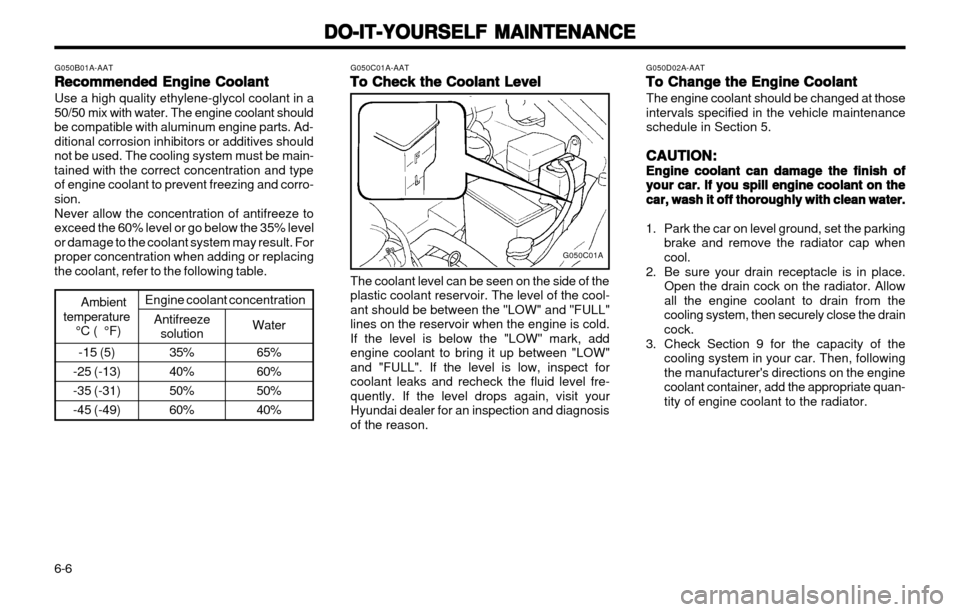
The coolant level can be seen on the side of the plastic coolant reservoir. The level of the cool-ant should be between the "LOW" and "FULL"lines on the reservoir when the engine is cold.If the level is below the "LOW" mark, addengine coolant to bring it up between "LOW"and "FULL". If the level is low, inspect forcoolant leaks and recheck the fluid level fre-quently. If the level drops again, visit yourHyundai dealer for an inspection and diagnosisof the reason. G050D02A-AAT
To Change the Engine Coolant
To Change the Engine Coolant To Change the Engine Coolant
To Change the Engine Coolant
To Change the Engine Coolant
The engine coolant should be changed at thoseintervals specified in the vehicle maintenanceschedule in Section 5.
CAUTION:
CAUTION: CAUTION:
CAUTION:
CAUTION:
Engine coolant can damage the finish of
Engine coolant can damage the finish of Engine coolant can damage the finish of
Engine coolant can damage the finish of
Engine coolant can damage the finish of
your car. If you spill engine coolant on the
your car. If you spill engine coolant on the your car. If you spill engine coolant on the
your car. If you spill engine coolant on the
your car. If you spill engine coolant on the
car, wash it off thoroughly with clean water.
car, wash it off thoroughly with clean water. car, wash it off thoroughly with clean water.
car, wash it off thoroughly with clean water.
car, wash it off thoroughly with clean water.
1. Park the car on level ground, set the parking brake and remove the radiator cap whencool.
2. Be sure your drain receptacle is in place. Open the drain cock on the radiator. Allowall the engine coolant to drain from thecooling system, then securely close the draincock.
3. Check Section 9 for the capacity of the cooling system in your car. Then, followingthe manufacturer's directions on the enginecoolant container, add the appropriate quan-tity of engine coolant to the radiator.
G050C01A
65% 60%50%40%
Water
Antifreeze
solution
Ambient
temperature °C ( °F) Engine coolant concentration
Page 103 of 249
DO-IT-YOURSELF MAINTENANCE
DO-IT-YOURSELF MAINTENANCE DO-IT-YOURSELF MAINTENANCE
DO-IT-YOURSELF MAINTENANCE
DO-IT-YOURSELF MAINTENANCE
6-7
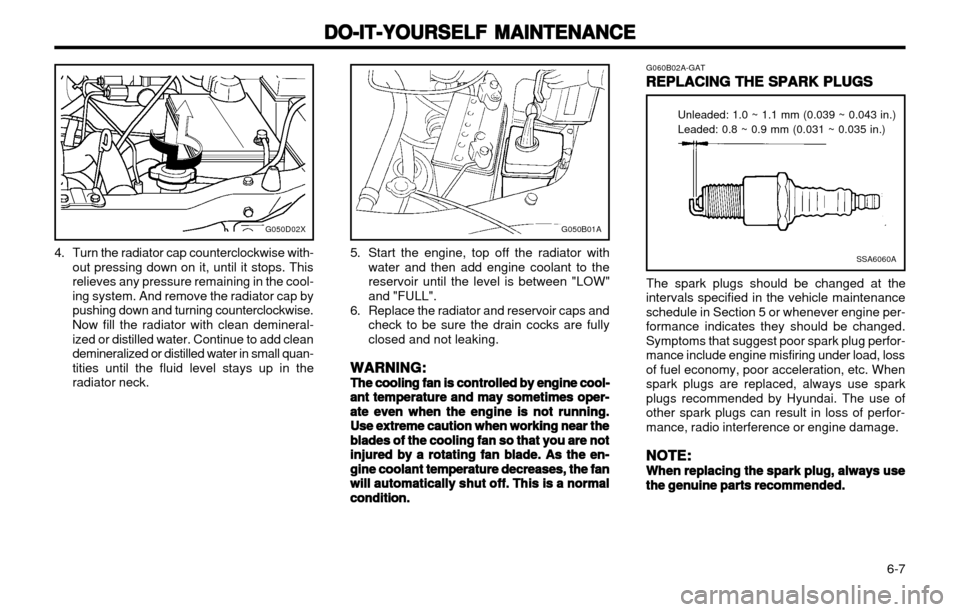
4. Turn the radiator cap counterclockwise with-out pressing down on it, until it stops. This relieves any pressure remaining in the cool-ing system. And remove the radiator cap bypushing down and turning counterclockwise. Now fill the radiator with clean demineral- ized or distilled water. Continue to add cleandemineralized or distilled water in small quan-tities until the fluid level stays up in theradiator neck.SSA6060A
Unleaded: 1.0 ~ 1.1 mm (0.039 ~ 0.043 in.) Leaded: 0.8 ~ 0.9 mm (0.031 ~ 0.035 in.)
G060B02A-GAT
REPLACING THE SPARK PLUGS
REPLACING THE SPARK PLUGS REPLACING THE SPARK PLUGS
REPLACING THE SPARK PLUGS
REPLACING THE SPARK PLUGS
The spark plugs should be changed at the
intervals specified in the vehicle maintenance schedule in Section 5 or whenever engine per-formance indicates they should be changed.Symptoms that suggest poor spark plug perfor-mance include engine misfiring under load, lossof fuel economy, poor acceleration, etc. Whenspark plugs are replaced, always use sparkplugs recommended by Hyundai. The use ofother spark plugs can result in loss of perfor-mance, radio interference or engine damage.
NOTE:
NOTE: NOTE:
NOTE:
NOTE:
When replacing the spark plug, always use
When replacing the spark plug, always use When replacing the spark plug, always use
When replacing the spark plug, always use
When replacing the spark plug, always use the genuine parts recommended.
the genuine parts recommended. the genuine parts recommended.
the genuine parts recommended.
the genuine parts recommended.
G050D02X
5. Start the engine, top off the radiator with
water and then add engine coolant to the reservoir until the level is between "LOW"and "FULL".
6. Replace the radiator and reservoir caps and check to be sure the drain cocks are fullyclosed and not leaking.
WARNING:
WARNING: WARNING:
WARNING:
WARNING:
The cooling fan is controlled by engine cool-
The cooling fan is controlled by engine cool- The cooling fan is controlled by engine cool-
The cooling fan is controlled by engine cool-
The cooling fan is controlled by engine cool- ant temperature and may sometimes oper-
ant temperature and may sometimes oper- ant temperature and may sometimes oper-
ant temperature and may sometimes oper-
ant temperature and may sometimes oper-
ate even when the engine is not running.
ate even when the engine is not running. ate even when the engine is not running.
ate even when the engine is not running.
ate even when the engine is not running.
Use extreme caution when working near the
Use extreme caution when working near the Use extreme caution when working near the
Use extreme caution when working near the
Use extreme caution when working near the
blades of the cooling fan so that you are not
blades of the cooling fan so that you are not blades of the cooling fan so that you are not
blades of the cooling fan so that you are not
blades of the cooling fan so that you are not
injured by a rotating fan blade. As the en-
injured by a rotating fan blade. As the en- injured by a rotating fan blade. As the en-
injured by a rotating fan blade. As the en-
injured by a rotating fan blade. As the en-
gine coolant temperature decreases, the fan
gine coolant temperature decreases, the fan gine coolant temperature decreases, the fan
gine coolant temperature decreases, the fan
gine coolant temperature decreases, the fan
will automatically shut off. This is a normal
will automatically shut off. This is a normal will automatically shut off. This is a normal
will automatically shut off. This is a normal
will automatically shut off. This is a normal
condition.
condition. condition.
condition.
condition.
G050B01A
Page 105 of 249
DO-IT-YOURSELF MAINTENANCE
DO-IT-YOURSELF MAINTENANCE DO-IT-YOURSELF MAINTENANCE
DO-IT-YOURSELF MAINTENANCE
DO-IT-YOURSELF MAINTENANCE
6-9
G090A01X-GAT
FILLING THE WASHER RESERVOIR
FILLING THE WASHER RESERVOIR FILLING THE WASHER RESERVOIR
FILLING THE WASHER RESERVOIR
FILLING THE WASHER RESERVOIR
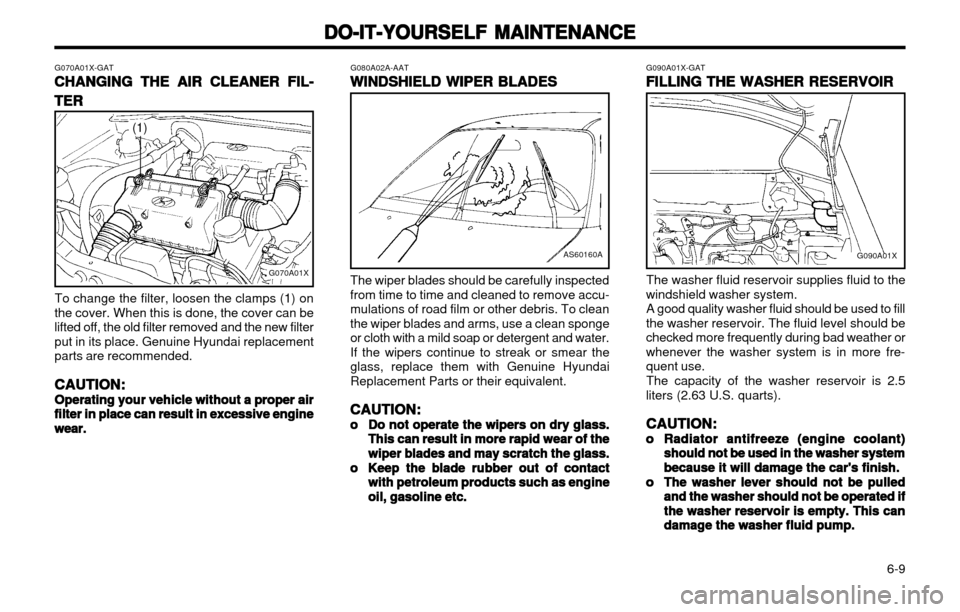
The washer fluid reservoir supplies fluid to the
windshield washer system. A good quality washer fluid should be used to fill
the washer reservoir. The fluid level should be checked more frequently during bad weather orwhenever the washer system is in more fre-quent use.
The capacity of the washer reservoir is 2.5
liters (2.63 U.S. quarts).
CAUTION:
CAUTION: CAUTION:
CAUTION:
CAUTION:
oo
oo
o Radiator antifreeze (engine coolant)
Radiator antifreeze (engine coolant) Radiator antifreeze (engine coolant)
Radiator antifreeze (engine coolant)
Radiator antifreeze (engine coolant)
should not be used in the washer system
should not be used in the washer system should not be used in the washer system
should not be used in the washer system
should not be used in the washer system
because it will damage the car's finish.
because it will damage the car's finish. because it will damage the car's finish.
because it will damage the car's finish.
because it will damage the car's finish.
oo
oo
o The washer lever should not be pulled
The washer lever should not be pulled The washer lever should not be pulled
The washer lever should not be pulled
The washer lever should not be pulled
and the washer should not be operated if
and the washer should not be operated if and the washer should not be operated if
and the washer should not be operated if
and the washer should not be operated if
the washer reservoir is empty. This can
the washer reservoir is empty. This can the washer reservoir is empty. This can
the washer reservoir is empty. This can
the washer reservoir is empty. This can
damage the washer fluid pump.
damage the washer fluid pump. damage the washer fluid pump.
damage the washer fluid pump.
damage the washer fluid pump.
G070A01X-GAT
CHANGING THE AIR CLEANER FIL-
CHANGING THE AIR CLEANER FIL- CHANGING THE AIR CLEANER FIL-
CHANGING THE AIR CLEANER FIL-
CHANGING THE AIR CLEANER FIL-
TER
TER TER
TER
TER G080A02A-AAT
WINDSHIELD WIPER BLADES
WINDSHIELD WIPER BLADES WINDSHIELD WIPER BLADES
WINDSHIELD WIPER BLADES
WINDSHIELD WIPER BLADES The wiper blades should be carefully inspected from time to time and cleaned to remove accu-mulations of road film or other debris. To cleanthe wiper blades and arms, use a clean spongeor cloth with a mild soap or detergent and water.If the wipers continue to streak or smear theglass, replace them with Genuine HyundaiReplacement Parts or their equivalent.
CAUTION:
CAUTION: CAUTION:
CAUTION:
CAUTION:
oo
oo
o Do not operate the wipers on dry glass.
Do not operate the wipers on dry glass. Do not operate the wipers on dry glass.
Do not operate the wipers on dry glass.
Do not operate the wipers on dry glass.
This can result in more rapid wear of the
This can result in more rapid wear of the This can result in more rapid wear of the
This can result in more rapid wear of the
This can result in more rapid wear of the
wiper blades and may scratch the glass.
wiper blades and may scratch the glass. wiper blades and may scratch the glass.
wiper blades and may scratch the glass.
wiper blades and may scratch the glass.
oo
oo
o Keep the blade rubber out of contact
Keep the blade rubber out of contact Keep the blade rubber out of contact
Keep the blade rubber out of contact
Keep the blade rubber out of contact
with petroleum products such as engine
with petroleum products such as engine with petroleum products such as engine
with petroleum products such as engine
with petroleum products such as engine
oil, gasoline etc.
oil, gasoline etc. oil, gasoline etc.
oil, gasoline etc.
oil, gasoline etc.
To change the filter, loosen the clamps (1) on
the cover. When this is done, the cover can be
lifted off, the old filter removed and the new filterput in its place. Genuine Hyundai replacement
parts are recommended.
CAUTION:
CAUTION: CAUTION:
CAUTION:
CAUTION:
Operating your vehicle without a proper air
Operating your vehicle without a proper air Operating your vehicle without a proper air
Operating your vehicle without a proper air
Operating your vehicle without a proper air filter in place
filter in place filter in place
filter in place
filter in place can result in excessive engine
can result in excessive engine can result in excessive engine
can result in excessive engine
can result in excessive engine
wear.
wear. wear.
wear.
wear.
G070A01X
(1)
AS60160AG090A01X
Page 157 of 249
FEATURES OF YOUR HYUNDAI
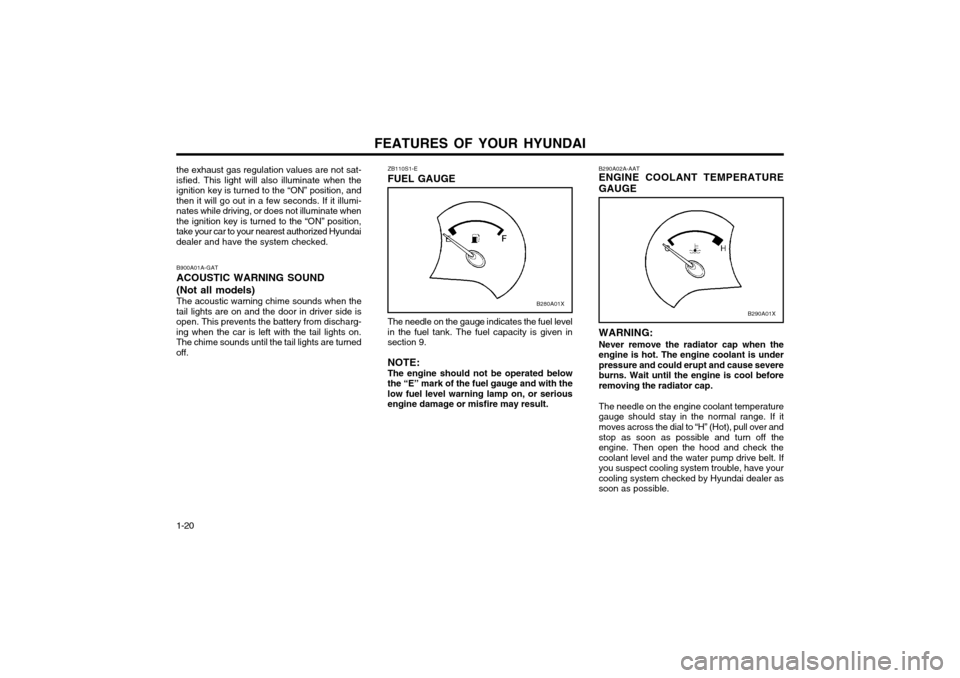
1-20 WARNING: Never remove the radiator cap when the engine is hot. The engine coolant is underpressure and could erupt and cause severeburns. Wait until the engine is cool beforeremoving the radiator cap. The needle on the engine coolant temperature
gauge should stay in the normal range. If itmoves across the dial to “H” (Hot), pull over and stop as soon as possible and turn off the engine. Then open the hood and check thecoolant level and the water pump drive belt. If
you suspect cooling system trouble, have yourcooling system checked by Hyundai dealer assoon as possible.
The needle on the gauge indicates the fuel levelin the fuel tank. The fuel capacity is given insection 9. NOTE: The engine should not be operated below the “E” mark of the fuel gauge and with thelow fuel level warning lamp on, or seriousengine damage or misfire may result. B290A02A-AAT ENGINE COOLANT TEMPERATURE GAUGE
ZB110S1-E FUEL GAUGE
B900A01A-GATACOUSTIC WARNING SOUND (Not all models) The acoustic warning chime sounds when the
tail lights are on and the door in driver side is open. This prevents the battery from discharg-ing when the car is left with the tail lights on.The chime sounds until the tail lights are turnedoff.
the exhaust gas regulation values are not sat-isfied. This light will also illuminate when theignition key is turned to the “ON” position, andthen it will go out in a few seconds. If it illumi-nates while driving, or does not illuminate whenthe ignition key is turned to the “ON” position,take your car to your nearest authorized Hyundaidealer and have the system checked.
B280A01XB290A01X
Page 203 of 249
WHAT TO DO IN AN EMERGENCY
3-2 3. If coolant is running out under the car or
steam is coming out from under the bonnet stop the engine. Do not open the bonnetuntil the coolant has stopped running or thesteaming has stopped. If there is no visibleloss of coolant and no steam, leave theengine running and check to be sure theengine cooling fan is operating. If the fan isnot running, turn the engine off.
4. Check to see if the water pump drive belt is missing. If it is not missing, check to see thatit is tight. If the drive belt seems to besatisfactory, check for coolant leaking fromthe radiator, hoses or under the car. (If theair conditioner had been in use, it is normalfor cold water to be draining from it).
WARNING: While the engine is running, keep hands andclothing away from moving parts such asthe fan and drive belts to prevent injury.
5. If the water pump drive belt is broken or coolant is leaking out, stop the engine imme-diately and call the nearest Hyundai dealerfor assistance.
WARNING: Do not remove the radiator cap when theengine is hot since steam and boiling watermay be ejected from the radiator resulting inburns or scalding.
CAUTION:
Personal injury and damage to the vehicle
may occur if jump starting is not performedcorrectly. If any doubt exists as to how thisoperation should be performed, seek assis-tance from qualified personnel. WARNING:
Motor vehicle batteries contain sulphuric
acid and emit hydrogen gas. Protective cloth- ing should be worn and care exercised toprevent the acid from coming into contactwith skin or clothing and the vehicle. Nakedlights should not be permitted in the vicinityof the battery. Care should be exercised topreventsparks occurring during connection.If acid accidentally comes into contact withskin or eyes, the affected area should imme-diately be flushed with copious amounts ofwater and medical assistance sought.
1. Ensure that the booster battery is 12 volt type. If the booster battery is installed in another vehicle, ensure that the two vehi-cles are not touching.
2. Turn off all unnecessary electrical equip- ment in both vehicles.
3. Ensure that the engine of the vehicle provid- ing the jump start is running prior to connec-tion of the jump cables.
4. Connect the red jump cable to the positive (+) terminal of the booster battery and theother end to the positive (+) terminal of thedischarged battery. 5. Attach the black jump cable to the negative
(-) terminal of the booster battery, and theother end to a ground point within the enginecompartment of the vehicle with the flat bat-tery. Do not connect to the negative batteryterminal of the flat battery since sparks maybe generated with the subsequent risk ofexplosion.
6. Raise the booster vehicle engine speed to 2,000 r.p.m. and start the engine of thevehicle with the flat battery.
7. Remove jump cables in the reverse order of installation (black cable first).
NOTE: If the jump cable is incorrectly installed, damage to the vehicle electrical system mayoccur, in particular the electronic compo-nents such as the Fuel Injection systemcomputer and the Automatic Transaxle com-puter. The battery must never be discon-nected whilst the engine is running. XD040A1-E
IF THE ENGINE OVERHEATS If the temperature gauge indicates overheating:
1. Pull off the road and stop as soon as it is safe to do so.
2. Place the gear selector lever in "P" (auto- matic), or neutral (manual transaxle, semi- automatic transalxe) and set the parkingbrake. If the air conditioner is on, turn it off.