oil type Hyundai Azera 2005 Owner's Manual
[x] Cancel search | Manufacturer: HYUNDAI, Model Year: 2005, Model line: Azera, Model: Hyundai Azera 2005Pages: 297, PDF Size: 13.2 MB
Page 79 of 297
1FEATURES OF YOUR HYUNDAI
62
B260F01A-AAT High Beam Indicator Light
The high beam indicator light comes on whenever the headlights areswitched to the high beam or flash position.
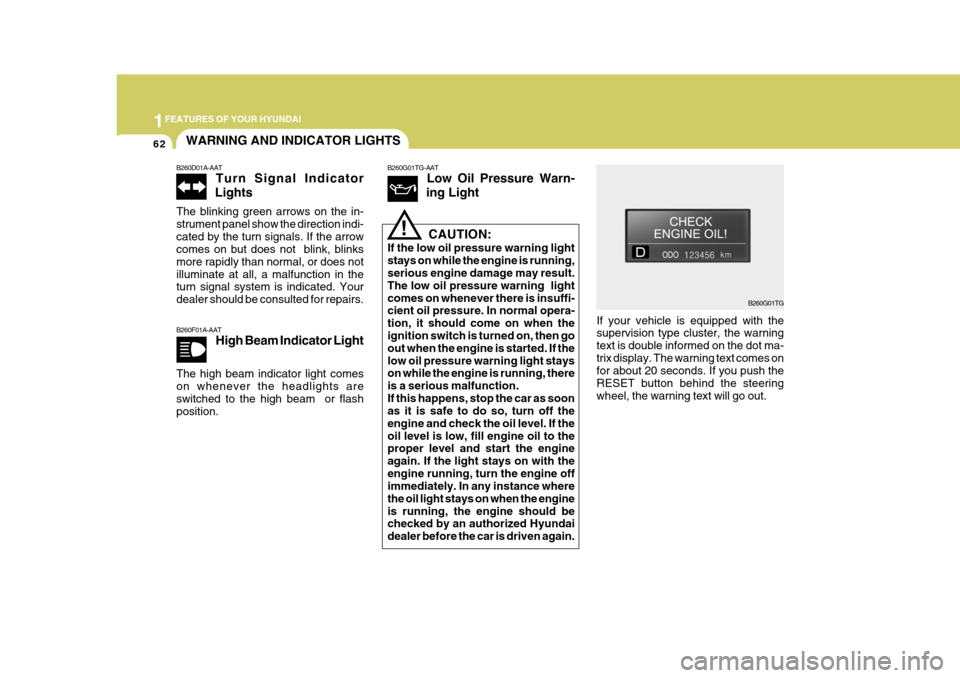
If your vehicle is equipped with the supervision type cluster, the warning text is double informed on the dot ma-trix display. The warning text comes on for about 20 seconds. If you push the RESET button behind the steeringwheel, the warning text will go out.
CAUTION:
If the low oil pressure warning lightstays on while the engine is running, serious engine damage may result. The low oil pressure warning lightcomes on whenever there is insuffi- cient oil pressure. In normal opera- tion, it should come on when the ignition switch is turned on, then go out when the engine is started. If thelow oil pressure warning light stays on while the engine is running, there is a serious malfunction.If this happens, stop the car as soon as it is safe to do so, turn off the engine and check the oil level. If theoil level is low, fill engine oil to the proper level and start the engine again. If the light stays on with theengine running, turn the engine off immediately. In any instance where the oil light stays on when the engineis running, the engine should be checked by an authorized Hyundai dealer before the car is driven again.
!
B260G01TG
WARNING AND INDICATOR LIGHTS
B260D01A-AAT Turn Signal Indicator
Lights
The blinking green arrows on the in- strument panel show the direction indi-cated by the turn signals. If the arrow comes on but does not blink, blinks more rapidly than normal, or does notilluminate at all, a malfunction in the turn signal system is indicated. Your dealer should be consulted for repairs.
B260G01TG-AAT Low Oil Pressure Warn-
ing Light
Page 201 of 297
2
DRIVING YOUR HYUNDAI
17
C160G01A-GAT To Keep Locks from Freezing To keep the locks from freezing, squirt an approved de-icer fluid or glycerineinto the key opening. If a lock is cov- ered with ice, squirt it with an approved de-icing fluid to remove the ice. If thelock is frozen internally, you may be able to thaw it out by using a heated key. Handle the heated key with careto avoid burning your fingers. NOTE: The proper temperature for using the immobilizer key is from -40°C (- 40°F) to 80°C (176°F). If you heat the immobilizer key over 80°C (176°F) toopen the frozen lock, it may cause damage to the transponder in its head.
C160D01A-AAT Check Battery and Cables Winter puts additional burdens on the battery system. Visually inspect thebattery and cables as described in Section 6. The level of charge in your battery can be checked by your Hyundaidealer or a service station.
C160F01A-AAT Check Spark Plugs and Ignition System Inspect your spark plugs as described in Section 6 and replace them if neces-sary. Also check all ignition wiring and components to be sure they are not cracked, worn or damaged in any way.
C160E01A-AAT Change to "Winter Weight" Oil if Necessary In some climates it is recommended that a lower viscosity "winter weight" oil be used during cold weather. See Section 9 for recommendations. If youaren't sure what weight oil you should use, consult your Hyundai dealer.
C160H01A-AAT Use Approved Anti-Freeze in Window Washer System To keep the water in the window washer system from freezing, add an approvedanti-freeze solution in accordance with instructions on the container. Window washer anti-freeze is available fromHyundai dealers and most auto parts outlets. Do not use engine coolant or other types of anti-freeze as thesemay damage the finish.
Page 226 of 297
44CORROSION PREVENTION AND APPEARANCE CARE
6
E040E01A-AAT Cleaning the Windows You may use any household window cleaner on the windows. However, when cleaning the inside of the rear window be careful not to damage therear window defroster wiring.
E040C01A-AAT Cleaning the Carpets Use a foam-type carpet cleaner. Clean- ers of this type are available in aerosol cans in liquid form or powder. Read theinstructions and follow them exactly. Using a vacuum cleaner with the ap- propriate attachment, remove as muchdirt from the carpets as possible. Apply the foam following the manufacturer's directions, then rub in overlappingcircles. Do not add water. These clean- ers work best when the carpet is kept as dry as possible.
E040B01A-AAT To Clean the Leather Upholstery (If Installed) In the normal course of use, leather upholstered surfaces will, like anymaterial, pick-up dust and dirt. This dust and dirt must be cleaned off or it may work into the surface of the leather,causing damage. Fine leather needs care, and should be cleaned when necessary. Washing leather thoroughly with soap and water will keep your leather lustrous, beauti-ful and ensure you have many years of wear. Take a piece of cheese cloth and usingany mild soap and lukewarm water, work up a good lather. Thoroughly wash the leather. Wipe clean with aslightly damp cloth and dry with soft cloth. Do this as often as the leather becomes soiled. During tanning operations, sufficient oils are incorporated through process-ing that none need be applied during the life of the leather. Oil applied to the finished surface will in no way help the leather and may do more harm thangood. Varnishes and furniture polishesshould never be used under any con- ditions.
E040D01A-AAT Cleaning the Seat Belts To clean the seat belts, use a cloth or sponge with mild soap or detergentand warm water. Do not use strong detergents, dye, bleach or abrasive materials on the seat belts as this mayweaken the fabric. While cleaning the belts, inspect them for excessive wear, cuts, fraying orother signs of damage and replace them if necessary.
Page 231 of 297
5VEHICLE MAINTENANCE REQUIREMENTS
4
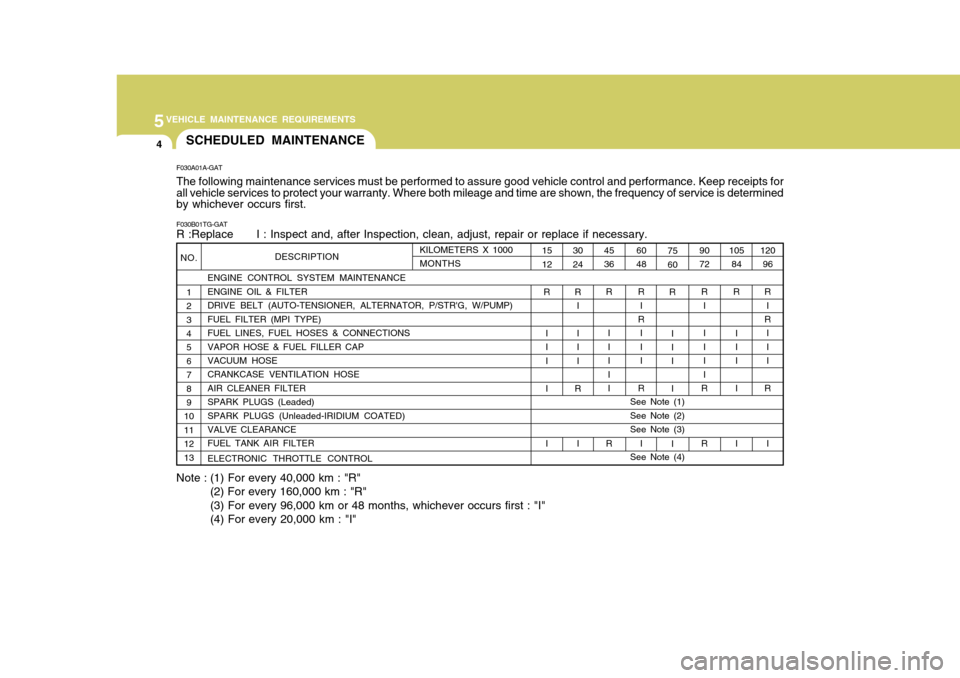
Note : (1) For every 40,000 km : "R" (2) For every 160,000 km : "R" (3) For every 96,000 km or 48 months, whichever occurs first : "I"(4) For every 20,000 km : "I"
NO.
1234 5 6789
10111213 ENGINE CONTROL SYSTEM MAINTENANCEENGINE OIL & FILTERDRIVE BELT (AUTO-TENSIONER, ALTERNATOR, P/STR'G, W/PUMP)FUEL FILTER (MPI TYPE)FUEL LINES, FUEL HOSES & CONNECTIONSVAPOR HOSE & FUEL FILLER CAP VACUUM HOSE CRANKCASE VENTILATION HOSEAIR CLEANER FILTERSPARK PLUGS (Leaded)SPARK PLUGS (Unleaded-IRIDIUM COATED)VALVE CLEARANCE FUEL TANK AIR FILTER ELECTRONIC THROTTLE CONTROL
F030A01A-GAT The following maintenance services must be performed to assure good vehicle control and performance. Keep receipts for all vehicle services to protect your warranty. Where both mileage and time are shown, the frequency of service is determinedby whichever occurs first. F030B01TG-GAT R :Replace I : Inspect and, after Inspection, clean, adjust, repair or replace if necessary.
SCHEDULED MAINTENANCE
120
96
R I
R
I II
R
I
105
84
R
I I I I I
90 72
R I I III
R R
75 60
R
I I I I I
60 48
R I
R
III
R
I
4536
R
IIII I
R
30 24
R I I II
R
I
1512
R
III I IKILOMETERS X 1000 MONTHSDESCRIPTION
See Note (1) See Note (2) See Note (3) See Note (4)
Page 262 of 297
6 DO-IT-YOURSELF MAINTENANCE
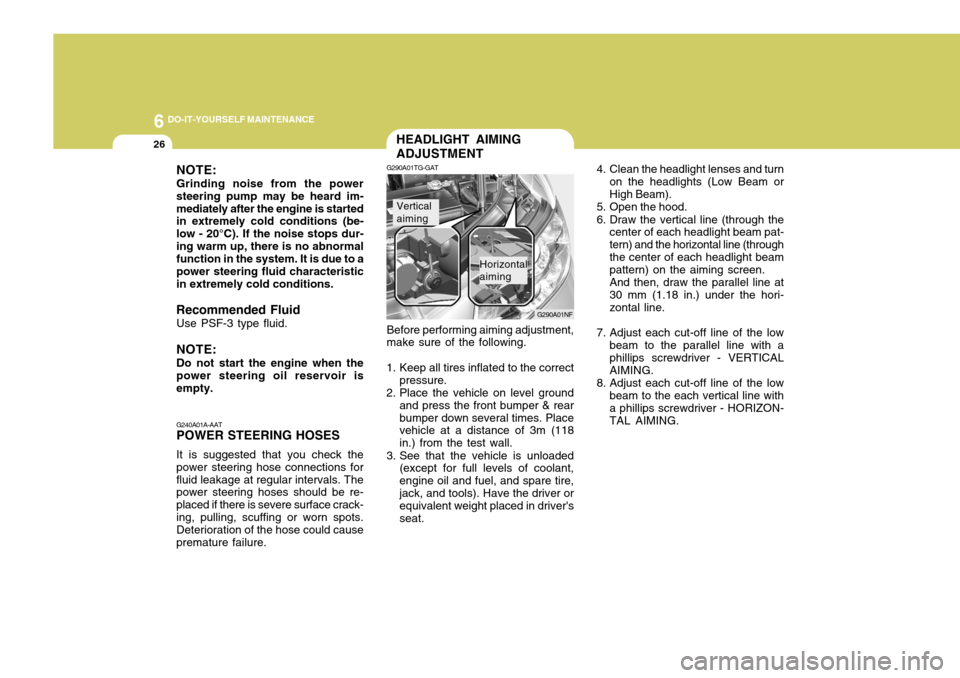
26HEADLIGHT AIMING ADJUSTMENT
G290A01TG-GAT
G290A01NF
Before performing aiming adjustment, make sure of the following.
1. Keep all tires inflated to the correct pressure.
2. Place the vehicle on level ground and press the front bumper & rear bumper down several times. Place vehicle at a distance of 3m (118 in.) from the test wall.
3. See that the vehicle is unloaded (except for full levels of coolant,engine oil and fuel, and spare tire,jack, and tools). Have the driver or equivalent weight placed in driver's seat.
Vertical aiming
Horizontal aiming 4. Clean the headlight lenses and turn
on the headlights (Low Beam or High Beam).
5. Open the hood.
6. Draw the vertical line (through the center of each headlight beam pat- tern) and the horizontal line (throughthe center of each headlight beam pattern) on the aiming screen. And then, draw the parallel line at 30 mm (1.18 in.) under the hori- zontal line.
7. Adjust each cut-off line of the low beam to the parallel line with a phillips screwdriver - VERTICAL AIMING.
8. Adjust each cut-off line of the low beam to the each vertical line with a phillips screwdriver - HORIZON-TAL AIMING.
NOTE: Grinding noise from the power steering pump may be heard im-mediately after the engine is started in extremely cold conditions (be- low - 20°C). If the noise stops dur-ing warm up, there is no abnormal function in the system. It is due to a power steering fluid characteristicin extremely cold conditions.
Recommended Fluid Use PSF-3 type fluid. NOTE: Do not start the engine when the power steering oil reservoir is empty. G240A01A-AAT POWER STEERING HOSES It is suggested that you check the power steering hose connections forfluid leakage at regular intervals. The power steering hoses should be re- placed if there is severe surface crack-ing, pulling, scuffing or worn spots. Deterioration of the hose could cause premature failure.
Page 264 of 297
6 DO-IT-YOURSELF MAINTENANCE
28
Replacement instructions:
1. Allow the bulb to cool. Wear eye protection.
2. Open the engine hood and discon- nect the negative (-) post of the battery.
3. Always grasp the bulb by its plastic base, avoid touching the glass.
G270A01TG-GAT
HEADLIGHT AND FRONT FOG LIGHT
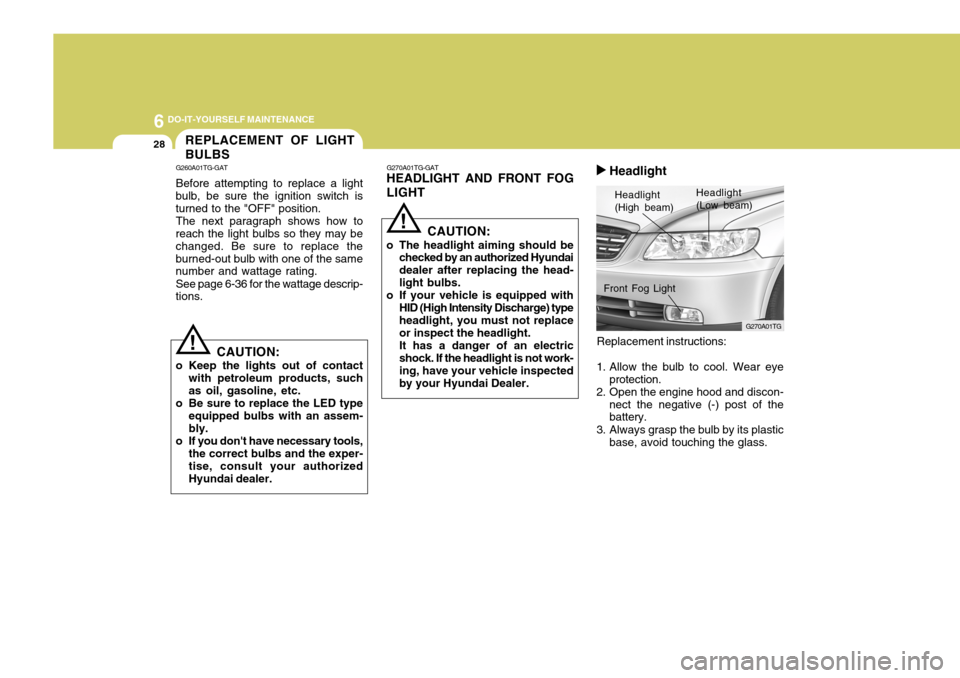
Headlight (High beam) Headlight(Low beam)
G270A01TG
Front Fog Light
REPLACEMENT OF LIGHT BULBS
G260A01TG-GAT Before attempting to replace a light
bulb, be sure the ignition switch is turned to the "OFF" position.
The next paragraph shows how to
reach the light bulbs so they may bechanged. Be sure to replace theburned-out bulb with one of the same number and wattage rating.
See page 6-36 for the wattage descrip-
tions.
! CAUTION:
o Keep the lights out of contact with petroleum products, such as oil, gasoline, etc.
o Be sure to replace the LED type
equipped bulbs with an assem- bly.
o If you don't have necessary tools, the correct bulbs and the exper-tise, consult your authorized Hyundai dealer. CAUTION:
o The headlight aiming should be checked by an authorized Hyundaidealer after replacing the head-light bulbs.
o If your vehicle is equipped with
HID (High Intensity Discharge) type headlight, you must not replace or inspect the headlight. It has a danger of an electric shock. If the headlight is not work- ing, have your vehicle inspectedby your Hyundai Dealer.
! Headlight
Page 289 of 297
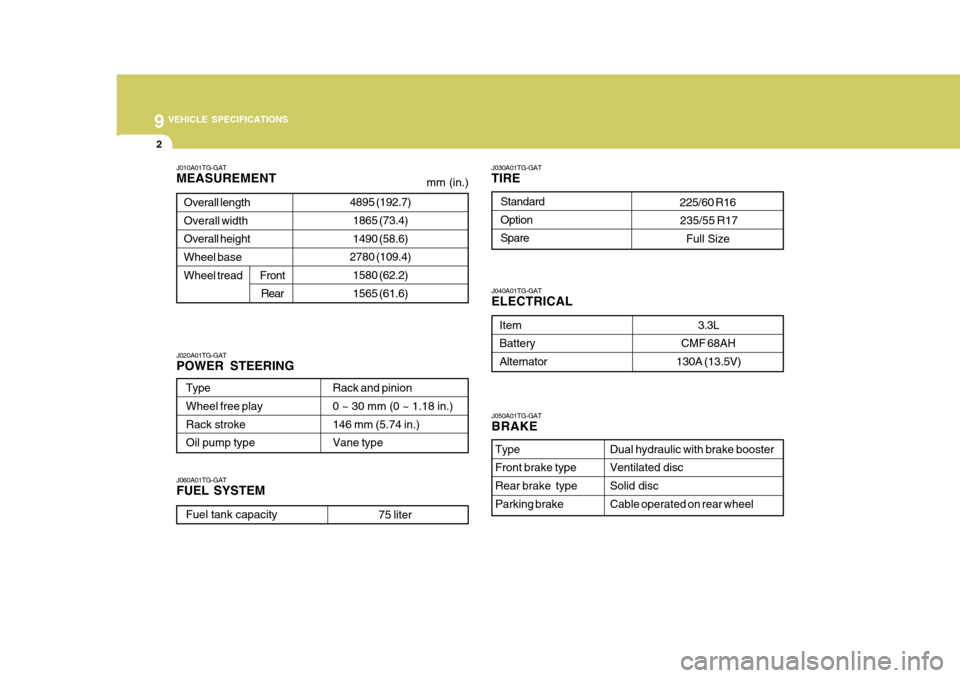
9 VEHICLE SPECIFICATIONS
2
Standard OptionSpare
225/60 R16
235/55 R17
Full Size
3.3L
130A (13.5V)
J010A01TG-GAT MEASUREMENT4895 (192.7)
1865 (73.4) 1490 (58.6)
2780 (109.4)
1580 (62.2)1565 (61.6)
Overall lengthOverall width Overall heightWheel base Wheel tread
Front
Rear
Type Wheel free play Rack strokeOil pump type Rack and pinion0 ~ 30 mm (0 ~ 1.18 in.) 146 mm (5.74 in.) Vane type
J060A01TG-GAT FUEL SYSTEM
J020A01TG-GAT POWER STEERING J030A01TG-GAT TIRE
Item BatteryAlternator
J040A01TG-GAT ELECTRICAL
mm (in.)
Fuel tank capacity75 liter
CMF 68AH
J050A01TG-GAT BRAKE
Dual hydraulic with brake booster Ventilated discSolid disc Cable operated on rear wheel
Type Front brake typeRear brake type Parking brake
Page 291 of 297
9 VEHICLE SPECIFICATIONS
4
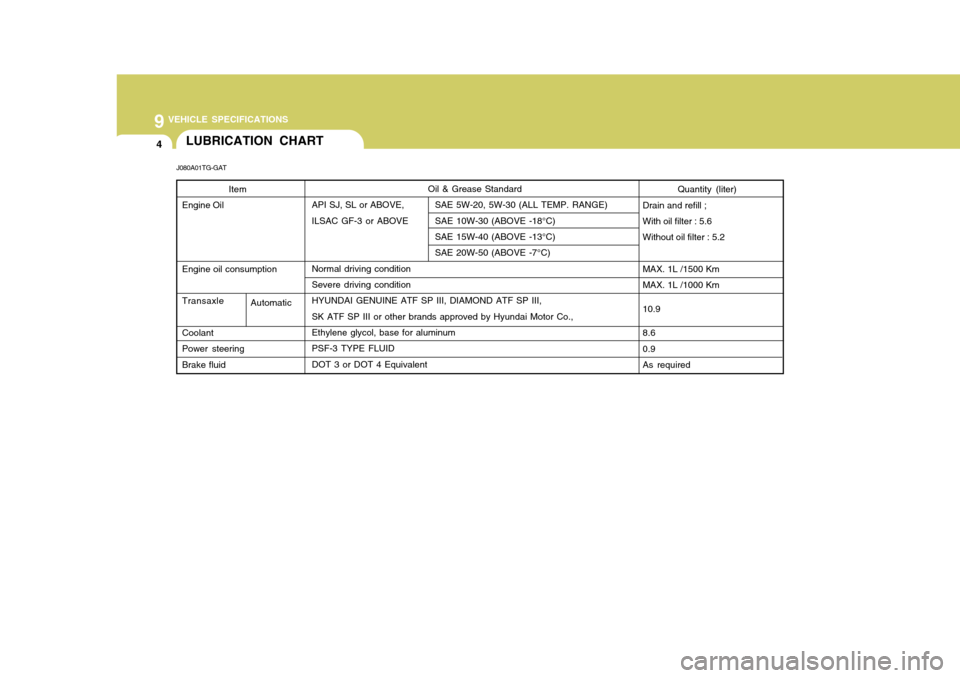
Oil & Grease Standard
API SJ, SL or ABOVE, SAE 5W-20, 5W-30 (ALL TEMP. RANGE)
ILSAC GF-3 or ABOVE SAE 10W-30 (ABOVE -18°C)
SAE 15W-40 (ABOVE -13°C) SAE 20W-50 (ABOVE -7°C)
Normal driving condition Severe driving condition HYUNDAI GENUINE ATF SP III, DIAMOND ATF SP III, SK ATF SP III or other brands approved by Hyundai Motor Co.,Ethylene glycol, base for aluminum PSF-3 TYPE FLUID DOT 3 or DOT 4 EquivalentLUBRICATION CHART
J080A01TG-GAT
Quantity (liter)
Drain and refill ; With oil filter : 5.6 Without oil filter : 5.2 MAX. 1L /1500 Km MAX. 1L /1000 Km 10.98.6 0.9 As required
Item
Engine Oil Engine oil consumption TransaxleCoolant Power steeringBrake fluid
Automatic