reverse light Hyundai Azera 2007 Owner's Manual
[x] Cancel search | Manufacturer: HYUNDAI, Model Year: 2007, Model line: Azera, Model: Hyundai Azera 2007Pages: 308, PDF Size: 12.63 MB
Page 60 of 308
1FEATURES OF YOUR HYUNDAI46
CAUTION:
If a seat track position sensor or an
occupant classification system is not
working properly, the SRS airbag warn-
ing light on the instrument panel
will illuminate because the SRS airbag
warning light is connected with the seat
track position sensor and the occupant
classification system. If the SRS airbag
warning light does not illuminate when
the ignition key is turned to the "ON"
position, remains illuminated after ap-
proximately 6 seconds when the ignition
key is turned to the "ON" position, or if it
illuminates while the vehicle is being
driven, have an authorized Hyundai
dealer inspect the advanced SRS airbag
system as soon as possible.
!
AIR
BAG
!
WARNING:
o Modification to the seat structure can
adversely affect the seat track posi-
tion sensor and cause the airbag to
deploy at a different level than should
be provided.
o Do not place any objects underneath
the front seats as they could damage
the seat track position sensor or in-
terfere with the occupant classifica-
tion system.
o Do not place any objects that may
cause magnetic fields near the front
seat. These may cause a malfunction
of the seat track position sensor.
NOTE:o Be sure to read information about the
SRS on the labels provided on the
reverse of the sun visor and in the
glove box.
o Advanced airbags are combined with
pre-tensioner seat belts to help pro-
vide enhanced occupant protection
in frontal crashes. Front airbags are
not intended to deploy in collisions in
which sufficient protection can be pro-
vided by the pre-tensioner seat belt.
o If you are considering modification of
your vehicle due to a disability, please
contact the Hyundai Customer As-
sistance Center at 1-800-633-5151.
Page 118 of 308
1FEATURES OF YOUR HYUNDAI
104
!
Integrated HomeLink
® Wireless Con-
trol System
The HomeLink
® Wireless Control System
provides a convenient way to replace up to
three hand-held radio-frequency (RF)
transmitters with a single built-in device.
This innovative feature will learn the radio
frequency codes of most current transmit-
ters to operate devices such as gate op-
erators, garage door openers, entry door
locks, security systems, even home light-
ing. Both standard and rolling code-
equipped transmitters can be programmed
by following the outlined procedures. Ad-
ditional HomeLink
® information can be
found at: www.homelink.com or by calling
1-800-355-3515.
CAUTION:
Before programming HomeLink
® to a
garage door opener or gate operator,
make sure that people and objects are
out of the way of the device to prevent
potential harm or damage. Do not use
HomeLink
® with any garage door opener
that lacks the safety stop and reverse
features as required by U.S. federal
safety standards (this includes any ga-
rage door opener model manufactured
before April 1, 1982). A garage door that
cannot detect an object - signaling the
door to stop and reverse - does not meet
current U.S. federal safety standards.
Using a garage door opener without these
features increases the risk of serious
injury or death.Programming HomeLink
®
NOTE:o When programming a garage door
opener, it is advised to park the ve-
hicle outside of the garage.
o It is recommended that a new battery
be placed in the hand-held transmit-
ter of the device being programmed
to HomeLink
® for quicker training and
accurate transmission of the radio-
frequency signal.
o Some vehicles may require the igni-
tion switch to be turned to the second
(or "accessories") position for pro-
gramming and/or operation of
HomeLink.
o In the event that there are still pro-
gramming difficulties or questions
after following the programming steps
listed below, contact HomeLink
® at:
www.homelink.com or 1-800-355-
3515. Retain the original transmitter of the RF
device you are programming for use in
other vehicles as well as for future
HomeLink
® programming. It is also sug-
gested that upon the sale of the vehicle, the
programmed HomeLink
® buttons be
erased for security purposes.
1. Press and hold the button for more
than 6 seconds. When the compass
memory is cleared a "C" will appear in
the display.
2. To calibrate the compass, drive the
vehicle in 2 complete circles at less than
5 MPH (8 Km/h).
Page 186 of 308
2
DRIVING YOUR HYUNDAI
6
!
CAUTION:
Never shift into "R" or "P" position while
the vehicle is moving.
The indicator lights in the instrument clus-
ter indicate the selector lever position when
the ignition is switched "ON". During sports
mode operation, the gear currently in use
displays in the numeral indicator.C090B02A-AATThe function of each position is as
follows:
o P (Park):Use to hold the vehicle in place when
parked or while starting the engine. When-
ever parking the car, apply the parking
brake and shift the selector lever to the "P"
(Park) position.
CAUTION:
Never place the selector lever in the "P"
(Park) position unless the vehicle is
fully stopped. Failure to observe this
caution will cause severe damage to
the transaxle.
!
NOTE:
Depress the brake pedal when shift-
ing.
The selector lever can be shifted
freely.
The first few shifts on a new vehicle, or
if the battery has been disconnected,
may be somewhat abrupt. This is a nor-
mal condition, and the shifting sequence
will adjust after shifts are cycled a few
times by the T.C.M (Transaxle Control
Module).
C090A02NF
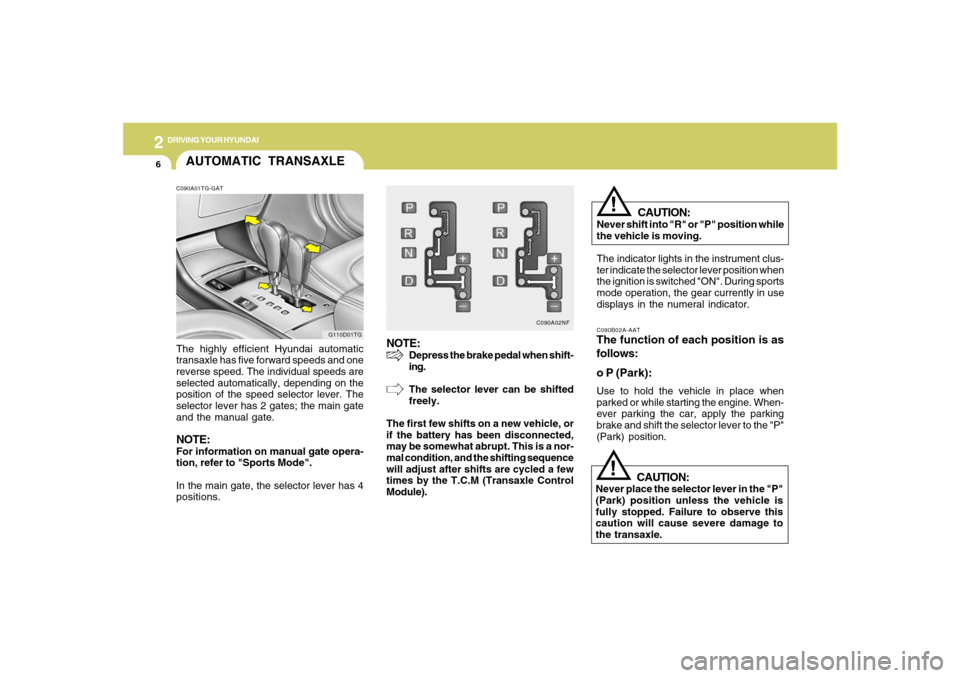
AUTOMATIC TRANSAXLEC090A01TG-GATThe highly efficient Hyundai automatic
transaxle has five forward speeds and one
reverse speed. The individual speeds are
selected automatically, depending on the
position of the speed selector lever. The
selector lever has 2 gates; the main gate
and the manual gate.NOTE:For information on manual gate opera-
tion, refer to "Sports Mode".
In the main gate, the selector lever has 4
positions.
G110D01TG
Page 194 of 308
2
DRIVING YOUR HYUNDAI
14
o If a tire goes flat while you are driving,
apply the brakes gently and keep the
car pointed straight ahead while you
slow down. When you are moving slowly
enough for it to be safe to do so, pull off
the road and stop in a safe place.
o If your car is equipped with an automatic
transaxle, don't let your car creep for-
ward. To avoid creeping forward, keep
your foot firmly on the brake pedal when
the car is stopped.
o Use caution when parking on a hill.
Firmly engage the parking brake and
place the gear selector lever in "P" (au-
tomatic transaxle) or in first or reverse
gear (manual transaxle). If your car is
facing downhill, turn the front wheels
into the curb to help keep the car from
rolling. If your car is facing uphill, turn
the front wheels away from the curb to
help keep the car from rolling. If there is
no curb or if it is required by other
conditions to keep the car from rolling,
block the wheels.
!GOOD BRAKING PRAC-
TICESC130A02A-AAT
WARNING:
o Whenever leaving vehicle or parking,
always set the parking brake as far as
possible and fully engage the vehicle's
transaxle into the park position. Ve-
hicles not fully engaged in park with
the parking brake set are at risk for
moving inadvertently and injuring
yourself or others.
o All vehicles should always have the
parking brake fully engaged when
parking to avoid inadvertent move-
ment of the car which can injure occu-
pants or pedestrians.
o Nothing should be carried on top of
the shelf panel behind the rear seat. If
there were an accident or a sudden
stop, such objects could move for-
ward and cause damage to the ve-
hicle or injure the occupants.o After being parked, check to be sure the
parking brake is not engaged and that
the parking brake indicator light is out
before driving away.
o Driving through water may get the
brakes wet. They can also get wet when
the car is washed. Wet brakes can be
dangerous! Your car will not stop as
quickly if the brakes are wet. Wet brakes
may cause the car to pull to one side. To
dry the brakes, apply the brakes lightly
until the braking action returns to nor-
mal, taking care to keep the car under
control at all times. If the braking action
does not return to normal, stop as soon
as it is safe to do so and call your
Hyundai dealer for assistance.
o Don't coast down hills with the car out of
gear. This is extremely hazardous. Keep
the car in gear at all times, use the
brakes to slow down, then shift to a
lower gear so that engine braking will
help you maintain a safe speed.
o Don't "ride" the brake pedal. Resting
your foot on the brake pedal while driv-
ing can be dangerous because it can
result in the brakes overheating and
losing their effectiveness. It also in-
creases the wear of the brake compo-
nents.
Page 195 of 308
2
DRIVING YOUR HYUNDAI
15
DRIVING FOR ECONOMYC140A02A-AATYou can save fuel and get more miles from
your car if you follow these suggestions:
o Drive smoothly. Accelerate at a moder-
ate rate. Don't make "jack-rabbit" starts
or full-throttle shifts and maintain a
steady cruising speed. Don't race be-
tween stoplights. Try to adjust your
speed to that of the other traffic so you
don't have to change speeds unneces-
sarily. Avoid heavy traffic whenever pos-
sible. Always maintain a safe distance
from other vehicles so you can avoid
unnecessary braking. This also reduces
brake wear.
o Drive at a moderate speed. The faster
you drive, the more fuel your car uses.
Driving at a moderate speed, espe-
cially on the highway, is one of the most
effective ways to reduce fuel consump-
tion.
o Don't "ride" the brake or clutch pedal.
This can increase fuel consumption and
also increase wear on these compo-
nents. In addition, driving with your foot
resting on the brake pedal may cause
the brakes to overheat, which reduces
their effectiveness and may lead to more
serious consequences. o Under some conditions your parking
brake can freeze in the engaged posi-
tion. This is most likely to happen when
there is an accumulation of snow or ice
around or near the rear brakes or if the
brakes are wet. If there is a risk that the
parking brake may freeze, apply it only
temporarily while you put the gear se-
lector lever in "P" (automatic) or in first
or reverse gear (manual transaxle) and
block the rear wheels so the car cannot
roll. Then release the parking brake.
o Do not hold the vehicle on the upgrade
with the accelerator pedal. This can
cause the transaxle to overheat. Al-
ways use the brake pedal or parking
brake.o Take care of your tires. Keep them in-
flated to the recommended pressure.
Incorrect inflation, either too much or
too little, results in unnecessary tire
wear. Check the tire pressures at least
once a month.
o Be sure that the wheels are aligned
correctly. Improper alignment can re-
sult from hitting curbs or driving too fast
over irregular surfaces. Poor alignment
causes faster tire wear and may also
result in other problems as well as
greater fuel consumption.
o Keep your car in good condition. For
better fuel economy and reduced main-
tenance costs, maintain your car in ac-
cordance with the maintenance sched-
ule in Section 5. If you drive your car in
severe conditions, more frequent main-
tenance is required (see Section 5 for
details).
o Keep your car clean. For maximum
service, your Hyundai should be kept
clean and free of corrosive materials. It
is especially important that mud, dirt,
ice, etc. not be allowed to accumulate
on the underside of the car. This extra
weight can result in increased fuel con-
sumption and also contribute to corro-
sion.
Page 211 of 308
3
WHAT TO DO IN AN EMERGENCY
3
JUMP STARTING!
o If you should accidentally get acid on
your skin or in your eyes, immediately
remove any contaminated clothing and
flush the area with clean water for at
least 15 minutes. Then promptly obtain
medical attention. If you must be trans-
ported to an emergency facility, con-
tinue to apply water to the affected area
with a sponge or cloth.
o The gas produced by the battery during
the jump-start operation is highly explo-
sive. Do not smoke or allow a spark or
an open flame in the vicinity.
o The battery being used to provide the
jump start must be 12-volt. If you cannot
determine that it is a 12-volt battery, do
not attempt to use it for the jump start.
o To jump start a car with a discharged
battery, follow this procedure exactly:
1. If the booster battery is installed in an-
other vehicle, be sure the two vehicles
are not touching.
2. Turn off all unnecessary lights and
acces-sories in both vehicles.
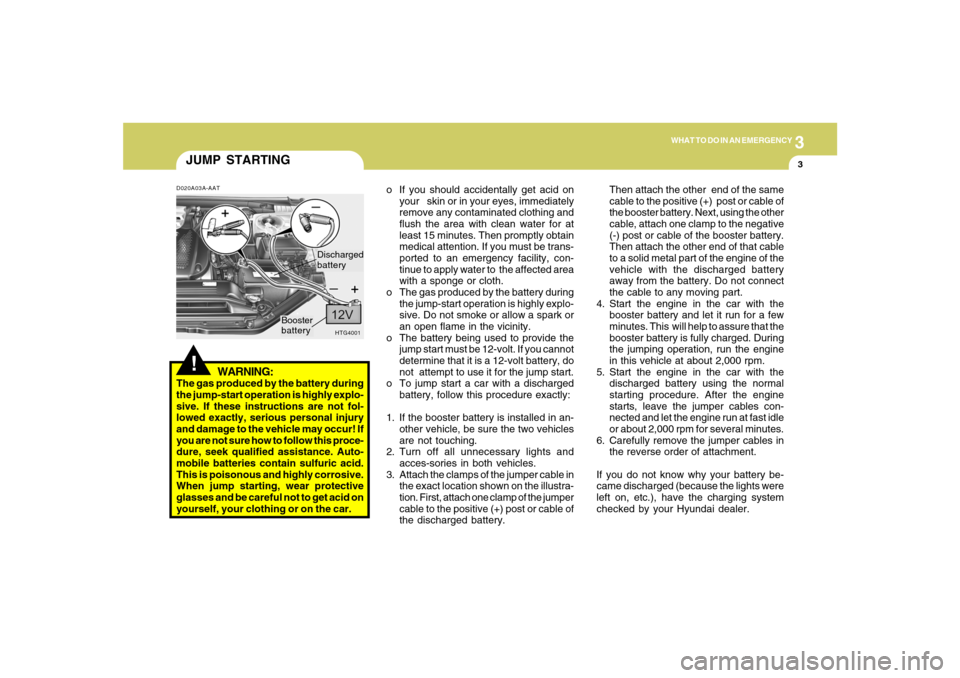
3. Attach the clamps of the jumper cable in
the exact location shown on the illustra-
tion. First, attach one clamp of the jumper
cable to the positive (+) post or cable of
the discharged battery.Then attach the other end of the same
cable to the positive (+) post or cable of
the booster battery. Next, using the other
cable, attach one clamp to the negative
(-) post or cable of the booster battery.
Then attach the other end of that cable
to a solid metal part of the engine of the
vehicle with the discharged battery
away from the battery. Do not connect
the cable to any moving part.
4. Start the engine in the car with the
booster battery and let it run for a few
minutes. This will help to assure that the
booster battery is fully charged. During
the jumping operation, run the engine
in this vehicle at about 2,000 rpm.
5. Start the engine in the car with the
discharged battery using the normal
starting procedure. After the engine
starts, leave the jumper cables con-
nected and let the engine run at fast idle
or about 2,000 rpm for several minutes.
6. Carefully remove the jumper cables in
the reverse order of attachment.
If you do not know why your battery be-
came discharged (because the lights were
left on, etc.), have the charging system
checked by your Hyundai dealer.
D020A03A-AAT
WARNING:
The gas produced by the battery during
the jump-start operation is highly explo-
sive. If these instructions are not fol-
lowed exactly, serious personal injury
and damage to the vehicle may occur! If
you are not sure how to follow this proce-
dure, seek qualified assistance. Auto-
mobile batteries contain sulfuric acid.
This is poisonous and highly corrosive.
When jump starting, wear protective
glasses and be careful not to get acid on
yourself, your clothing or on the car.
HTG4001
Booster
batteryDischarged
battery