direction Hyundai Azera 2008 Owner's Manual
[x] Cancel search | Manufacturer: HYUNDAI, Model Year: 2008, Model line: Azera, Model: Hyundai Azera 2008Pages: 345, PDF Size: 14.61 MB
Page 29 of 345
1
FEATURES OF YOUR HYUNDAI
15
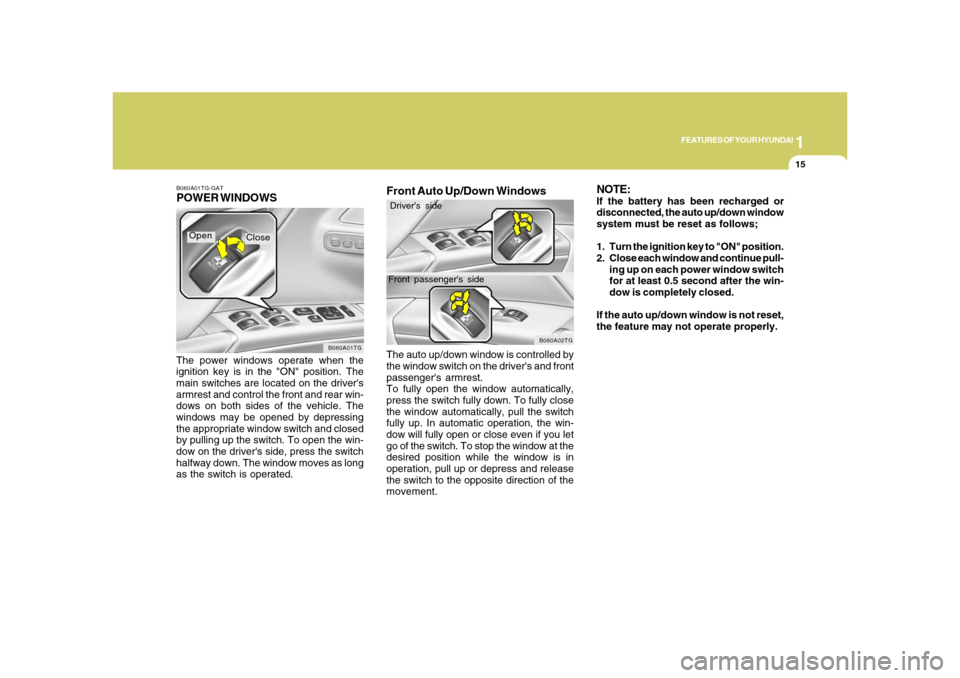
B060A01TG-GATPOWER WINDOWSThe power windows operate when the
ignition key is in the "ON" position. The
main switches are located on the driver's
armrest and control the front and rear win-
dows on both sides of the vehicle. The
windows may be opened by depressing
the appropriate window switch and closed
by pulling up the switch. To open the win-
dow on the driver's side, press the switch
halfway down. The window moves as long
as the switch is operated.
B060A01TG
Open
Close
Front Auto Up/Down WindowsThe auto up/down window is controlled by
the window switch on the driver's and front
passenger's armrest.
To fully open the window automatically,
press the switch fully down. To fully close
the window automatically, pull the switch
fully up. In automatic operation, the win-
dow will fully open or close even if you let
go of the switch. To stop the window at the
desired position while the window is in
operation, pull up or depress and release
the switch to the opposite direction of the
movement.
NOTE:If the battery has been recharged or
disconnected, the auto up/down window
system must be reset as follows;
1. Turn the ignition key to "ON" position.
2. Close each window and continue pull-
ing up on each power window switch
for at least 0.5 second after the win-
dow is completely closed.
If the auto up/down window is not reset,
the feature may not operate properly.
B060A02TG
Driver's side
Front passenger's side
Page 30 of 345
1FEATURES OF YOUR HYUNDAI16
!
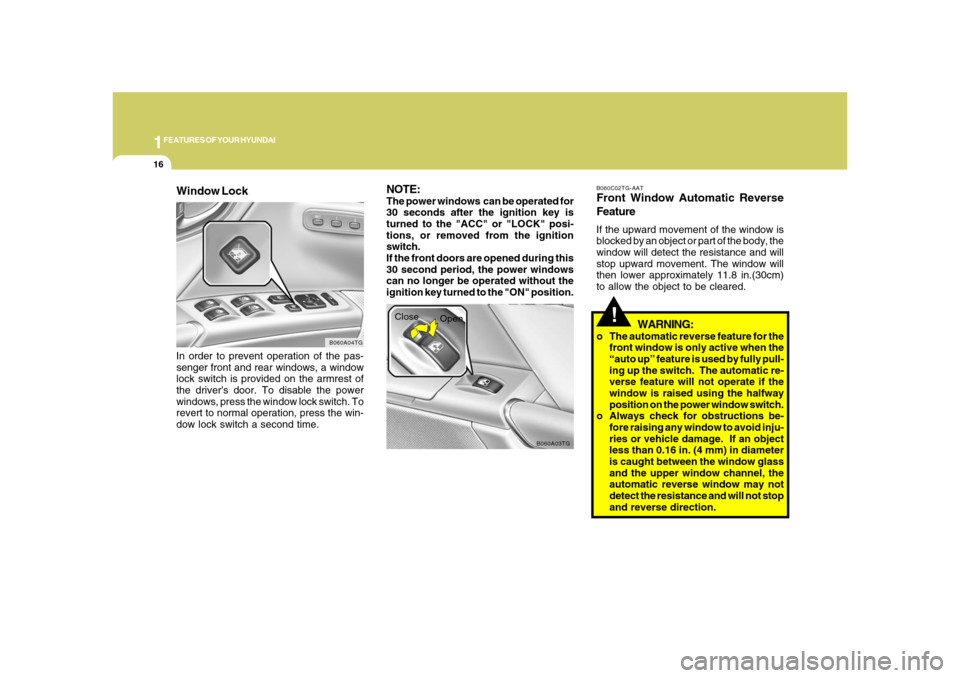
B060A03TG
Close
Open
WARNING:
o The automatic reverse feature for the
front window is only active when the
“auto up” feature is used by fully pull-
ing up the switch. The automatic re-
verse feature will not operate if the
window is raised using the halfway
position on the power window switch.
o Always check for obstructions be-
fore raising any window to avoid inju-
ries or vehicle damage. If an object
less than 0.16 in. (4 mm) in diameter
is caught between the window glass
and the upper window channel, the
automatic reverse window may not
detect the resistance and will not stop
and reverse direction.B060C02TG-AATFront Window Automatic Reverse
FeatureIf the upward movement of the window is
blocked by an object or part of the body, the
window will detect the resistance and will
stop upward movement. The window will
then lower approximately 11.8 in.(30cm)
to allow the object to be cleared.
NOTE:The power windows can be operated for
30 seconds after the ignition key is
turned to the "ACC" or "LOCK" posi-
tions, or removed from the ignition
switch.
If the front doors are opened during this
30 second period, the power windows
can no longer be operated without the
ignition key turned to the "ON" position.
Window Lock
B060A04TG
In order to prevent operation of the pas-
senger front and rear windows, a window
lock switch is provided on the armrest of
the driver's door. To disable the power
windows, press the window lock switch. To
revert to normal operation, press the win-
dow lock switch a second time.
Page 31 of 345
1
FEATURES OF YOUR HYUNDAI
17
!
WARNING:
o Passengers can be injured if their
head, hands or other body parts are
trapped by a closing window. Always
check for obstructions before raising
any window.
o NEVER leave the ignition key in the
vehicle.
o NEVER leave any child unattended in
the vehicle. Even very young children
may inadvertently cause the vehicle
to move, entangle themselves in the
windows, or otherwise injure them-
selves or others.
o Do not attempt to operate the main
switch on the driver's door and a
switch on another door in opposing
directions at the same time. If this is
done, the window will stop and cannot
be opened or closed.
Page 53 of 345
1
FEATURES OF YOUR HYUNDAI
39
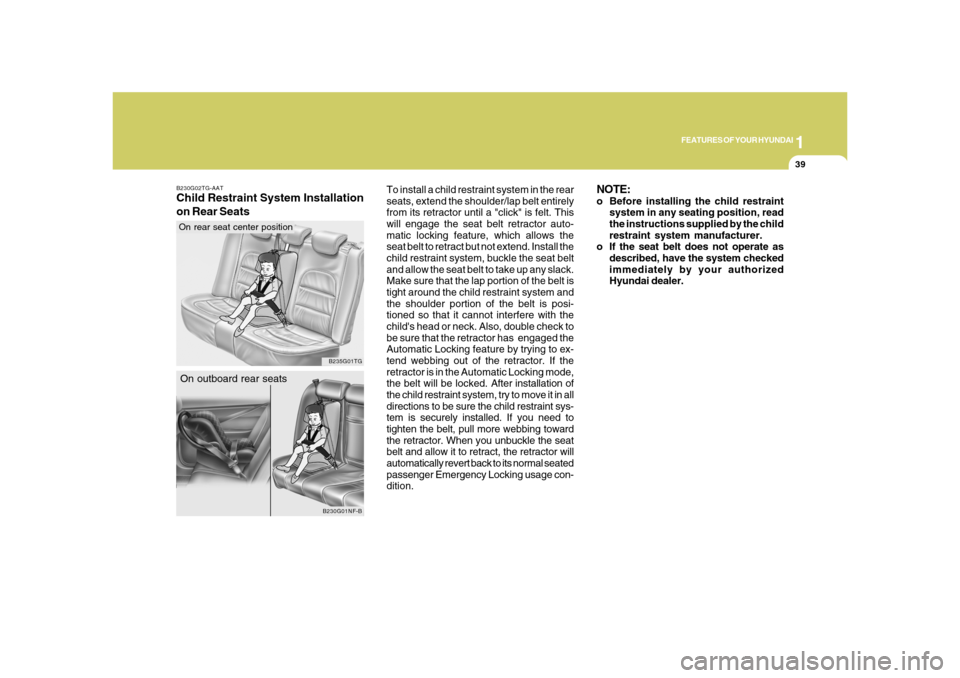
To install a child restraint system in the rear
seats, extend the shoulder/lap belt entirely
from its retractor until a "click" is felt. This
will engage the seat belt retractor auto-
matic locking feature, which allows the
seat belt to retract but not extend. Install the
child restraint system, buckle the seat belt
and allow the seat belt to take up any slack.
Make sure that the lap portion of the belt is
tight around the child restraint system and
the shoulder portion of the belt is posi-
tioned so that it cannot interfere with the
child's head or neck. Also, double check to
be sure that the retractor has engaged the
Automatic Locking feature by trying to ex-
tend webbing out of the retractor. If the
retractor is in the Automatic Locking mode,
the belt will be locked. After installation of
the child restraint system, try to move it in all
directions to be sure the child restraint sys-
tem is securely installed. If you need to
tighten the belt, pull more webbing toward
the retractor. When you unbuckle the seat
belt and allow it to retract, the retractor will
automatically revert back to its normal seated
passenger Emergency Locking usage con-
dition.
B230G02TG-AATChild Restraint System Installation
on Rear Seats
B230G01NF-B
On outboard rear seats
B235G01TG
On rear seat center position
NOTE:o Before installing the child restraint
system in any seating position, read
the instructions supplied by the child
restraint system manufacturer.
o If the seat belt does not operate as
described, have the system checked
immediately by your authorized
Hyundai dealer.
Page 78 of 345
1FEATURES OF YOUR HYUNDAI64
WARNING AND INDICATOR LIGHTSB260D01A-AAT
Turn Signal Indicator Lights
The blinking green arrows on the instru-
ment panel show the direction indicated
by the turn signals. If the arrow comes on
but does not blink, blinks more rapidly than
normal, or does not illuminate at all, a
malfunction in the turn signal system is
indicated. Your dealer should be consulted
for repairs.B260F01A-AAT
High Beam Indicator Light
The high beam indicator light comes on
whenever the headlights are switched to
the high beam or flash position.
B260G01TG-AAT
Low Oil Pressure Warning
Light
CAUTION:
If the low oil pressure warning light stays
on while the engine is running, serious
engine damage may result. The oil pres-
sure warning light comes on whenever
there is insufficient oil pressure. In nor-
mal operation, it should come on when
the ignition switch is turned on, then go
out when the engine is started. If the oil
pressure warning light stays on while
the engine is running, there is a serious
malfunction.
If this happens, stop the car as soon as
it is safe to do so, turn off the engine and
check the oil level. If the oil level is low,
fill the engine oil to the proper level and
start the engine again. If the light stays
on with the engine running, turn the en-
gine off immediately. In any instance
where the oil light stays on when the
engine is running, the engine should be
checked by a Hyundai dealer before the
car is driven again.
!
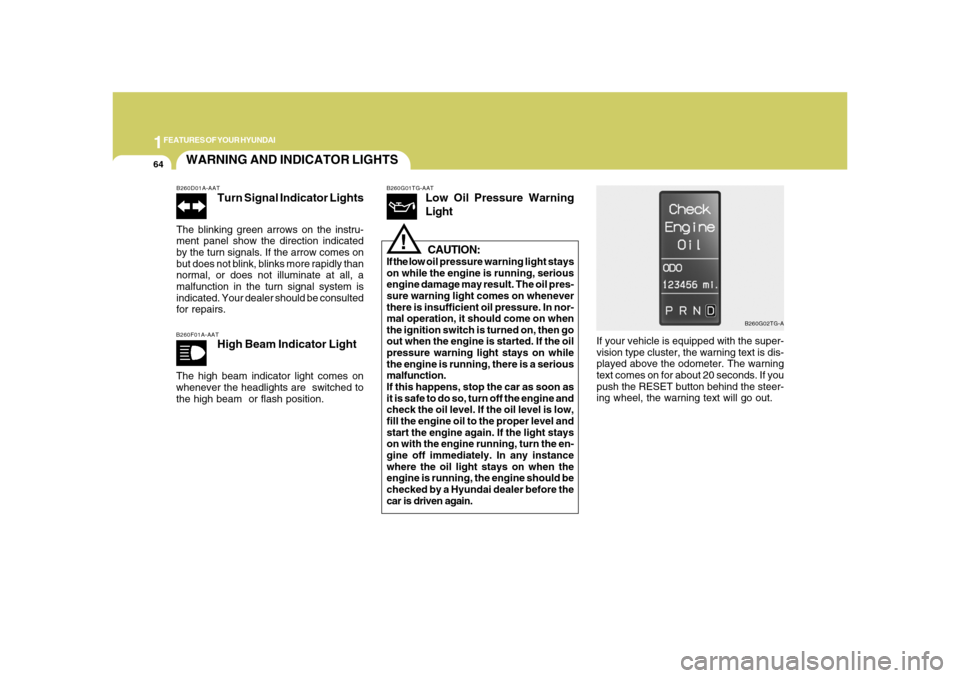
If your vehicle is equipped with the super-
vision type cluster, the warning text is dis-
played above the odometer. The warning
text comes on for about 20 seconds. If you
push the RESET button behind the steer-
ing wheel, the warning text will go out.
B260G02TG-A
Page 106 of 345
1FEATURES OF YOUR HYUNDAI92
!
Auto reverseIf an object or part of the body is detected
while the sunroof is closing automatically,
it will reverse direction, and then stop.
Auto reverse function does not work if a tiny
obstacle is blocked between the sliding
glass and the sunroof sash. You should
always check that all passengers and
objects are away from the sunroof before
closing it.
WARNING:
Be careful that someone’s head, hands
and body are not trapped by a closing
sunroof.Manual slide closePress the TILT UP button on the overhead
console for less than 0.5 second.
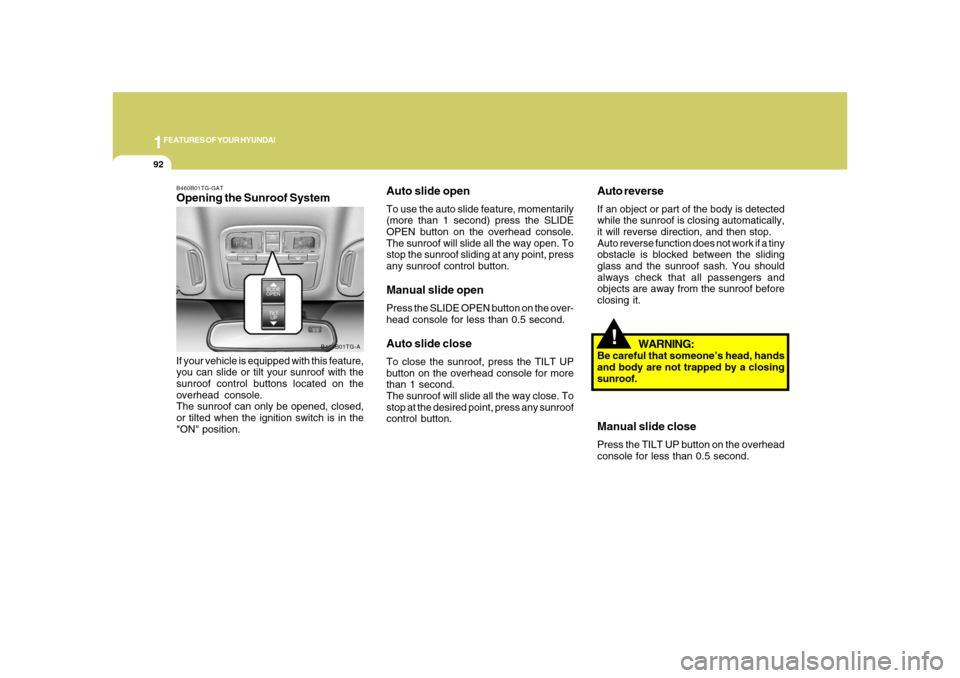
B460B01TG-GATOpening the Sunroof SystemIf your vehicle is equipped with this feature,
you can slide or tilt your sunroof with the
sunroof control buttons located on the
overhead console.
The sunroof can only be opened, closed,
or tilted when the ignition switch is in the
"ON" position.
B460B01TG-A
Auto slide openTo use the auto slide feature, momentarily
(more than 1 second) press the SLIDE
OPEN button on the overhead console.
The sunroof will slide all the way open. To
stop the sunroof sliding at any point, press
any sunroof control button.Manual slide openPress the SLIDE OPEN button on the over-
head console for less than 0.5 second.Auto slide closeTo close the sunroof, press the TILT UP
button on the overhead console for more
than 1 second.
The sunroof will slide all the way close. To
stop at the desired point, press any sunroof
control button.
Page 116 of 345
1FEATURES OF YOUR HYUNDAI
102
HOMELINK MIRRORB520C01NF-AATAutomatic-Dimming Mirror
with Z-Nav™ Electronic Compass
Display and HomeLink
®
Your vehicle comes with a Gentex Auto-
matic-Dimming Mirror with a Z-Nav™ Elec-
tronic Compass Display and an Integrated
HomeLink
® Wireless Control System. Dur-
ing nighttime driving, this feature will auto-
matically detect and reduce rearview mir-
ror glare while the compass indicates the
direction the vehicle is pointed. The
HomeLink® Universal Transceiver allows
you to activate your garage door(s), elec-
tric gate, home lighting, etc.
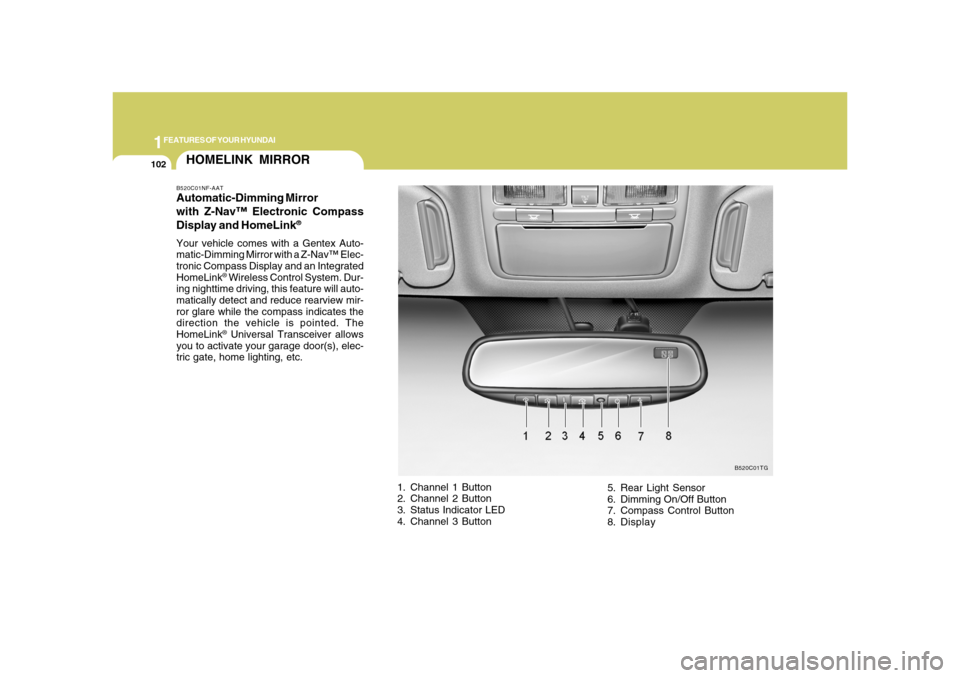
1. Channel 1 Button
2. Channel 2 Button
3. Status Indicator LED
4. Channel 3 Button5. Rear Light Sensor
6. Dimming On/Off Button
7. Compass Control Button
8. Display
B520C01TG
Page 138 of 345
1FEATURES OF YOUR HYUNDAI
124
B710B01TG-AATVentilator
B710B01TGB710B02TG
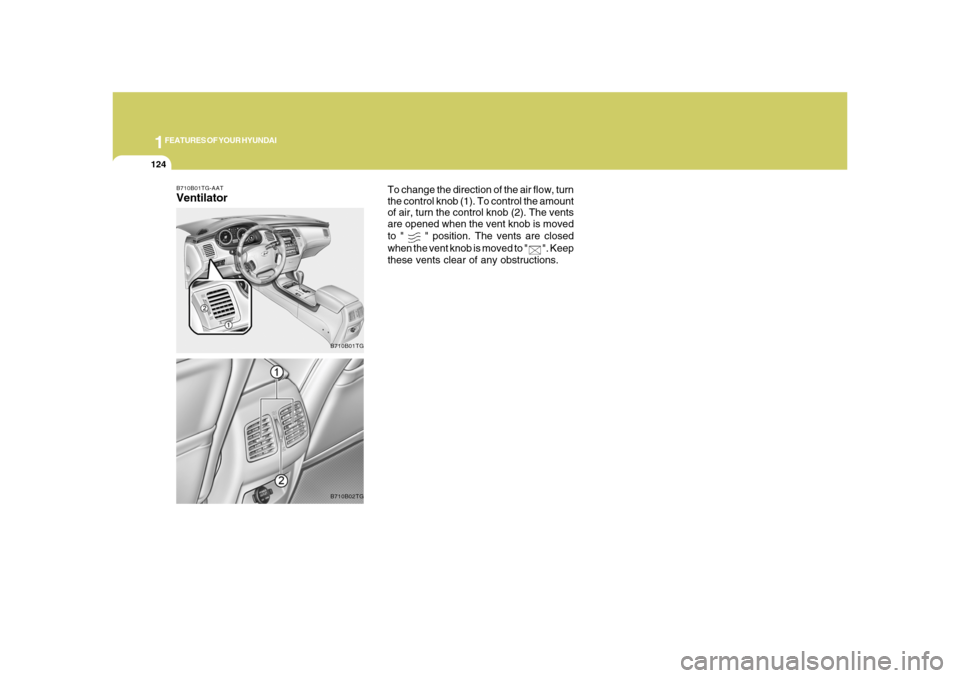
To change the direction of the air flow, turn
the control knob (1). To control the amount
of air, turn the control knob (2). The vents
are opened when the vent knob is moved
to "
" position. The vents are closed
when the vent knob is moved to "
". Keep
these vents clear of any obstructions.
Page 150 of 345
1FEATURES OF YOUR HYUNDAI
136
!
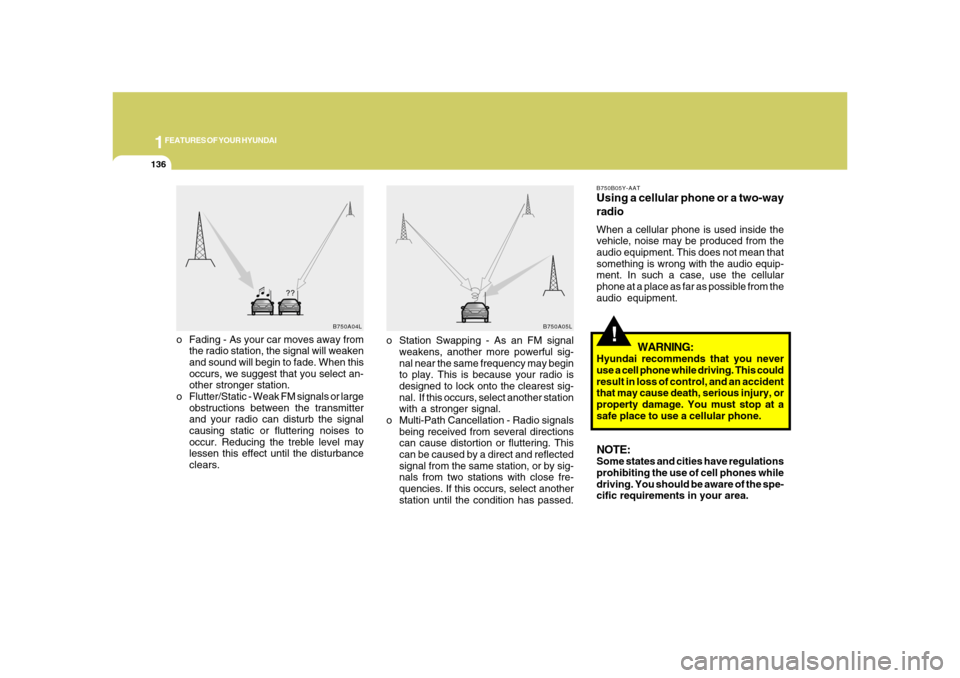
o Fading - As your car moves away from
the radio station, the signal will weaken
and sound will begin to fade. When this
occurs, we suggest that you select an-
other stronger station.
o Flutter/Static - Weak FM signals or large
obstructions between the transmitter
and your radio can disturb the signal
causing static or fluttering noises to
occur. Reducing the treble level may
lessen this effect until the disturbance
clears.
B750B05Y-AATUsing a cellular phone or a two-way
radioWhen a cellular phone is used inside the
vehicle, noise may be produced from the
audio equipment. This does not mean that
something is wrong with the audio equip-
ment. In such a case, use the cellular
phone at a place as far as possible from the
audio equipment.
WARNING:
Hyundai recommends that you never
use a cell phone while driving. This could
result in loss of control, and an accident
that may cause death, serious injury, or
property damage. You must stop at a
safe place to use a cellular phone.NOTE:Some states and cities have regulations
prohibiting the use of cell phones while
driving. You should be aware of the spe-
cific requirements in your area.
B750A04L
B750A05L
o Station Swapping - As an FM signal
weakens, another more powerful sig-
nal near the same frequency may begin
to play. This is because your radio is
designed to lock onto the clearest sig-
nal. If this occurs, select another station
with a stronger signal.
o Multi-Path Cancellation - Radio signals
being received from several directions
can cause distortion or fluttering. This
can be caused by a direct and reflected
signal from the same station, or by sig-
nals from two stations with close fre-
quencies. If this occurs, select another
station until the condition has passed.
Page 159 of 345
1
FEATURES OF YOUR HYUNDAI
145145
7. Adjustment Mode Select
(A.MODE) ButtonPressing the A.MODE button changes the
BASS, MIDDLE, TREBLE, FADER and
BALANCE mode. The mode selected is
shown on the display. After selecting the
each mode, rotate the VOLUME control
knob clockwise or counterclockwise.
BASS Control
To increase the BASS, rotate the knob
clockwise, while to decrease the BASS,
rotate the knob counterclockwise.
M455B01TG-AAT1. POWER ON-OFF Control Knobo The radio unit may be operated when
the ignition key is in the "ACC" or "ON"
position. Press the knob to switch the
power on. The display shows the radio
frequency in the radio mode, the tape
direction Indicator in the tape mode or
CD/MP3 track in either the CD/MP3
mode. To switch the power off, press the
knob again.
o Push the FM/AM, TAPE or CD/MP3 to
turn on that function without pushing
Power ON-OFF control knob.VOLUME ControlRotate the knob clockwise to increase the
volume and turn the knob counterclock-
wise to reduce the volume.2. BAND SelectorPressing the band selector FM/AM changes
the AM, FM1 and FM2 bands.
The mode selected is shown on the dis-
play.
3. TUNE (Manual) Select KnobRotate the knob clockwise to increase the
frequency and turn the knob counterclock-
wise to reduce the frequency.4. SEEK Select Button
(Automatic Channel Selection)Press the SEEK select button. When the
(
) side is pressed, the unit will
automatically tune to the next higher
frequency and when the (
) side is
pressed, it will automatically tune to the
next lower frequency.
5. SCAN ButtonWhen you press the button, frequency is
changed and the next channel is received
automatically. To stay on a station, press
the SCAN button again.
6. EQUALIZER (EQ) ButtonPress the EQ button to select the CLAS-
SIC, POPS, ROCK, JAZZ and DEFEAT
MODE for the desired tone quality. Each
press of the button changes the display as
follows;
CLASSIC → POPS → ROCK → JAZZ →DEFEAT