oil Hyundai Azera 2008 Owner's Manual
[x] Cancel search | Manufacturer: HYUNDAI, Model Year: 2008, Model line: Azera, Model: Hyundai Azera 2008Pages: 345, PDF Size: 14.61 MB
Page 14 of 345
YOUR VEHICLE AT A GLANCE
F12
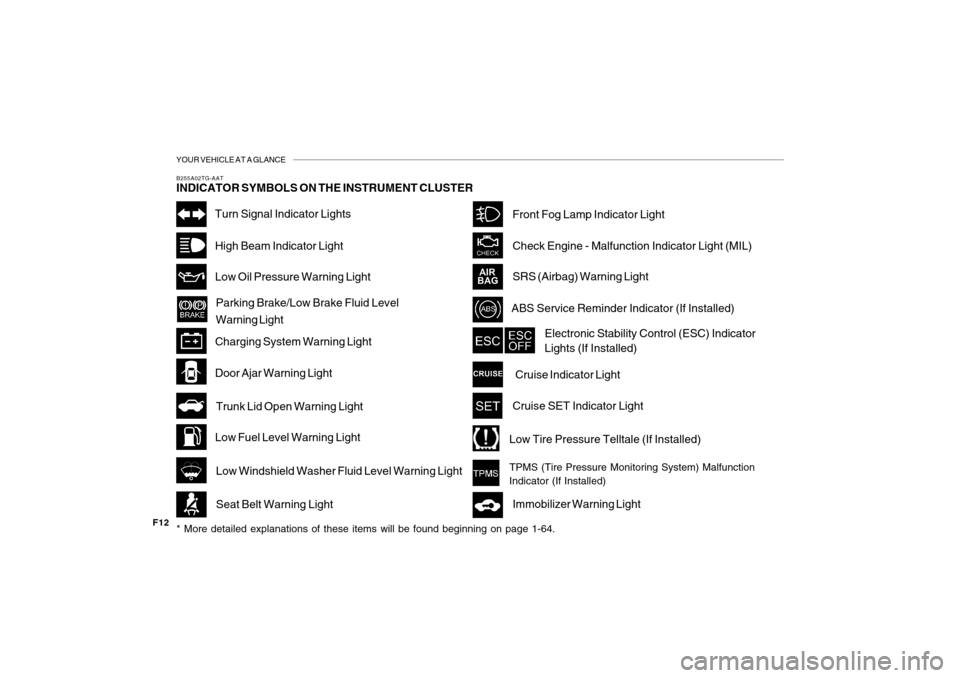
B255A02TG-AATINDICATOR SYMBOLS ON THE INSTRUMENT CLUSTER* More detailed explanations of these items will be found beginning on page 1-64.
Turn Signal Indicator LightsHigh Beam Indicator LightLow Oil Pressure Warning LightParking Brake/Low Brake Fluid Level
Warning Light
Charging System Warning LightDoor Ajar Warning LightTrunk Lid Open Warning LightLow Fuel Level Warning Light
Low Windshield Washer Fluid Level Warning LightSeat Belt Warning Light
Front Fog Lamp Indicator LightCheck Engine - Malfunction Indicator Light (MIL)SRS (Airbag) Warning LightABS Service Reminder Indicator (If Installed)
Electronic Stability Control (ESC) Indicator
Lights (If Installed)Cruise Indicator LightCruise SET Indicator LightLow Tire Pressure Telltale (If Installed)TPMS (Tire Pressure Monitoring System) Malfunction
Indicator (If Installed)Immobilizer Warning Light
Page 75 of 345

1
FEATURES OF YOUR HYUNDAI
61
1. Check Engine - Malfunction Indicator Light (MIL)
2. Low Oil Pressure Warning Light
3. Charging System Warning Light
4. SRS (Airbag) Warning Light
5. Tachometer
6. Turn Signal Indicator Lights
7. High Beam Indicator Light
8. Electronic Stability Control (ESC) Indicator Lights
(If Installed)
9. Automatic Transaxle Position Indicator Light
10. CRUISE Indicator Light
11. Front Fog Lamp Indicator Light
12. Cruise SET Indicator Light
13. Speedometer14. Low Windshield Washer Fluid Level Warning Light
15. Trunk Lid Open Warning Light
16. Low Tire Pressure Telltale (If Installed)
17. Immobilizer Warning Light
18. TPMS (Tire Pressure Monitoring System) Malfunction Indicator
(If Installed)
19. Coolant Temperature Gauge
20. ABS Service Reminder Indicator (SRI) (If Installed)
21. Door Ajar Warning Light
22. Seat Belt Warning Light (Driver's side)
23. Odometer/Trip Computer
24. Parking Brake/Low Brake Fluid Level Warning Light
25. Low Fuel Warning Light
26. Fuel Gauge
Page 77 of 345

1
FEATURES OF YOUR HYUNDAI
63
1. Check Engine - Malfunction Indicator Light (MIL)
2. Charging System Warning Light
3. Low Oil Pressure Warning Light
4. Parking Brake/Low Brake Fluid Level Warning Light
5. Tachometer
6. Door Ajar Warning Light
7. Turn Signal Indicator Lights
8. Odometer/Trip Computer/Warning Text
9. Speedometer
10. Trunk Lid Open Warning Light
11. CRUISE Indicator Light
12. Cruise SET Indicator Light
13. Immobilizer Warning Light
14. Coolant Temperature Gauge15. Low Windshield Washer Fluid Level Warning Light
16. SRS (Airbag) Warning Light
17. ABS Service Reminder Indicator (SRI) (If Installed)
18. Electronic Stability Control (ESC) Indicator Lights
(If Installed)
19. Seat Belt Warning Light (Driver's side)
20. High Beam Indicator Light
21. Automatic Transaxle Position Indicator Light
22. Front Fog Lamp Indicator Light
23. Low Tire Pressure Telltale (If Installed)
24. TPMS (Tire Pressure Monitoring System) Malfunction Indicator
(If Installed)
25. Low Fuel Warning Light
26. Fuel Gauge
Page 78 of 345
1FEATURES OF YOUR HYUNDAI64
WARNING AND INDICATOR LIGHTSB260D01A-AAT
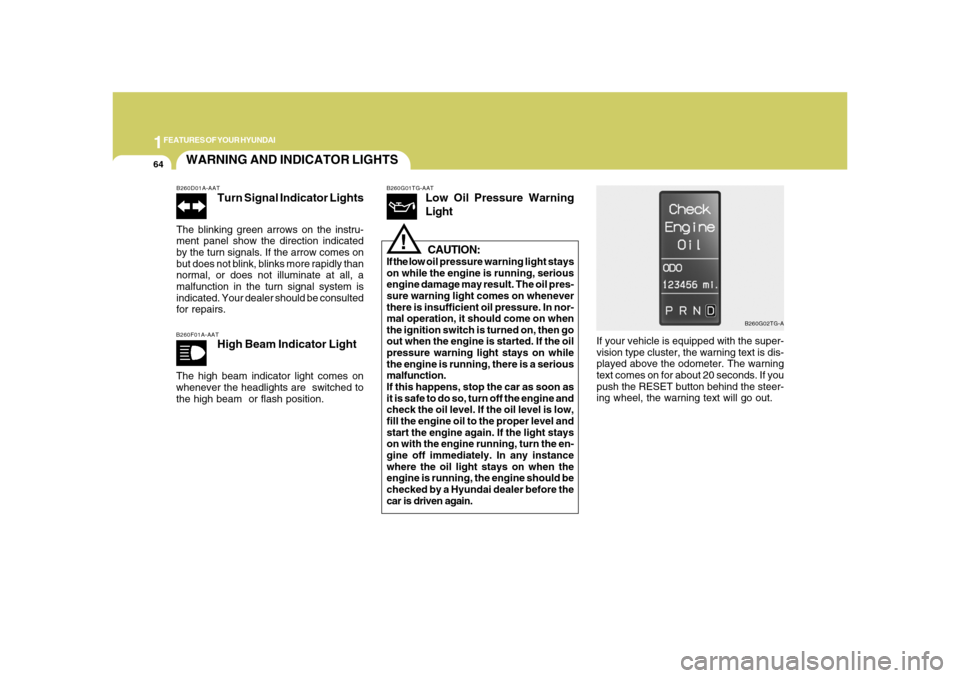
Turn Signal Indicator Lights
The blinking green arrows on the instru-
ment panel show the direction indicated
by the turn signals. If the arrow comes on
but does not blink, blinks more rapidly than
normal, or does not illuminate at all, a
malfunction in the turn signal system is
indicated. Your dealer should be consulted
for repairs.B260F01A-AAT
High Beam Indicator Light
The high beam indicator light comes on
whenever the headlights are switched to
the high beam or flash position.
B260G01TG-AAT
Low Oil Pressure Warning
Light
CAUTION:
If the low oil pressure warning light stays
on while the engine is running, serious
engine damage may result. The oil pres-
sure warning light comes on whenever
there is insufficient oil pressure. In nor-
mal operation, it should come on when
the ignition switch is turned on, then go
out when the engine is started. If the oil
pressure warning light stays on while
the engine is running, there is a serious
malfunction.
If this happens, stop the car as soon as
it is safe to do so, turn off the engine and
check the oil level. If the oil level is low,
fill the engine oil to the proper level and
start the engine again. If the light stays
on with the engine running, turn the en-
gine off immediately. In any instance
where the oil light stays on when the
engine is running, the engine should be
checked by a Hyundai dealer before the
car is driven again.
!
If your vehicle is equipped with the super-
vision type cluster, the warning text is dis-
played above the odometer. The warning
text comes on for about 20 seconds. If you
push the RESET button behind the steer-
ing wheel, the warning text will go out.
B260G02TG-A
Page 125 of 345
1
FEATURES OF YOUR HYUNDAI
111
!
CAUTION:
To prevent damage to the goods or the
vehicle, care should be taken when car-
rying fragile or bulky objects in the lug-
gage compartment.
!
WARNING:
Avoid eye injury. DO NOT overstretch.
The luggage net ALWAYS keep your
face and body out of its recoil path. DO
NOT use when the luggage net straps
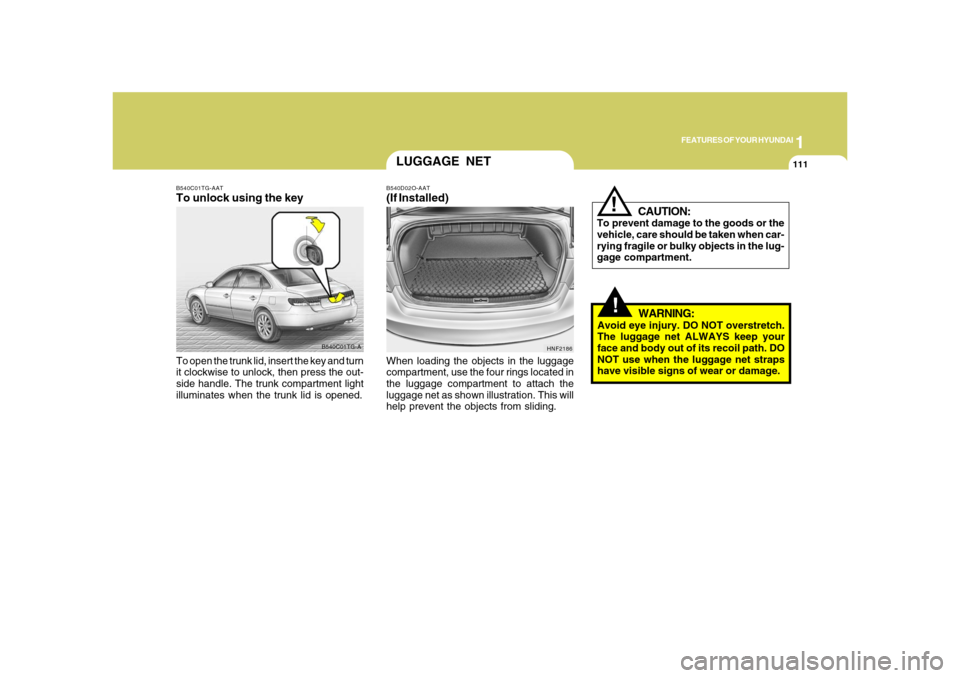
have visible signs of wear or damage. When loading the objects in the luggage
compartment, use the four rings located in
the luggage compartment to attach the
luggage net as shown illustration. This will
help prevent the objects from sliding.
HNF2186
LUGGAGE NETB540D02O-AAT(If Installed)
B540C01TG-A B540C01TG-AAT
To unlock using the keyTo open the trunk lid, insert the key and turn
it clockwise to unlock, then press the out-
side handle. The trunk compartment light
illuminates when the trunk lid is opened.
Page 162 of 345
1FEATURES OF YOUR HYUNDAI
148
M455D01TG-GAT1. TAPE PROGRAM Buttono This allows you to play the reverse side
of the tape by merely depressing the
program button. An arrow will appear in
the display to show tape direction.
o Push the TAPE button to turn on that
function without pushing power ON-
OFF control knob.2. TAPE EJECT Buttono When the button is pressed with a cas-
sette loaded, the cassette will eject.
o When the button is pressed during FF/
REW mode, the cassette will eject.3. AUTO MUSIC Search ButtonPress the button to find the starting point of
each song in a prerecorded music tape.
The quiet space between songs (must
have at least 4 sec. gap) can be accepted
by the AUTO MUSIC search button.
o Pressing the button (
) will play the
beginning of the next music segment.
o Pressing the button (
) will start
replay at the beginning of the music just
listened to.
4. FF/REW Buttono Fast forward tape winding starts when
the FF button is pressed during PLAY or
REW mode.
o Tape PLAY starts when the FF button is
pressed again during FF mode.
o Tape rewinding starts when the REW
button is pressed during PLAY or FF
mode.
o Tape PLAY starts when the REW button
pressed again during REW mode.5. REPEAT Buttono To repeat the track you are currently
listening to, press the RPT button. To
cancel, press again.
o If you do not release RPT operation
when the track ends, it will automati-
cally be replayed.
This process will be continued until you
push the button again.6. DOLBY ButtonIf you get background noise during tape
PLAY, you can reduce this considerably
by merely pressing the DOLBY button. If
you want to cancel the DOLBY feature,
press the button again.
7. EQUALIZER (EQ) ButtonPress the EQ button to select the CLAS-
SIC, POPS, ROCK, JAZZ and DEFEAT
MODE for the desired tone quality. Each
press of the button changes the display as
follows;NOTE:o To assure proper operation of the
unit, keep the vehicle interior tem-
perature within a normal range by
using the vehicle’s air conditioning or
heating system.
o When replacing the fuse, replace it
with a fuse having the correct capac-
ity.
o The preset station frequencies are all
erased when the car battery is dis-
connected. Therefore, all data will have
to be set again if this should occur.
o Do not add any oil to the rotating parts.
Keep magnets, screwdrivers and
other metallic objects away from the
tape mechanism and head. CLASSIC → POPS → ROCK → JAZZ →DEFEAT
Page 178 of 345
1FEATURES OF YOUR HYUNDAI
164
CAUTION
o Do not insert warped or poor quality
discs into the CD player as damage to
the unit may occur.
o Do not insert anything like coins into
the player slot as damage to the unit
may occur.
!
NOTE:o To assure proper operation of the
unit, keep the vehicle interior tem-
perature within a normal range by
using the vehicle’s air conditioning or
heating system.
o When replacing the fuse, replace it
with a fuse having the correct capac-
ity.
o All stored bookmarks are all erased
when the car battery is disconnected
or power to the vehicle is lost. If this
occurs, the bookmarks will have to be
reset.
o Do not add any oil to the rotating parts.
Keep magnets, screwdrivers and
other metallic objects away from the
tape mechanism and head.
o Do not place beverages close to the
audio system. The playback mecha-
nism may be damaged if you spill
them.
o Do not strike or allow anything to im-
pact the audio system, damage to the
system mechanisms could occur.
o Off-road or rough surface driving may
cause the compact disc to skip. Do
not use the compact disc when driv-
ing in such conditions as damage to
the compact disc face could occur.
o Do not attempt to grab or pull the
compact disc out while the disc is
being pulled into the audio unit by the
self-loading mechanism. Damage to
the audio unit and compact disc could
occur.
o This equipment is designed to be used
only in a 12 volt DC battery system
with negative ground.
o This unit is made of precision parts.
Do not attempt to disassemble or ad-
just any parts.o When driving your vehicle, be sure to
keep the volume of the unit set low
enough to allow you to hear sounds
coming from the outside.
o Do not expose this equipment (includ-
ing the speakers and tape) to water or
excessive moisture.
o Avoid using home-made recorded
compact discs in your audio unit. Origi-
nal compact discs are recommended.
o The unit may not play CD-RW
(Rewritable) discs.
Page 205 of 345
 button while
playing an MP3 file to display the next
available folder name and [DIR
](Direc-
tory Down) b Hyundai Azera 2008 Owners Manual 1
FEATURES OF YOUR HYUNDAI
191191
13. Directory Name Search ButtonPress [DIR
](Directory Up) button while
playing an MP3 file to display the next
available folder name and [DIR
](Direc-
tory Down) b](/img/35/14485/w960_14485-204.png)
1
FEATURES OF YOUR HYUNDAI
191191
13. Directory Name Search ButtonPress [DIR
](Directory Up) button while
playing an MP3 file to display the next
available folder name and [DIR
](Direc-
tory Down) button, the previous folder name.
Find the folder you searched for and press
7 to play the songs inside the folder from
the top of the list. (If you do not take any
action after searching for the folder for 5 or
more seconds, this search will be can-
celed.)
14. Mark / Memory ButtonYou can choose only the songs you want
to listen to and play them in respective
order. (Refer to the operation method.)
Press again to cancel.
15. Disc Load /All Load ButtonWhen you press [LOAD] button, one of the
empty slots of the CD changer will be
opened in the order of (1), (2), (3), (4), (5).
Insert the CD when the word "INSERT" on
LCD and the light of the deck flicker then
the deck will be closed you will be able to
play and listen to the corresponding CD.
Also, you can load all 6 CDs to all empty
slots of the changer when you press the
[LOAD] button for more than 0.8 seconds
in respective order. In this case the CD you
loaded last will be played. If you do not load
CD for 10 seconds after pressing the
[LOAD] button, or press the [LOAD] button
once again, the loading will be canceled.
In this case, the display for empty disc slots
will go off, and it will be displayed again
when the slot is loaded with a disc.NOTE:o Insert CD only when the word "IN-
SERT" on the LCD and the light of the
deck flicker. (Insert CDs one by one in
respective order.)
o In other cases, the CD will not be
inserted (CD DOOR will be closed),
and if you try to insert CD by force it
may cause damage to the audio sys-
tem.o The disc player takes up to six discs.
Do not try to load more than six.
NOTE:o To assure proper operation of the
unit, keep the vehicle interior tem-
perature within a normal range by
using the vehicle’s air conditioning or
heating system.
o When replacing the fuse, replace it
with a fuse having the correct capac-
ity.
o All stored bookmarks are all erased
when the car battery is disconnected
or power to the vehicle is lost. If this
occurs, the bookmarks will have to be
reset.
o Do not add any oil to the rotating parts.
Keep magnets, screwdrivers and
other metallic objects away from the
tape mechanism and head.
Page 210 of 345
1FEATURES OF YOUR HYUNDAI
196
CARE OF DISCS
B850A02L B850A02F-AAT
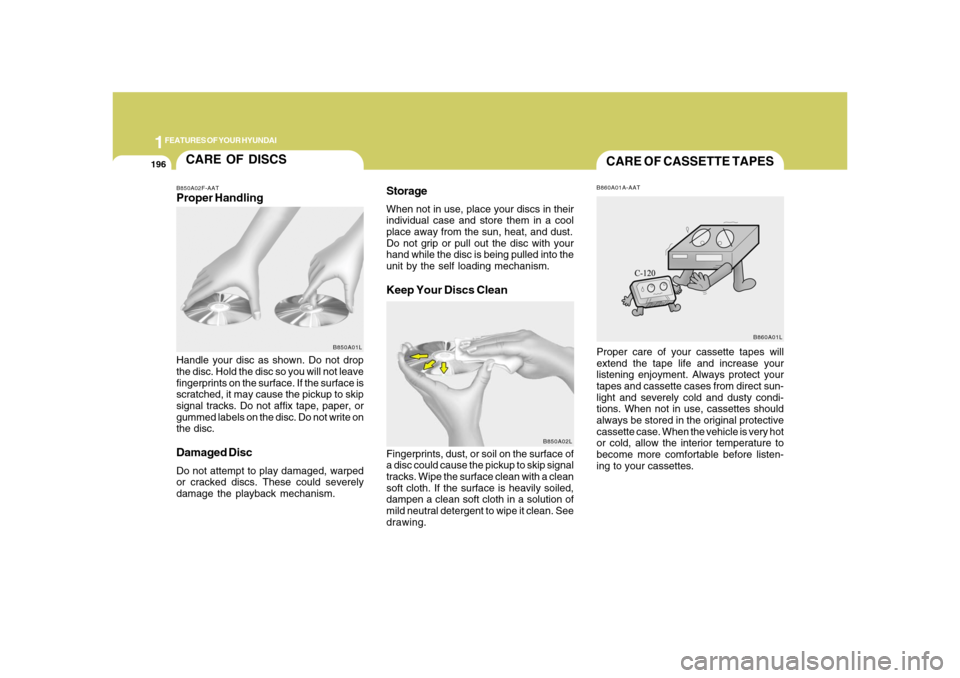
Proper HandlingStorage
When not in use, place your discs in their
individual case and store them in a cool
place away from the sun, heat, and dust.
Do not grip or pull out the disc with your
hand while the disc is being pulled into the
unit by the self loading mechanism.Keep Your Discs Clean
Handle your disc as shown. Do not drop
the disc. Hold the disc so you will not leave
fingerprints on the surface. If the surface is
scratched, it may cause the pickup to skip
signal tracks. Do not affix tape, paper, or
gummed labels on the disc. Do not write on
the disc.Damaged DiscDo not attempt to play damaged, warped
or cracked discs. These could severely
damage the playback mechanism.Fingerprints, dust, or soil on the surface of
a disc could cause the pickup to skip signal
tracks. Wipe the surface clean with a clean
soft cloth. If the surface is heavily soiled,
dampen a clean soft cloth in a solution of
mild neutral detergent to wipe it clean. See
drawing.
B850A01L
CARE OF CASSETTE TAPESB860A01A-AATProper care of your cassette tapes will
extend the tape life and increase your
listening enjoyment. Always protect your
tapes and cassette cases from direct sun-
light and severely cold and dusty condi-
tions. When not in use, cassettes should
always be stored in the original protective
cassette case. When the vehicle is very hot
or cold, allow the interior temperature to
become more comfortable before listen-
ing to your cassettes.
B860A01L
Page 211 of 345
1
FEATURES OF YOUR HYUNDAI
197197
B860A03L
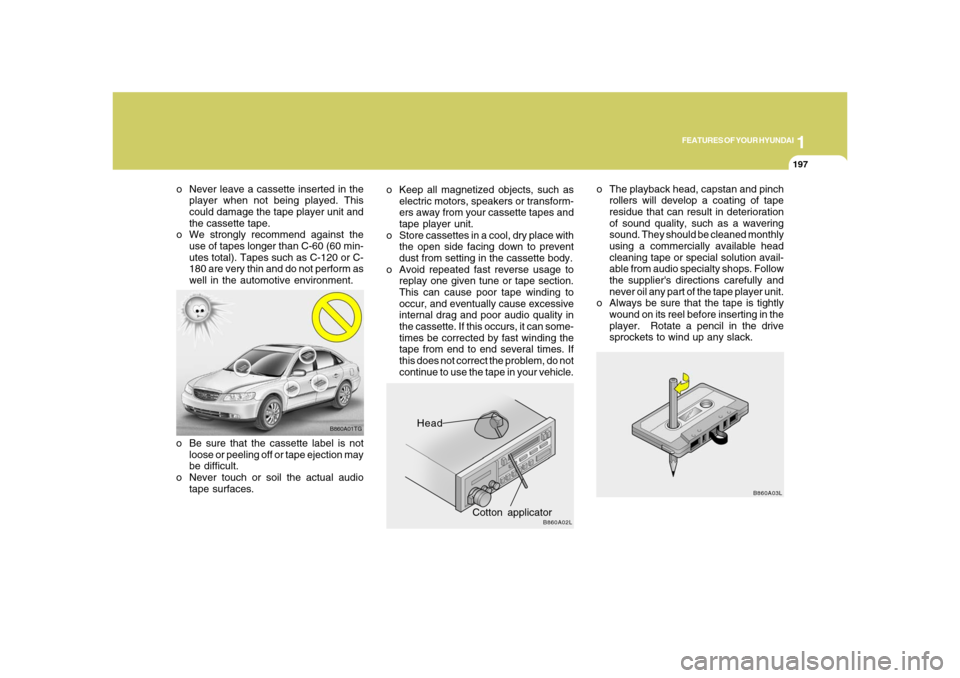
o The playback head, capstan and pinch
rollers will develop a coating of tape
residue that can result in deterioration
of sound quality, such as a wavering
sound. They should be cleaned monthly
using a commercially available head
cleaning tape or special solution avail-
able from audio specialty shops. Follow
the supplier's directions carefully and
never oil any part of the tape player unit.
o Always be sure that the tape is tightly
wound on its reel before inserting in the
player. Rotate a pencil in the drive
sprockets to wind up any slack.
Head
Cotton applicator
B860A02L
o Keep all magnetized objects, such as
electric motors, speakers or transform-
ers away from your cassette tapes and
tape player unit.
o Store cassettes in a cool, dry place with
the open side facing down to prevent
dust from setting in the cassette body.
o Avoid repeated fast reverse usage to
replay one given tune or tape section.
This can cause poor tape winding to
occur, and eventually cause excessive
internal drag and poor audio quality in
the cassette. If this occurs, it can some-
times be corrected by fast winding the
tape from end to end several times. If
this does not correct the problem, do not
continue to use the tape in your vehicle.
B860A01TG
o Be sure that the cassette label is not
loose or peeling off or tape ejection may
be difficult.
o Never touch or soil the actual audio
tape surfaces. o Never leave a cassette inserted in the
player when not being played. This
could damage the tape player unit and
the cassette tape.
o We strongly recommend against the
use of tapes longer than C-60 (60 min-
utes total). Tapes such as C-120 or C-
180 are very thin and do not perform as
well in the automotive environment.