Hyundai Azera 2010 Owner's Manual
Azera 2010
Hyundai
Hyundai
https://www.carmanualsonline.info/img/35/14481/w960_14481-0.png
Hyundai Azera 2010 Owner's Manual
Trending: deactivate airbag, jump cable, relay, navigation system, steering wheel adjustment, coolant reservoir, load capacity
Page 291 of 334
6
DO-IT-YOURSELF MAINTENANCE
25
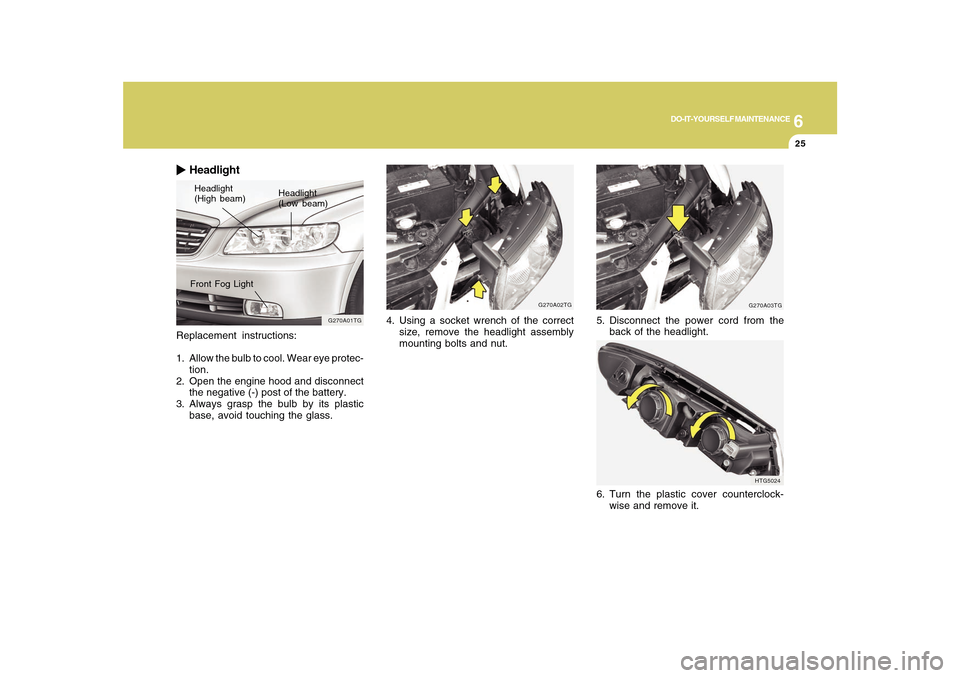
Replacement instructions:
1. Allow the bulb to cool. Wear eye protec-
tion.
2. Open the engine hood and disconnect
the negative (-) post of the battery.
3. Always grasp the bulb by its plastic
base, avoid touching the glass.
HeadlightHeadlight
(High beam)Headlight
(Low beam)
G270A01TG
Front Fog Light
G270A02TG
4. Using a socket wrench of the correct
size, remove the headlight assembly
mounting bolts and nut.
G270A03TG
5. Disconnect the power cord from the
back of the headlight.
HTG5024
6. Turn the plastic cover counterclock-
wise and remove it.
Page 292 of 334
6
DO-IT-YOURSELF MAINTENANCE
26
HTG5026
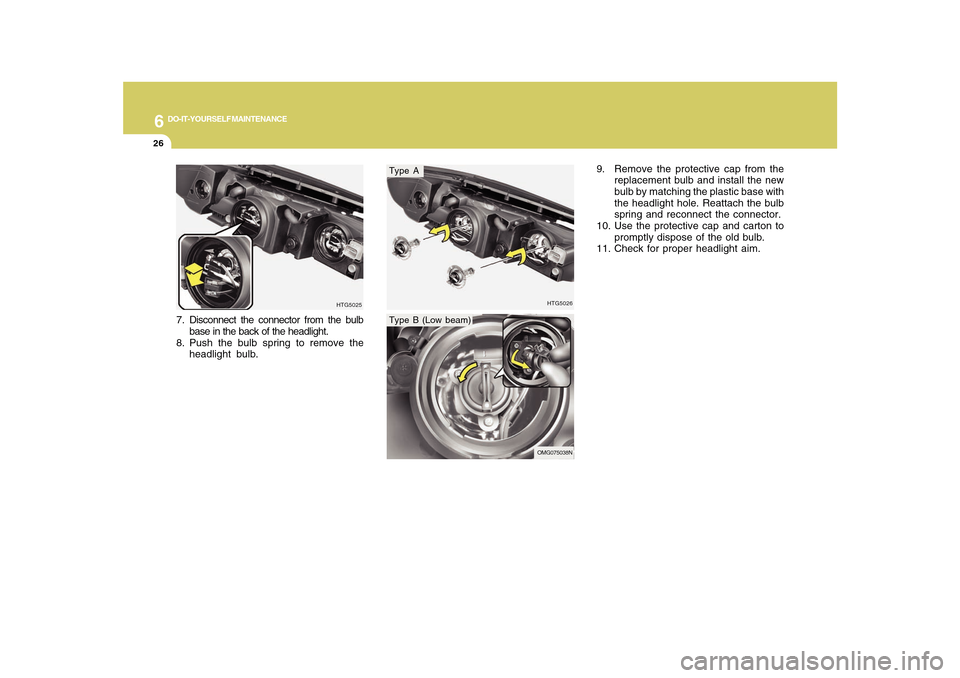
7. Disconnect the connector from the bulb
base in the back of the headlight.
8. Push the bulb spring to remove the
headlight bulb.
HTG5025
Type AType B (Low beam)
9. Remove the protective cap from the
replacement bulb and install the new
bulb by matching the plastic base with
the headlight hole. Reattach the bulb
spring and reconnect the connector.
10. Use the protective cap and carton to
promptly dispose of the old bulb.
11. Check for proper headlight aim.
OMG075038N
Page 293 of 334
6
DO-IT-YOURSELF MAINTENANCE
27
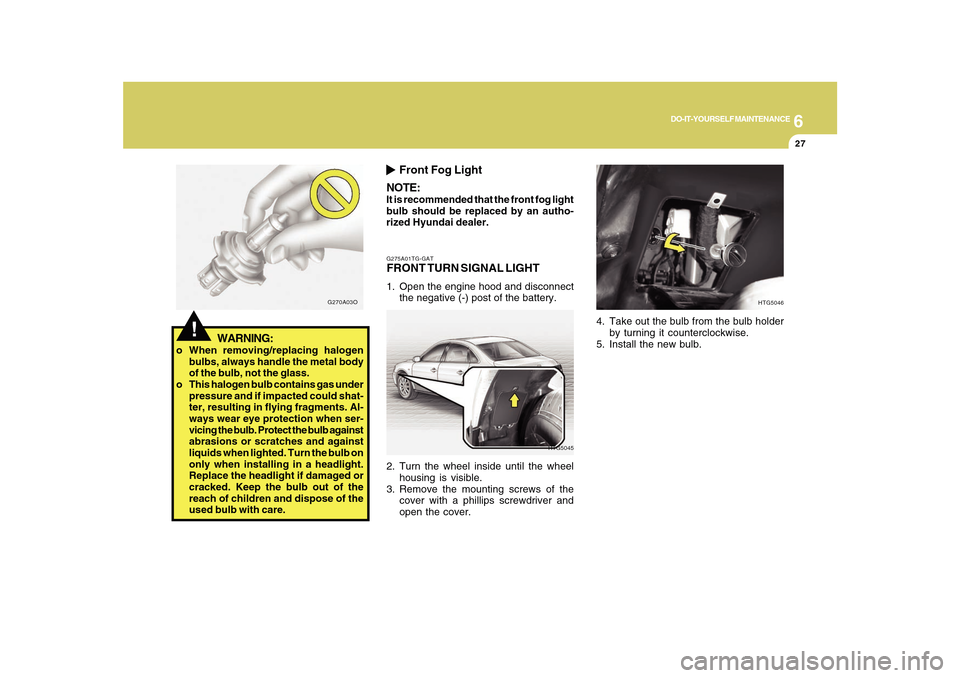
G275A01TG-GATFRONT TURN SIGNAL LIGHT1. Open the engine hood and disconnect
the negative (-) post of the battery.
HTG5045
2. Turn the wheel inside until the wheel
housing is visible.
3. Remove the mounting screws of the
cover with a phillips screwdriver and
open the cover.4. Take out the bulb from the bulb holder
by turning it counterclockwise.
5. Install the new bulb.
HTG5046
!
WARNING:
o When removing/replacing halogen
bulbs, always handle the metal body
of the bulb, not the glass.
o This halogen bulb contains gas under
pressure and if impacted could shat-
ter, resulting in flying fragments. Al-
ways wear eye protection when ser-
vicing the bulb. Protect the bulb against
abrasions or scratches and against
liquids when lighted. Turn the bulb on
only when installing in a headlight.
Replace the headlight if damaged or
cracked. Keep the bulb out of the
reach of children and dispose of the
used bulb with care.
G270A03O
Front Fog Light
NOTE:
It is recommended that the front fog light
bulb should be replaced by an autho-
rized Hyundai dealer.
Page 294 of 334
6
DO-IT-YOURSELF MAINTENANCE
28
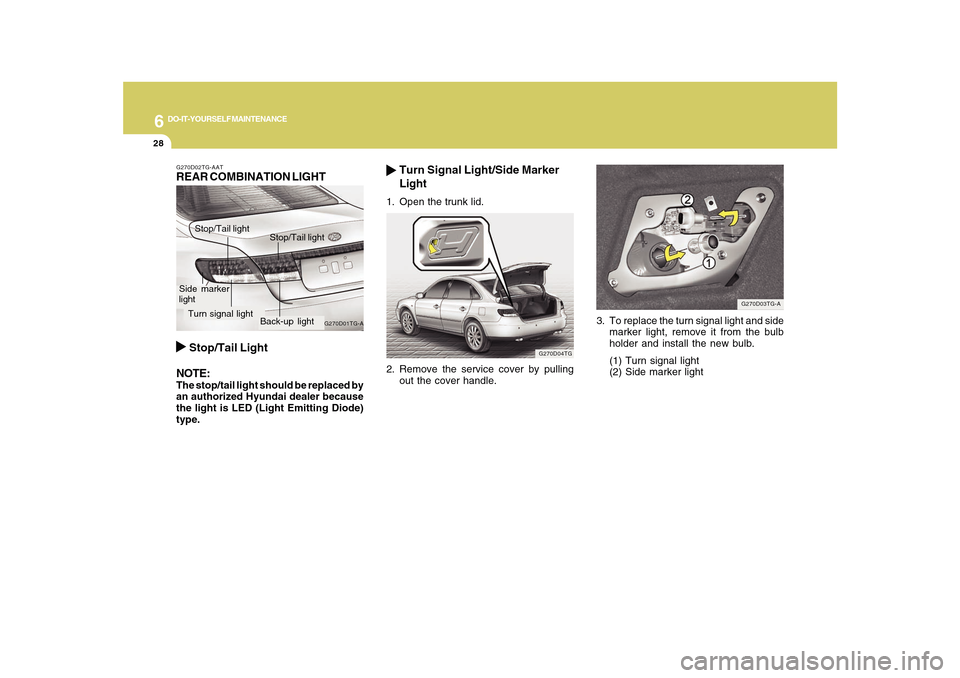
3. To replace the turn signal light and side
marker light, remove it from the bulb
holder and install the new bulb.
(1) Turn signal light
(2) Side marker light
G270D03TG-A
Turn Signal Light/Side Marker
Light
1. Open the trunk lid.2. Remove the service cover by pulling
out the cover handle.
G270D04TG
G270D02TG-AATREAR COMBINATION LIGHT
Stop/Tail Light
NOTE:The stop/tail light should be replaced by
an authorized Hyundai dealer because
the light is LED (Light Emitting Diode)
type.
Turn signal lightSide marker
light
G270D01TG-A
Stop/Tail light
Stop/Tail light
Back-up light
Page 295 of 334
6
DO-IT-YOURSELF MAINTENANCE
29
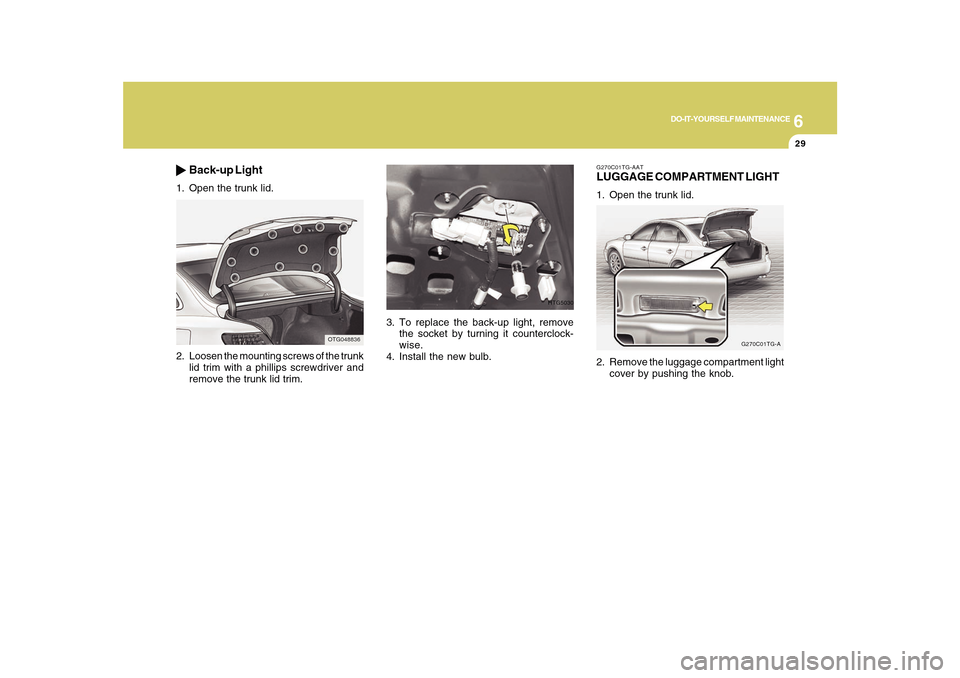
3. To replace the back-up light, remove
the socket by turning it counterclock-
wise.
4. Install the new bulb.
HTG5030
G270C01TG-AATLUGGAGE COMPARTMENT LIGHT1. Open the trunk lid.
2. Remove the luggage compartment light
cover by pushing the knob.
G270C01TG-A
OTG048836
2. Loosen the mounting screws of the trunk
lid trim with a phillips screwdriver and
remove the trunk lid trim.
Back-up Light
1. Open the trunk lid.
Page 296 of 334
6
DO-IT-YOURSELF MAINTENANCE
30
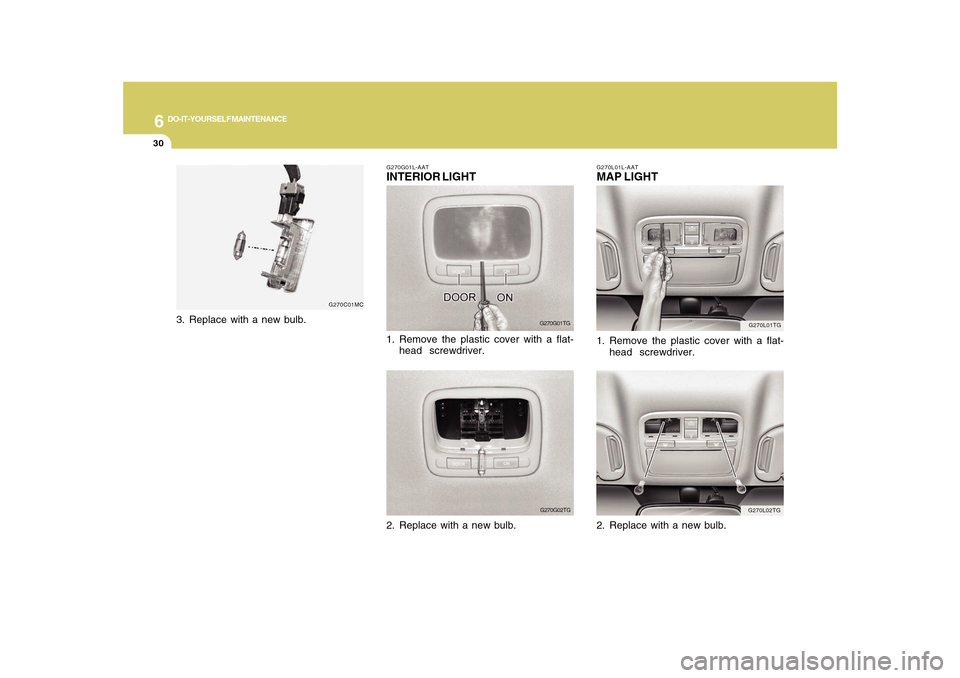
G270L01TG
G270L02TG G270L01L-AAT
MAP LIGHT1. Remove the plastic cover with a flat-
head screwdriver.
2. Replace with a new bulb.
G270G01L-AATINTERIOR LIGHT
G270G01TG
1. Remove the plastic cover with a flat-
head screwdriver.
G270G02TG
2. Replace with a new bulb.
G270C01MC
3. Replace with a new bulb.
Page 297 of 334
6
DO-IT-YOURSELF MAINTENANCE
31
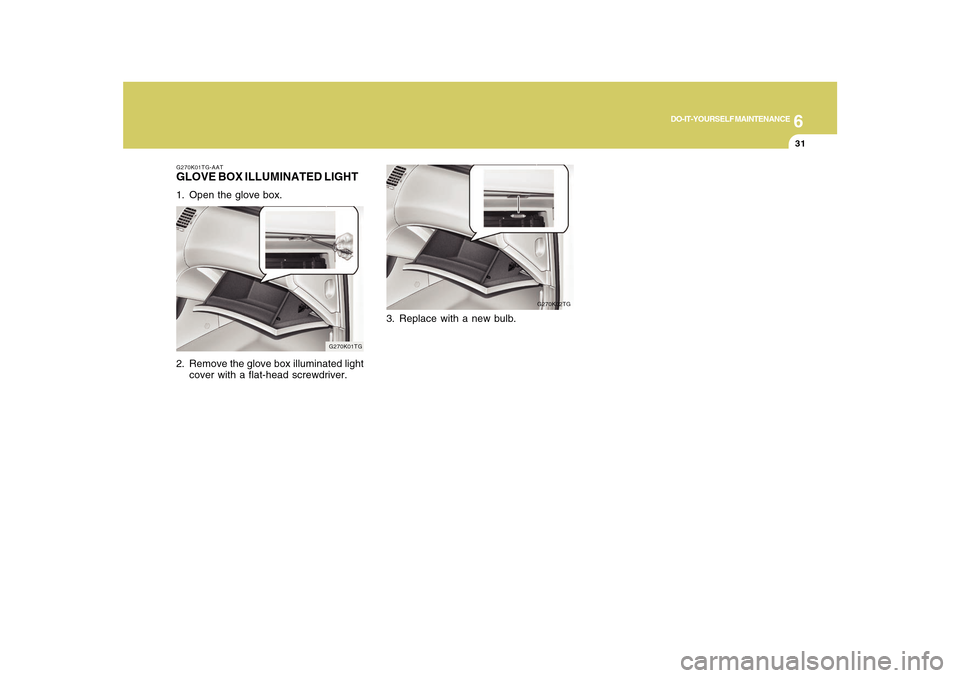
G270K02TG
G270K01TG-AATGLOVE BOX ILLUMINATED LIGHT1. Open the glove box.
2. Remove the glove box illuminated light
cover with a flat-head screwdriver.
G270K01TG
3. Replace with a new bulb.
Page 298 of 334
6
DO-IT-YOURSELF MAINTENANCE
32
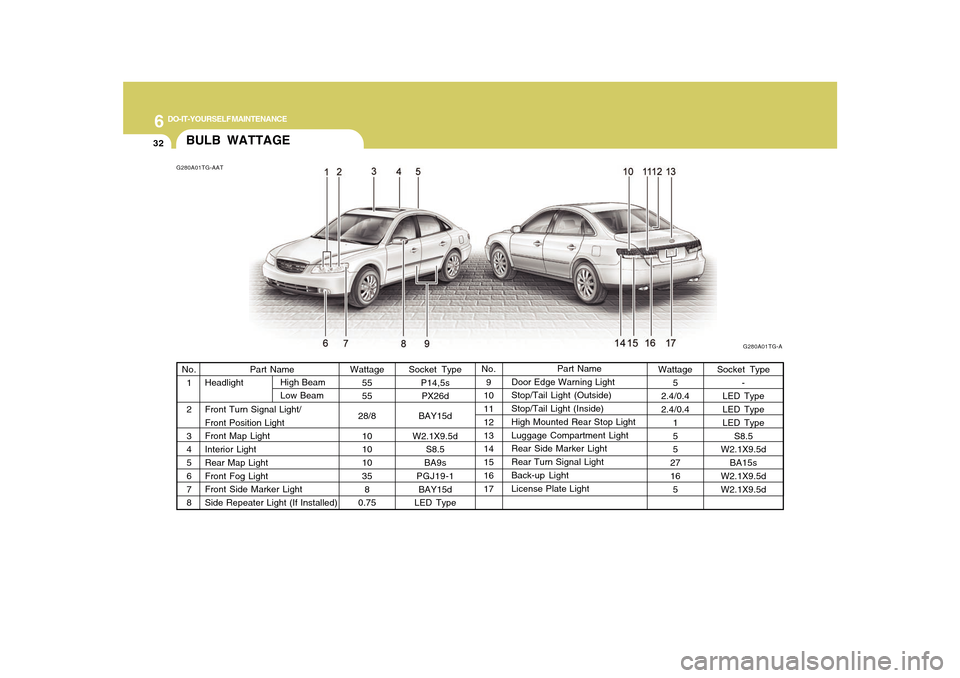
BULB WATTAGEG280A01TG-AAT
G280A01TG-A
Socket Type
P14,5s
PX26d
BAY15d
W2.1X9.5d
S8.5
BA9s
PGJ19-1
BAY15d
LED TypePart Name
Door Edge Warning Light
Stop/Tail Light (Outside)
Stop/Tail Light (Inside)
High Mounted Rear Stop Light
Luggage Compartment Light
Rear Side Marker Light
Rear Turn Signal Light
Back-up Light
License Plate Light Part Name
Headlight
Front Turn Signal Light/
Front Position Light
Front Map Light
Interior Light
Rear Map Light
Front Fog Light
Front Side Marker Light
Side Repeater Light (If Installed) No.
1
2
3
4
5
6
7
8No.
9
10
11
12
13
14
15
16
17 Wattage
55
55
28/8
10
10
10
35
8
0.75Wattage
5
2.4/0.4
2.4/0.4
1
5
5
27
16
5Socket Type
-
LED Type
LED Type
LED Type
S8.5
W2.1X9.5d
BA15s
W2.1X9.5d
W2.1X9.5d High Beam
Low Beam
Page 299 of 334
6
DO-IT-YOURSELF MAINTENANCE
33
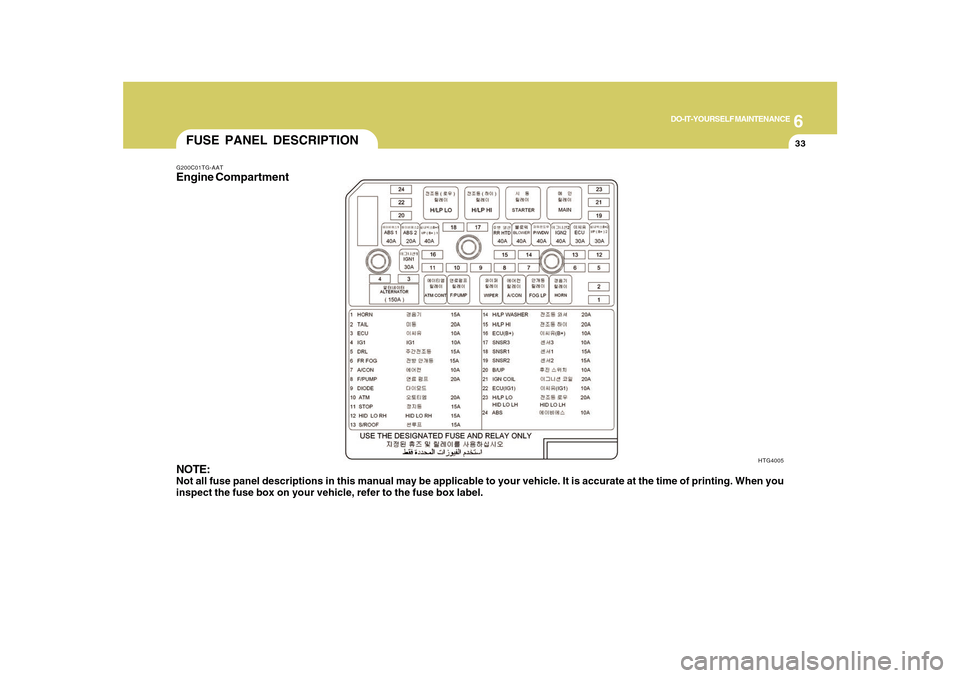
FUSE PANEL DESCRIPTIONG200C01TG-AATEngine Compartment
NOTE:Not all fuse panel descriptions in this manual may be applicable to your vehicle. It is accurate at the time of printing. When you
inspect the fuse box on your vehicle, refer to the fuse box label.
HTG4005
Page 300 of 334
6
DO-IT-YOURSELF MAINTENANCE
34
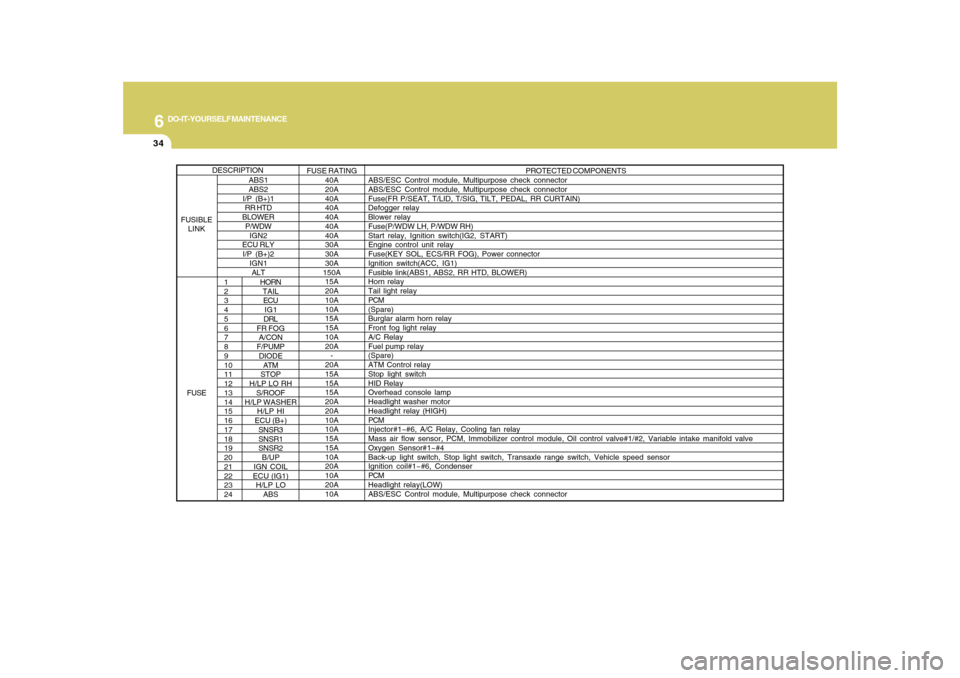
1
2
3
4
5
6
7
8
9
10
11
12
13
14
15
16
17
18
19
20
21
22
23
24
HORN
TAIL
ECU
IG1
DRL
FR FOG
A/CON
F/PUMP
DIODE
ATM
STOP
H/LP LO RH
S/ROOF
H/LP WASHER
H/LP HI
ECU (B+)
SNSR3
SNSR1
SNSR2
B/UP
IGN COIL
ECU (IG1)
H/LP LO
ABSPROTECTED COMPONENTS
ABS/ESC Control module, Multipurpose check connector
ABS/ESC Control module, Multipurpose check connector
Fuse(FR P/SEAT, T/LID, T/SIG, TILT, PEDAL, RR CURTAIN)
Defogger relay
Blower relay
Fuse(P/WDW LH, P/WDW RH)
Start relay, Ignition switch(IG2, START)
Engine control unit relay
Fuse(KEY SOL, ECS/RR FOG), Power connector
Ignition switch(ACC, IG1)
Fusible link(ABS1, ABS2, RR HTD, BLOWER)
Horn relay
Tail light relay
PCM
(Spare)
Burglar alarm horn relay
Front fog light relay
A/C Relay
Fuel pump relay
(Spare)
ATM Control relay
Stop light switch
HID Relay
Overhead console lamp
Headlight washer motor
Headlight relay (HIGH)
PCM
Injector#1~#6, A/C Relay, Cooling fan relay
Mass air flow sensor, PCM, Immobilizer control module, Oil control valve#1/#2, Variable intake manifold valve
Oxygen Sensor#1~#4
Back-up light switch, Stop light switch, Transaxle range switch, Vehicle speed sensor
Ignition coil#1~#6, Condenser
PCM
Headlight relay(LOW)
ABS/ESC Control module, Multipurpose check connector
ABS1
ABS2
I/P (B+)1
RR HTD
BLOWER
P/WDW
IGN2
ECU RLY
I/P (B+)2
IGN1
ALTFUSE RATING
40A
20A
40A
40A
40A
40A
40A
30A
30A
30A
150A
15A
20A
10A
10A
15A
15A
10A
20A
-
20A
15A
15A
15A
20A
20A
10A
10A
15A
15A
10A
20A
10A
20A
10A
DESCRIPTION
FUSIBLE
LINK
FUSE
Trending: garage door opener, low beam, weight, clock, stop start, navigation, mirror
