door lock Hyundai Azera 2012 Owner's Manual
[x] Cancel search | Manufacturer: HYUNDAI, Model Year: 2012, Model line: Azera, Model: Hyundai Azera 2012Pages: 403, PDF Size: 9.28 MB
Page 11 of 403
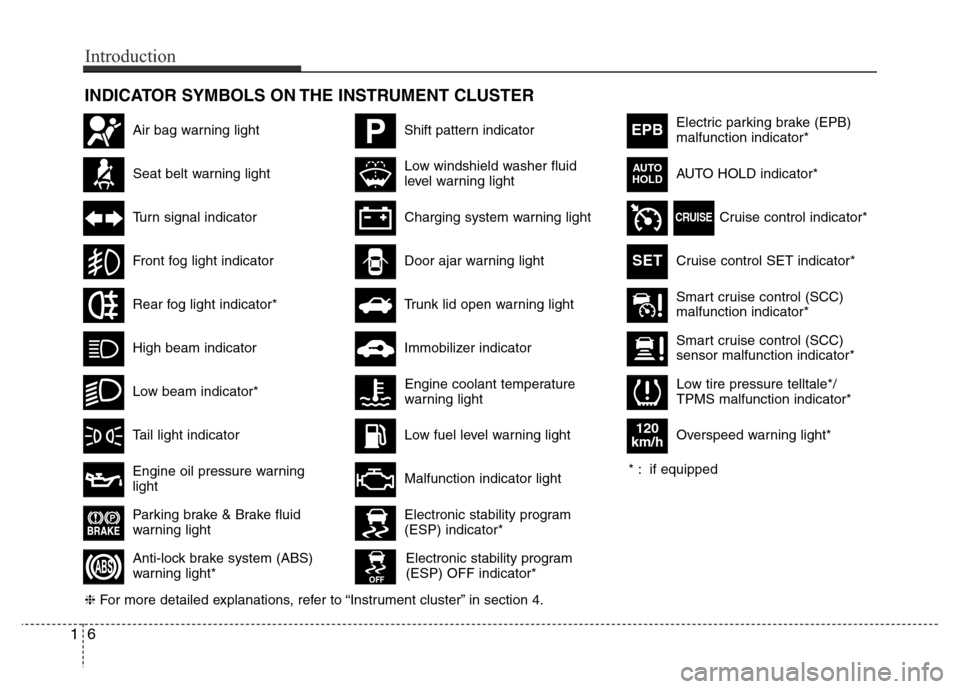
INDICATOR SYMBOLS ON THE INSTRUMENT CLUSTER
Seat belt warning light
High beam indicator
Turn signal indicator
Anti-lock brake system (ABS)
warning light*
Parking brake & Brake fluid
warning light
Engine oil pressure warning
light
Electronic stability program
(ESP) indicator*
Electronic stability program
(ESP) OFF indicator*
Malfunction indicator light
Smart cruise control (SCC)
malfunction indicator*
Smart cruise control (SCC)
sensor malfunction indicator*
Cruise control indicator*
Cruise control SET indicator*
Immobilizer indicator
Low fuel level warning light
❈For more detailed explanations, refer to “Instrument cluster” in section 4.
Charging system warning light
Tail light indicator
Front fog light indicator
Low windshield washer fluid
level warning lightElectric parking brake (EPB)
malfunction indicator*
AUTO HOLD indicator*
EPB
CRUISE
AUTO
HOLD
Engine coolant temperature
warning light
Door ajar warning light
Low tire pressure telltale*/
TPMS malfunction indicator*
PShift pattern indicatorAir bag warning light
Rear fog light indicator*
Overspeed warning light*
120
km/h
SET
* : if equipped
16
Introduction
Low beam indicator*
Trunk lid open warning light
Page 13 of 403
Your vehicle at a glance
2 2
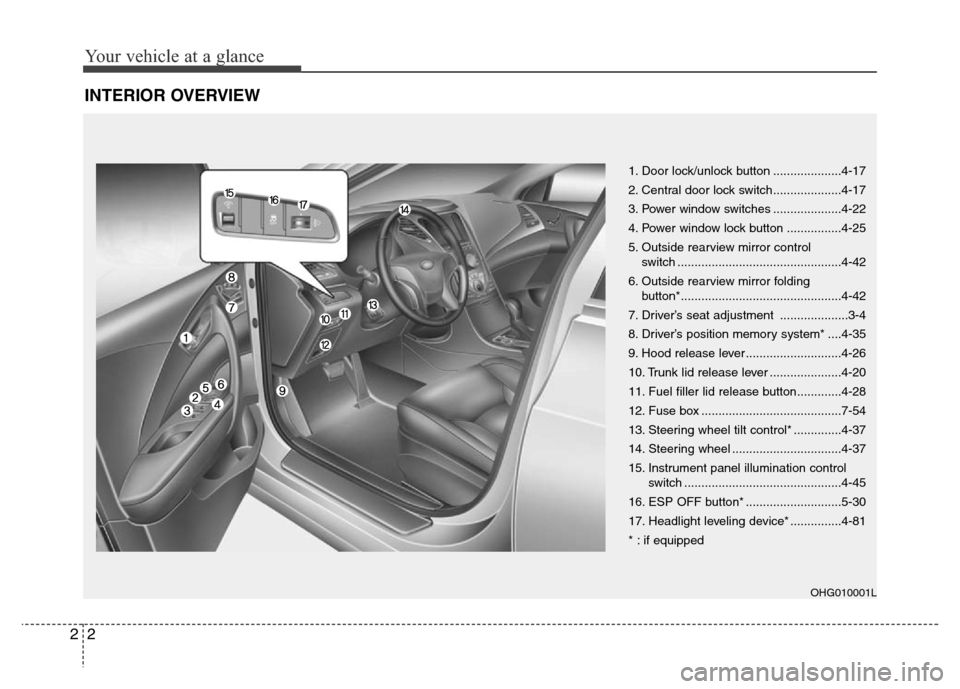
INTERIOR OVERVIEW
1. Door lock/unlock button ....................4-17
2. Central door lock switch....................4-17
3. Power window switches ....................4-22
4. Power window lock button ................4-25
5. Outside rearview mirror control
switch ................................................4-42
6. Outside rearview mirror folding
button*...............................................4-42
7. Driver’s seat adjustment ....................3-4
8. Driver’s position memory system* ....4-35
9. Hood release lever ............................4-26
10. Trunk lid release lever .....................4-20
11. Fuel filler lid release button.............4-28
12. Fuse box .........................................7-54
13. Steering wheel tilt control* ..............4-37
14. Steering wheel ................................4-37
15. Instrument panel illumination control
switch ..............................................4-45
16. ESP OFF button* ............................5-30
17. Headlight leveling device* ...............4-81
* : if equipped
OHG010001L
Page 36 of 403
321
Safety features of your vehicle
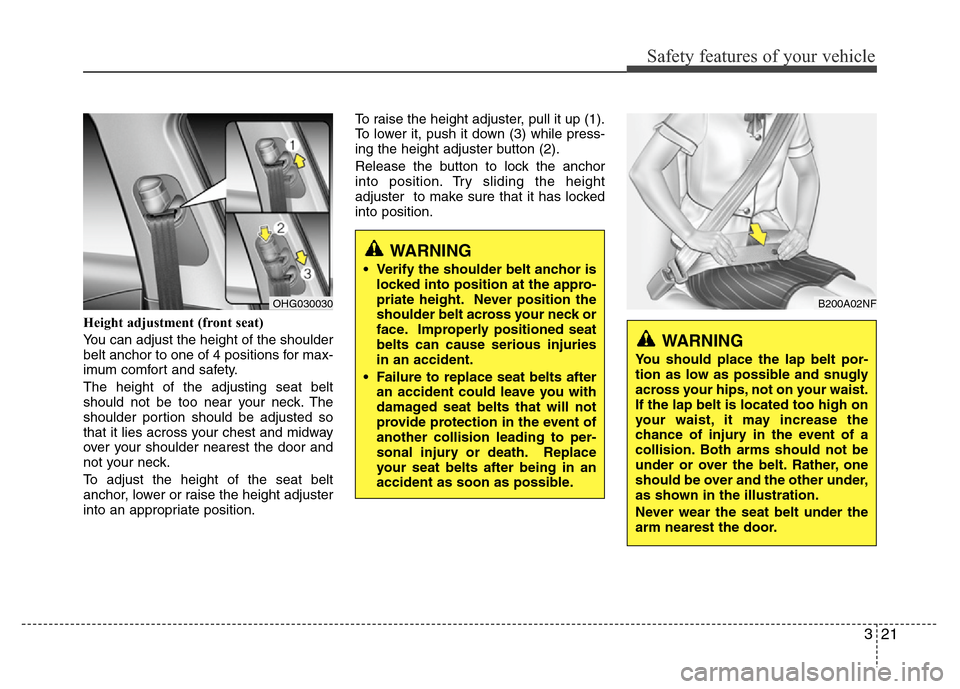
Height adjustment (front seat)
You can adjust the height of the shoulder
belt anchor to one of 4 positions for max-
imum comfort and safety.
The height of the adjusting seat belt
should not be too near your neck. The
shoulder portion should be adjusted so
that it lies across your chest and midway
over your shoulder nearest the door and
not your neck.
To adjust the height of the seat belt
anchor, lower or raise the height adjuster
into an appropriate position.To raise the height adjuster, pull it up (1).
To lower it, push it down (3) while press-
ing the height adjuster button (2).
Release the button to lock the anchor
into position. Try sliding the height
adjuster to make sure that it has locked
into position.
B200A02NF
WARNING
You should place the lap belt por-
tion as low as possible and snugly
across your hips, not on your waist.
If the lap belt is located too high on
your waist, it may increase the
chance of injury in the event of a
collision. Both arms should not be
under or over the belt. Rather, one
should be over and the other under,
as shown in the illustration.
Never wear the seat belt under the
arm nearest the door.
OHG030030
WARNING
• Verify the shoulder belt anchor is
locked into position at the appro-
priate height. Never position the
shoulder belt across your neck or
face. Improperly positioned seat
belts can cause serious injuries
in an accident.
• Failure to replace seat belts after
an accident could leave you with
damaged seat belts that will not
provide protection in the event of
another collision leading to per-
sonal injury or death. Replace
your seat belts after being in an
accident as soon as possible.
Page 57 of 403
Safety features of your vehicle
42 3
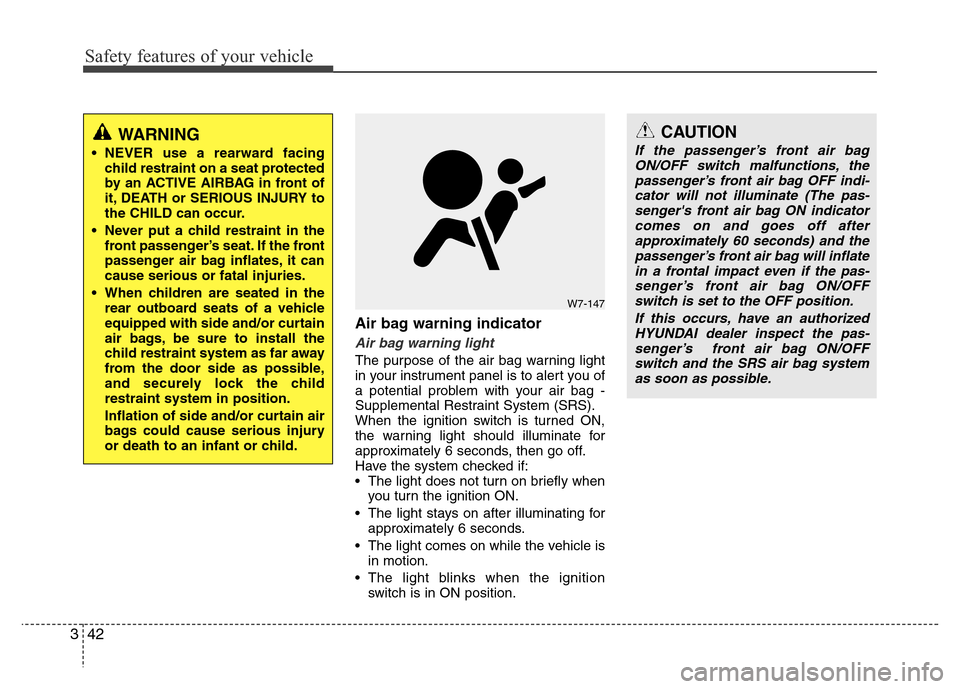
Air bag warning indicator
Air bag warning light
The purpose of the air bag warning light
in your instrument panel is to alert you of
a potential problem with your air bag -
Supplemental Restraint System (SRS).
When the ignition switch is turned ON,
the warning light should illuminate for
approximately 6 seconds, then go off.
Have the system checked if:
• The light does not turn on briefly when
you turn the ignition ON.
• The light stays on after illuminating for
approximately 6 seconds.
• The light comes on while the vehicle is
in motion.
• The light blinks when the ignition
switch is in ON position.
W7-147
CAUTION
If the passenger’s front air bag
ON/OFF switch malfunctions, the
passenger’s front air bag OFF indi-
cator will not illuminate (The pas-
senger's front air bag ON indicator
comes on and goes off after
approximately 60 seconds) and the
passenger’s front air bag will inflate
in a frontal impact even if the pas-
senger’s front air bag ON/OFF
switch is set to the OFF position.
If this occurs, have an authorized
HYUNDAI dealer inspect the pas-
senger’s front air bag ON/OFF
switch and the SRS air bag system
as soon as possible.WARNING
• NEVER use a rearward facing
child restraint on a seat protected
by an ACTIVE AIRBAG in front of
it, DEATH or SERIOUS INJURY to
the CHILD can occur.
• Never put a child restraint in the
front passenger’s seat. If the front
passenger air bag inflates, it can
cause serious or fatal injuries.
• When children are seated in the
rear outboard seats of a vehicle
equipped with side and/or curtain
air bags, be sure to install the
child restraint system as far away
from the door side as possible,
and securely lock the child
restraint system in position.
Inflation of side and/or curtain air
bags could cause serious injury
or death to an infant or child.
Page 68 of 403

353
Safety features of your vehicle
The curtain air bags are designed to
deploy only during certain side impact
collisions, depending on the crash sever-
ity, angle, speed and impact. The curtain
air bags are not designed to deploy in all
side impact situations, collisions from the
front or rear of the vehicle or in most
rollover situations.
WARNING
• In order for side and curtain air
bags to provide the best protec-
tion, front seat occupants and
outboard rear occupants should
sit in an upright position with the
seat belts properly fastened.
Importantly, children should sit in
a proper child restraint system in
the rear seat.
• When children are seated in the
rear outboard seats, they must be
seated in the proper child
restraint system. Make sure to
position the child restraint sys-
tem as far away from the door
side as possible, and secure the
child restraint system in a locked
position.
(Continued)
(Continued)
• Do not allow the passengers to
lean their heads or bodies onto
doors, put their arms on the
doors, stretch their arms out of
the window, or place objects
between the doors and passen-
gers when they are seated on
seats equipped with side and/or
curtain air bags.
• Never try to open or repair any
components of the side curtain
air bag system. This should only
be done by an authorized
HYUNDAI dealer.
Failure to follow the above instruc-
tions can result in injury or death to
the vehicle occupants in an acci-
dent.
Page 77 of 403
4
Keys / 4-3
Smart key / 4-7
Remote keyless entry / 4-10
Theft-alarm system / 4-13
Door locks / 4-16
Trunk / 4-20
Windows / 4-22
Hood / 4-26
Fuel filler lid / 4-28
Panorama sunroof / 4-31
Driver position memory system / 4-35
Steering wheel / 4-37
Mirrors / 4-40
Instrument cluster / 4-44
Rear parking assist system / 4-68
Parking assist system / 4-72
Rearview camera / 4-76
Hazard warning flasher / 4-76
Lighting / 4-77
Wipers and washers / 4-83
Interior light / 4-86
Welcome system / 4-89
Defroster / 4-90
Features of your vehicle
Page 79 of 403
43
Features of your vehicle
Record your key number
The key code number is
stamped on the key
code tag attached to the
key set. Should you lose
your keys, we recom-
mend that you contact an authorized
HYUNDAI dealer. Remove the key code
tag and store it in a safe place. Also,
record the key code number and keep it
in a safe and handy place, but not in the
vehicle.
Key operations
• Used to start the engine.
• Used to lock and unlock the doors.
• Used to lock and unlock the glove box.
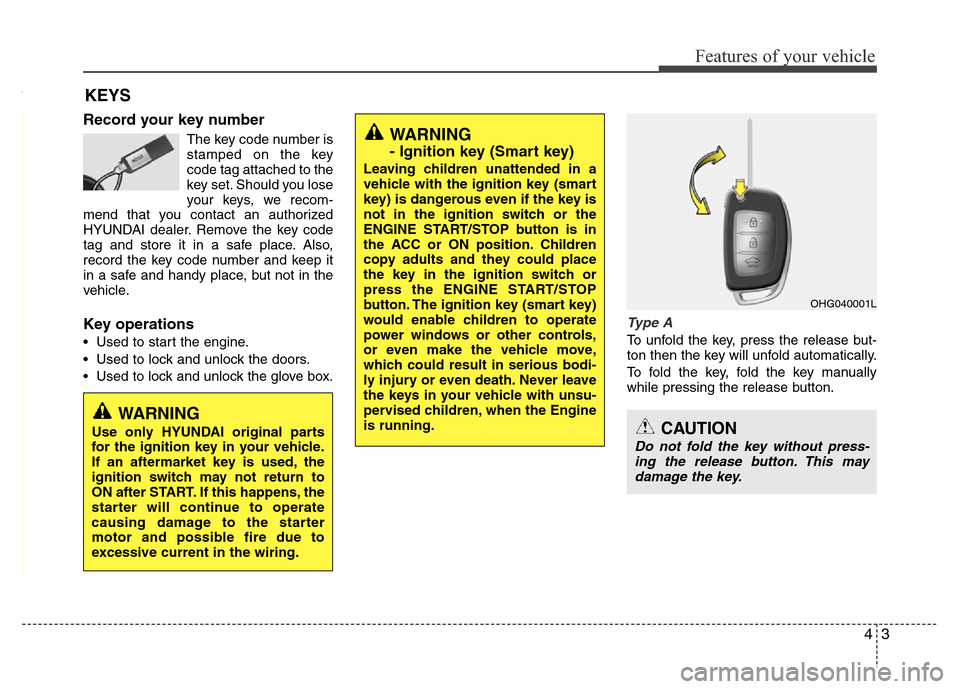
Type A
To unfold the key, press the release but-
ton then the key will unfold automatically.
To fold the key, fold the key manually
while pressing the release button.
KEYS
WARNING
- Ignition key (Smart key)
Leaving children unattended in a
vehicle with the ignition key (smart
key) is dangerous even if the key is
not in the ignition switch or the
ENGINE START/STOP button is in
the ACC or ON position. Children
copy adults and they could place
the key in the ignition switch or
press the ENGINE START/STOP
button. The ignition key (smart key)
would enable children to operate
power windows or other controls,
or even make the vehicle move,
which could result in serious bodi-
ly injury or even death. Never leave
the keys in your vehicle with unsu-
pervised children, when the Engine
is running.
WARNING
Use only HYUNDAI original parts
for the ignition key in your vehicle.
If an aftermarket key is used, the
ignition switch may not return to
ON after START. If this happens, the
starter will continue to operate
causing damage to the starter
motor and possible fire due to
excessive current in the wiring.
OHG040001L
CAUTION
Do not fold the key without press-
ing the release button. This may
damage the key.
Page 80 of 403
Features of your vehicle
4 4
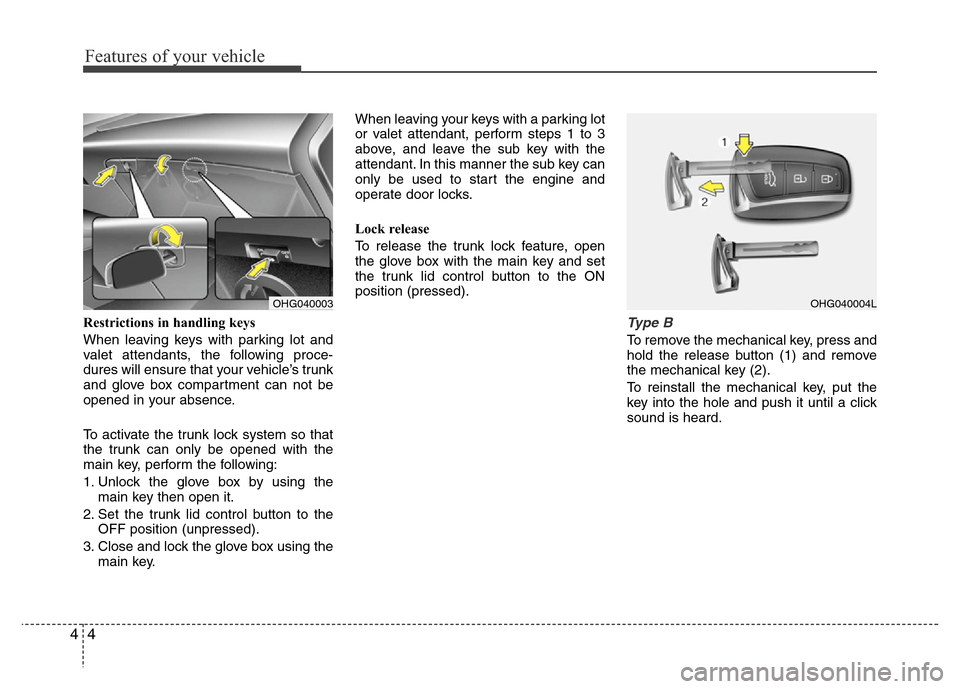
Restrictions in handling keys
When leaving keys with parking lot and
valet attendants, the following proce-
dures will ensure that your vehicle’s trunk
and glove box compartment can not be
opened in your absence.
To activate the trunk lock system so that
the trunk can only be opened with the
main key, perform the following:
1. Unlock the glove box by using the
main key then open it.
2. Set the trunk lid control button to the
OFF position (unpressed).
3. Close and lock the glove box using the
main key.When leaving your keys with a parking lot
or valet attendant, perform steps 1 to 3
above, and leave the sub key with the
attendant. In this manner the sub key can
only be used to start the engine and
operate door locks.
Lock release
To release the trunk lock feature, open
the glove box with the main key and set
the trunk lid control button to the ON
position (pressed).Type B
To remove the mechanical key, press and
hold the release button (1) and remove
the mechanical key (2).
To reinstall the mechanical key, put the
key into the hole and push it until a click
sound is heard.
OHG040003OHG040004L
Page 81 of 403
45
Features of your vehicle
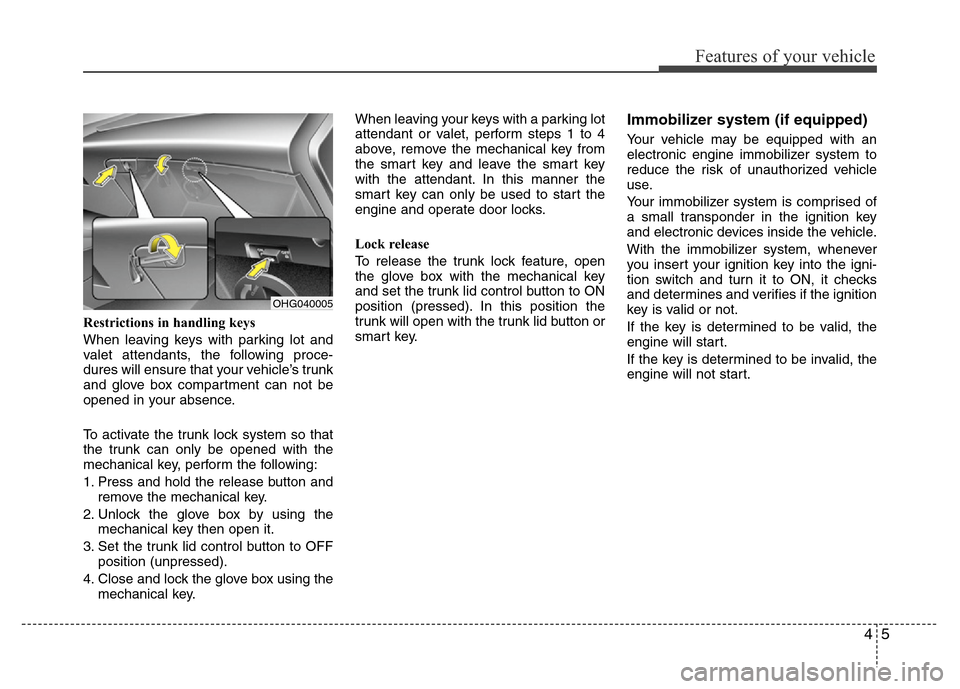
Restrictions in handling keys
When leaving keys with parking lot and
valet attendants, the following proce-
dures will ensure that your vehicle’s trunk
and glove box compartment can not be
opened in your absence.
To activate the trunk lock system so that
the trunk can only be opened with the
mechanical key, perform the following:
1.
Press and hold the release button and
remove the mechanical key.
2. Unlock the glove box by using the
mechanical key then open it.
3. Set the trunk lid control button to OFF
position (unpressed).
4. Close and lock the glove box using the
mechanical key.When leaving your keys with a parking lot
attendant or valet, perform steps 1 to 4
above, remove the mechanical key from
the smart key and leave the smart key
with the attendant. In this manner the
smart key can only be used to start the
engine and operate door locks.
Lock release
To release the trunk lock feature, open
the glove box with the mechanical key
and set the trunk lid control button to ON
position (pressed). In this position the
trunk will open with the trunk lid button or
smart key.
Immobilizer system (if equipped)
Your vehicle may be equipped with an
electronic engine immobilizer system to
reduce the risk of unauthorized vehicle
use.
Your immobilizer system is comprised of
a small transponder in the ignition key
and electronic devices inside the vehicle.
With the immobilizer system, whenever
you insert your ignition key into the igni-
tion switch and turn it to ON, it checks
and determines and verifies if the ignition
key is valid or not.
If the key is determined to be valid, the
engine will start.
If the key is determined to be invalid, the
engine will not start.
OHG040005
Page 83 of 403
47
Features of your vehicle
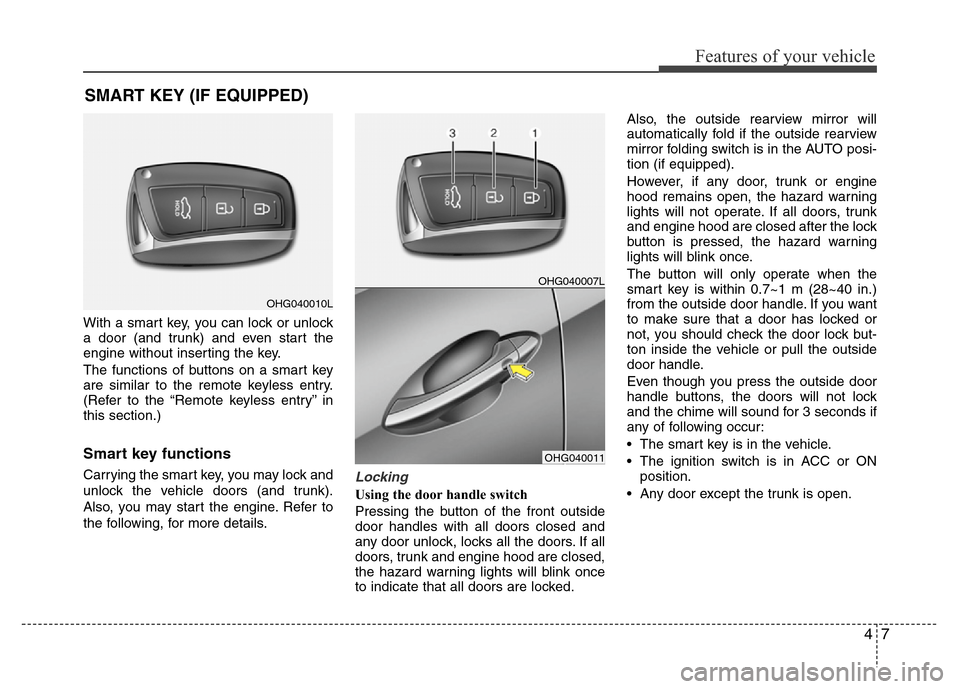
With a smart key, you can lock or unlock
a door (and trunk) and even start the
engine without inserting the key.
The functions of buttons on a smart key
are similar to the remote keyless entry.
(Refer to the “Remote keyless entry” in
this section.)
Smart key functions
Carrying the smart key, you may lock and
unlock the vehicle doors (and trunk).
Also, you may start the engine. Refer to
the following, for more details.Locking
Using the door handle switch
Pressing the button of the front outside
door handles with all doors closed and
any door unlock, locks all the doors. If all
doors, trunk and engine hood are closed,
the hazard warning lights will blink once
to indicate that all doors are locked.Also, the outside rearview mirror will
automatically fold if the outside rearview
mirror folding switch is in the AUTO posi-
tion (if equipped).
However, if any door, trunk or engine
hood remains open, the hazard warning
lights will not operate. If all doors, trunk
and engine hood are closed after the lock
button is pressed, the hazard warning
lights will blink once.
The button will only operate when the
smart key is within 0.7~1 m (28~40 in.)
from the outside door handle. If you want
to make sure that a door has locked or
not, you should check the door lock but-
ton inside the vehicle or pull the outside
door handle.
Even though you press the outside door
handle buttons, the doors will not lock
and the chime will sound for 3 seconds if
any of following occur:
• The smart key is in the vehicle.
• The ignition switch is in ACC or ON
position.
• Any door except the trunk is open.
SMART KEY (IF EQUIPPED)
OHG040010L
OHG040007L
OHG040011