fog light Hyundai Azera 2013 Owner's Manual
[x] Cancel search | Manufacturer: HYUNDAI, Model Year: 2013, Model line: Azera, Model: Hyundai Azera 2013Pages: 403, PDF Size: 9.28 MB
Page 11 of 403
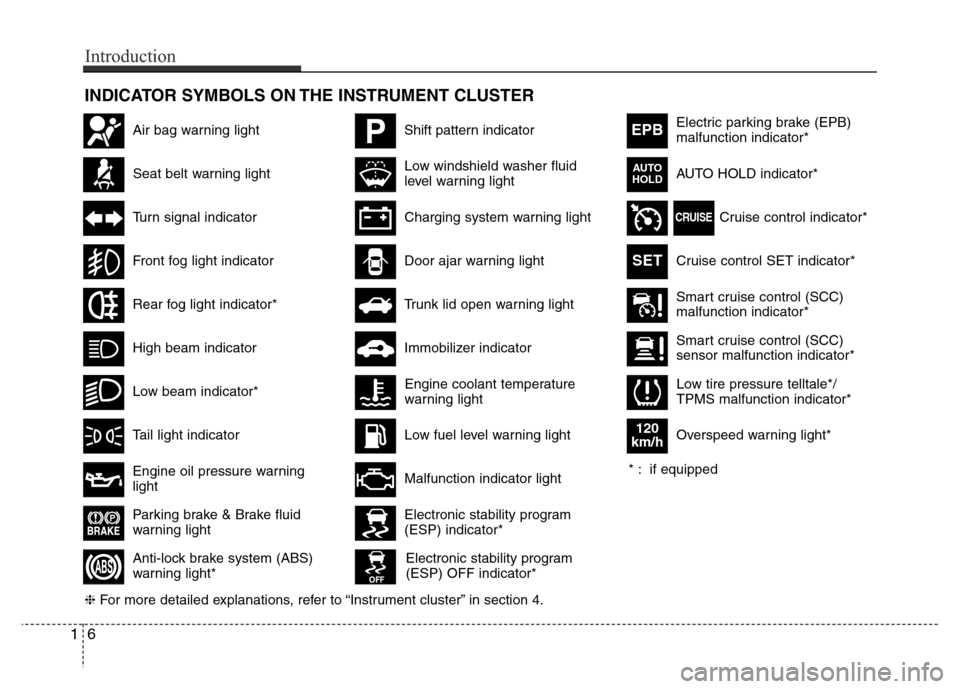
INDICATOR SYMBOLS ON THE INSTRUMENT CLUSTER
Seat belt warning light
High beam indicator
Turn signal indicator
Anti-lock brake system (ABS)
warning light*
Parking brake & Brake fluid
warning light
Engine oil pressure warning
light
Electronic stability program
(ESP) indicator*
Electronic stability program
(ESP) OFF indicator*
Malfunction indicator light
Smart cruise control (SCC)
malfunction indicator*
Smart cruise control (SCC)
sensor malfunction indicator*
Cruise control indicator*
Cruise control SET indicator*
Immobilizer indicator
Low fuel level warning light
❈For more detailed explanations, refer to “Instrument cluster” in section 4.
Charging system warning light
Tail light indicator
Front fog light indicator
Low windshield washer fluid
level warning lightElectric parking brake (EPB)
malfunction indicator*
AUTO HOLD indicator*
EPB
CRUISE
AUTO
HOLD
Engine coolant temperature
warning light
Door ajar warning light
Low tire pressure telltale*/
TPMS malfunction indicator*
PShift pattern indicatorAir bag warning light
Rear fog light indicator*
Overspeed warning light*
120
km/h
SET
* : if equipped
16
Introduction
Low beam indicator*
Trunk lid open warning light
Page 131 of 403

455
Features of your vehicle
Turn signal indicator
The blinking green arrows on the instru-
ment panel show the direction indicated
by the turn signals. If the arrow comes on
but does not blink, blinks more rapidly
than normal, or does not illuminate at all,
a malfunction in the turn signal system is
indicated. Your dealer should be consult-
ed for repairs.
Front fog light indicator
(if equipped)
This light comes on when the front fog
lights are ON.
Rear fog light indicator
(if equipped)
This indicator illuminates when the rear
fog lights are ON.
High beam indicator
This indicator illuminates when the head-
lights are on and in the high beam posi-
tion or when the turn signal lever is pulled
into the Flash-to-Pass position.
Low beam indicator
(if equipped)
This indicator illuminates when the head-
lights are on and in the low beam posi-
tion.
When the high beam indicator is ON, the
low bean indicator will turn off and low
beam light remains on.
Tail light indicator
This indicator illuminates when the tail
lights are on.
Page 157 of 403
481
Features of your vehicle
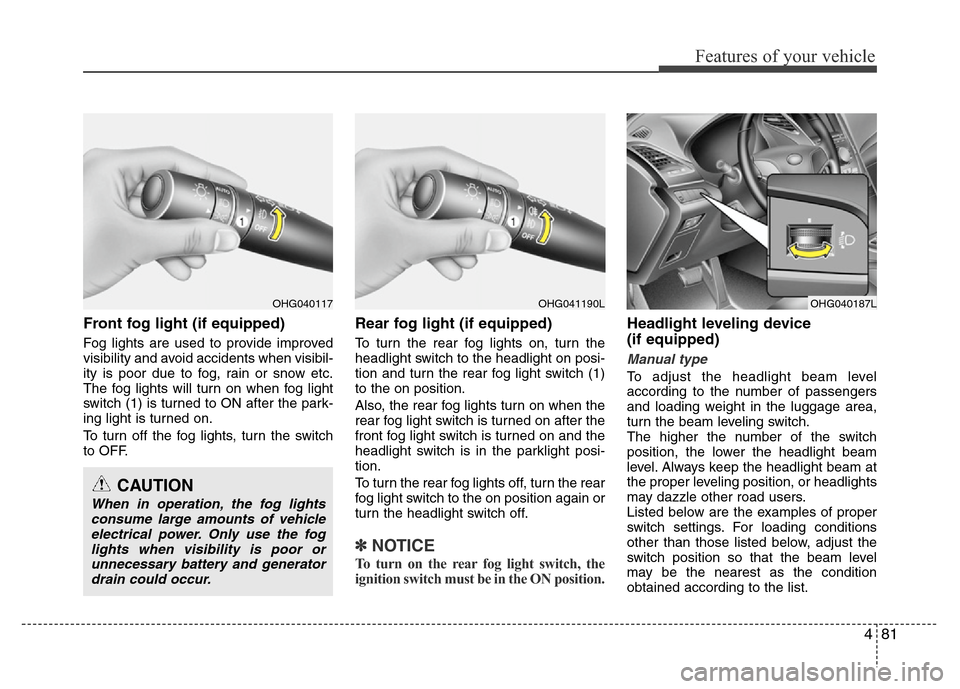
Front fog light (if equipped)
Fog lights are used to provide improved
visibility and avoid accidents when visibil-
ity is poor due to fog, rain or snow etc.
The fog lights will turn on when fog light
switch (1) is turned to ON after the park-
ing light is turned on.
To turn off the fog lights, turn the switch
to OFF.
Rear fog light (if equipped)
To turn the rear fog lights on, turn the
headlight switch to the headlight on posi-
tion and turn the rear fog light switch (1)
to the on position.
Also, the rear fog lights turn on when the
rear fog light switch is turned on after the
front fog light switch is turned on and the
headlight switch is in the parklight posi-
tion.
To turn the rear fog lights off, turn the rear
fog light switch to the on position again or
turn the headlight switch off.
✽NOTICE
To turn on the rear fog light switch, the
ignition switch must be in the ON position.
Headlight leveling device
(if equipped)
Manual type
To adjust the headlight beam level
according to the number of passengers
and loading weight in the luggage area,
turn the beam leveling switch.
The higher the number of the switch
position, the lower the headlight beam
level. Always keep the headlight beam at
the proper leveling position, or headlights
may dazzle other road users.
Listed below are the examples of proper
switch settings. For loading conditions
other than those listed below, adjust the
switch position so that the beam level
may be the nearest as the condition
obtained according to the list.
OHG040117
CAUTION
When in operation, the fog lights
consume large amounts of vehicle
electrical power. Only use the fog
lights when visibility is poor or
unnecessary battery and generator
drain could occur.
OHG040187LOHG041190L
Page 173 of 403

497
Features of your vehicle
Air conditioning
Press the A/C (air conditioning) button to
turn the air conditioning system on (indi-
cator light will illuminate). Press the but-
ton again to turn the air conditioning sys-
tem off.
OFF mode
Press the OFF button to turn off the air
climate control system. However, you can
still operate the mode and air intake but-
tons as long as the ignition switch is in
the ON position.
System operation
Ventilation
1. Set the mode to the position.
2. Set the air intake control to the outside
(fresh) air position.
3. Set the temperature control to the
desired position.
4. Set the fan speed control to the
desired speed.
Heating
1. Set the mode to the position.
2. Set the air intake control to the outside
(fresh) air position.
3. Set the temperature control to the
desired position.
4. Set the fan speed control to the
desired speed.
5. If dehumidified heating is desired, turn
the air conditioning system (if
equipped) on.
• If the windshield fogs up, set the mode
to the
orposition.
OHG040139OHG042194C
Page 175 of 403
499
Features of your vehicle
Air conditioning system operation tips
• If the vehicle has been parked in direct
sunlight during hot weather, open the
windows for a short time to let the hot
air inside the vehicle escape.
• To help reduce moisture inside of the
windows on rainy or humid days,
decrease the humidity inside the vehi-
cle by operating the air conditioning
system.
• During air conditioning system opera-
tion, you may occasionally notice a
slight change in engine speed as the
air conditioning compressor cycles.
This is a normal system operation
characteristic.
• Use the air conditioning system every
month only for a few minutes to ensure
maximum system performance.
• When using the air conditioning sys-
tem, you may notice clear water drip-
ping (or even puddling) on the ground
under the passenger side of the vehi-
cle. This is a normal system operation
characteristic.
• Operating the air conditioning system
in the recirculated air position provides
maximum cooling, however, continual
operation in this mode may cause the
air inside the vehicle to become stale.• During cooling operation, you may
occasionally notice a misty air flow
because of rapid cooling and humid air
intake. This is a normal system opera-
tion characteristic.
• If you operate air conditioner exces-
sively, the difference between the tem-
perature of the outside air and that of
the windshield could cause the outer
surface of the windshield to fog up,
causing loss of visibility. In this case,
set the mode selection knob or button
to the position and fan speed con-
trol to the lower speed.
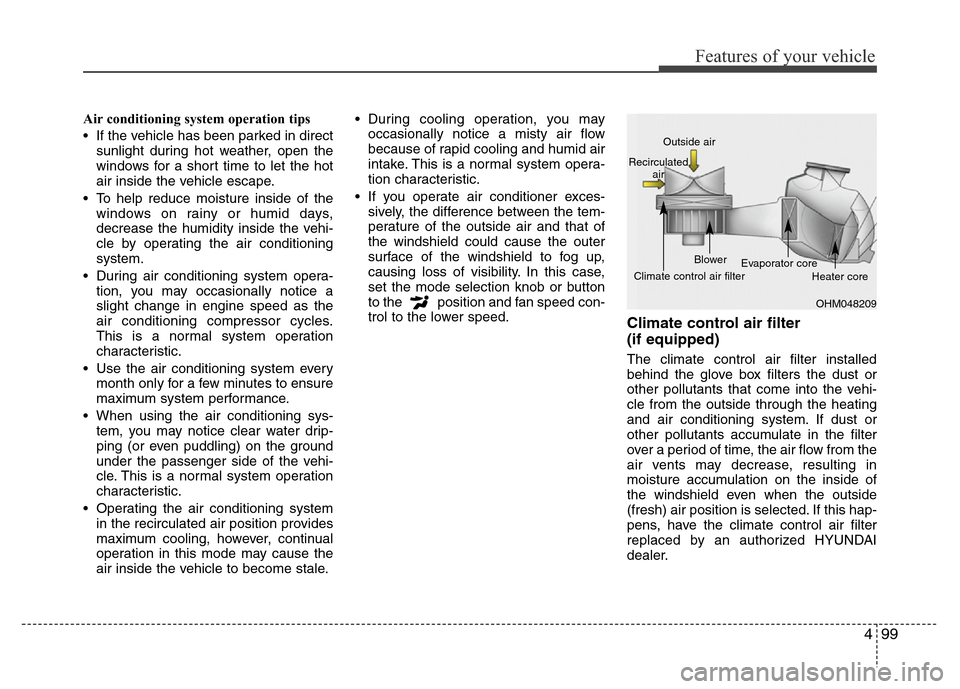
Climate control air filter
(if equipped)
The climate control air filter installed
behind the glove box filters the dust or
other pollutants that come into the vehi-
cle from the outside through the heating
and air conditioning system. If dust or
other pollutants accumulate in the filter
over a period of time, the air flow from the
air vents may decrease, resulting in
moisture accumulation on the inside of
the windshield even when the outside
(fresh) air position is selected. If this hap-
pens, have the climate control air filter
replaced by an authorized HYUNDAI
dealer.
OHM048209 Outside air
Recirculated
air
Climate control air filterBlower
Evaporator core
Heater core
Page 371 of 403
759
Maintenance
No.Fuse ratingSymbol Protected component
F127.5AA/C Control Module, E/R Fuse & Relay (RLY.14), Cluster Ionizer, Driver/Passenger Seat Warmer
Module, Driver/Passenger CCS Control Module
F1310ASteering Wheel Heater
F1420AE/R Fuse & Relay Box (F11, F12, F13)
F1520A-
F1610AData Link Connector, A/C Control Module, Driver/Passenger Door Module, Instrument Cluster, Tire
Pressure Monitoring Module, Auto Light & Photo Sensor
F1710A
Cup Holder Lamp, Rear Door Lamp LH/RH, MAP Lamp, Driver/Passenger Door Mood Lamp,
Driver/Passenger Door Lamp, Driver/Passenger Foot Lamp, Driver/Passenger Door Scuff Lamp,
Rear Door Mood Lamp LH/RH, Vanity Lamp Switch LH/RH, Rear Door Scuff Lamp LH/RH,
Trunk Room Lamp, Center Tray Lamp, Garnish Lamp LH/RH, Rear Personal Lamp Center/LH/RH
F1825AWiper Motor, E/R Fuse & Relay Box (RLY. 8, RLY. 11, RLY. 12)
F1910AImmobilizer Module, Smart Key Control Module, Stop Lamp Switch, Start Stop Button Switch
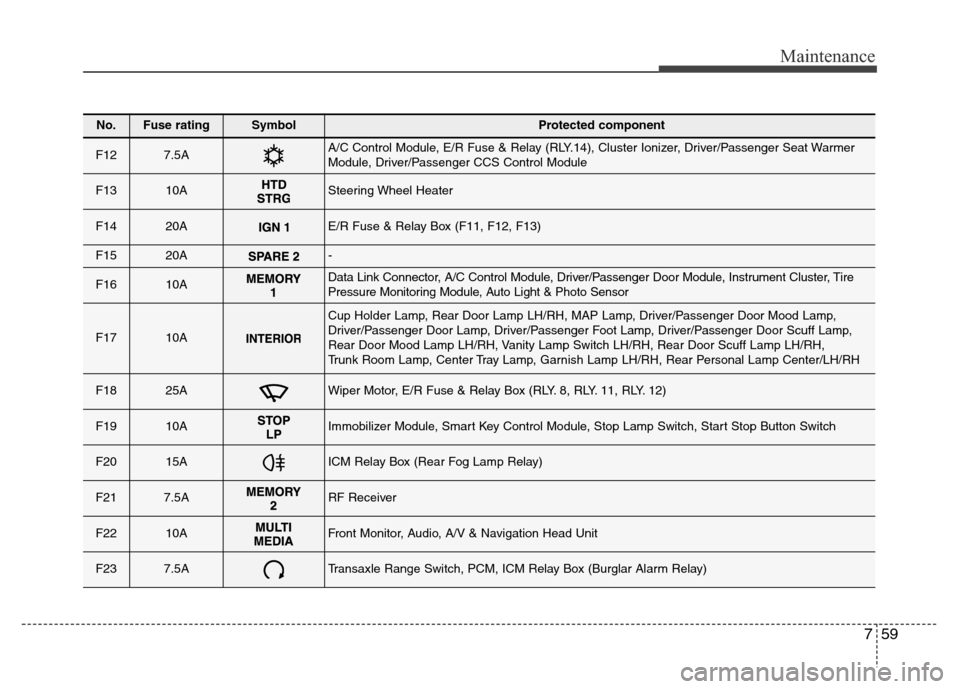
F2015AICM Relay Box (Rear Fog Lamp Relay)
F217.5ARF Receiver
F2210AFront Monitor, Audio, A/V & Navigation Head Unit
F237.5ATransaxle Range Switch, PCM, ICM Relay Box (Burglar Alarm Relay)
Page 377 of 403
765
Maintenance
LIGHT BULBS
Use only the bulbs of the specified
wattage.
✽NOTICE
After driving in heavy rain or washing
the vehicle, headlight and taillight lenses
could appear frosty. This condition is
caused by the temperature difference
between the lamp inside and outside.
This is similar to the condensation on
your windows inside your vehicle during
the rain and doesn’t indicate a problem
with your vehicle. If the water leaks into
the lamp bulb circuitry, have the vehicle
checked by an authorized HYUNDAI
dealer.
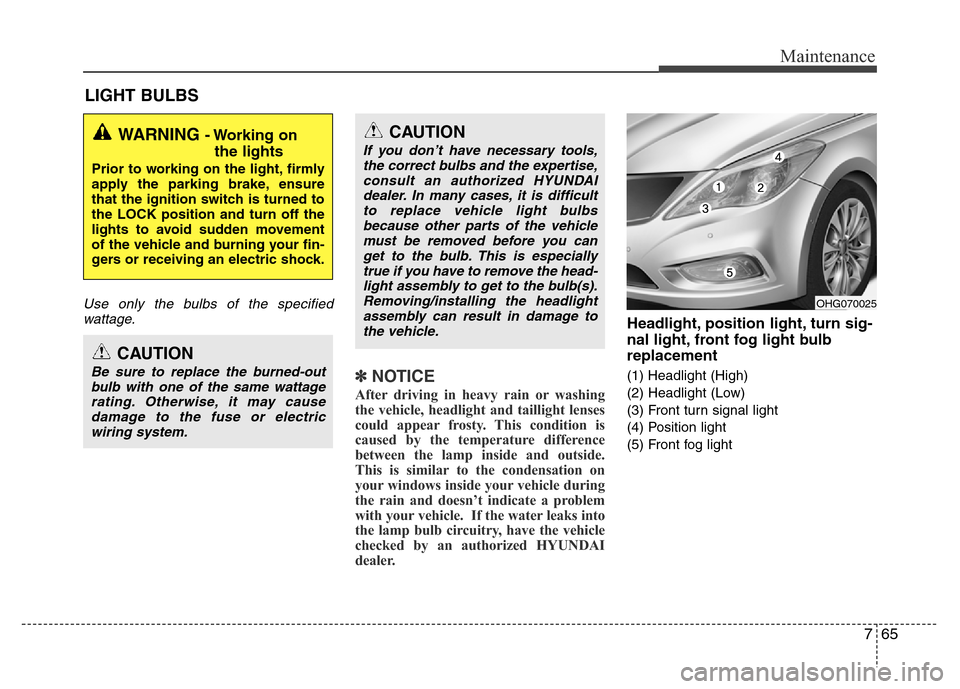
Headlight, position light, turn sig-
nal light, front fog light bulb
replacement
(1) Headlight (High)
(2) Headlight (Low)
(3) Front turn signal light
(4) Position light
(5) Front fog light
WARNING - Working on
the lights
Prior to working on the light, firmly
apply the parking brake, ensure
that the ignition switch is turned to
the LOCK position and turn off the
lights to avoid sudden movement
of the vehicle and burning your fin-
gers or receiving an electric shock.
CAUTION
Be sure to replace the burned-out
bulb with one of the same wattage
rating. Otherwise, it may cause
damage to the fuse or electric
wiring system.
CAUTION
If you don’t have necessary tools,
the correct bulbs and the expertise,
consult an authorized HYUNDAI
dealer. In many cases, it is difficult
to replace vehicle light bulbs
because other parts of the vehicle
must be removed before you can
get to the bulb. This is especially
true if you have to remove the head-
light assembly to get to the bulb(s).
Removing/installing the headlight
assembly can result in damage to
the vehicle.
OHG070025
Page 380 of 403
Maintenance
68 7
Traffic Change (For Europe)
The low beam light distribution is asym-
metric.
If you go abroad to a country with oppo-
site traffic direction, this asymmetric part
will dazzle oncoming car driver. To pre-
vent dazzle, ECE regulation demand
several technical solutions (ex. automatic
change system, adhesive sheet, down
aiming). This headlamps are designed
not to dazzle opposite drivers. So, you do
not need to change your headlamps in a
country with opposite traffic direction.
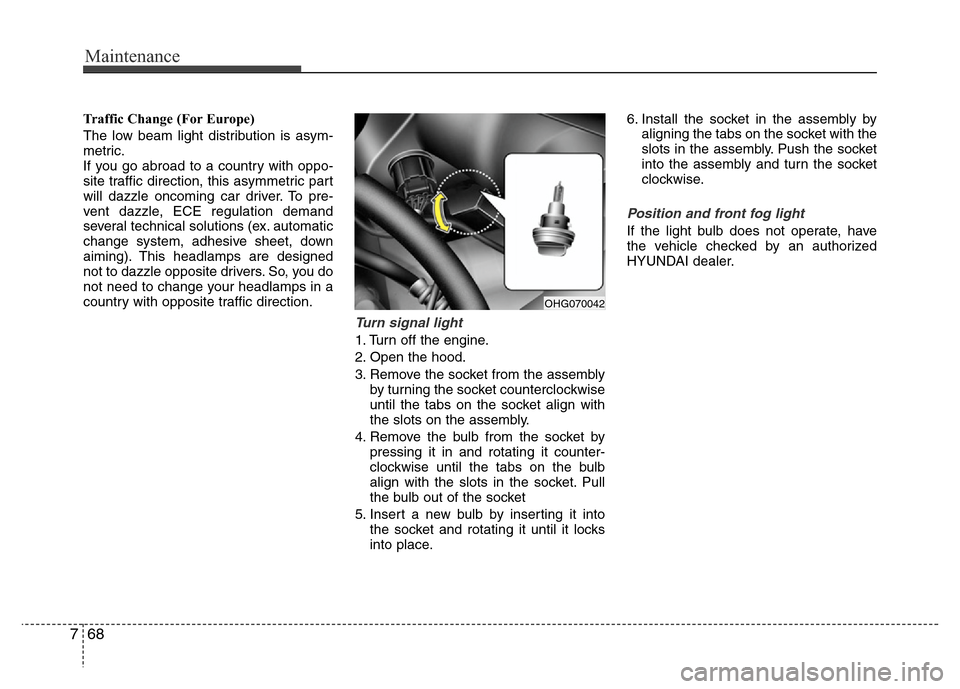
Turn signal light
1. Turn off the engine.
2. Open the hood.
3. Remove the socket from the assembly
by turning the socket counterclockwise
until the tabs on the socket align with
the slots on the assembly.
4. Remove the bulb from the socket by
pressing it in and rotating it counter-
clockwise until the tabs on the bulb
align with the slots in the socket. Pull
the bulb out of the socket
5. Insert a new bulb by inserting it into
the socket and rotating it until it locks
into place.6. Install the socket in the assembly by
aligning the tabs on the socket with the
slots in the assembly. Push the socket
into the assembly and turn the socket
clockwise.
Position and front fog light
If the light bulb does not operate, have
the vehicle checked by an authorized
HYUNDAI dealer.
OHG070042
Page 381 of 403
769
Maintenance
Side repeater light bulb replace-
ment
If the light bulb does not operate, have
the vehicle checked by an authorized
HYUNDAI dealer.
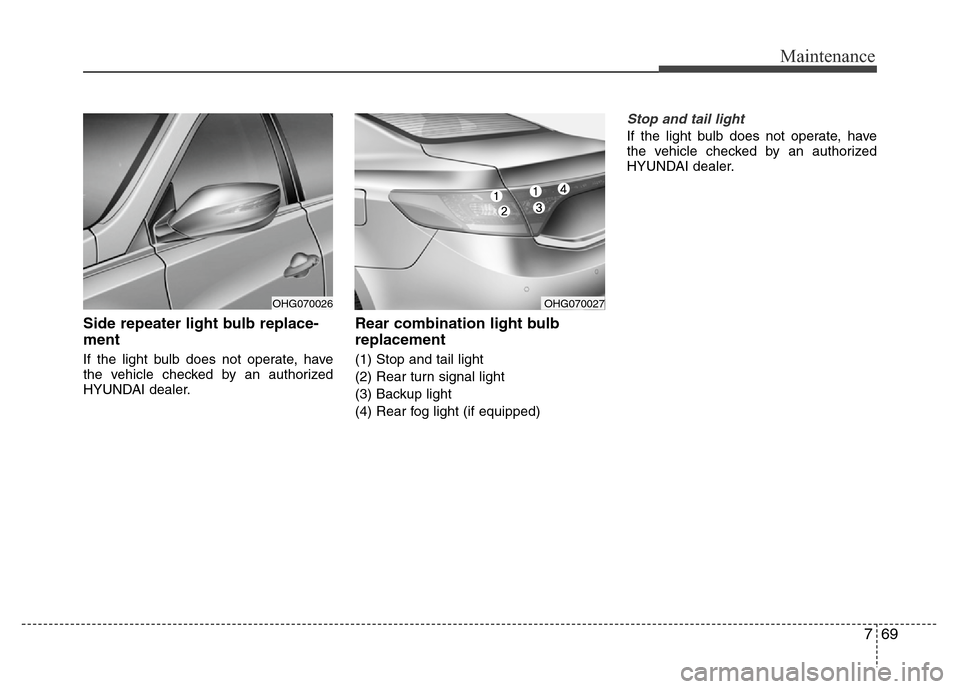
Rear combination light bulb
replacement
(1) Stop and tail light
(2) Rear turn signal light
(3) Backup light
(4) Rear fog light (if equipped)
Stop and tail light
If the light bulb does not operate, have
the vehicle checked by an authorized
HYUNDAI dealer.
OHG070026OHG070027
Page 383 of 403
771
Maintenance
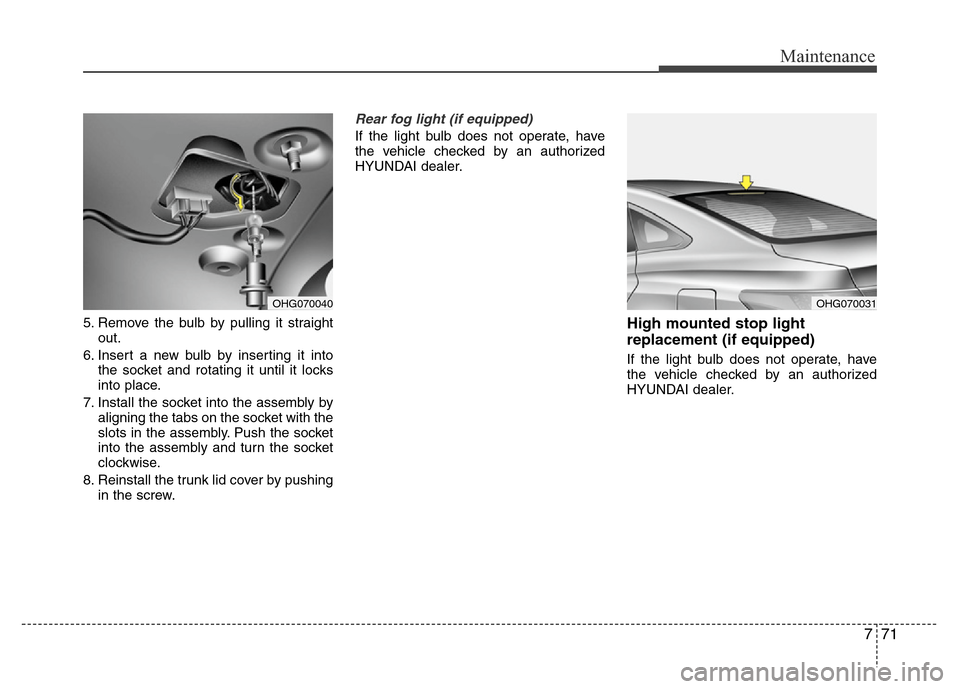
5. Remove the bulb by pulling it straight
out.
6. Insert a new bulb by inserting it into
the socket and rotating it until it locks
into place.
7. Install the socket into the assembly by
aligning the tabs on the socket with the
slots in the assembly. Push the socket
into the assembly and turn the socket
clockwise.
8. Reinstall the trunk lid cover by pushing
in the screw.
Rear fog light (if equipped)
If the light bulb does not operate, have
the vehicle checked by an authorized
HYUNDAI dealer.
High mounted stop light
replacement (if equipped)
If the light bulb does not operate, have
the vehicle checked by an authorized
HYUNDAI dealer.
OHG070040OHG070031