buttons Hyundai Azera 2014 Owner's Manual
[x] Cancel search | Manufacturer: HYUNDAI, Model Year: 2014, Model line: Azera, Model: Hyundai Azera 2014Pages: 403, PDF Size: 9.28 MB
Page 83 of 403
47
Features of your vehicle
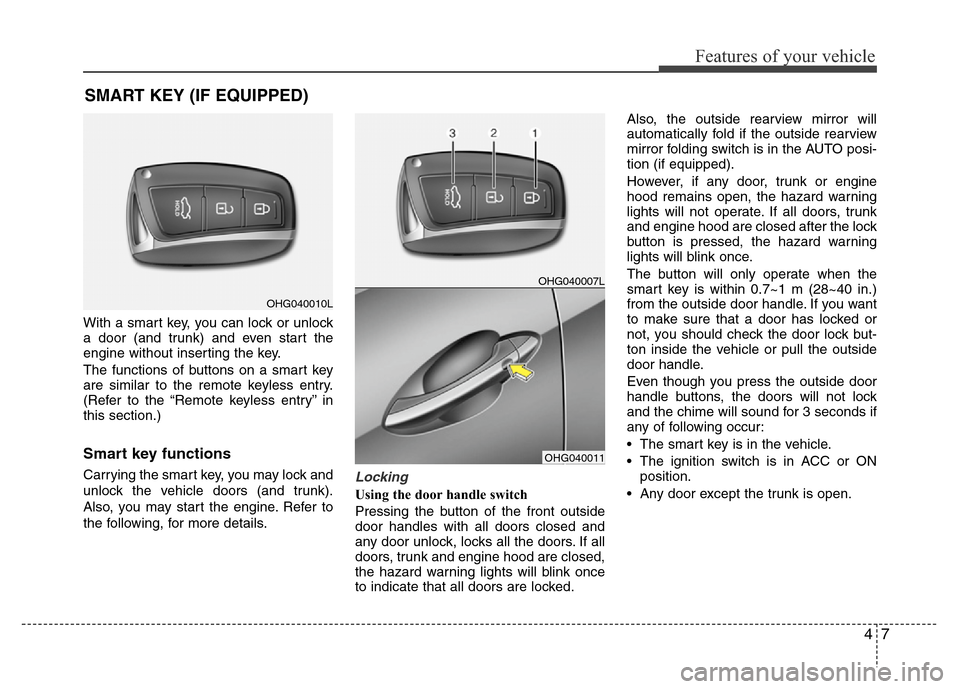
With a smart key, you can lock or unlock
a door (and trunk) and even start the
engine without inserting the key.
The functions of buttons on a smart key
are similar to the remote keyless entry.
(Refer to the “Remote keyless entry” in
this section.)
Smart key functions
Carrying the smart key, you may lock and
unlock the vehicle doors (and trunk).
Also, you may start the engine. Refer to
the following, for more details.Locking
Using the door handle switch
Pressing the button of the front outside
door handles with all doors closed and
any door unlock, locks all the doors. If all
doors, trunk and engine hood are closed,
the hazard warning lights will blink once
to indicate that all doors are locked.Also, the outside rearview mirror will
automatically fold if the outside rearview
mirror folding switch is in the AUTO posi-
tion (if equipped).
However, if any door, trunk or engine
hood remains open, the hazard warning
lights will not operate. If all doors, trunk
and engine hood are closed after the lock
button is pressed, the hazard warning
lights will blink once.
The button will only operate when the
smart key is within 0.7~1 m (28~40 in.)
from the outside door handle. If you want
to make sure that a door has locked or
not, you should check the door lock but-
ton inside the vehicle or pull the outside
door handle.
Even though you press the outside door
handle buttons, the doors will not lock
and the chime will sound for 3 seconds if
any of following occur:
• The smart key is in the vehicle.
• The ignition switch is in ACC or ON
position.
• Any door except the trunk is open.
SMART KEY (IF EQUIPPED)
OHG040010L
OHG040007L
OHG040011
Page 111 of 403
435
Features of your vehicle
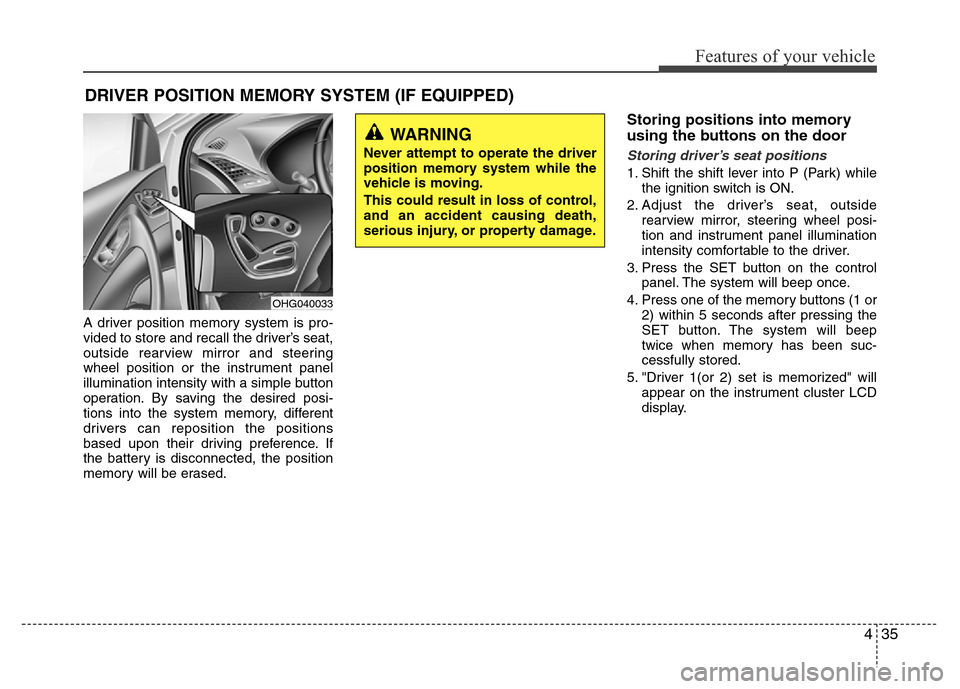
A driver position memory system is pro-
vided to store and recall the driver’s seat,
outside rearview mirror and steering
wheel position or the instrument panel
illumination intensity with a simple button
operation. By saving the desired posi-
tions into the system memory, different
drivers can reposition the positions
based upon their driving preference. If
the battery is disconnected, the position
memory will be erased.
Storing positions into memory
using the buttons on the door
Storing driver’s seat positions
1. Shift the shift lever into P (Park) while
the ignition switch is ON.
2. Adjust the driver’s seat, outside
rearview mirror, steering wheel posi-
tion and instrument panel illumination
intensity comfortable to the driver.
3. Press the SET button on the control
panel. The system will beep once.
4. Press one of the memory buttons (1 or
2) within 5 seconds after pressing the
SET button. The system will beep
twice when memory has been suc-
cessfully stored.
5. "Driver 1(or 2) set is memorized" will
appear on the instrument cluster LCD
display.
DRIVER POSITION MEMORY SYSTEM (IF EQUIPPED)
WARNING
Never attempt to operate the driver
position memory system while the
vehicle is moving.
This could result in loss of control,
and an accident causing death,
serious injury, or property damage.
OHG040033
Page 179 of 403
4103
Features of your vehicle
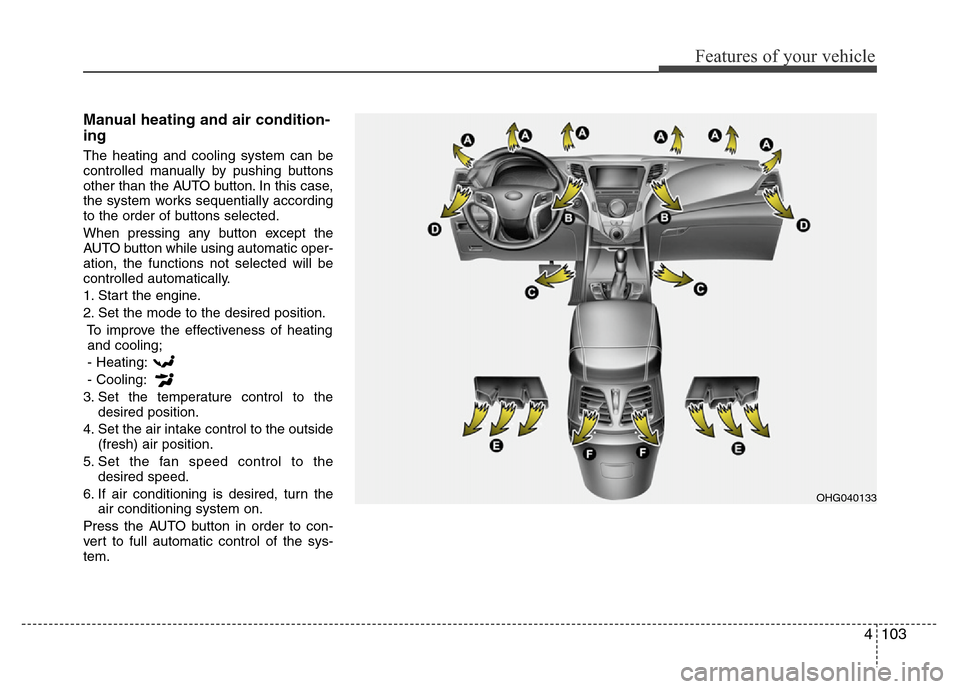
Manual heating and air condition-
ing
The heating and cooling system can be
controlled manually by pushing buttons
other than the AUTO button. In this case,
the system works sequentially according
to the order of buttons selected.
When pressing any button except the
AUTO button while using automatic oper-
ation, the functions not selected will be
controlled automatically.
1. Start the engine.
2. Set the mode to the desired position.
To improve the effectiveness of heating
and cooling;
- Heating:
- Cooling:
3. Set the temperature control to the
desired position.
4. Set the air intake control to the outside
(fresh) air position.
5. Set the fan speed control to the
desired speed.
6. If air conditioning is desired, turn the
air conditioning system on.
Press the AUTO button in order to con-
vert to full automatic control of the sys-
tem.
OHG040133
Page 202 of 403
Features of your vehicle
126 4
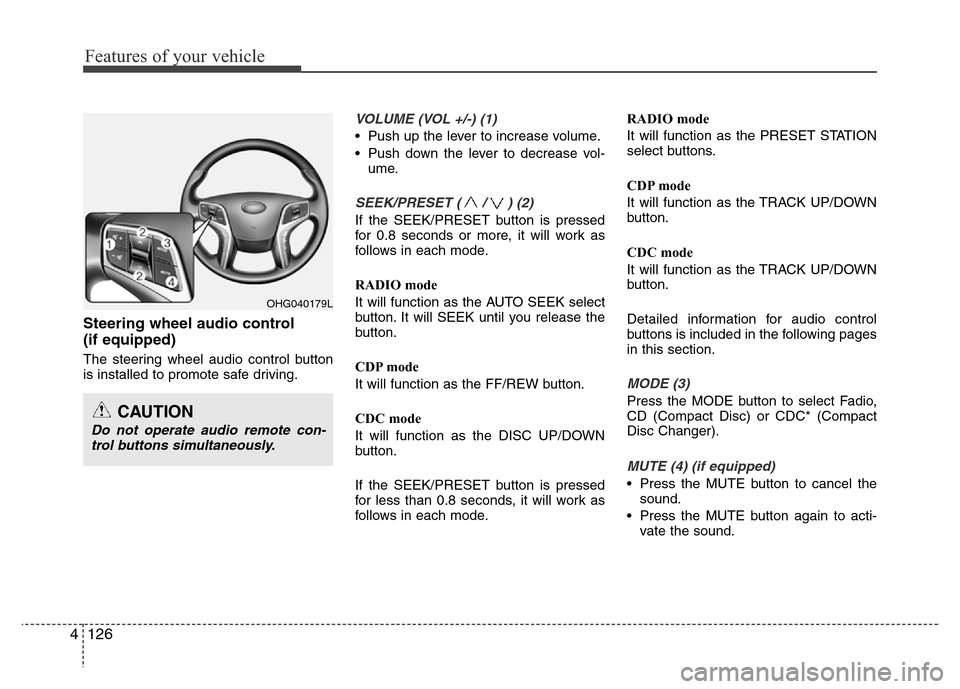
Steering wheel audio control
(if equipped)
The steering wheel audio control button
is installed to promote safe driving.
VOLUME (VOL +/-) (1)
• Push up the lever to increase volume.
• Push down the lever to decrease vol-
ume.
SEEK/PRESET ( / ) (2)
If the SEEK/PRESET button is pressed
for 0.8 seconds or more, it will work as
follows in each mode.
RADIO mode
It will function as the AUTO SEEK select
button. It will SEEK until you release the
button.
CDP mode
It will function as the FF/REW button.
CDC mode
It will function as the DISC UP/DOWN
button.
If the SEEK/PRESET button is pressed
for less than 0.8 seconds, it will work as
follows in each mode.RADIO mode
It will function as the PRESET STATION
select buttons.
CDP mode
It will function as the TRACK UP/DOWN
button.
CDC mode
It will function as the TRACK UP/DOWN
button.
Detailed information for audio control
buttons is included in the following pages
in this section.
MODE (3)
Press the MODE button to select Fadio,
CD (Compact Disc) or CDC* (Compact
Disc Changer).
MUTE (4) (if equipped)
• Press the MUTE button to cancel the
sound.
• Press the MUTE button again to acti-
vate the sound.
OHG040179L
CAUTION
Do not operate audio remote con-
trol buttons simultaneously.
Page 207 of 403
4131
Features of your vehicle
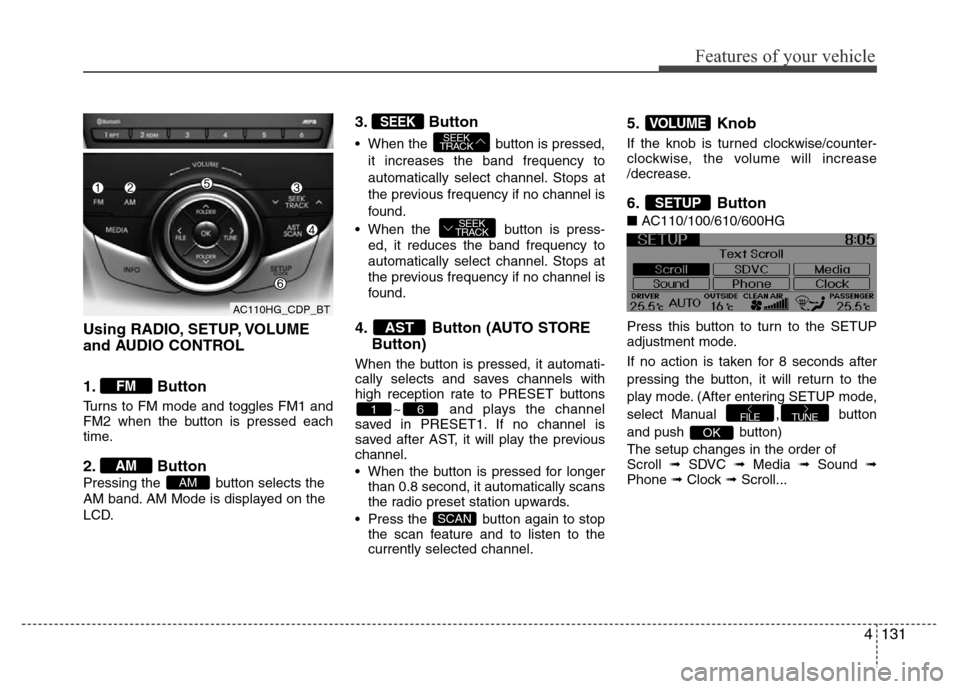
Using RADIO, SETUP, VOLUME
and AUDIO CONTROL
1. Button
Turns to FM mode and toggles FM1 and
FM2 when the button is pressed each
time.
2. Button
Pressing the button selects the
AM band. AM Mode is displayed on the
LCD.
3. Button
• When the button is pressed,
it increases the band frequency to
automatically select channel. Stops at
the previous frequency if no channel is
found.
• When the button is press-
ed, it reduces the band frequency to
automatically select channel. Stops at
the previous frequency if no channel is
found.
4. Button (AUTO STORE
Button)
When the button is pressed, it automati-
cally selects and saves channels with
high reception rate to PRESET buttons
~ and plays the channel
saved in PRESET1. If no channel is
saved after AST, it will play the previous
channel.
• When the button is pressed for longer
than 0.8 second, it automatically scans
the radio preset station upwards.
• Press the button again to stop
the scan feature and to listen to the
currently selected channel.
5. Knob
If the knob is turned clockwise/counter-
clockwise, the volume will increase
/decrease.
6. Button
■AC110/100/610/600HG
Press this button to turn to the SETUP
adjustment mode.
If no action is taken for 8 seconds after
pressing the button, it will return to the
play mode. (After entering SETUP mode,
select Manual , button
and push button)
The setup changes in the order of
Scroll ➟ SDVC ➟ Media ➟ Sound ➟
Phone ➟ Clock ➟ Scroll...
OK
TUNEFILE
SETUP
VOLUME
SCAN
61
AST
SEEK
TRACK
SEEK
TRACKSEEK
AM
AM
FM
AC110HG_CDP_BT
Page 210 of 403
Features of your vehicle
134 4
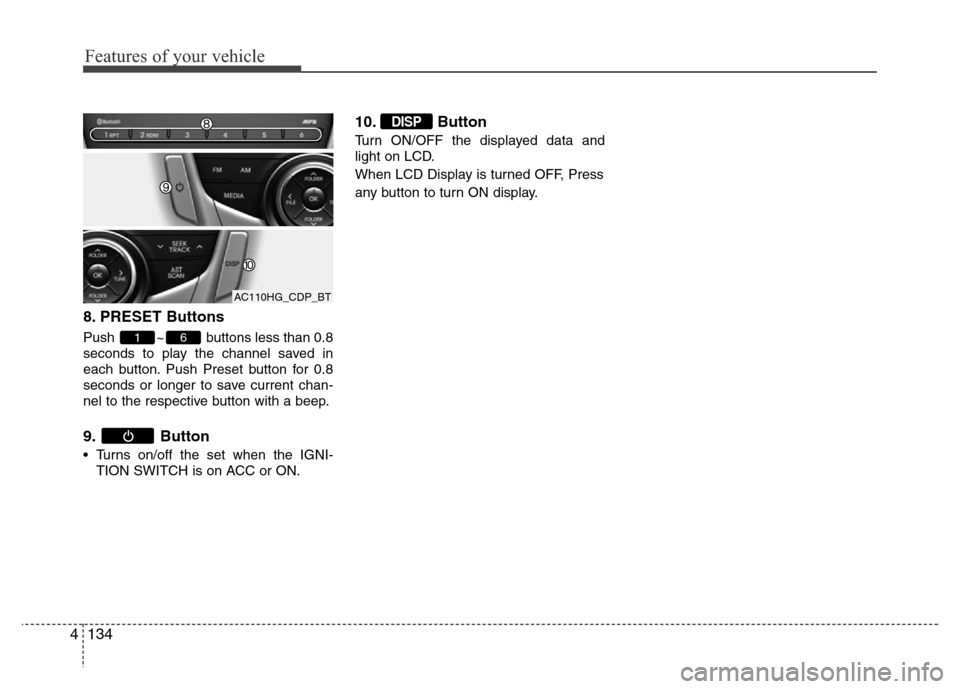
8. PRESET Buttons
Push ~ buttons less than 0.8
seconds to play the channel saved in
each button. Push Preset button for 0.8
seconds or longer to save current chan-
nel to the respective button with a beep.
9. Button
• Turns on/off the set when the IGNI-
TION SWITCH is on ACC or ON.
10. Button
Turn ON/OFF the displayed data and
light on LCD.
When LCD Display is turned OFF, Press
any button to turn ON display.
DISP
61
AC110HG_CDP_BT
Page 218 of 403
Features of your vehicle
142 4
✽NOTICE FOR USING THE
iPod®DEVICE
• Some iPod®models might not support
the communication protocol and the
files will not be played.
Supported iPod
®models:
- iPod®Mini
- iPod®4th (Photo) ~ 6th (Classic) gen-
eration
- iPod
®Nano 1st~4th generation
- iPod®Touch 1st~2nd generation
• The order of search or playback of
songs in the iPod
®can be different
from the order searched in the audio
system.
• If the iPod
®disabled due to its own
malfunction, reset the iPod®. (Reset:
Refer to iPod®manual)
• An iPod®may not operate normally
on low battery.
• Some iPod
®devices, such as the
iPhone, can be connected through the
Bluetooth
®Wireless Technology inter-
face. The device must have audio
Bluetooth
®Wireless Technology capa-
bility (such as for stereo headphone
Bluetooth
®Wireless Technology). The
device can play, but it will not be con-
trolled by the audio system.
CAUTION IN USING THE
iPod®DEVICE
• The Hyundai iPod®Power Cable is
needed in order to operate iPod®
with the audio buttons on the
audio system. The USB cable pro-
vided by Apple may cause mal-
function and should not be used
for Hyundai vehicles.
❋ The Hyundai iPod®Power Cable
may be purchased through your
Hyundai Dealership.
• When connecting iPod
®with the
iPod®Power Cable, insert the con-
nector to the multimedia socket
completely. If not inserted com-
pletely, communications between
iPod
®and audio may be interrupt-
ed.
• When adjusting the sound effects of
the iPod
®and the audio system, the
sound effects of both devices will
overlap and might reduce or distort
the quality of the sound.
• Deactivate (turn off) the equalizer
function of an iPod
®when adjust-
ing the audio system’s volume,
and turn off the equalizer of the
audio system when using the
equalizer of an iPod
®.
(Continued)
(Continued)
• When the iPod®cable is connect-
ed, the system can be switched to
AUX mode even without iPod
®
device and may cause noise.
Disconnect the iPod®cable when
you are not using the iPod®
device.
• When not using iPod®with car
audio, detach the iPod®cable from
iPod. Otherwise, iPod®may remain
in accessory mode, and may not
work properly.
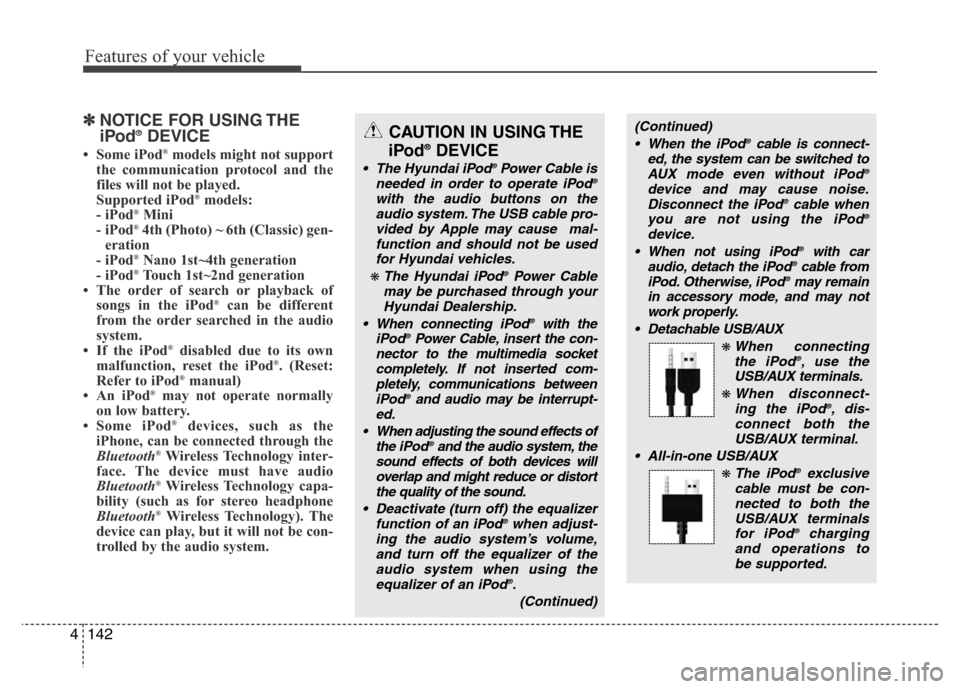
• Detachable USB/AUX
❋ When connecting
the iPod®, use the
USB/AUX terminals.
❋ When disconnect-
ing the iPod®, dis-
connect both the
USB/AUX terminal.
• All-in-one USB/AUX
❋ The iPod®exclusive
cable must be con-
nected to both the
USB/AUX terminals
for iPod
®charging
and operations to
be supported.
Page 221 of 403
4145
Features of your vehicle
• Changing Priority
If several phones are paired with the
audio system, the system attempts to
connect following order when the
Bluetooth®Wireless Technology system
is enabled:
1) “Priority” checked phone.
2) Previously connected phone
3) Gives up auto connection.
1. Press button to enter SETUP
mode.
2. Select “Phone”, then “Priority” in
PHONE menu.
3. Select desired phone name from the
list shown.
• Turning
Bluetooth®Wireless
Technology ON/OFF
Bluetooth®Wireless Technology Wireless
Technology system can be enabled (ON)
or disabled (OFF) by this menu.
- If
Bluetooth®Wireless Technology is
disabled, all the commands related to
Bluetooth®Wireless Technology system
prompts whether you wish to turn
Bluetooth®Wireless Technology ON or
not.
1. Press button to enter SETUP
mode.
2. Select “Phone”, then “BT Off ” in
PHONE menu.
■Receiving a Phone Call
When receiving a phone call, a ringtone
is audible from speakers and the audio
system changes into telephone mode.
When receiving a phone call, “Incoming”
message and incoming phone number (if
available) are displayed on the audio.
• To Answer a Call:
- Press button on the steering
wheel.
• To Reject a Call:
- Press button on the steering
wheel.
• To Adjust Ring Volume:
- Use VOLUME buttons on the steering
wheel.
• To Transfer a Call to the Phone (Private
Call):
- Press and hold button on the
steering wheel until the audio system
transfers a call to the phone.
■Talking on the Phone
When talking on the phone, “Active Calls”
message and the other party’s phone
number (if available) are displayed on the
audio.
• To Mute the Microphone
- Press button on the steering
wheel.
• To Finish a Call
- Press button on the steering
wheel.
■Making a Phone Call
A Call Back can be made by pressing
button on the steering wheel.
- This is the same function as using the
button solely on the cellular
phone.
NOTE:
Some phone models require pressing
button twice to make a call.
MUTE
SETUP
SETUP