set clock Hyundai Azera 2017 Owner's Manual
[x] Cancel search | Manufacturer: HYUNDAI, Model Year: 2017, Model line: Azera, Model: Hyundai Azera 2017Pages: 520, PDF Size: 16.33 MB
Page 221 of 520
Features of your vehicle
142
4
The power outlet is designed to pro-
vide power for mobile telephones or
other devices designed to operate
with vehicle electrical systems. The
devices should draw less than 10
amps with the engine running.
Use the power outlet only when the
engine is running and remove the
accessory plug after use. Using the
accessory plug for prolonged peri-
ods of time with the engine off could
cause the battery to discharge.
Only use 12V electric accessories which are less than 10A in electric
capacity. If not, it could lead to an
overheated power outlet or electric
wiring in the vehicle and electric
systems may malfunction.
Adjust the air-conditioner or heater to the lowest operating level when
using the power outlet.
Close the cover when not in use.
Some electronic devices can cause electronic interference when
plugged into a vehicle’s power
outlet. These devices may cause
excessive audio static and malfunc-
tions in other electronic systems or
devices used in your vehicle.Digital clock (if equipped)
Whenever the battery terminals or
related fuses are disconnected, you
must reset the time.
Detailed information on setting the
clock is described in Audio system
section 4.
WARNING
Do not adjust the clock while
driving. You may lose your
steering control and cause an
accident that results in severe
personal injury or death.
WARNING - Electricshock
Do not put fingers or objects
(pin, coin, etc.) into a power out-
let and do not touch with wet
hands. You may get an electric
shock.
CAUTION
Make sure that the electric devices are plugged in secure-ly. If not, it could cause a mal-function of electric systems.
If you use an electric device with a battery, electric currentmay flow from the electricdevice into the vehicle andmay cause a malfunction ofelectric systems. Only useelectric devices which couldprevent inverse current.
Page 222 of 520
4143
Features of your vehicle
Clock with AVN system (if equipped)
You can set the clock by using the
Audio or Navigation.
GPS Time check
The clock is automatically updated
through the navigation system.
GPS Time non-check
The clock can be manually adjusted.
1. Select the "Setup" key on the Head Unit.
2. Select the "Clock".
3. Select the "Date/Time Settings".
For more details, please refer to
the manual that was supplied with
your vehicle.
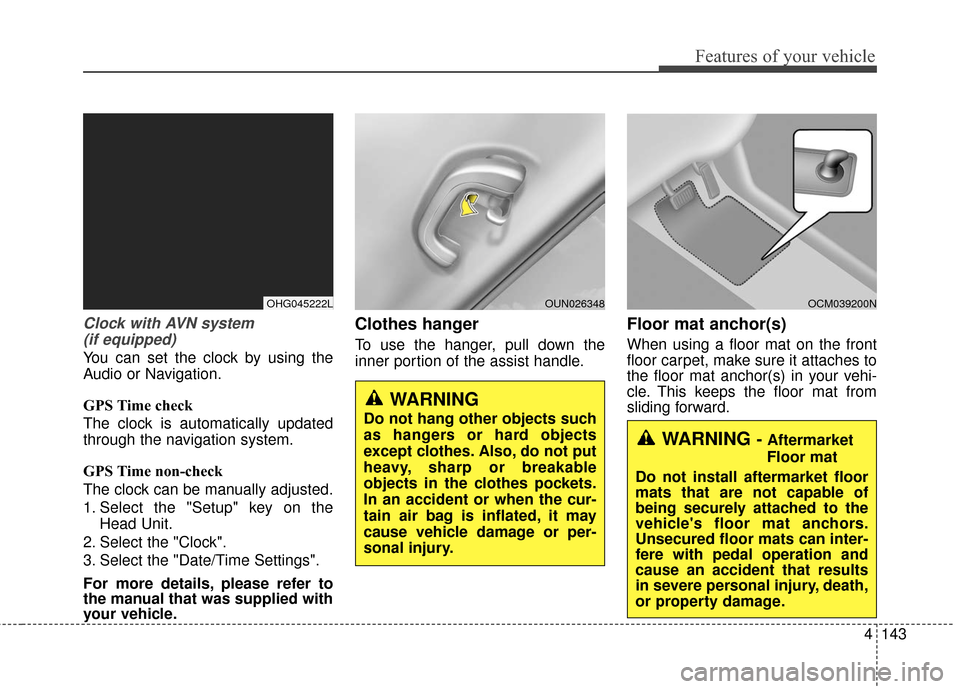
Clothes hanger
To use the hanger, pull down the
inner portion of the assist handle.
Floor mat anchor(s)
When using a floor mat on the front
floor carpet, make sure it attaches to
the floor mat anchor(s) in your vehi-
cle. This keeps the floor mat from
sliding forward.
WARNING - Aftermarket
Floor mat
Do not install aftermarket floor
mats that are not capable of
being securely attached to the
vehicle's floor mat anchors.
Unsecured floor mats can inter-
fere with pedal operation and
cause an accident that results
in severe personal injury, death,
or property damage.
WARNING
Do not hang other objects such
as hangers or hard objects
except clothes. Also, do not put
heavy, sharp or breakable
objects in the clothes pockets.
In an accident or when the cur-
tain air bag is inflated, it may
cause vehicle damage or per-
sonal injury.
OCM039200NOUN026348OHG045222L
Page 244 of 520
Features of your vehicle
165
4
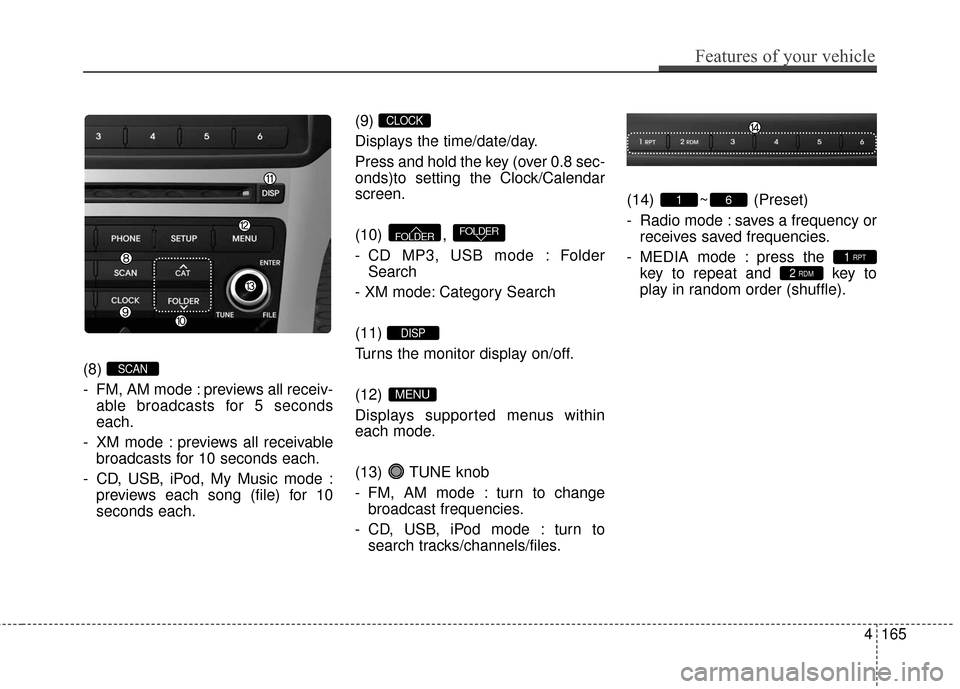
(8)
- FM, AM mode : previews all receiv-
able broadcasts for 5 seconds
each.
- XM mode : previews all receivable broadcasts for 10 seconds each.
- CD, USB, iPod, My Music mode : previews each song (file) for 10
seconds each. (9)
Displays the time/date/day.
Press and hold the key (over 0.8 sec-
onds)to setting the Clock/Calendar
screen.
(10) ,
- CD MP3, USB mode : Folder
Search
- XM mode: Category Search
(11)
Turns the monitor display on/off.
(12)
Displays supported menus within
each mode.
(13) TUNE knob
- FM, AM mode : turn to change broadcast frequencies.
- CD, USB, iPod mode : turn to search tracks/channels/files. (14) ~ (Preset)
- Radio mode : saves a frequency or
receives saved frequencies.
- MEDIA mode : press the key to repeat and key to
play in random order (shuffle).
2 RDM1 RPT
61
MENU
DISP
FOLDERFOLDER
CLOCK
SCAN
Page 291 of 520
![Hyundai Azera 2017 Owners Manual Features of your vehicle
212
4
USING SETUP
Starting Mode
Press the key to display the
Setup screen.
You can select and control options
related to [Display], [Sound], [Clock /
Calendar], [Phone] and [ Hyundai Azera 2017 Owners Manual Features of your vehicle
212
4
USING SETUP
Starting Mode
Press the key to display the
Setup screen.
You can select and control options
related to [Display], [Sound], [Clock /
Calendar], [Phone] and [](/img/35/14459/w960_14459-290.png)
Features of your vehicle
212
4
USING SETUP
Starting Mode
Press the key to display the
Setup screen.
You can select and control options
related to [Display], [Sound], [Clock /
Calendar], [Phone] and [System].
✽ ✽
NOTICE
Once settings have been changed,
press the key to return to the
previous menu.
Display Settings
Adjusting the Brightness
Press the key Select [Display]
Select [Brightness]
Use the TUNE knob to adjust the
screen brightness or set the
Brightness on Automatic, Daylight, or
Nightmode.
(1) Automatic : Adjusts the bright- ness automatically
(2) Day : Always maintains the bright- ness on high
(3) Night : Always maintains the brightness on low
Mode Pop-up
Press the key Select [Display]
Select [Mode Pop up]
This feature is used to display the
Mode Pop-up screen when entering
radio and media modes.
When this feature is turned on,
pressing the or key
will display the Mode Pop-up screen.
✽ ✽ NOTICE
The media Mode Pop-up screen can
be displayed only when two or more
media modes have been connected.
MEDIA RADIO
SETUP
SETUP
MENU
SETUP
Page 294 of 520
![Hyundai Azera 2017 Owners Manual 4215
Features of your vehicle
Clock/Calendar Setting
Clock Setting
Press the key Select [Clock/
Calendar] Select [Clock Settings]
Use the TUNE knob to select the
Hour, Minutes and AM/PM setting
and Hyundai Azera 2017 Owners Manual 4215
Features of your vehicle
Clock/Calendar Setting
Clock Setting
Press the key Select [Clock/
Calendar] Select [Clock Settings]
Use the TUNE knob to select the
Hour, Minutes and AM/PM setting
and](/img/35/14459/w960_14459-293.png)
4215
Features of your vehicle
Clock/Calendar Setting
Clock Setting
Press the key Select [Clock/
Calendar] Select [Clock Settings]
Use the TUNE knob to select the
Hour, Minutes and AM/PM setting
and use TUNE knob to change
settings.
Calendar Setting
Press the key Select [Clock/
Calendar] Select [Calendar
Settings]
Use the TUNE knob to select the
Month, Day, and Year and use TUNE knob to change settings.
Time Format
Press the key Select [Clock/
Calendar] Select [Time Format]
This feature is used to change the
clock format between 12hr or 24hr.
Clock Display
Press the key Select [Clock/
Calendar] Select [Clock Display
(Power off)]
This feature is used to display a clock
on the screen when the audio sys-
tem is turned off.SETUP
SETUP SETUP
SETUP
Page 407 of 520
615
What to do in an emergency
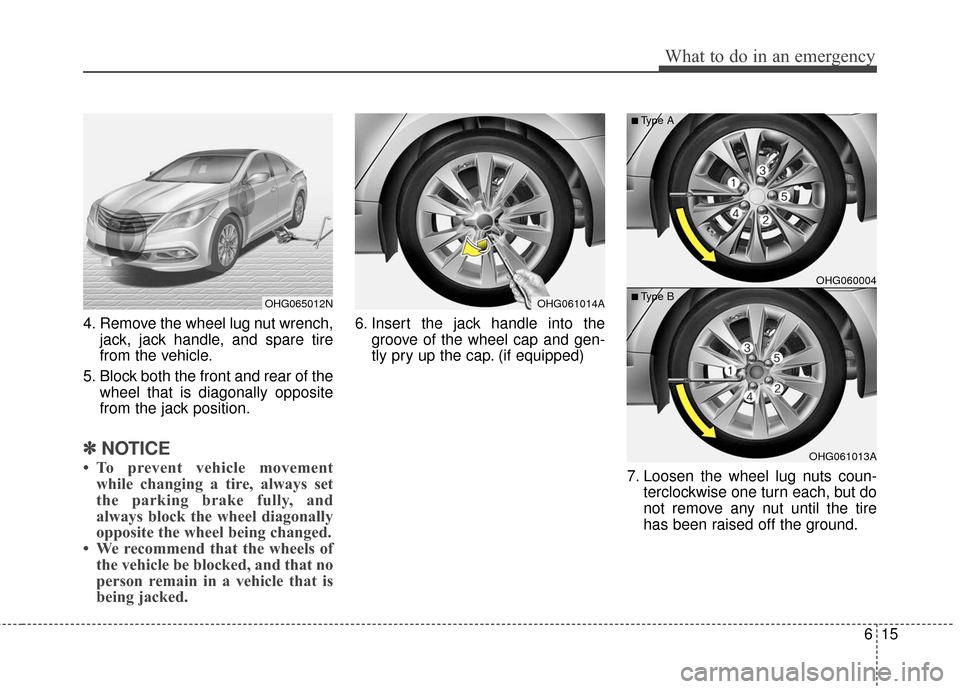
4. Remove the wheel lug nut wrench,jack, jack handle, and spare tire
from the vehicle.
5. Block both the front and rear of the wheel that is diagonally opposite
from the jack position.
✽ ✽NOTICE
• To prevent vehicle movement
while changing a tire, always set
the parking brake fully, and
always block the wheel diagonally
opposite the wheel being changed.
• We recommend that the wheels of the vehicle be blocked, and that no
person remain in a vehicle that is
being jacked.
6. Insert the jack handle into the
groove of the wheel cap and gen-
tly pry up the cap. (if equipped)
7. Loosen the wheel lug nuts coun-terclockwise one turn each, but do
not remove any nut until the tire
has been raised off the ground.
OHG065012NOHG061014A
OHG060004
OHG061013A
■Type A
■ Type B
Page 414 of 520
What to do in an emergency
22
6
When towing your vehicle in an
emergency without wheel dollies :
1. Set the ignition switch in the ACC
position.
2. Place the shift lever in N (Neutral).
3. Release the parking brake.
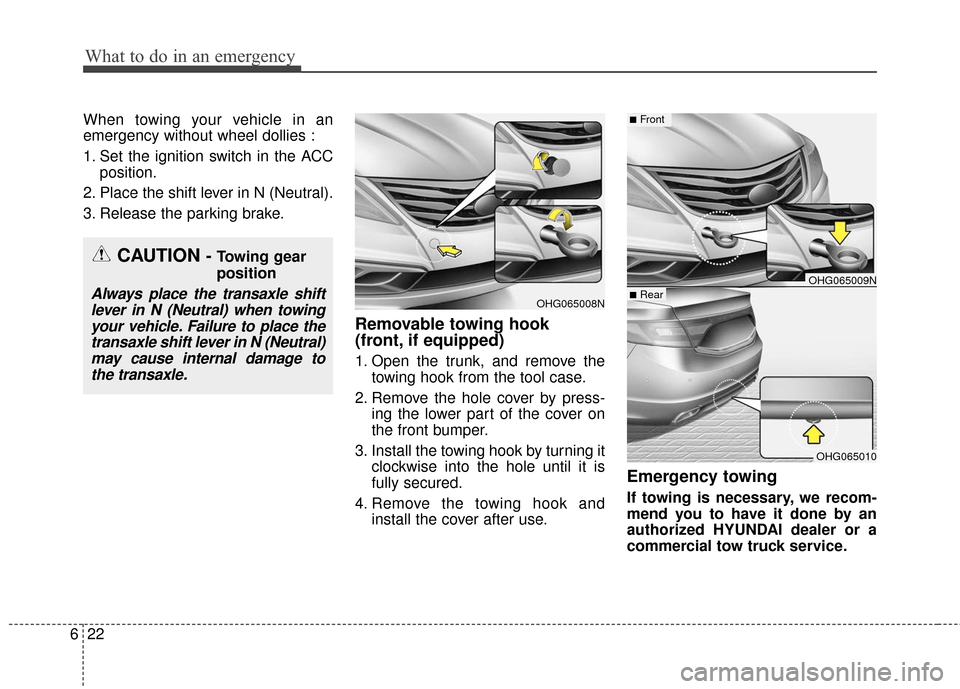
Removable towing hook
(front, if equipped)
1. Open the trunk, and remove the towing hook from the tool case.
2. Remove the hole cover by press- ing the lower part of the cover on
the front bumper.
3. Install the towing hook by turning it clockwise into the hole until it is
fully secured.
4. Remove the towing hook and install the cover after use.
Emergency towing
If towing is necessary, we recom-
mend you to have it done by an
authorized HYUNDAI dealer or a
commercial tow truck service.
OHG065008N
OHG065009N■Rear
■Front
OHG065010
CAUTION - Towing gear
position
Always place the transaxle shiftlever in N (Neutral) when towingyour vehicle. Failure to place thetransaxle shift lever in N (Neutral)may cause internal damage tothe transaxle.
Page 452 of 520
Maintenance
36
7
Battery recharging
Your vehicle has a maintenance-free,
calcium-based battery.
If the battery becomes discharged
in a short time (because, for exam-
ple, the headlights or interior lights
were left on while the vehicle was
not in use), recharge it by slow
charging (trickle) for 10 hours.
If the battery gradually discharges because of high electric load while
the vehicle is being used, recharge
it at 20-30A for two hours. When recharging the battery, observe
the following precautions:
The battery must be removed from
the vehicle and placed in an area
with good ventilation.
Watch the battery during charging, and stop or reduce the charging
rate if the battery cells begin
gassing (boiling) violently or if the
temperature of the electrolyte of
any cell exceeds 120°F (49°C).
Wear eye protection when check- ing the battery during charging.
Disconnect the battery charger in the following order.
1. Turn off the battery charger main switch.
2. Unhook the negative clamp from the negative battery terminal.
3. Unhook the positive clamp from the positive battery terminal.
Before performing maintenance or recharging the battery, turn off all
accessories and stop the engine.
The negative battery cable must be removed first and installed last
when the battery is disconnected.
Reset items
Items should be reset after the bat-
tery has been discharged or the bat-
tery has been disconnected.
Auto up/down window (See section 4)
Sunroof (See section 4)
Driver position memory system (See section 4)
Trip computer (See section 4)
Climate control system (See section 4)
Clock (See section 4)
Audio (See section 4)
Page 469 of 520
753
Maintenance
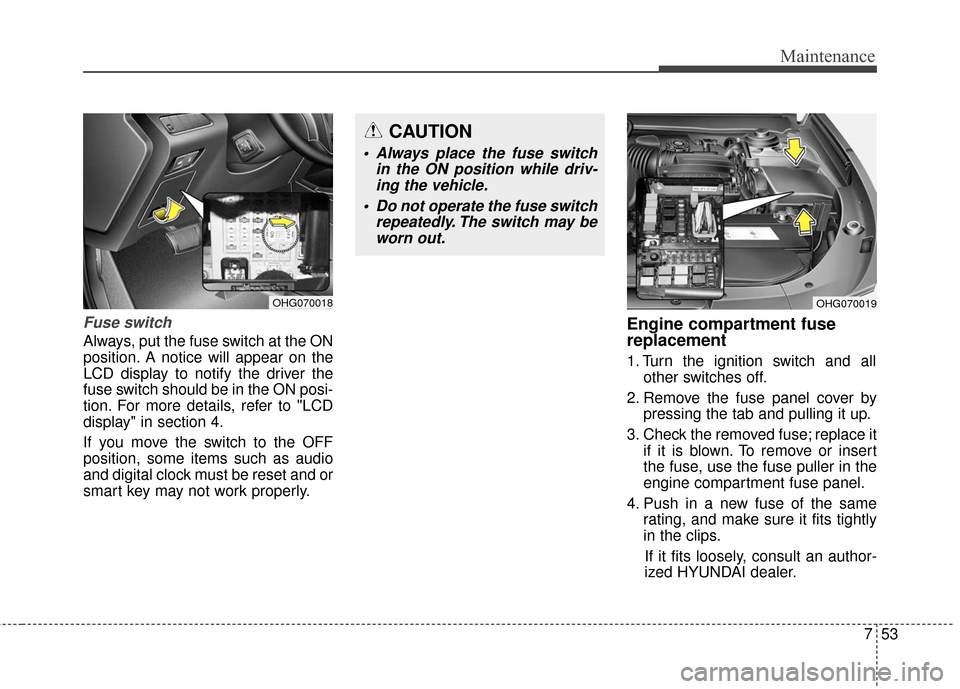
Fuse switch
Always, put the fuse switch at the ON
position. A notice will appear on the
LCD display to notify the driver the
fuse switch should be in the ON posi-
tion. For more details, refer to "LCD
display" in section 4.
If you move the switch to the OFF
position, some items such as audio
and digital clock must be reset and or
smart key may not work properly.
Engine compartment fuse
replacement
1. Turn the ignition switch and allother switches off.
2. Remove the fuse panel cover by pressing the tab and pulling it up.
3. Check the removed fuse; replace it if it is blown. To remove or insert
the fuse, use the fuse puller in the
engine compartment fuse panel.
4. Push in a new fuse of the same rating, and make sure it fits tightly
in the clips.
If it fits loosely, consult an author-
ized HYUNDAI dealer.
OHG070019OHG070018
CAUTION
Always place the fuse switch in the ON position while driv-ing the vehicle.
Do not operate the fuse switch repeatedly. The switch may beworn out.
Page 514 of 520
Index
6I
Immobilizer system ........................................................4-4
Indicators and warnings ................................................4-77
Inside rearview mirror ..................................................4-46
Instrument cluster ..........................................................4-58Engine coolant temperature gauge ............................4-60
Fuel gauge ................................................................4-60
Instrument panel illumination ..................................4-59
LCD display ..............................................................4-63
LCD display warnings and indicators ......................4-77
Odometer ..................................................................4-61
Speedometer ..............................................................4-59
Tachometer ................................................................4-59
Trip computer mode ..................................................4-64
User settings mode ....................................................4-68
Warning and indicators ............................................4-77
Instrument panel fuse replacement ................................7-52
Instrument panel illumination........................................4-59
Instrument panel overview ..............................................2-5
Interior care....................................................................7-78\
Interior features............................................................4-140 Ashtray ....................................................................4-14\
0
Clothes hanger ........................................................4-143
Cup holder ..............................................................4-140
Digital clock ............................................................4-142 Floor mat anchor(s) ................................................4-143
Power outlet ............................................................4-141
Rear curtain ............................................................4-144
Side curtain..............................................................4-145
Sunvisor ..................................................................4-141
Interior light ................................................................4-109 Door courtesy lamp ................................................4-111
Glove box lamp ......................................................4-111
Map lamp ................................................................4-109
Mood lamp ..............................................................4-110
Room lamp ..............................................................4-110
Trunk room lamp ....................................................4-110
Vanity mirror lamp ..................................................4-111
Interior overview..............................................................2-4
Jack and tools ................................................................6-13
Jump starting....................................................................6-5
Keys ........................................................................\
........4-3
J
K
I