coolant level Hyundai Coupe 2005 Owner's Guide
[x] Cancel search | Manufacturer: HYUNDAI, Model Year: 2005, Model line: Coupe, Model: Hyundai Coupe 2005Pages: 478, PDF Size: 13.44 MB
Page 430 of 478

6OWNER MAINTENANCE
12CHANGING THE AIR CLEANER FILTER
G070A01E-AAT To change the filter, unsnap the clips
around the cover. When this is done, the cover can be lifted off, the oldfilter removed and the new filter put in its place. Genuine Hyundai Replace- ment Parts are recommended.
HGK5010
! CAUTION:
o Operating your vehicle without a proper air cleaner filter in place can result in excessive engine wear.
o When removing the air cleaner filter, be careful that dust or dirtdoes not enter the air intake. These may result in damage tothe air cleaner filter.
G050D04E
!WARNING:
The cooling fan is controlled by engine coolant temperature and may sometimes operate even whenthe engine is not running. Use extreme caution when working near the blades of the cooling fan sothat you are not injured by a rotat- ing fan blade. As the engine cool- ant temperature decreases, the fanwill automatically shut off. This is a normal condition.
5. Prepare a suitable quantity of new
engine coolant (refer to section 9) and pour this into the radiator.
6. Start the engine with the radiator cap still removed and continue to add coolant as the level decreases as air is expelled from the system.When the level remains constant, replace the radiator cap and re- plenish the coolant reservoir.
7. When the engine is hot, check to ensure that no coolant leaks arepresent.
gkfluk-6.p65 11/21/2005, 3:00 PM
12
Page 433 of 478
6
OWNER MAINTENANCE
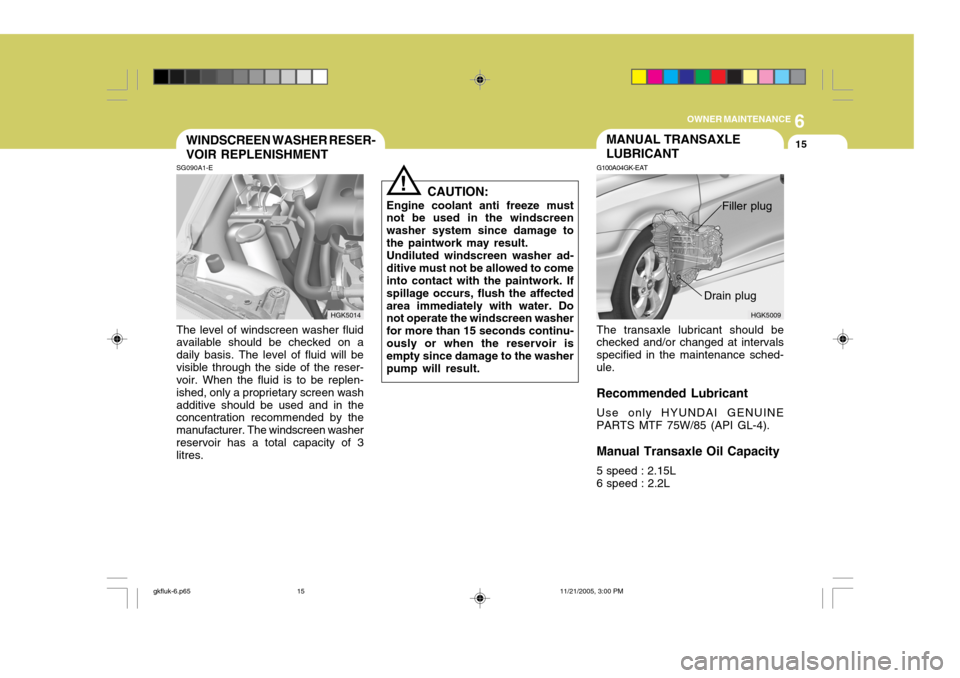
15MANUAL TRANSAXLE LUBRICANT
HGK5009
G100A04GK-EAT The transaxle lubricant should be checked and/or changed at intervals specified in the maintenance sched-ule. Recommended Lubricant Use only HYUNDAI GENUINE PARTS MTF 75W/85 (API GL-4). Manual Transaxle Oil Capacity 5 speed : 2.15L 6 speed : 2.2L Drain plugSG090A1-E The level of windscreen washer fluid available should be checked on a daily basis. The level of fluid will bevisible through the side of the reser- voir. When the fluid is to be replen- ished, only a proprietary screen washadditive should be used and in the concentration recommended by the manufacturer. The windscreen washerreservoir has a total capacity of 3 litres. CAUTION:
Engine coolant anti freeze mustnot be used in the windscreen washer system since damage tothe paintwork may result.Undiluted windscreen washer ad-ditive must not be allowed to come into contact with the paintwork. If spillage occurs, flush the affectedarea immediately with water. Do not operate the windscreen washer for more than 15 seconds continu-ously or when the reservoir is empty since damage to the washer pump will result.
WINDSCREEN WASHER RESER- VOIR REPLENISHMENT
!
HGK5014
Filler plug
gkfluk-6.p65
11/21/2005, 3:00 PM
15
Page 447 of 478
6
OWNER MAINTENANCE
29
G290B01GK-EAT
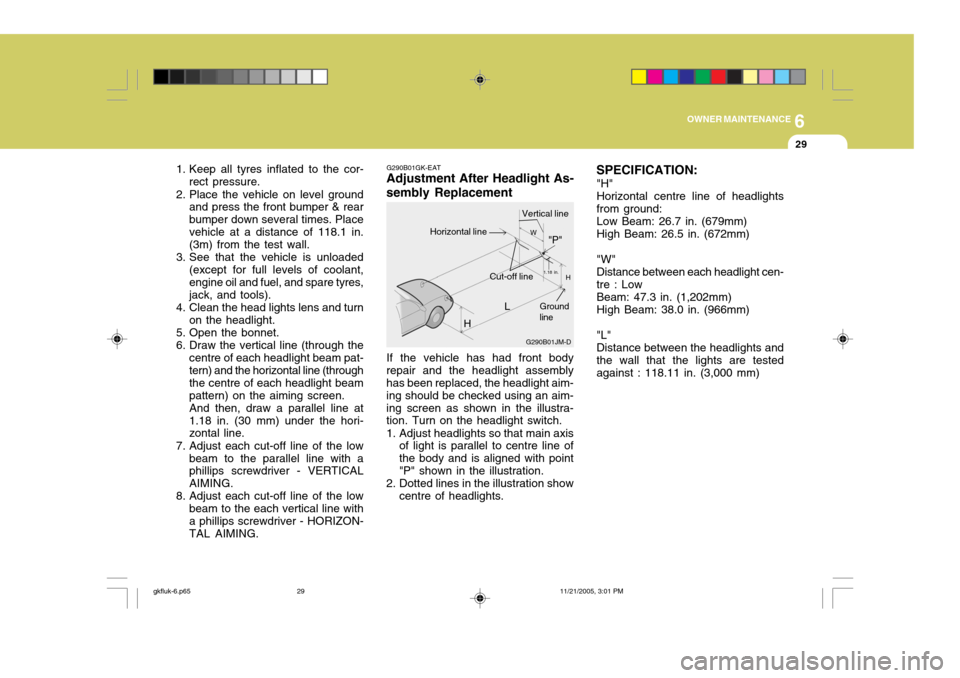
Adjustment After Headlight As- sembly Replacement
If the vehicle has had front body
repair and the headlight assembly has been replaced, the headlight aim- ing should be checked using an aim-ing screen as shown in the illustra- tion. Turn on the headlight switch.
1. Adjust headlights so that main axis of light is parallel to centre line of the body and is aligned with point"P" shown in the illustration.
2. Dotted lines in the illustration show centre of headlights. SPECIFICATION:
"H" Horizontal centre line of headlights from ground: Low Beam: 26.7 in. (679mm) High Beam: 26.5 in. (672mm) "W" Distance between each headlight cen- tre : Low Beam: 47.3 in. (1,202mm) High Beam: 38.0 in. (966mm) "L" Distance between the headlights and the wall that the lights are tested against : 118.11 in. (3,000 mm)
1. Keep all tyres inflated to the cor-
rect pressure.
2. Place the vehicle on level ground and press the front bumper & rearbumper down several times. Placevehicle at a distance of 118.1 in. (3m) from the test wall.
3. See that the vehicle is unloaded (except for full levels of coolant, engine oil and fuel, and spare tyres,jack, and tools).
4. Clean the head lights lens and turn on the headlight.
5. Open the bonnet.
6. Draw the vertical line (through the centre of each headlight beam pat- tern) and the horizontal line (through the centre of each headlight beampattern) on the aiming screen.And then, draw a parallel line at1.18 in. (30 mm) under the hori- zontal line.
7. Adjust each cut-off line of the low beam to the parallel line with aphillips screwdriver - VERTICAL AIMING.
8. Adjust each cut-off line of the low beam to the each vertical line witha phillips screwdriver - HORIZON- TAL AIMING. L
G290B01JM-D
W
H
H Cut-off line"P"
Vertical lineHorizontal line
Ground line
1.18 in.
gkfluk-6.p65
11/21/2005, 3:01 PM
29