turn signal bulb Hyundai Coupe 2005 Owner's Manual
[x] Cancel search | Manufacturer: HYUNDAI, Model Year: 2005, Model line: Coupe, Model: Hyundai Coupe 2005Pages: 478, PDF Size: 13.44 MB
Page 66 of 478
1FEATURES OF YOUR HYUNDAI
52MULTI-FUNCITION LIGHT SWITCH
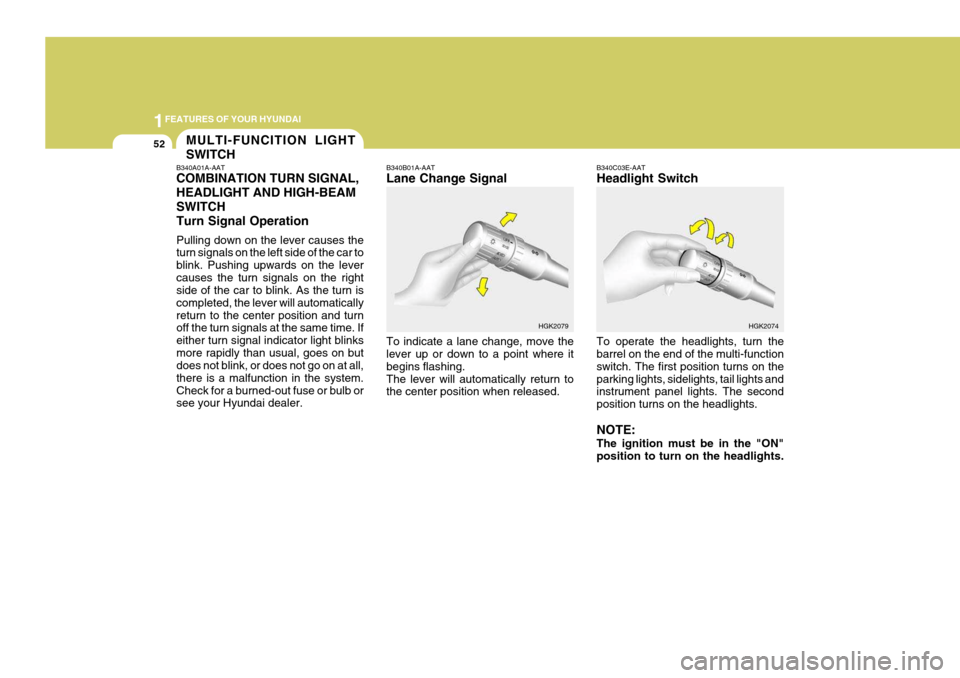
B340A01A-AAT COMBINATION TURN SIGNAL, HEADLIGHT AND HIGH-BEAMSWITCHTurn Signal Operation Pulling down on the lever causes the turn signals on the left side of the car to blink. Pushing upwards on the levercauses the turn signals on the right side of the car to blink. As the turn is completed, the lever will automaticallyreturn to the center position and turn off the turn signals at the same time. If either turn signal indicator light blinksmore rapidly than usual, goes on but does not blink, or does not go on at all, there is a malfunction in the system.Check for a burned-out fuse or bulb or see your Hyundai dealer. B340B01A-AAT Lane Change Signal To indicate a lane change, move the lever up or down to a point where it begins flashing.The lever will automatically return to the center position when released.
B340C03E-AAT Headlight Switch To operate the headlights, turn the barrel on the end of the multi-function switch. The first position turns on theparking lights, sidelights, tail lights and instrument panel lights. The second position turns on the headlights. NOTE: The ignition must be in the "ON" position to turn on the headlights.
HGK2079
HGK2074
Page 230 of 478
6 DO-IT-YOURSELF MAINTENANCE
32
HGK5025
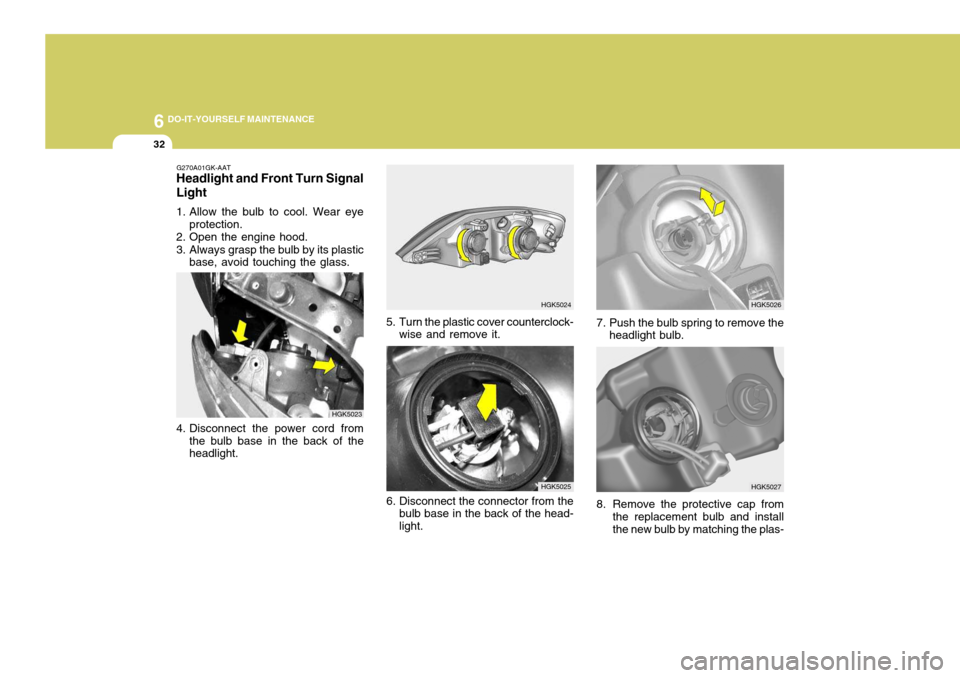
8. Remove the protective cap from
the replacement bulb and install the new bulb by matching the plas-
G270A01GK-AAT
Headlight and Front Turn Signal Light
1. Allow the bulb to cool. Wear eye
protection.
2. Open the engine hood.
3. Always grasp the bulb by its plastic base, avoid touching the glass.
HGK5024
5. Turn the plastic cover counterclock- wise and remove it.
4. Disconnect the power cord from the bulb base in the back of the headlight. HGK5023
6. Disconnect the connector from thebulb base in the back of the head- light. 7. Push the bulb spring to remove the
headlight bulb.
HGK5027
HGK5026
Page 231 of 478
6
DO-IT-YOURSELF MAINTENANCE
33
!WARNING:
This halogen bulb contains gas under pressure and if impacted could shatter, resulting in flying fragments. Always wear eye pro-tection when servicing the bulb. Protect the bulb against abrasions or scratches and against liquidswhen lighted. Turn the bulb on only when installing in a head- light. Replace the headlight if dam-aged or cracked. Keep the bulb out of the reach of children and dispose of the used bulb with care.
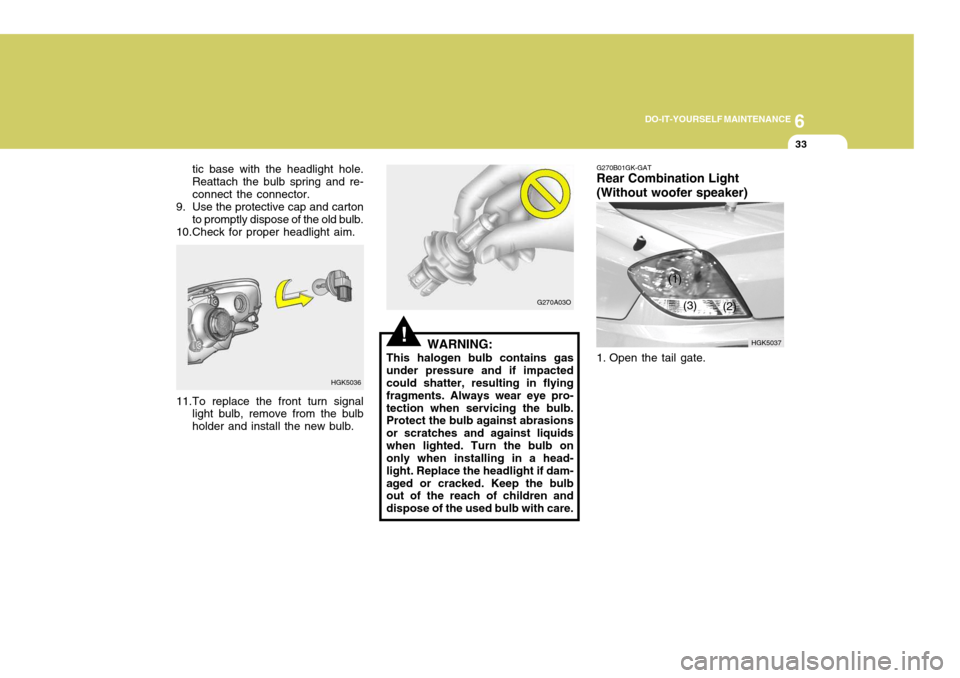
11.To replace the front turn signal
light bulb, remove from the bulbholder and install the new bulb. HGK5036
tic base with the headlight hole.Reattach the bulb spring and re-connect the connector.
9. Use the protective cap and carton
to promptly dispose of the old bulb.
10.Check for proper headlight aim.
G270A03OG270B01GK-GAT Rear Combination Light (Without woofer speaker)
1. Open the tail gate.
HGK5037
(1)
(2)
(3)
Page 232 of 478
6 DO-IT-YOURSELF MAINTENANCE
34
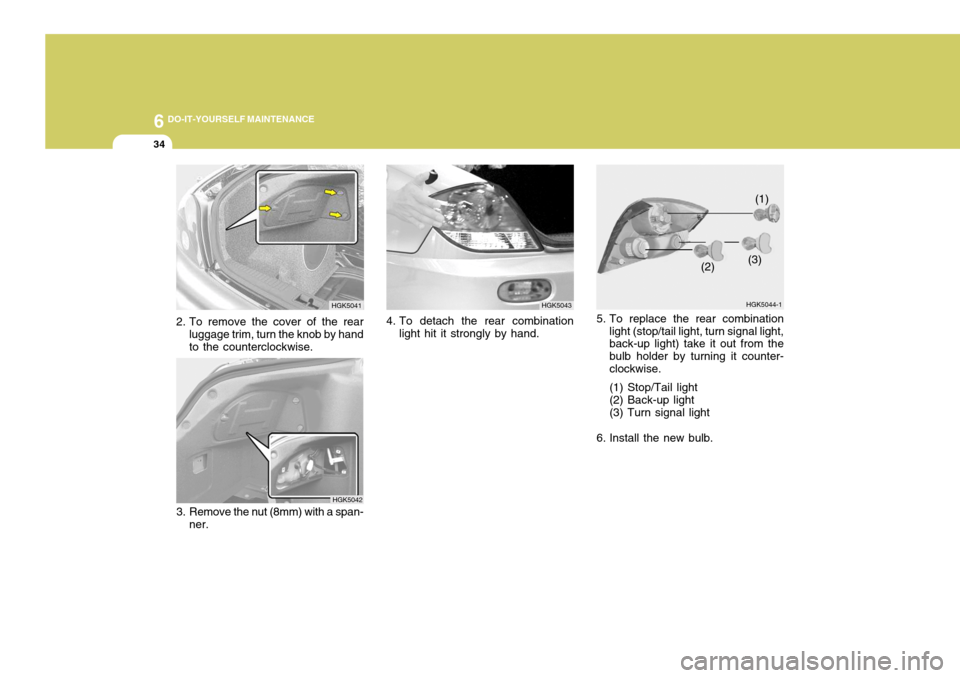
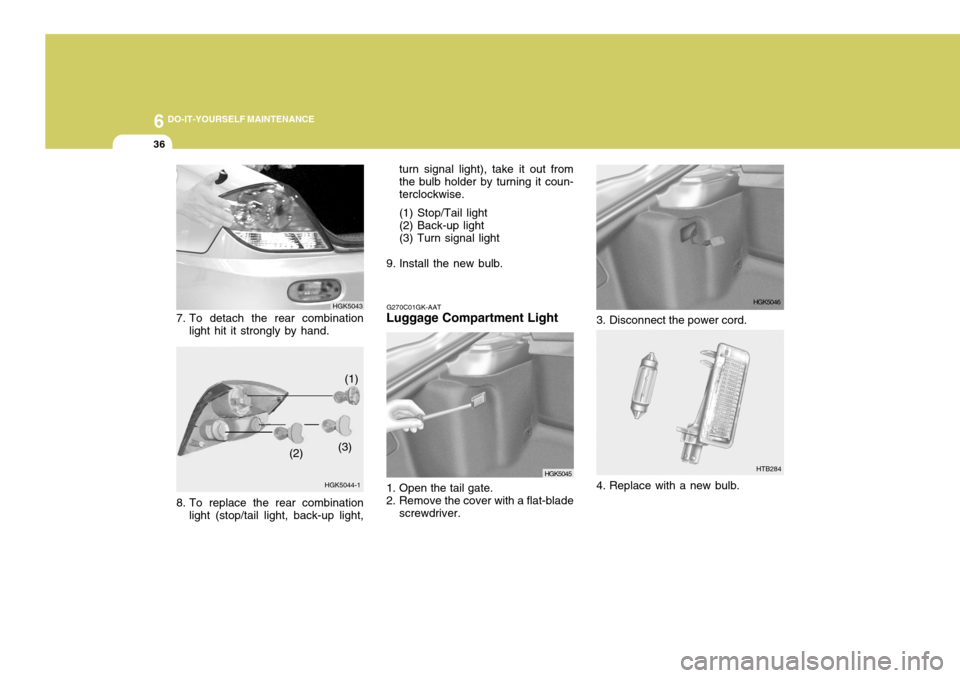
5. To replace the rear combination
light (stop/tail light, turn signal light, back-up light) take it out from the bulb holder by turning it counter-clockwise. (1) Stop/Tail light (2) Back-up light (3) Turn signal light
6. Install the new bulb. HGK5044-1
(1)
(2) (3)
3. Remove the nut (8mm) with a span-
ner. HGK50424. To detach the rear combination
light hit it strongly by hand. HGK5043
HGK5041
2. To remove the cover of the rear luggage trim, turn the knob by hand to the counterclockwise.
Page 234 of 478
6 DO-IT-YOURSELF MAINTENANCE
36
G270C01GK-AAT
Luggage Compartment Light
1. Open the tail gate.
2. Remove the cover with a flat-blade
screwdriver.
HGK5045HGK5044-1 (1)
(2) (3) turn signal light), take it out from the bulb holder by turning it coun-terclockwise. (1) Stop/Tail light (2) Back-up light (3) Turn signal light
9. Install the new bulb.
HGK5043
7. To detach the rear combination light hit it strongly by hand.
8. To replace the rear combination light (stop/tail light, back-up light, HTB284
3. Disconnect the power cord.
HGK5046
4. Replace with a new bulb.
Page 237 of 478
6
DO-IT-YOURSELF MAINTENANCE
39
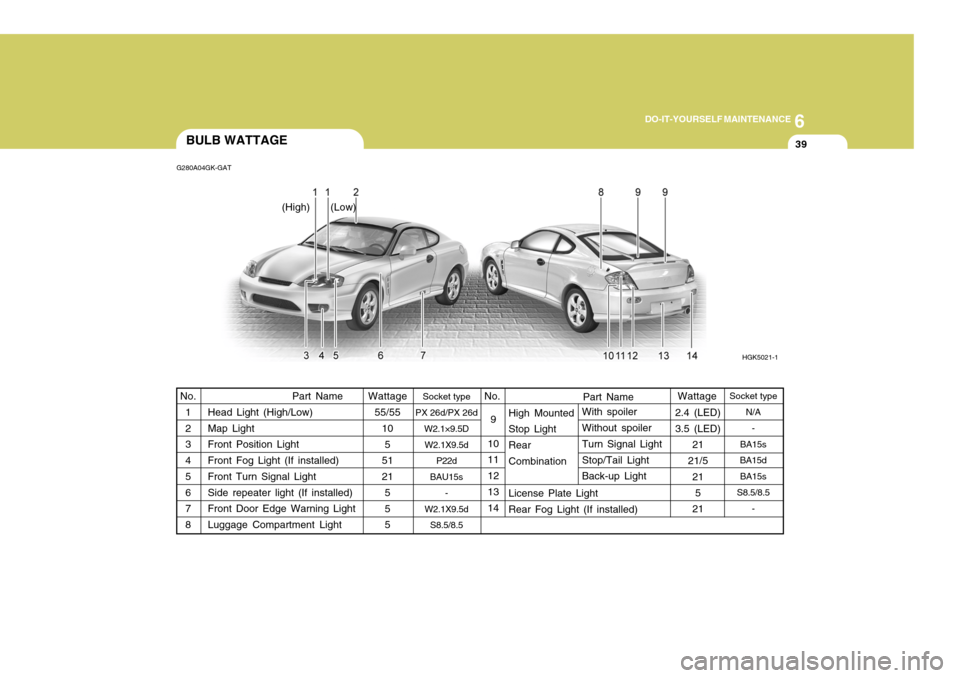
Part Name
High Mounted Stop Light Rear Combination License Plate Light Rear Fog Light (If installed) With spoilerWithout spoiler Turn Signal Light Stop/Tail Light Back-up Light
9
10 11 12 13 14
Part Name
Head Light (High/Low) Map Light Front Position Light Front Fog Light (If installed) Front Turn Signal Light Side repeater light (If installed) Front Door Edge Warning Light Luggage Compartment Light
BULB WATTAGE
Socket type
PX 26d/PX 26d W2.1×9.5D
W2.1X9.5d P22d
BAU15s -
W2.1X9.5d S8.5/8.5
G280A04GK-GAT
Wattage
No.No.
1 2 3 4 5 6 7 8
HGK5021-1
(High) (Low)
Wattage55/55 10
5
51 21 55 5
2.4 (LED) 3.5 (LED)
21
21/5 21
5
21
Socket type
N/A-
BA15s
BA15d
BA15s
S8.5/8.5
-
Page 448 of 478
6OWNER MAINTENANCE
30REPLACING LIGHT BULBS
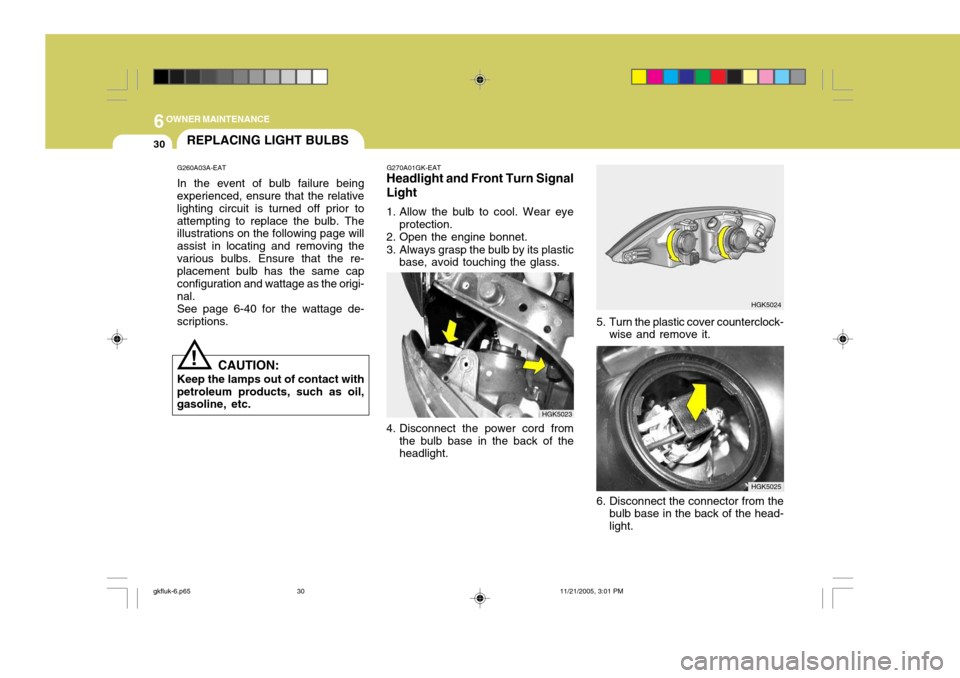
G260A03A-EAT In the event of bulb failure being experienced, ensure that the relative lighting circuit is turned off prior toattempting to replace the bulb. The illustrations on the following page will assist in locating and removing thevarious bulbs. Ensure that the re- placement bulb has the same cap configuration and wattage as the origi-nal.See page 6-40 for the wattage de-scriptions.
CAUTION:
Keep the lamps out of contact withpetroleum products, such as oil, gasoline, etc.
!
HGK5025
G270A01GK-EAT
Headlight and Front Turn Signal Light
1. Allow the bulb to cool. Wear eye
protection.
2. Open the engine bonnet.
3. Always grasp the bulb by its plastic base, avoid touching the glass.
HGK5024
5. Turn the plastic cover counterclock- wise and remove it.
4. Disconnect the power cord from the bulb base in the back of the headlight. HGK5023
6. Disconnect the connector from thebulb base in the back of the head- light.
gkfluk-6.p65 11/21/2005, 3:01 PM
30
Page 449 of 478
6
OWNER MAINTENANCE
31
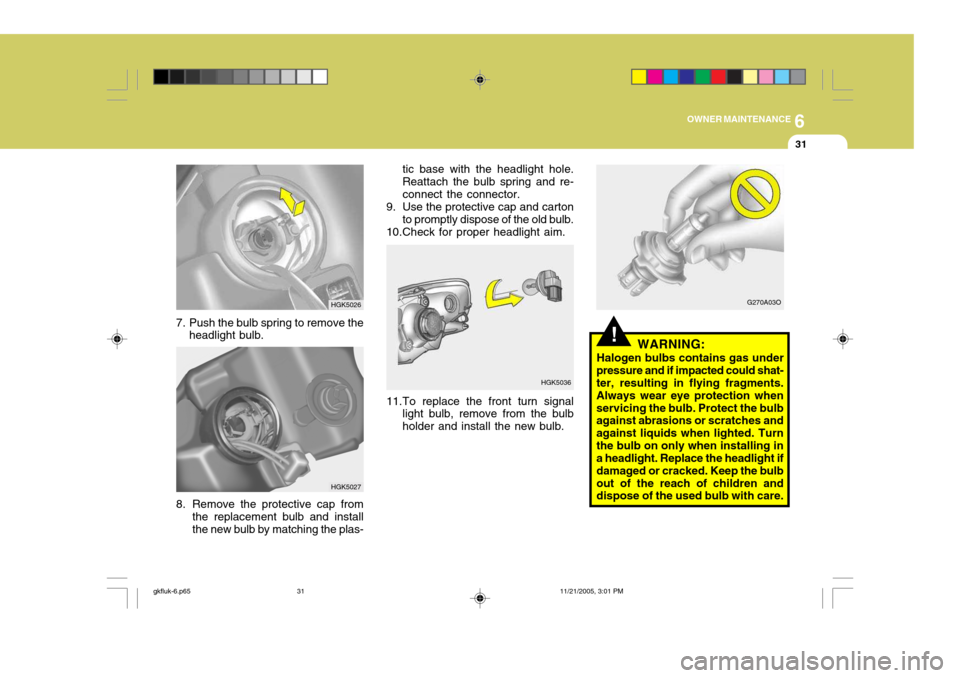
!WARNING:
Halogen bulbs contains gas under
pressure and if impacted could shat- ter, resulting in flying fragments. Always wear eye protection whenservicing the bulb. Protect the bulb against abrasions or scratches and against liquids when lighted. Turnthe bulb on only when installing in a headlight. Replace the headlight if damaged or cracked. Keep the bulbout of the reach of children and dispose of the used bulb with care.
11.To replace the front turn signal
light bulb, remove from the bulb holder and install the new bulb. HGK5036
tic base with the headlight hole.Reattach the bulb spring and re-connect the connector.
9. Use the protective cap and carton
to promptly dispose of the old bulb.
10.Check for proper headlight aim.
G270A03O
8. Remove the protective cap fromthe replacement bulb and install the new bulb by matching the plas-
7. Push the bulb spring to remove the
headlight bulb.
HGK5027
HGK5026
gkfluk-6.p65 11/21/2005, 3:01 PM
31
Page 451 of 478
6
OWNER MAINTENANCE
33
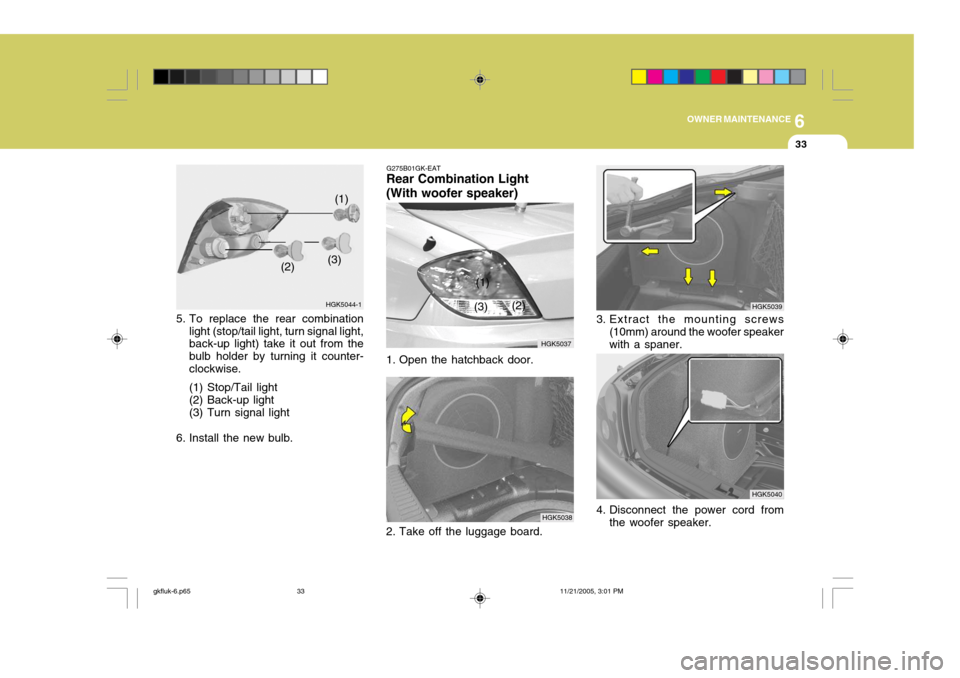
1. Open the hatchback door. HGK5039
HGK5040
3. Extract the mounting screws
(10mm) around the woofer speaker with a spaner.
4. Disconnect the power cord from the woofer speaker.
HGK5038
G275B01GK-EAT
Rear Combination Light (With woofer speaker)
HGK5037
(1)
(2)
(3)
2. Take off the luggage board.
5. To replace the rear combination light (stop/tail light, turn signal light, back-up light) take it out from the bulb holder by turning it counter-clockwise. (1) Stop/Tail light (2) Back-up light (3) Turn signal light
6. Install the new bulb. HGK5044-1
(1)
(2) (3)
gkfluk-6.p65
11/21/2005, 3:01 PM
33
Page 452 of 478
6OWNER MAINTENANCE
34
HGK5041
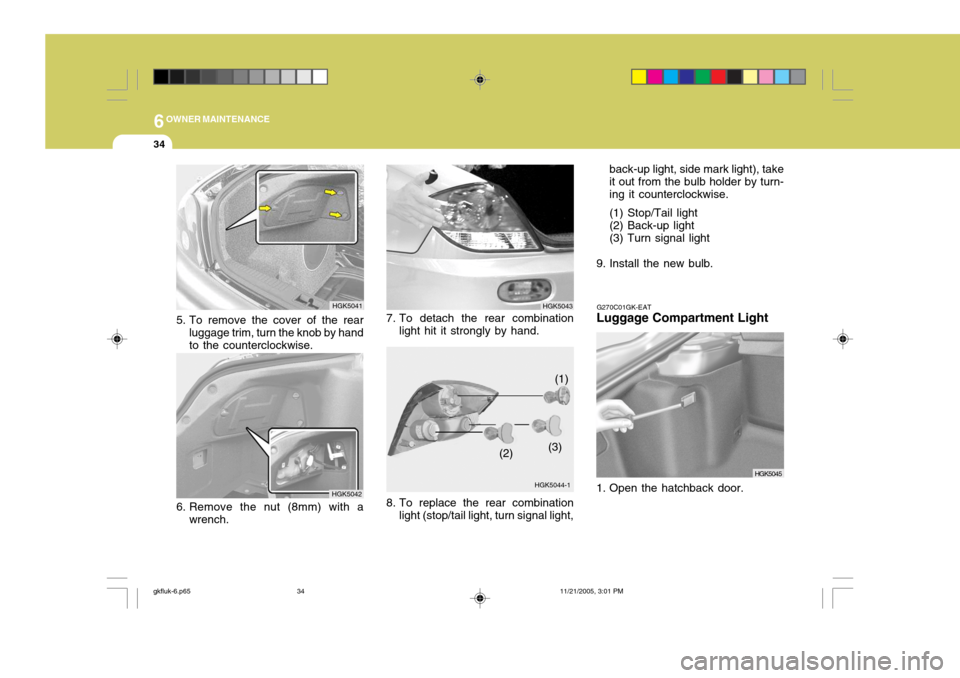
5. To remove the cover of the rear luggage trim, turn the knob by hand to the counterclockwise.
HGK5042
6. Remove the nut (8mm) with a wrench.G270C01GK-EAT
Luggage Compartment Light
1. Open the hatchback door.
HGK5045HGK5044-1 (1)
(2) (3) back-up light, side mark light), take it out from the bulb holder by turn-ing it counterclockwise. (1) Stop/Tail light (2) Back-up light (3) Turn signal light
9. Install the new bulb.
HGK5043
7. To detach the rear combination light hit it strongly by hand.
8. To replace the rear combination light (stop/tail light, turn signal light,
gkfluk-6.p65 11/21/2005, 3:01 PM
34