tow Hyundai Creta 2018 Owner's Manual
[x] Cancel search | Manufacturer: HYUNDAI, Model Year: 2018, Model line: Creta, Model: Hyundai Creta 2018Pages: 472, PDF Size: 11.87 MB
Page 10 of 472
No special break-in period is need-
ed. By following a few simple precau-
tions for the first 1,000 km (600
miles) you may add to the perform-
ance, economy and life of your vehi-
cle:
Do not race the engine.
While driving, keep your engine
speed (rpm, or revolutions per
minute) between 2,000 rpm and
4,000 rpm.
Do not maintain a single speed for
long periods of time, either fast or
slow.
Varying engine speed is needed to
properly break-in the engine.
Avoid hard stops, except in emer-
gencies, to allow the brakes to seat
properly.
Don't tow a trailer during the first
2,000 km (1,200 miles) of opera-
tion.
F10
Introduction
V VE
EH
HI
IC
CL
LE
E
B
BR
RE
EA
AK
K-
-I
IN
N
P PR
RO
OC
CE
ES
SS
S
Page 31 of 472
2-11
Safety system of your vehicle
2
To prevent damage, NEVER hit or
pull on the headrests.If you recline the seatback towards
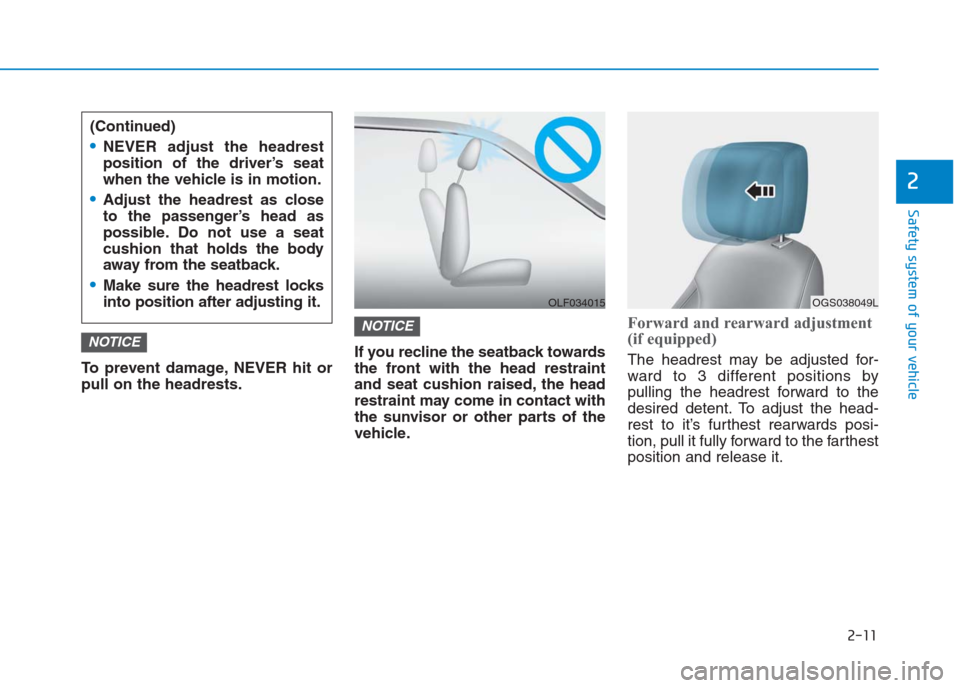
the front with the head restraint
and seat cushion raised, the head
restraint may come in contact with
the sunvisor or other parts of the
vehicle.
Forward and rearward adjustment
(if equipped)
The headrest may be adjusted for-
ward to 3 different positions by
pulling the headrest forward to the
desired detent. To adjust the head-
rest to it’s furthest rearwards posi-
tion, pull it fully forward to the farthest
position and release it.
NOTICE
NOTICE
(Continued)
NEVER adjust the headrest
position of the driver’s seat
when the vehicle is in motion.
Adjust the headrest as close
to the passenger’s head as
possible. Do not use a seat
cushion that holds the body
away from the seatback.
Make sure the headrest locks
into position after adjusting it.
OLF034015OGS038049L
Page 36 of 472
2-16
Safety system of your vehicle
Folding the rear seat
The rear seatbacks (or cushions)
may be folded to facilitate carrying
long items or to increase the luggage
capacity of the vehicle.
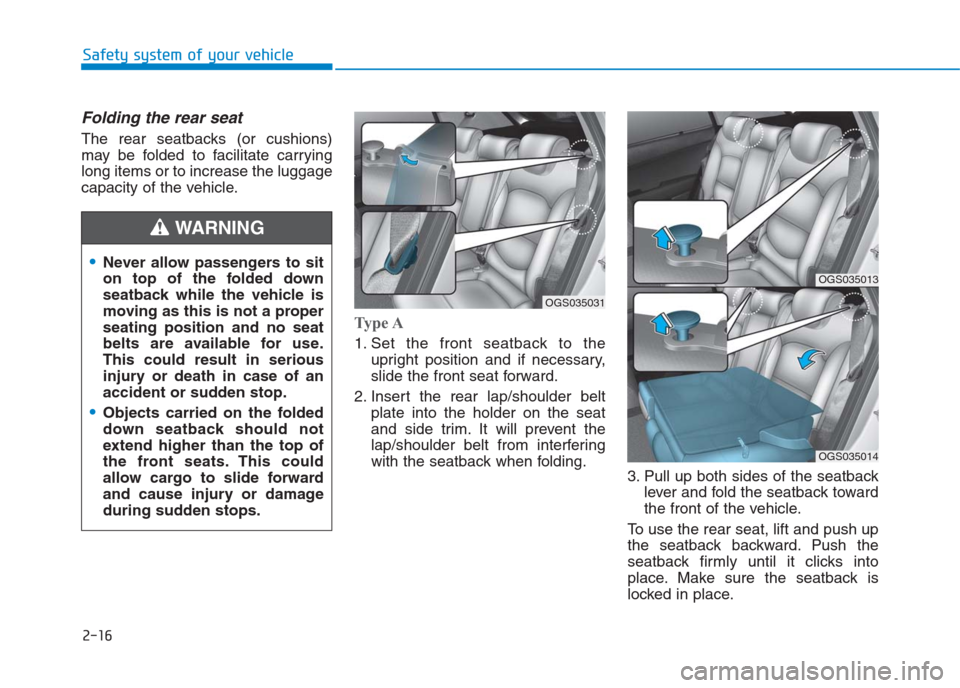
Type A
1. Set the front seatback to the
upright position and if necessary,
slide the front seat forward.
2. Insert the rear lap/shoulder belt
plate into the holder on the seat
and side trim. It will prevent the
lap/shoulder belt from interfering
with the seatback when folding.
3. Pull up both sides of the seatback
lever and fold the seatback toward
the front of the vehicle.
To use the rear seat, lift and push up
the seatback backward. Push the
seatback firmly until it clicks into
place. Make sure the seatback is
locked in place.
OGS035031
OGS035013
OGS035014
Never allow passengers to sit
on top of the folded down
seatback while the vehicle is
moving as this is not a proper
seating position and no seat
belts are available for use.
This could result in serious
injury or death in case of an
accident or sudden stop.
Objects carried on the folded
down seatback should not
extend higher than the top of
the front seats. This could
allow cargo to slide forward
and cause injury or damage
during sudden stops.
WARNING
Page 37 of 472

2-17
Safety system of your vehicle
2
When returning the rear seatbacks to
the upright position, remember to
return the rear shoulder belts to their
proper position.
Type B
1. Insert the rear seat belt webbing in
the guide to prevent the seat belt
from being damaged.
2. Set the front seatback to the
upright position and if necessary,
slide the front seat forward.
3. Lower the rear headrests to the
lowest position.4. Pull up the seatback lever, then
fold the seat toward the front of the
vehicle.5. To use the rear seat, lift and push
up the seatback backward. Push
the seatback firmly until it clicks
into place. Make sure the seatback
is locked in place.
When returning the rear seatbacks to
the upright position, remember to
return the rear shoulder belts to their
proper position.
OGC034006
OGS035037OGC034009
Page 95 of 472
3-10
Convenient features of your vehicle
Loss of a smart key
A maximum of two smart keys can be
registered to a single vehicle. If you
happen to lose your smart key, it is
recommended that you should imme-
diately take the vehicle and remaining
key to your authorized HYUNDAI
dealer or tow the vehicle, if necessary.
Smart key precautions
The smart key will not work if any of
the following occur:
The smart key is close to a radio
transmitter such as a radio station
or an airport which can interfere
with normal operation of the trans-
mitter.
The smart key is near a mobile two
way radio system or a cellular
phone.
Another vehicle’s smart key is being
operated close to your vehicle.
When the smart key does not work
correctly, open and close the door
with the mechanical key. If you have
a problem with the smart key, it is
recommended that you contact an
authorized HYUNDAI dealer.
(Continue)(Continue)
If the smart key is in close proximity
to your mobile phone, the signal
could be blocked by your mobile
phones normal operational signals.
This is especially important when the
phone is active such as making and
receiving calls, text messaging,
and/or sending/receiving emails.
Avoid placing the smart key and your
mobile phone in the same pants or
jacket pocket and always try to main-
tain an adequate distance between
the two devices.
Page 98 of 472
3-13
Convenient features of your vehicle
3
Operating door locks from
outside the vehicle
Mechanical key
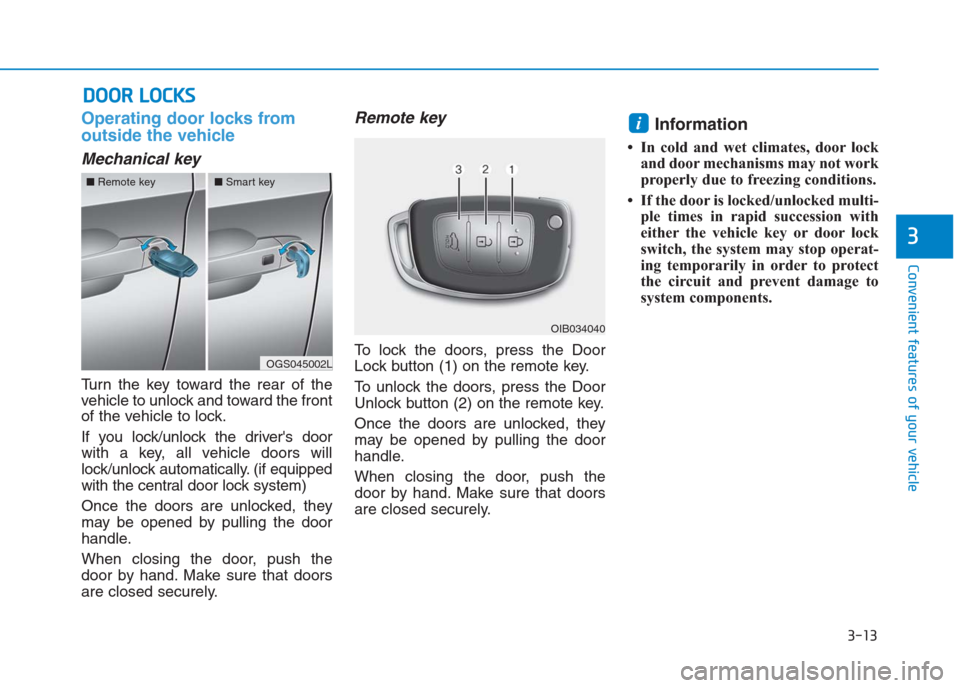
Turn the key toward the rear of the
vehicle to unlock and toward the front
of the vehicle to lock.
If you lock/unlock the driver's door
with a key, all vehicle doors will
lock/unlock automatically. (if equipped
with the central door lock system)
Once the doors are unlocked, they
may be opened by pulling the door
handle.
When closing the door, push the
door by hand. Make sure that doors
are closed securely.
Remote key
To lock the doors, press the Door
Lock button (1) on the remote key.
To unlock the doors, press the Door
Unlock button (2) on the remote key.
Once the doors are unlocked, they
may be opened by pulling the door
handle.
When closing the door, push the
door by hand. Make sure that doors
are closed securely.
Information
• In cold and wet climates, door lock
and door mechanisms may not work
properly due to freezing conditions.
• If the door is locked/unlocked multi-
ple times in rapid succession with
either the vehicle key or door lock
switch, the system may stop operat-
ing temporarily in order to protect
the circuit and prevent damage to
system components.
i
D DO
OO
OR
R
L
LO
OC
CK
KS
S
OIB034040
OGS045002L ■Remote key■Smart key
Page 122 of 472
3-37
Convenient features of your vehicle
3
Tilt steering
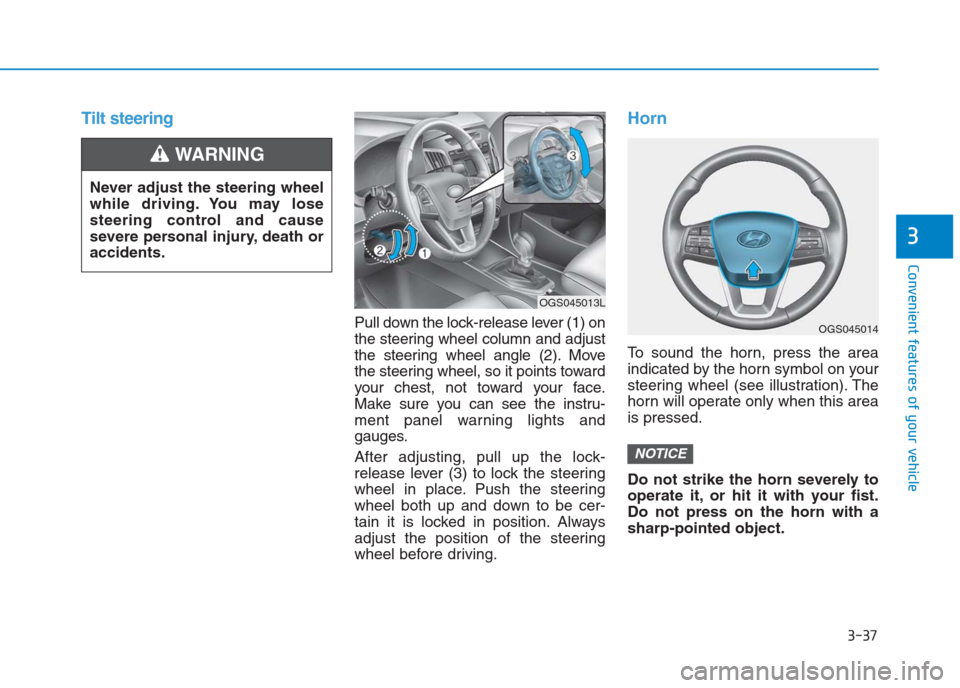
Pull down the lock-release lever (1) on
the steering wheel column and adjust
the steering wheel angle (2). Move
the steering wheel, so it points toward
your chest, not toward your face.
Make sure you can see the instru-
ment panel warning lights and
gauges.
After adjusting, pull up the lock-
release lever (3) to lock the steering
wheel in place. Push the steering
wheel both up and down to be cer-
tain it is locked in position. Always
adjust the position of the steering
wheel before driving.
Horn
To sound the horn, press the area
indicated by the horn symbol on your
steering wheel (see illustration). The
horn will operate only when this area
is pressed.
Do not strike the horn severely to
operate it, or hit it with your fist.
Do not press on the horn with a
sharp-pointed object.
NOTICE
Never adjust the steering wheel
while driving. You may lose
steering control and cause
severe personal injury, death or
accidents.
WARNING
OGS045014
OGS045013L
Page 123 of 472
3-38
Convenient features of your vehicle
Inside rearview mirror
Before you start driving, adjust the
rearview mirror to the center on the
view through the rear window.
Day/night rearview mirror
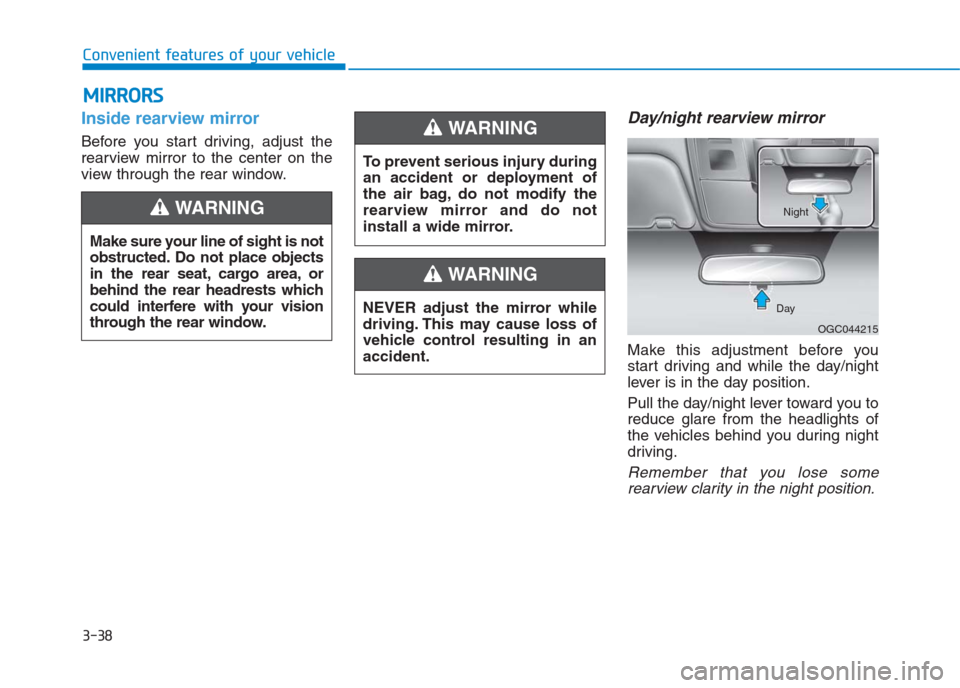
Make this adjustment before you
start driving and while the day/night
lever is in the day position.
Pull the day/night lever toward you to
reduce glare from the headlights of
the vehicles behind you during night
driving.
Remember that you lose some
rearview clarity in the night position.
M MI
IR
RR
RO
OR
RS
S
Make sure your line of sight is not
obstructed. Do not place objects
in the rear seat, cargo area, or
behind the rear headrests which
could interfere with your vision
through the rear window.
WARNING
To prevent serious injury during
an accident or deployment of
the air bag, do not modify the
rearview mirror and do not
install a wide mirror.
WARNING
NEVER adjust the mirror while
driving. This may cause loss of
vehicle control resulting in an
accident.
WARNING
OGC044215 DayNight
Page 124 of 472
3-39
Convenient features of your vehicle
3
Electrochromic mirror (ECM)
(if equipped)
The electric rearview mirror automati-
cally controls the glare from the head-
lights of the car behind you in night-
time or low light driving conditions.
When the engine is running, the
glare is automatically controlled by
the sensor mounted in the rearview
mirror. The sensor detects the light
level around the vehicle, and auto-
matically adjusts to control the head-
light glare from vehicles behind you.
Whenever the shift lever is placed in
R (Reverse), the mirror will automat-
ically go to the brightest setting in
order to improve the drivers view
behind the vehicle.
To operate the electric rearview
mirror:
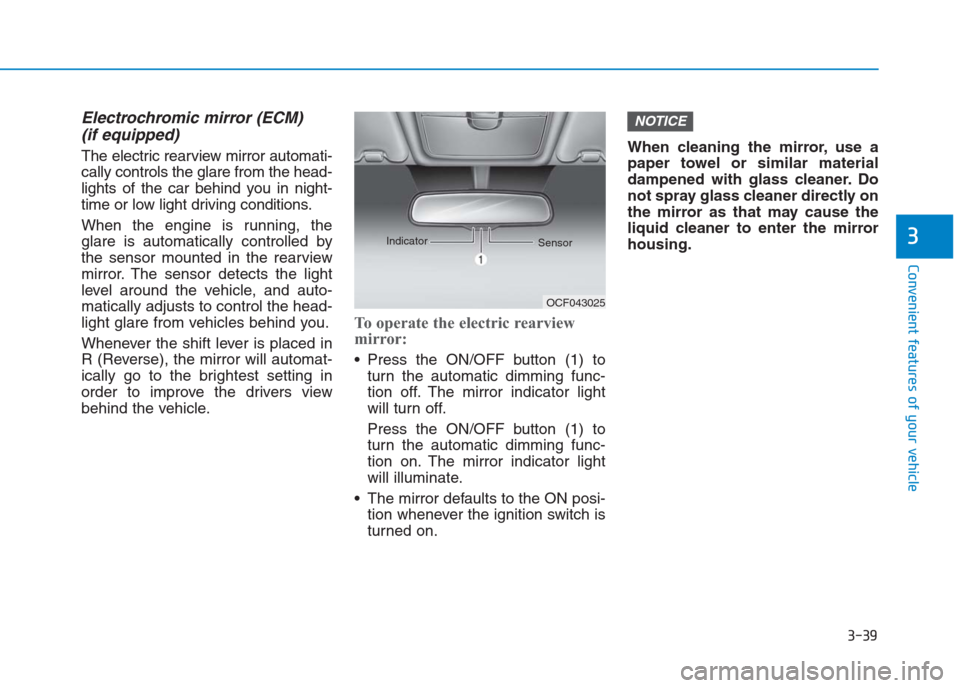
Press the ON/OFF button (1) to
turn the automatic dimming func-
tion off. The mirror indicator light
will turn off.
Press the ON/OFF button (1) to
turn the automatic dimming func-
tion on. The mirror indicator light
will illuminate.
The mirror defaults to the ON posi-
tion whenever the ignition switch is
turned on.When cleaning the mirror, use a
paper towel or similar material
dampened with glass cleaner. Do
not spray glass cleaner directly on
the mirror as that may cause the
liquid cleaner to enter the mirror
housing.
NOTICE
OCF043025 Indicator
Sensor
Page 126 of 472

3-41
Convenient features of your vehicle
3
Electric type (if equipped)
Adjusting the rearview mirrors:
Move the lever (1) to the L (Left) or R
(Right) to select the rearview mirror
you would like to adjust.
Use the mirror adjustment control (2)
to position the selected mirror up,
down, left or right.
After adjustment, move the lever (1)
to the middle to prevent inadvertent
adjustment. The mirrors stop moving when
they reach the maximum adjust-
ing angles, but the motor contin-
ues to operate while the switch
is pressed. Do not press the
switch longer than necessary,
the motor may be damaged.
Do not attempt to adjust the out-
side rearview mirror by hand or
the motor may be damaged.
Folding the outside rearview
mirror
Manual type
To fold the outside rearview mirror,
grasp the housing of the mirror and
then fold it toward the rear of the
vehicle.
NOTICE
OGC044024
OGS045151L